Page 64 of 312

Replacing front parking lamp/turn signal bulbs
1. Make sure headlamp switch is in the off position, then open the hood.
2. Reach over the front bolster.
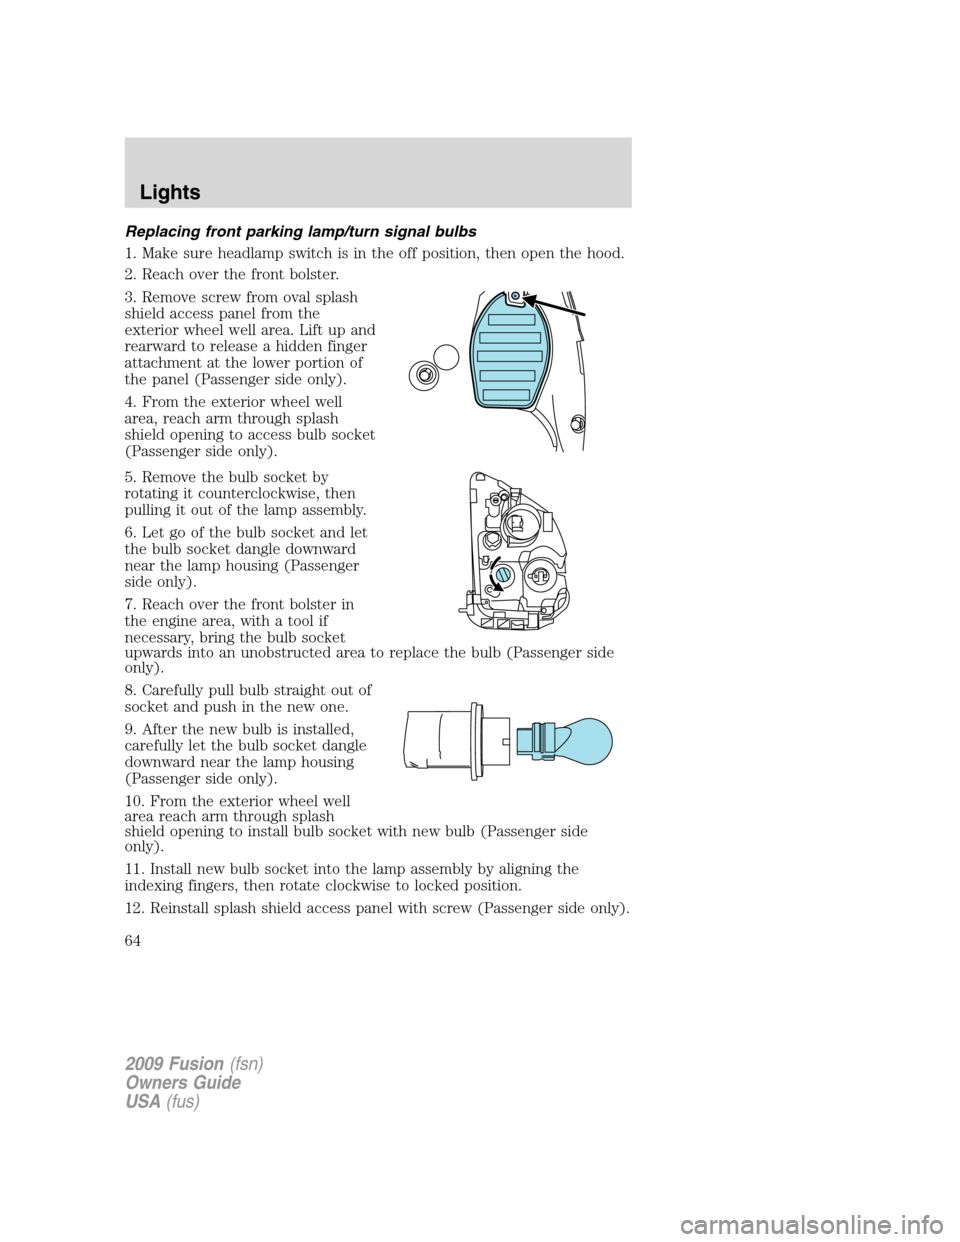
3. Remove screw from oval splash
shield access panel from the
exterior wheel well area. Lift up and
rearward to release a hidden finger
attachment at the lower portion of
the panel (Passenger side only).
4. From the exterior wheel well
area, reach arm through splash
shield opening to access bulb socket
(Passenger side only).
5. Remove the bulb socket by
rotating it counterclockwise, then
pulling it out of the lamp assembly.
6. Let go of the bulb socket and let
the bulb socket dangle downward
near the lamp housing (Passenger
side only).
7. Reach over the front bolster in
the engine area, with a tool if
necessary, bring the bulb socket
upwards into an unobstructed area to replace the bulb (Passenger side
only).
8. Carefully pull bulb straight out of
socket and push in the new one.
9. After the new bulb is installed,
carefully let the bulb socket dangle
downward near the lamp housing
(Passenger side only).
10. From the exterior wheel well
area reach arm through splash
shield opening to install bulb socket with new bulb (Passenger side
only).
11. Install new bulb socket into the lamp assembly by aligning the
indexing fingers, then rotate clockwise to locked position.
12. Reinstall splash shield access panel with screw (Passenger side only).
2009 Fusion(fsn)
Owners Guide
USA(fus)
Lights
64
Page 65 of 312

Replacing front side marker bulbs
1. Make sure the headlamp control
is in the off position.
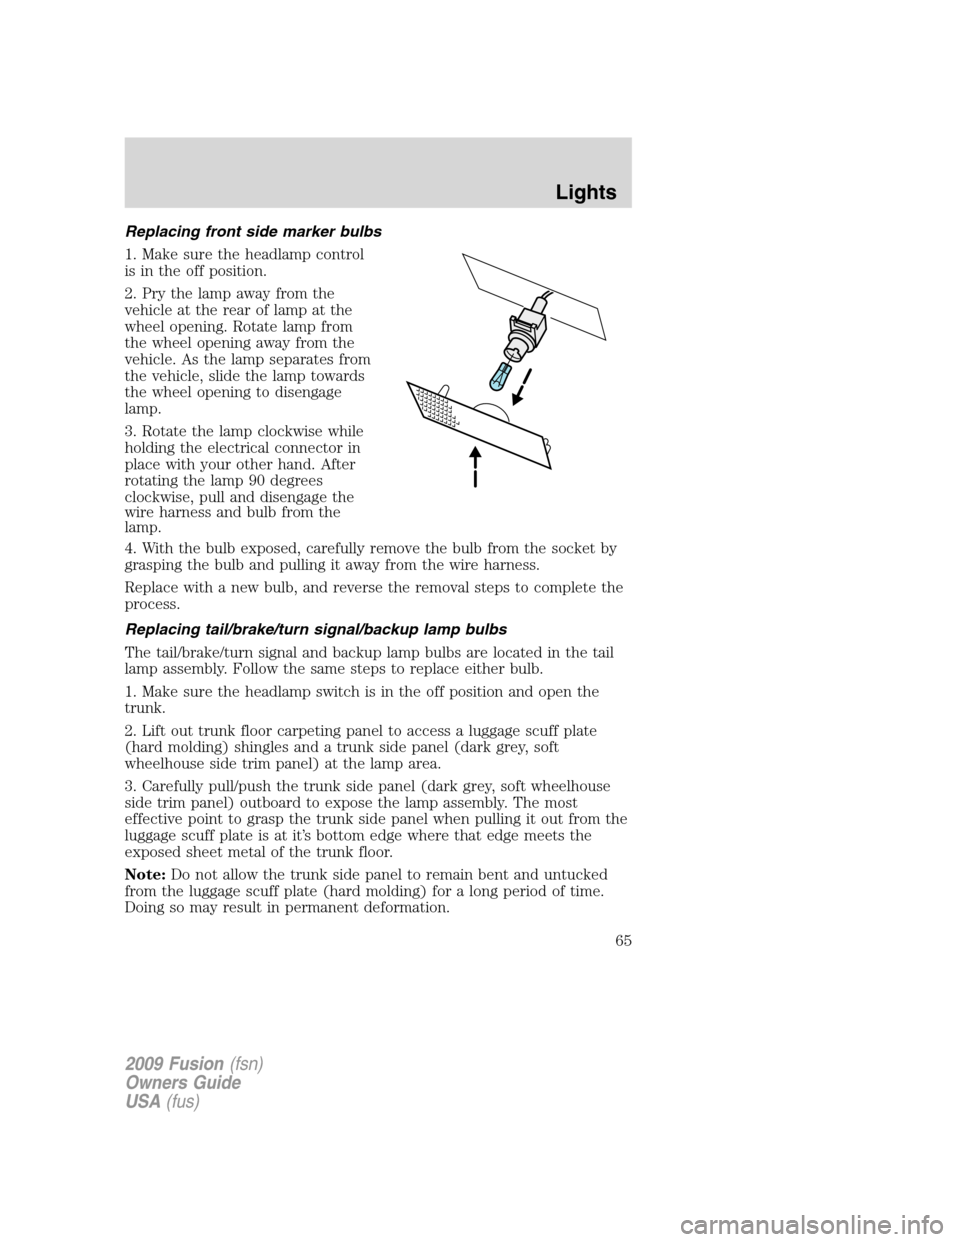
2. Pry the lamp away from the
vehicle at the rear of lamp at the
wheel opening. Rotate lamp from
the wheel opening away from the
vehicle. As the lamp separates from
the vehicle, slide the lamp towards
the wheel opening to disengage
lamp.
3. Rotate the lamp clockwise while
holding the electrical connector in
place with your other hand. After
rotating the lamp 90 degrees
clockwise, pull and disengage the
wire harness and bulb from the
lamp.
4. With the bulb exposed, carefully remove the bulb from the socket by
grasping the bulb and pulling it away from the wire harness.
Replace with a new bulb, and reverse the removal steps to complete the
process.
Replacing tail/brake/turn signal/backup lamp bulbs
The tail/brake/turn signal and backup lamp bulbs are located in the tail
lamp assembly. Follow the same steps to replace either bulb.
1. Make sure the headlamp switch is in the off position and open the
trunk.
2. Lift out trunk floor carpeting panel to access a luggage scuff plate
(hard molding) shingles and a trunk side panel (dark grey, soft
wheelhouse side trim panel) at the lamp area.
3. Carefully pull/push the trunk side panel (dark grey, soft wheelhouse
side trim panel) outboard to expose the lamp assembly. The most
effective point to grasp the trunk side panel when pulling it out from the
luggage scuff plate is at it’s bottom edge where that edge meets the
exposed sheet metal of the trunk floor.
Note:Do not allow the trunk side panel to remain bent and untucked
from the luggage scuff plate (hard molding) for a long period of time.
Doing so may result in permanent deformation.
2009 Fusion(fsn)
Owners Guide
USA(fus)
Lights
65
Page 66 of 312

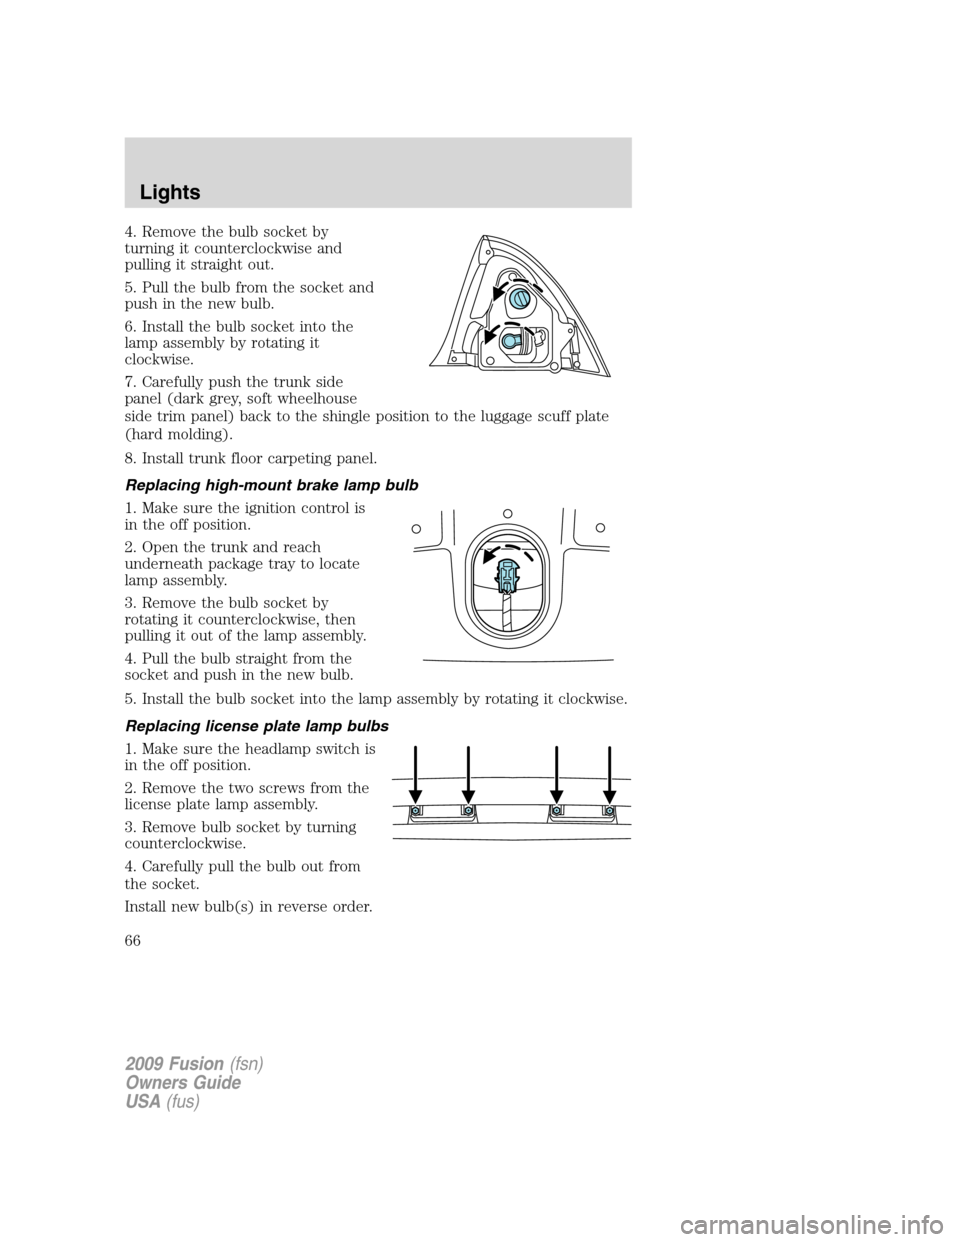
4. Remove the bulb socket by
turning it counterclockwise and
pulling it straight out.
5. Pull the bulb from the socket and
push in the new bulb.
6. Install the bulb socket into the
lamp assembly by rotating it
clockwise.
7. Carefully push the trunk side
panel (dark grey, soft wheelhouse
side trim panel) back to the shingle position to the luggage scuff plate
(hard molding).
8. Install trunk floor carpeting panel.
Replacing high-mount brake lamp bulb
1. Make sure the ignition control is
in the off position.
2. Open the trunk and reach
underneath package tray to locate
lamp assembly.
3. Remove the bulb socket by
rotating it counterclockwise, then
pulling it out of the lamp assembly.
4. Pull the bulb straight from the
socket and push in the new bulb.
5. Install the bulb socket into the lamp assembly by rotating it clockwise.
Replacing license plate lamp bulbs
1. Make sure the headlamp switch is
in the off position.
2. Remove the two screws from the
license plate lamp assembly.
3. Remove bulb socket by turning
counterclockwise.
4. Carefully pull the bulb out from
the socket.
Install new bulb(s) in reverse order.
2009 Fusion(fsn)
Owners Guide
USA(fus)
Lights
66
Page 67 of 312
Replacing fog lamp bulbs (if equipped)
1. Make sure the fog lamp switch is
in the off position.
2. From underneath the vehicle,
partially remove the tire splash
shield by removing four drive
screws.
After removing to allow free access
to the front fog lamp bulb and
electrical wire harness, the splash shield flap should be able to be
repositioned.
3. Rotate the harness/bulb assembly
counterclockwise, to remove from
the fog lamp.
4. Carefully disconnect the bulb
from the harness assembly via the
two snap clips.
Install the new bulb in reverse order.
2009 Fusion(fsn)
Owners Guide
USA(fus)
Lights
67
Page 71 of 312
CLOCK (IF EQUIPPED)
Press the right (+) control to move
the time display forwards.
Press the left (-) control to move
the time display backwards.
INSTRUMENT PANEL STORAGE COMPARTMENT
The storage compartment may be
used to secure sunglasses or similar
sized objects. Press the control to
open the storage compartment.
AUXILIARY POWER POINT (12VDC)
Power outlets are designed for accessory plugs only. Do not insert
any other object in the power outlet as this will damage the
outlet and blow the fuse. Do not hang any type of accessory or
accessory bracket from the plug. Improper use of the power
outlet can cause damage not covered by your warranty.
The auxiliary power points are
located on the instrument panel and
in the center console utility
compartment.
Do not use the power point for
operating the cigarette lighter
element (if equipped).
2009 Fusion(fsn)
Owners Guide
USA(fus)
Driver Controls
71
Page 75 of 312
EXTERIOR MIRRORS
Power side view mirrors
WARNING:Do not adjust the mirror while the vehicle is in
motion.
To adjust your mirrors:
1. Rotate the control clockwise to
adjust the right mirror and rotate
the control counterclockwise to
adjust the left mirror.
2. Move the control in the direction
you wish to tilt the mirror.
3. Return to the center position to lock mirrors in place.
Heated mirrors (if equipped)
Both mirrors are heated
automatically to remove ice, mist
and fog when the rear window
defrost is activated.
Do not remove ice from the
mirrors with a scraper or
attempt to readjust the mirror
glass if it is frozen in place.
These actions could cause damage to the glass and mirrors.
SPEED CONTROL
With speed control set, you can maintain a set speed without keeping
your foot on the accelerator pedal.
WARNING:Do not use the speed control in heavy traffic or on
roads that are winding, slippery or unpaved.
2009 Fusion(fsn)
Owners Guide
USA(fus)
Driver Controls
75
Page 226 of 312

Fuse/Relay
LocationFuse Amp
RatingProtected Circuits
12 7.5A Delay accessories: Radio head units,
Moon roof, Lock switch illumination,
Electrochromatic mirrors, Ambient
lighting
13 7.5A Cluster, Analog clock, Climate control
head units
14 15A Washer pump
15 20A Cigar lighter
16 15A Door lock actuator, Decklid lock
solenoid
17 20A Subwoofer
18 20A Radio head units, OBDII connector
19 7.5A Not used (Spare)
20 7.5A Power mirrors, Satellite radio module,
All wheel drive
21 7.5A Stop lamps, CHMSL
22 7.5A Audio
23 7.5A Wiper relay coil, Cluster logic
24 7.5A OCS (Passenger’s seat), PAD
indicator
25 7.5A RCM
26 7.5A PATS Transceiver, Brake shift
interlock solenoid, Brake pedal
switch, Automatic transmission relay
coil, Reverse switch (back-up lamps
for manual transmission)
27 7.5A Cluster, Climate control head units
28 10A ABS/Traction Control, Heated seats,
Compass, Reverse sensing system
C/B 30A Circuit
BreakerMoon roof power, Delayed accessory
(SJB fuse 12, power window)
2009 Fusion(fsn)
Owners Guide
USA(fus)
Roadside Emergencies
226
Page 232 of 312

•Wet weather driving capability
•All-Wheel driving capability (if applicable)
•Load leveling adjustment (if applicable)
When driving with the full-size dissimilar spare tire/wheel additional
caution should be given to:
•Towing a trailer
•Driving vehicles equipped with a camper body
•Driving vehicles with a load on the cargo rack
Drive cautiously when using a full-size dissimilar spare tire/wheel and
seek service as soon as possible.
Stopping and securing the vehicle
1. Park on a level surface, set the parking brake and activate the hazard
flashers.
2. Place the gearshift lever in P (Park) (automatic transmission) or R
(Reverse) (manual transmission) and turn the engine off.
Removing the spare tire and jack
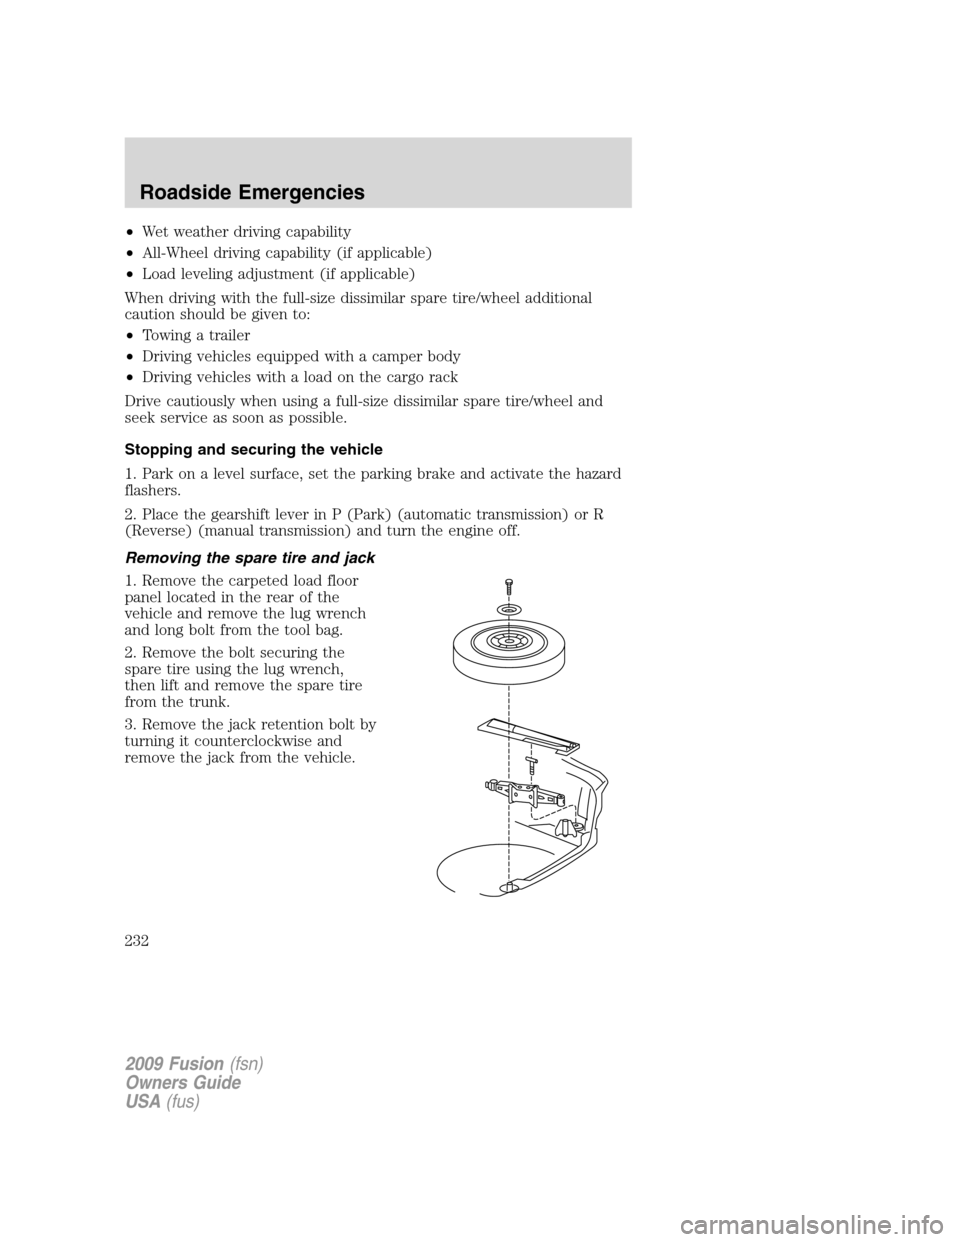
1. Remove the carpeted load floor
panel located in the rear of the
vehicle and remove the lug wrench
and long bolt from the tool bag.
2. Remove the bolt securing the
spare tire using the lug wrench,
then lift and remove the spare tire
from the trunk.
3. Remove the jack retention bolt by
turning it counterclockwise and
remove the jack from the vehicle.
2009 Fusion(fsn)
Owners Guide
USA(fus)
Roadside Emergencies
232