2009 FORD FUSION (AMERICAS) set clock
[x] Cancel search: set clockPage 23 of 312
•DELETE SONG:Press OK to delete a song from the system’s
memory. Press
/to cycle through the saved songs. When the
song appears in the display that you would like to delete, press OK.
The song will appear in the display for confirmation. Press OK again
and the display will read SONG DELETED. If you do not want to
delete the currently listed song, press
/to select either
RETURN or CANCEL.
Note:If there are no songs presently saved, the display will read NO
SONGS.
•DELETE ALL SONGS:Press OK to delete all song’s from the
system’s memory. The display will read ARE YOU SURE ? Press OK to
confirm deletion of all saved songs and the display will read ALL
DELETED.
Note:If there are no songs presently saved, the display will read NO
SONGS.
•ENABLE ALERTS / DISABLE ALERTS:Press OK to enable/disable
the satellite alert status which alerts you when your selected songs are
playing on a satellite radio channel. (The system default is disabled.)
SONG ALERTS ENABLED/DISABLED will appear in the display. The
menu listing will display the opposite state. For example, if you have
chosen to enable the song alerts, the menu listing will read DISABLE
as the alerts are currently on, so your other option is to turn them off.
Satellite radio is available only with a valid SIRIUS radio
subscription. Check with your authorized dealer for availability.
Setting the clock:If your vehicle is equipped with an in-dash clock,
refer toClockin theDriver Controlschapter for instructions on how to
set the time.
If your vehicle is not equipped with an in-dash clock, press MENU until
SET HOURS or SET MINUTES appears in the display. Press
/to
adjust the hours/minutes. Press OK to close and return to the main
menu.
AUTOSET:Press MENU until the display reads AUTOSET. Autoset
allows you to set the strongest local radio stations without losing your
original manually set preset stations for AM/FM1/FM2. Use
//
SEEKto turn on/off.
When the six strongest stations are filled, the station stored in preset 1
will begin playing. If there are less than six strong stations, the system
will store the last one in the remaining presets. Press OK to close and
return to the main menu.
2009 Fusion(fsn)
Owners Guide
USA(fus)
Entertainment Systems
23
Page 31 of 312
•DELETE SONG:Press OK to delete a song from the system’s
memory. Press
/to cycle through the saved songs. When the
song appears in the display that you would like to delete, press OK.
The song will appear in the display for confirmation. Press OK again
and the display will read SONG DELETED. If you do not want to
delete the currently listed song, press
/to select either
RETURN or CANCEL.
Note:If there are no songs presently saved, the display will read NO
SONGS.
•DELETE ALL SONGS:Press OK to delete all song’s from the
system’s memory. The display will read ARE YOU SURE ? Press OK to
confirm deletion of all saved songs and the display will read ALL
DELETED.
Note:If there are no songs presently saved, the display will read NO
SONGS.
•ENABLE ALERTS / DISABLE ALERTS:Press OK to enable/disable
the satellite alert status which alerts you when your selected songs are
playing on a satellite radio channel. (The system default is disabled.)
SONG ALERTS ENABLED/DISABLED will appear in the display. The
menu listing will display the opposite state. For example, if you have
chosen to enable the song alerts, the menu listing will read DISABLE
as the alerts are currently on, so your other option is to turn them off.
Satellite radio is available only with a valid SIRIUS radio
subscription. Check with your authorized dealer for availability.
Setting the clock:If your vehicle is equipped with an in-dash clock,
refer toClockin theDriver Controlschapter for instructions on how to
set the time.
If your vehicle is not equipped with an in-dash clock, press MENU until
SET HOURS or SET MINUTES appears in the display. Press
/to
adjust. Press OK to close and return to the main menu.
AUTOSET:Press MENU until the display reads AUTOSET. Autoset
allows you to set the strongest local radio stations without losing your
original manually set preset stations for AM/FM1/FM2. Use
//
SEEKto turn on/off.
When the six strongest stations are filled, the station stored in preset 1
will begin playing. If there are less than six strong stations, the system
will store the last one in the remaining presets. Press OK to close and
return to the main menu.
2009 Fusion(fsn)
Owners Guide
USA(fus)
Entertainment Systems
31
Page 75 of 312
EXTERIOR MIRRORS
Power side view mirrors
WARNING:Do not adjust the mirror while the vehicle is in
motion.
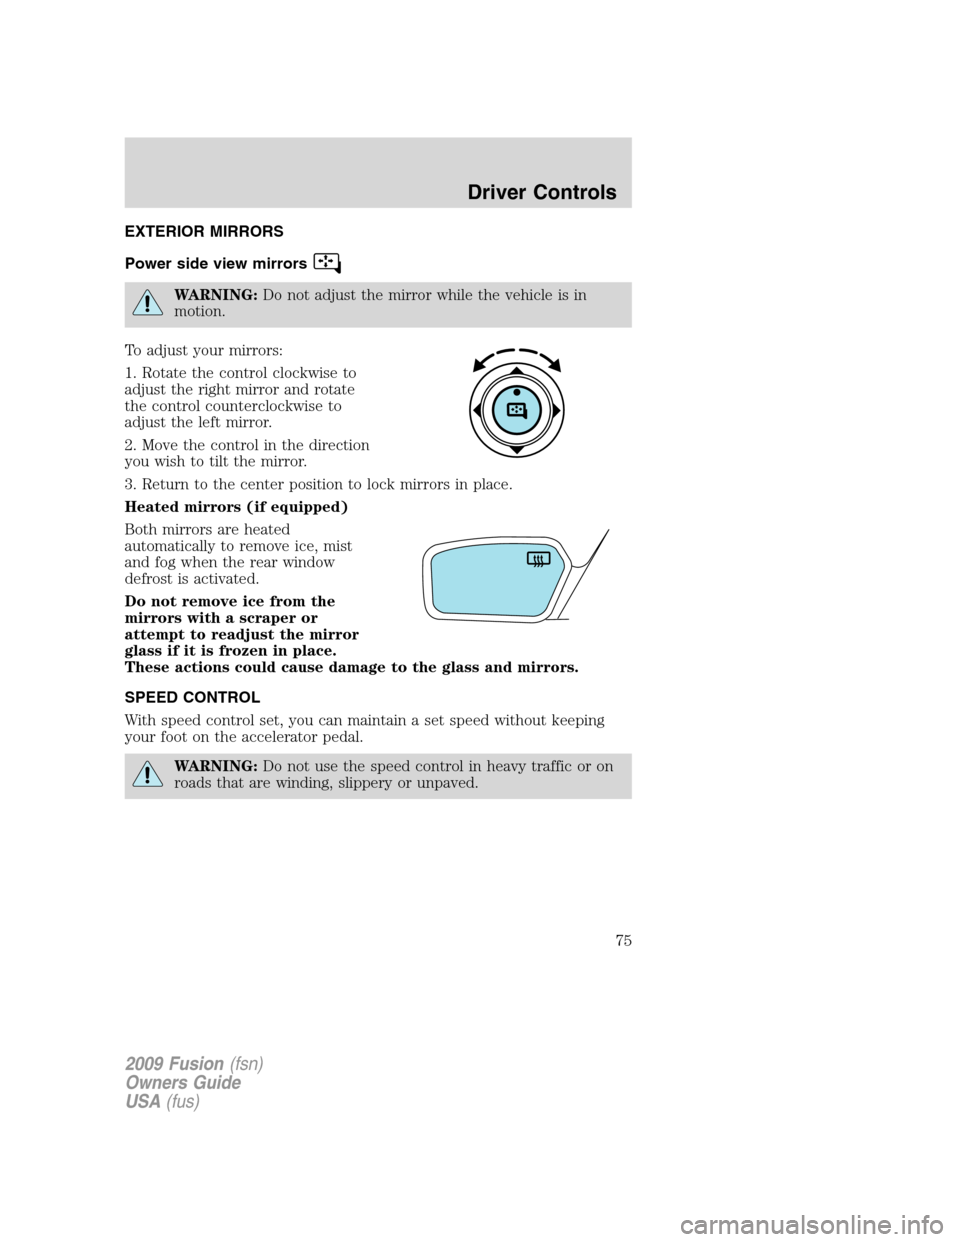
To adjust your mirrors:
1. Rotate the control clockwise to
adjust the right mirror and rotate
the control counterclockwise to
adjust the left mirror.
2. Move the control in the direction
you wish to tilt the mirror.
3. Return to the center position to lock mirrors in place.
Heated mirrors (if equipped)
Both mirrors are heated
automatically to remove ice, mist
and fog when the rear window
defrost is activated.
Do not remove ice from the
mirrors with a scraper or
attempt to readjust the mirror
glass if it is frozen in place.
These actions could cause damage to the glass and mirrors.
SPEED CONTROL
With speed control set, you can maintain a set speed without keeping
your foot on the accelerator pedal.
WARNING:Do not use the speed control in heavy traffic or on
roads that are winding, slippery or unpaved.
2009 Fusion(fsn)
Owners Guide
USA(fus)
Driver Controls
75
Page 232 of 312
•Wet weather driving capability
•All-Wheel driving capability (if applicable)
•Load leveling adjustment (if applicable)
When driving with the full-size dissimilar spare tire/wheel additional
caution should be given to:
•Towing a trailer
•Driving vehicles equipped with a camper body
•Driving vehicles with a load on the cargo rack
Drive cautiously when using a full-size dissimilar spare tire/wheel and
seek service as soon as possible.
Stopping and securing the vehicle
1. Park on a level surface, set the parking brake and activate the hazard
flashers.
2. Place the gearshift lever in P (Park) (automatic transmission) or R
(Reverse) (manual transmission) and turn the engine off.
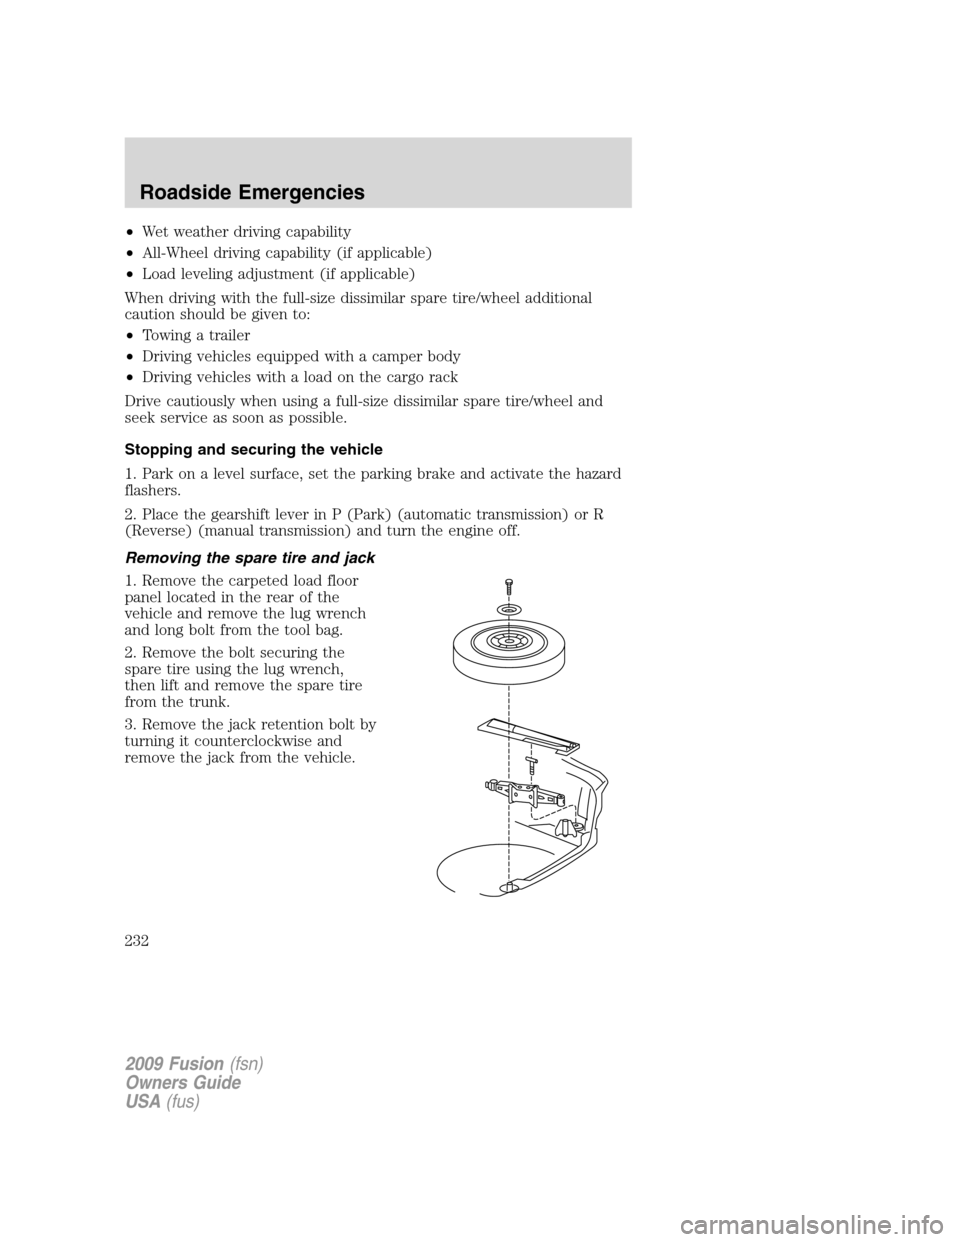
Removing the spare tire and jack
1. Remove the carpeted load floor
panel located in the rear of the
vehicle and remove the lug wrench
and long bolt from the tool bag.
2. Remove the bolt securing the
spare tire using the lug wrench,
then lift and remove the spare tire
from the trunk.
3. Remove the jack retention bolt by
turning it counterclockwise and
remove the jack from the vehicle.
2009 Fusion(fsn)
Owners Guide
USA(fus)
Roadside Emergencies
232
Page 233 of 312
Tire change procedure
WARNING:To help prevent the vehicle from moving when you
change a tire, be sure the parking brake is set, then block (in
both directions) the wheel that is diagonally opposite (other side and
end of the vehicle) to the tire being changed.
WARNING:If the vehicle slips off the jack, you or someone else
could be seriously injured.
WARNING:Do not attempt to change a tire on the side of the
vehicle close to moving traffic. Pull far enough off the road to
avoid the danger of being hit when operating the jack or changing the
wheel.
Note:Passengers should not remain in the vehicle when the vehicle is
being jacked.
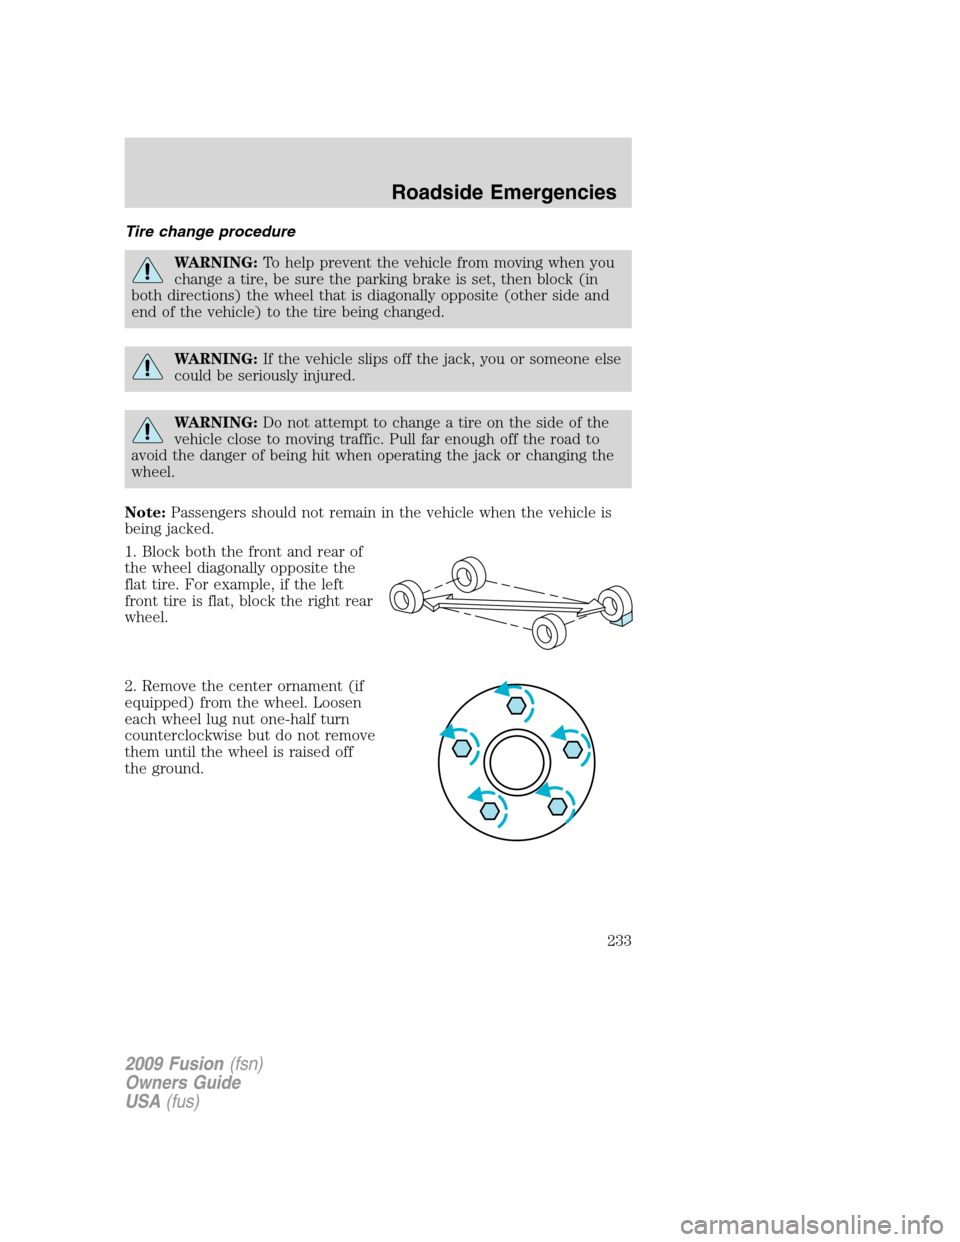
1. Block both the front and rear of
the wheel diagonally opposite the
flat tire. For example, if the left
front tire is flat, block the right rear
wheel.
2. Remove the center ornament (if
equipped) from the wheel. Loosen
each wheel lug nut one-half turn
counterclockwise but do not remove
them until the wheel is raised off
the ground.
2009 Fusion(fsn)
Owners Guide
USA(fus)
Roadside Emergencies
233
Page 272 of 312
4. Allow the engine to idle for at least one minute.
5. Turn the A/C on and allow the engine to idle for at least one minute.
6. Drive the vehicle to complete the relearning process.
•The vehicle may need to be driven 10 miles (16 km) or more to
relearn the idle and fuel trim strategy.
•If you do not allow the engine to relearn its idle trim, the idle
quality of your vehicle may be adversely affected until the idle
trim is eventually relearned.
When the battery is disconnected or a new battery installed, the
transmission must relearn its adaptive strategy. As a result of this, the
transmission may shift firmly. This operation is considered normal and
will not affect function or durability of the transmission. Over time the
adaptive learning process will fully update transmission operation to its
optimum shift feel.
If the battery has been disconnected or a new battery has been installed,
the clock and the preset radio stations must be reset once the battery is
reconnected.
•Always dispose of automotive
batteries in a responsible manner.
Follow your local authorized
standards for disposal. Call your
local authorized recycling center
to find out more about recycling
automotive batteries.
ENGINE COOLANT
Checking engine coolant
The concentration and level of engine coolant should be checked at the
intervals listed inscheduled maintenance information.The coolant
concentration should be maintained at 50/50 coolant and distilled water,
which equates to a freeze point of -34°F (-36°C). Coolant concentration
testing is possible with a hydrometer or antifreeze tester (such as the
Rotunda Battery and Antifreeze Tester, 014–R1060). The level of coolant
should be maintained at the “FULL COLD” level or within the “COLD
FILL RANGE” in the coolant reservoir. If the level falls below, add
coolant per the instructions in theAdding engine coolantsection.
LEAD
RETURN
RECYCLE
2009 Fusion(fsn)
Owners Guide
USA(fus)
Maintenance and Specifications
272
Page 281 of 312
Use the following guidelines to avoid electrostatic charge build-up when
filling an ungrounded fuel container:
•Place approved fuel container on the ground.
•DO NOT fill a fuel container while it is in the vehicle (including the
cargo area).
•Keep the fuel pump nozzle in contact with the fuel container while
filling.
•DO NOT use a device that would hold the fuel pump handle in the fill
position.
Fuel filler cap
Your fuel tank filler cap has an indexed design with a 1/4 turn on/off
feature.
When fueling your vehicle:
1. Turn the engine off.
2. Carefully turn the filler cap counterclockwise until it spins off.
3. Pull to remove the cap from the fuel filler pipe.
4. To install the cap, align the tabs on the cap with the notches on the
filler pipe.
5. Turn the filler cap clockwise 1/4 of a turn until it clicks at least once.
If the check fuel cap light
or a “check fuel cap” message comes on,
the fuel filler cap may not be properly installed. The light or message can
come on after several driving events after you’ve refueled your vehicle.
At the next opportunity, safely pull off of the road, remove the fuel filler
cap, align the cap properly and reinstall it. The check fuel cap
light
or “check fuel cap” message may not reset immediately; it may
take several driving cycles for the check fuel cap light
or “check fuel
cap” message to turn off. A driving cycle consists of an engine start-up
(after four or more hours with the engine off) followed by city and
highway driving.
Continuing to drive with the check fuel cap light
or “check fuel cap”
message on may cause the
light to turn on as well.
If you must replace the fuel filler cap, replace it with a fuel filler
cap that is designed for your vehicle. The customer warranty may
be void for any damage to the fuel tank or fuel system if the
correct genuine Ford, Motorcraft or other certified fuel filler cap
is not used.
2009 Fusion(fsn)
Owners Guide
USA(fus)
Maintenance and Specifications
281
Page 308 of 312
in rear seat ..............................154
LATCH .....................................157
recommendations ...................152
Child safety seats - booster
seats ...........................................162
Cleaning your vehicle
engine compartment ..............254
instrument panel ....................256
interior .....................................257
plastic parts ............................255
washing ....................................252
waxing .....................................253
wheels ......................................253
wiper blades ............................256
Climate control (see Air
conditioning or Heating) ......47, 49
Clock ............................................71
Clock adjust
6-CD in dash .............................31
AM/FM/CD .................................23
Clutch
fluid ..........................................290
operation while driving ..........211
recommended shift speeds ....212
Compass, electronic
set zone adjustment .................84
Console ........................................70
overhead ....................................70
Controls
power seat ...............................117
steering column ........................78
Coolant
checking and adding ..............272
refill capacities ................276, 299
specifications ..........................299
Cruise control
(see Speed control) ....................75
Cupholder(s) .............................121Customer Assistance ................221
Ford Extended Service
Plan ..........................................248
Getting assistance outside the
U.S. and Canada .....................249
Getting roadside assistance ...221
Getting the service you
need .........................................244
Ordering additional owner’s
literature .................................250
Utilizing the
Mediation/Arbitration
Program ...................................248
D
Daytime running lamps
(see Lamps) ................................54
Dipstick
automatic transmission
fluid ..................................291, 293
engine oil .................................265
Driving under special
conditions ..................210, 216, 218
sand .........................................217
snow and ice ...........................219
through water .................217, 220
E
Electronic message center .........81
Emergencies, roadside
jump-starting ..........................236
Emission control system ..........287
Engine ........................................302
cleaning ...................................254
coolant .....................................272
fail-safe cooling .......................277
idle speed control ...................270
lubrication specifications .......299
refill capacities ........................299
2009 Fusion(fsn)
Owners Guide
USA(fus)
Index
308