Page 43 of 276

AIMING THE HEADLAMPS
The headlamps on your vehicle are properly aimed at the assembly plant.
If your vehicle has been in an accident, the alignment of your headlamps
should be checked by your authorized dealer.
Vertical aim adjustment
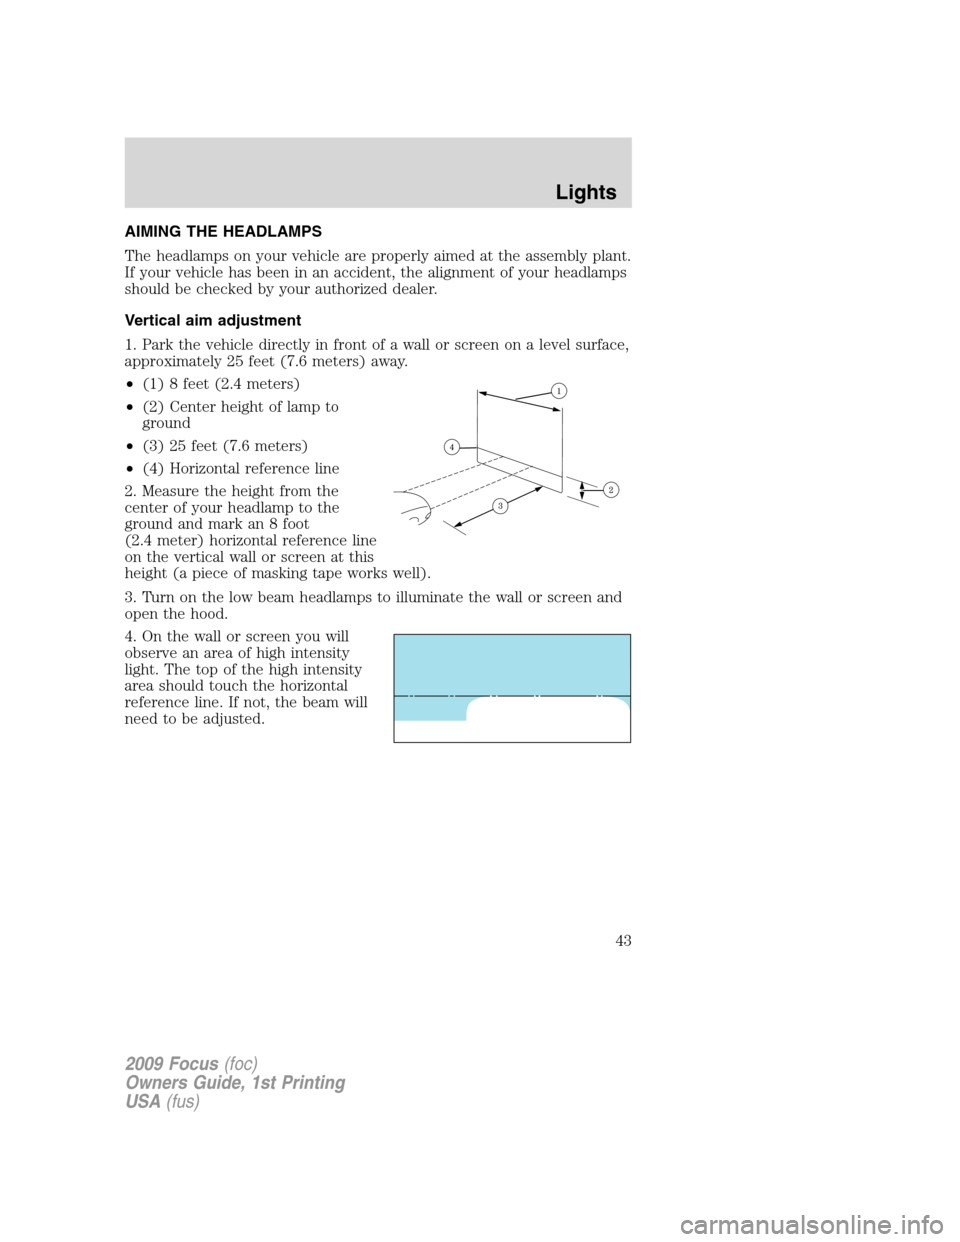
1. Park the vehicle directly in front of a wall or screen on a level surface,
approximately 25 feet (7.6 meters) away.
•(1) 8 feet (2.4 meters)
•(2) Center height of lamp to
ground
•(3) 25 feet (7.6 meters)
•(4) Horizontal reference line
2. Measure the height from the
center of your headlamp to the
ground and mark an 8 foot
(2.4 meter) horizontal reference line
on the vertical wall or screen at this
height (a piece of masking tape works well).
3. Turn on the low beam headlamps to illuminate the wall or screen and
open the hood.
4. On the wall or screen you will
observe an area of high intensity
light. The top of the high intensity
area should touch the horizontal
reference line. If not, the beam will
need to be adjusted.
2009 Focus(foc)
Owners Guide, 1st Printing
USA(fus)
Lights
43
Page 44 of 276
5. Locate the vertical adjuster on
each headlamp, then usea7mm
Allen wrench or a Phillips
screwdriver to adjust the headlamp
up or down.
6. HORIZONTAL AIM IS NOT
REQUIRED FOR THIS VEHICLE
AND IS NON-ADJUSTABLE.
7. Close the hood and turn off the
lamps.
TURN SIGNAL CONTROL
•Push down to activate the left
turn signal.
•Push up to activate the right turn
signal.
INTERIOR LAMPS
Map lamps
To turn on the map lamps, press the
outer edge of the clear lens. The
map lamp lights when:
•any door is opened.
•the remote entry controls are
pressed and the ignition is off.
2009 Focus(foc)
Owners Guide, 1st Printing
USA(fus)
Lights
44
Page 46 of 276

Using the right bulbs
Replacement bulbs are specified in the chart below. Headlamp bulbs
must be marked with an authorized “D.O.T.” for North America to ensure
lamp performance, light brightness and pattern and safe visibility. The
correct bulbs will not damage the lamp assembly or void the lamp
assembly warranty and will provide quality bulb burn time.
Function Trade number
Headlamps H13
Park and turn lamp (front) 3457 NAK or 3457AK
Side marker lamp (front) 168
Fog lamps (if equipped) H11 LL
Stop/turn and tail lamps 3057K
Backup lamp 921
License plate lamp C5W L
* High-mount brake lamp LED
* To replace these lamps - see your authorized dealer.
To replace all instrument panel lights - see your authorized dealer
Replacing interior bulbs
Check the operation of all bulbs frequently.
Replacing exterior bulbs
Check the operation of all the bulbs frequently.
Replacing headlamp bulbs
1. Make sure the headlamp control
is in the off position and open the
hood.
2. Remove four push pins from the
radiator grille and pull the grille
forward to access the lower screw.
3. Remove three bolts and washers
from the headlamp assembly.
4. Carefully pull the headlamp
assembly up and away from the
vehicle to disengage the spring clip located on the bottom of the
headlamp assembly.
5. Disconnect electrical connector from the bulb.
2009 Focus(foc)
Owners Guide, 1st Printing
USA(fus)
Lights
46
Page 47 of 276

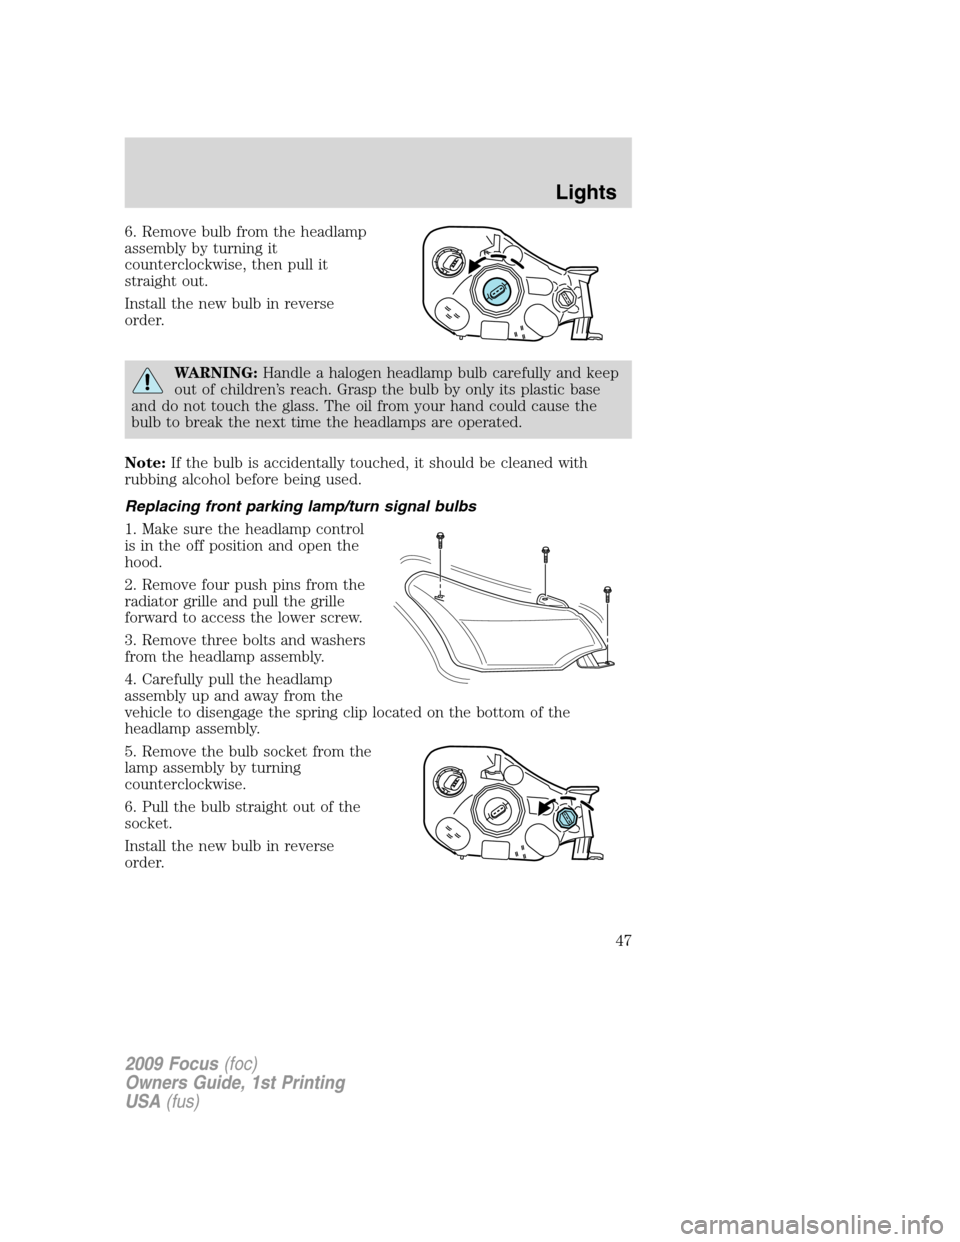
6. Remove bulb from the headlamp
assembly by turning it
counterclockwise, then pull it
straight out.
Install the new bulb in reverse
order.
WARNING:Handle a halogen headlamp bulb carefully and keep
out of children’s reach. Grasp the bulb by only its plastic base
and do not touch the glass. The oil from your hand could cause the
bulb to break the next time the headlamps are operated.
Note:If the bulb is accidentally touched, it should be cleaned with
rubbing alcohol before being used.
Replacing front parking lamp/turn signal bulbs
1. Make sure the headlamp control
is in the off position and open the
hood.
2. Remove four push pins from the
radiator grille and pull the grille
forward to access the lower screw.
3. Remove three bolts and washers
from the headlamp assembly.
4. Carefully pull the headlamp
assembly up and away from the
vehicle to disengage the spring clip located on the bottom of the
headlamp assembly.
5. Remove the bulb socket from the
lamp assembly by turning
counterclockwise.
6. Pull the bulb straight out of the
socket.
Install the new bulb in reverse
order.
2009 Focus(foc)
Owners Guide, 1st Printing
USA(fus)
Lights
47
Page 48 of 276

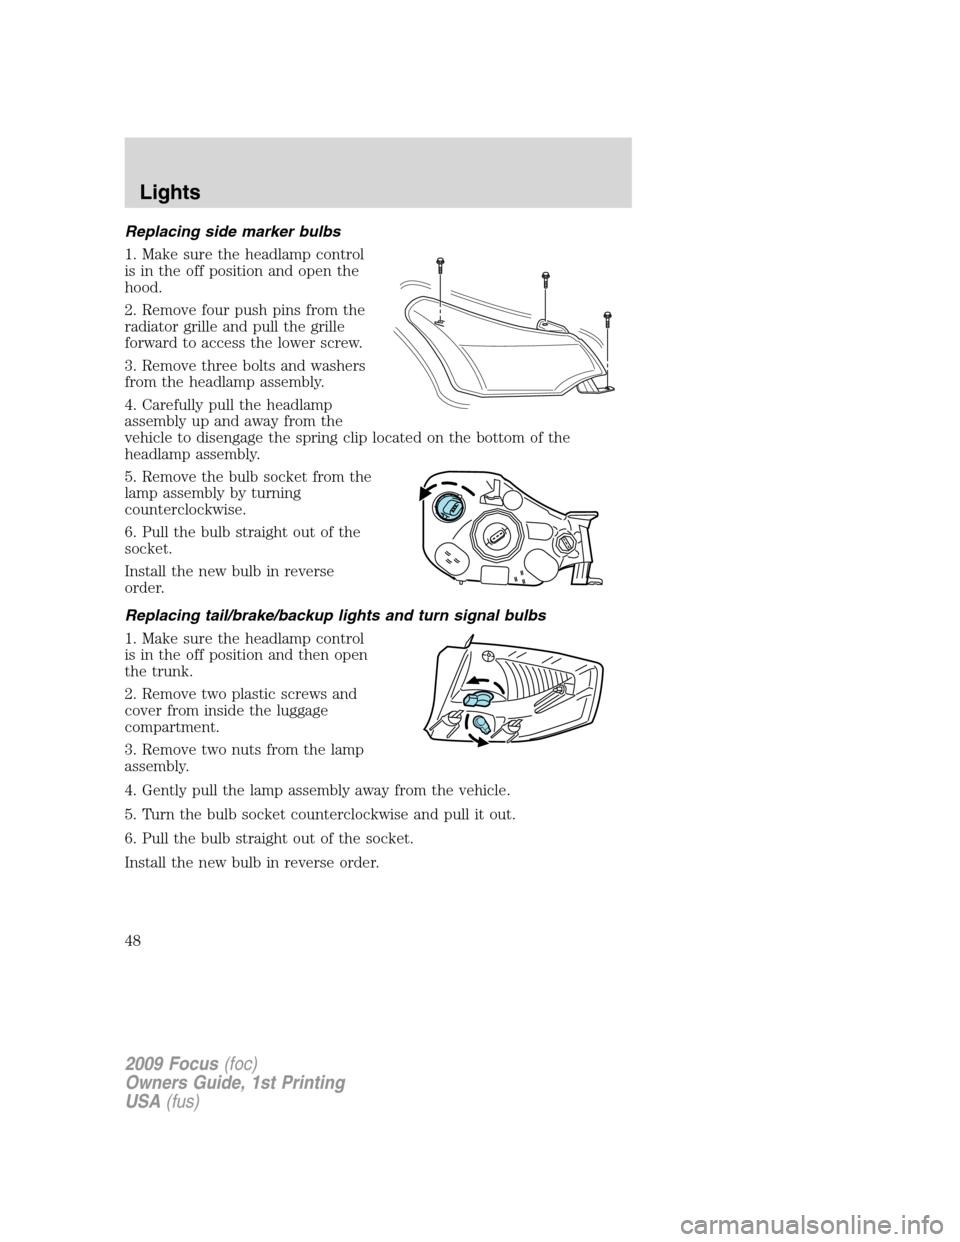
Replacing side marker bulbs
1. Make sure the headlamp control
is in the off position and open the
hood.
2. Remove four push pins from the
radiator grille and pull the grille
forward to access the lower screw.
3. Remove three bolts and washers
from the headlamp assembly.
4. Carefully pull the headlamp
assembly up and away from the
vehicle to disengage the spring clip located on the bottom of the
headlamp assembly.
5. Remove the bulb socket from the
lamp assembly by turning
counterclockwise.
6. Pull the bulb straight out of the
socket.
Install the new bulb in reverse
order.
Replacing tail/brake/backup lights and turn signal bulbs
1. Make sure the headlamp control
is in the off position and then open
the trunk.
2. Remove two plastic screws and
cover from inside the luggage
compartment.
3. Remove two nuts from the lamp
assembly.
4. Gently pull the lamp assembly away from the vehicle.
5. Turn the bulb socket counterclockwise and pull it out.
6. Pull the bulb straight out of the socket.
Install the new bulb in reverse order.
2009 Focus(foc)
Owners Guide, 1st Printing
USA(fus)
Lights
48
Page 232 of 276
Working with the engine on
•Automatic transmission:
1. Set the parking brake and shift to P (Park).
2. Block the wheels.
•Manual transmission:
1. Set the parking brake, depress the clutch and place the gearshift in N
(Neutral).
2. Block the wheels.
WARNING:To reduce the risk of vehicle damage and/or
personal burn injuries, do not start your engine with the air
cleaner removed and do not remove it while the engine is running.
OPENING THE HOOD
1. Inside the vehicle, pull the hood
release handle located under the
instrument panel.
2009 Focus(foc)
Owners Guide, 1st Printing
USA(fus)
Maintenance and Specifications
232
Page 236 of 276

Replace wiper blades at least once per year for optimum performance.
Poor wiper quality can be improved by cleaning the wiper blades and the
windshield. Refer toWindows and wiper bladesin theCleaning
chapter.
To prolong the life of the wiper blades, it is highly recommended to
scrape off the ice on the windshield before turning on the wipers. The
layer of ice has many sharp edges and can damage the micro edge of the
wiper rubber element.
ENGINE OIL
Checking the engine oil
Refer to thescheduled maintenance informationfor the appropriate
intervals for checking the engine oil.
1. Make sure the vehicle is on level ground.
2. Turn the engine off and wait 15 minutes for the oil to drain into the
oil pan.
3. Set the parking brake and ensure the gearshift is securely latched in P
(automatic transmission) or 1st (manual transmission).
4. Open the hood. Protect yourself from engine heat.
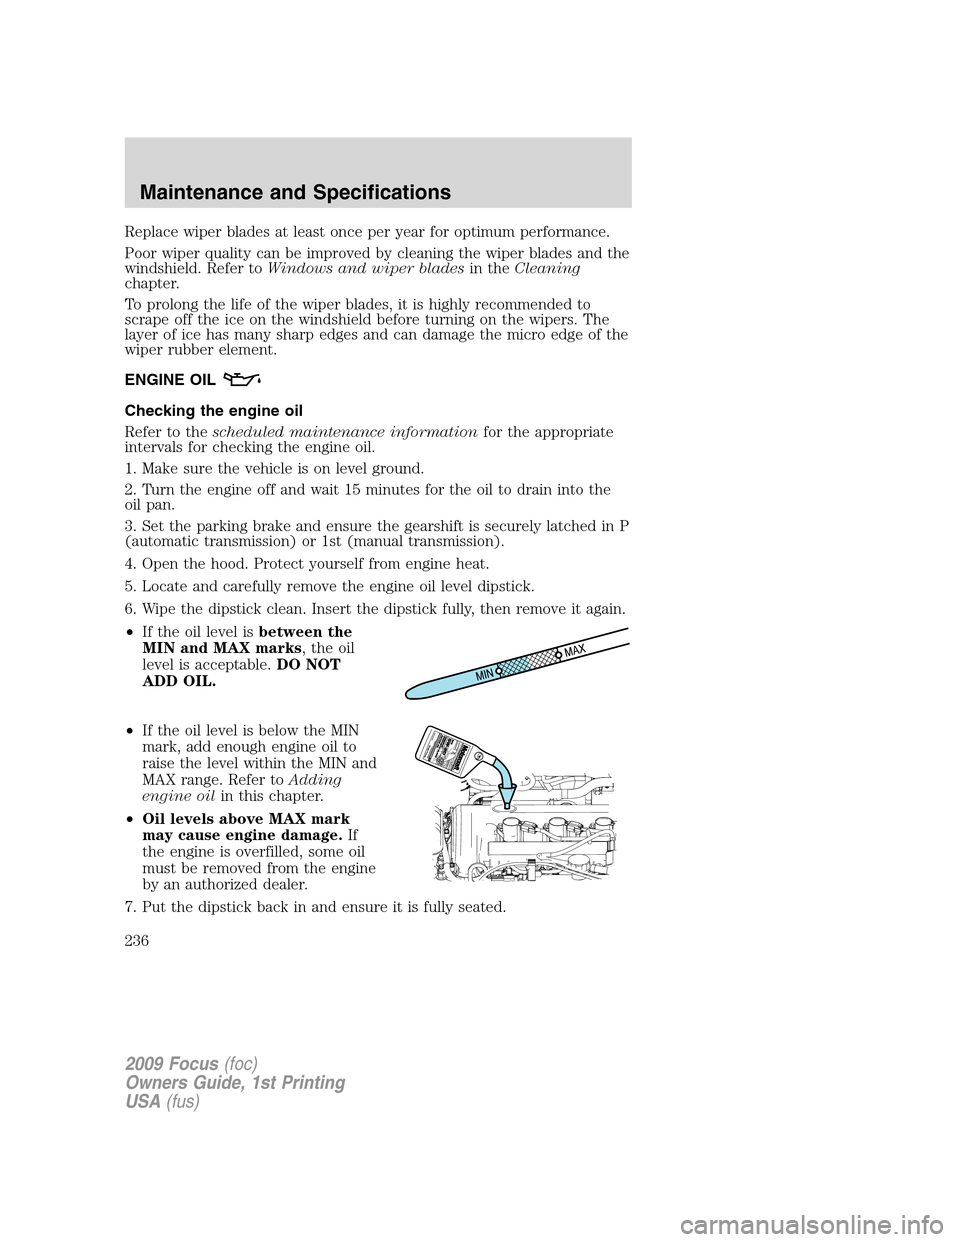
5. Locate and carefully remove the engine oil level dipstick.
6. Wipe the dipstick clean. Insert the dipstick fully, then remove it again.
•If the oil level isbetween the
MIN and MAX marks, the oil
level is acceptable.DO NOT
ADD OIL.
•If the oil level is below the MIN
mark, add enough engine oil to
raise the level within the MIN and
MAX range. Refer toAdding
engine oilin this chapter.
•Oil levels above MAX mark
may cause engine damage.If
the engine is overfilled, some oil
must be removed from the engine
by an authorized dealer.
7. Put the dipstick back in and ensure it is fully seated.
2009 Focus(foc)
Owners Guide, 1st Printing
USA(fus)
Maintenance and Specifications
236