2009 FORD F350 oil
[x] Cancel search: oilPage 325 of 419
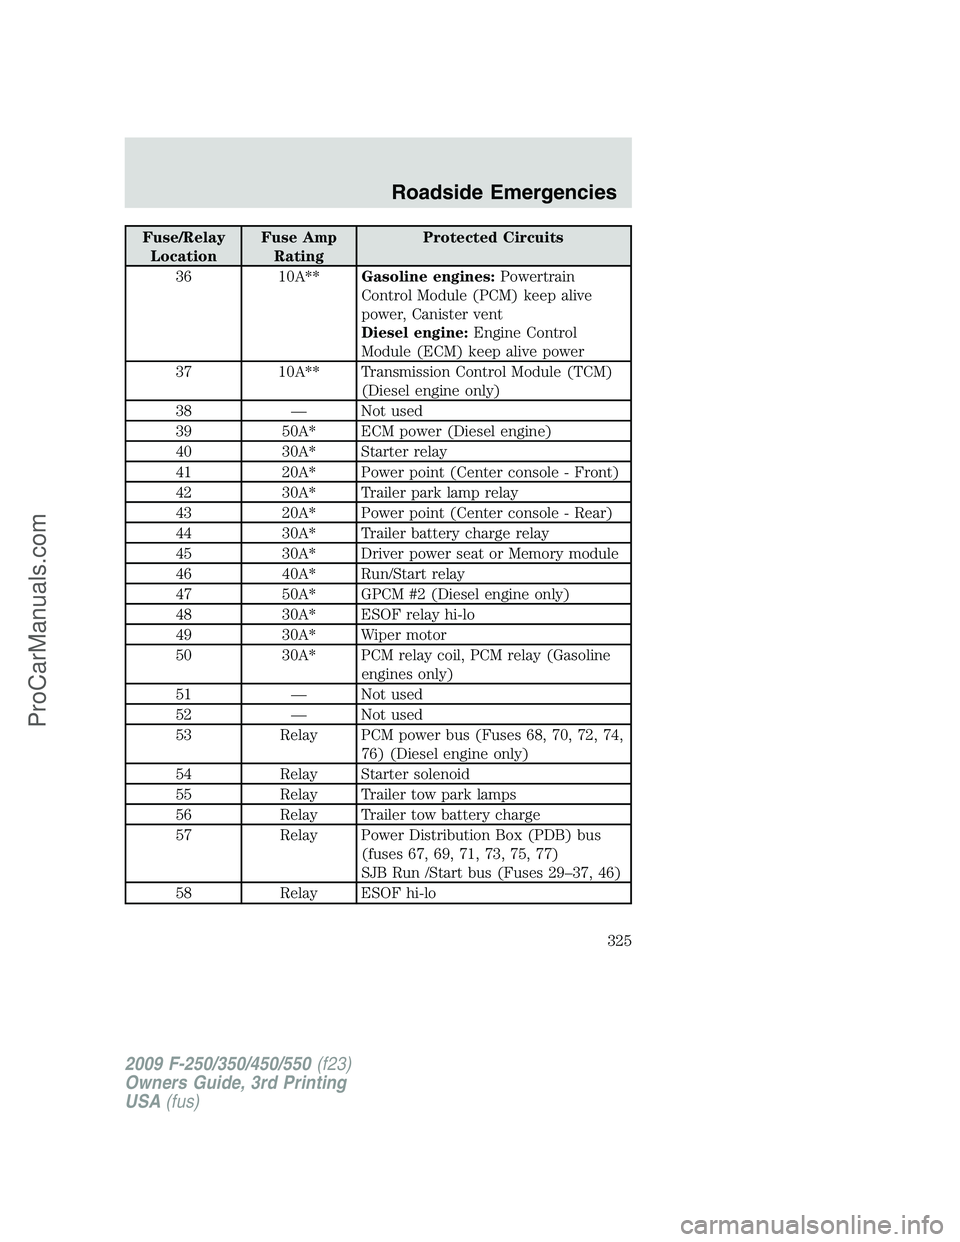
Fuse/Relay
LocationFuse Amp
RatingProtected Circuits
36 10A**Gasoline engines:Powertrain
Control Module (PCM) keep alive
power, Canister vent
Diesel engine:Engine Control
Module (ECM) keep alive power
37 10A** Transmission Control Module (TCM)
(Diesel engine only)
38 — Not used
39 50A* ECM power (Diesel engine)
40 30A* Starter relay
41 20A* Power point (Center console - Front)
42 30A* Trailer park lamp relay
43 20A* Power point (Center console - Rear)
44 30A* Trailer battery charge relay
45 30A* Driver power seat or Memory module
46 40A* Run/Start relay
47 50A* GPCM #2 (Diesel engine only)
48 30A* ESOF relay hi-lo
49 30A* Wiper motor
50 30A* PCM relay coil, PCM relay (Gasoline
engines only)
51 — Not used
52 — Not used
53 Relay PCM power bus (Fuses 68, 70, 72, 74,
76) (Diesel engine only)
54 Relay Starter solenoid
55 Relay Trailer tow park lamps
56 Relay Trailer tow battery charge
57 Relay Power Distribution Box (PDB) bus
(fuses 67, 69, 71, 73, 75, 77)
SJB Run /Start bus (Fuses 29–37, 46)
58 Relay ESOF hi-lo
2009 F-250/350/450/550(f23)
Owners Guide, 3rd Printing
USA(fus)
Roadside Emergencies
325
ProCarManuals.com
Page 326 of 419
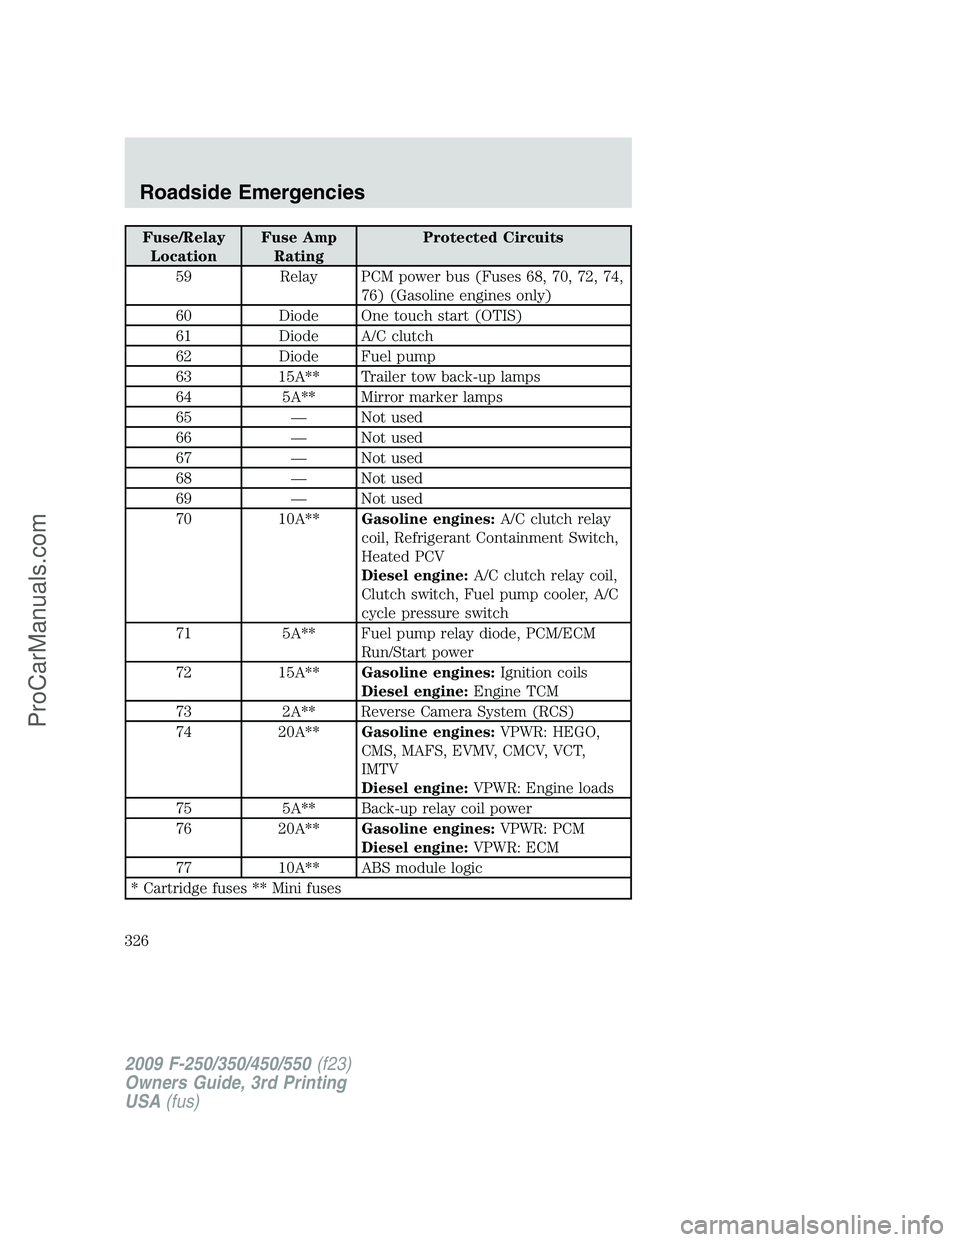
Fuse/Relay
LocationFuse Amp
RatingProtected Circuits
59 Relay PCM power bus (Fuses 68, 70, 72, 74,
76) (Gasoline engines only)
60 Diode One touch start (OTIS)
61 Diode A/C clutch
62 Diode Fuel pump
63 15A** Trailer tow back-up lamps
64 5A** Mirror marker lamps
65 — Not used
66 — Not used
67 — Not used
68 — Not used
69 — Not used
70 10A**Gasoline engines:A/C clutch relay
coil, Refrigerant Containment Switch,
Heated PCV
Diesel engine:A/C clutch relay coil,
Clutch switch, Fuel pump cooler, A/C
cycle pressure switch
71 5A** Fuel pump relay diode, PCM/ECM
Run/Start power
72 15A**Gasoline engines:Ignition coils
Diesel engine:Engine TCM
73 2A** Reverse Camera System (RCS)
74 20A**Gasoline engines:VPWR: HEGO,
CMS, MAFS, EVMV, CMCV, VCT,
IMTV
Diesel engine:VPWR: Engine loads
75 5A** Back-up relay coil power
76 20A**Gasoline engines:VPWR: PCM
Diesel engine:VPWR: ECM
77 10A** ABS module logic
* Cartridge fuses ** Mini fuses
2009 F-250/350/450/550(f23)
Owners Guide, 3rd Printing
USA(fus)
Roadside Emergencies
326
ProCarManuals.com
Page 342 of 419
5. Repeat this tightness check procedure when servicing the spare tire
pressure (every six months, perscheduled maintenance information),
or at any time that the spare tire is disturbed through service of other
components.
6. If removed, install the spare tire lock (if equipped) into the bumper
drive tube with the spare tire lock key (if equipped) and jack handle.
WHEEL LUG NUT TORQUE SPECIFICATIONS
On vehicles equipped with single rear wheels, retighten the lug nuts to
the specified torque at 500 miles (800 km) after any wheel disturbance
(tire rotation, changing a flat tire, wheel removal, etc.).
On vehicles equipped with dual rear wheels, retighten the wheel lug nuts
to the specified torque at 100 miles (160 km), and again at 500 miles
(800 km) of new vehicle operation and after any wheel disturbance (tire
rotation, changing a flat tire, wheel removal, etc.).
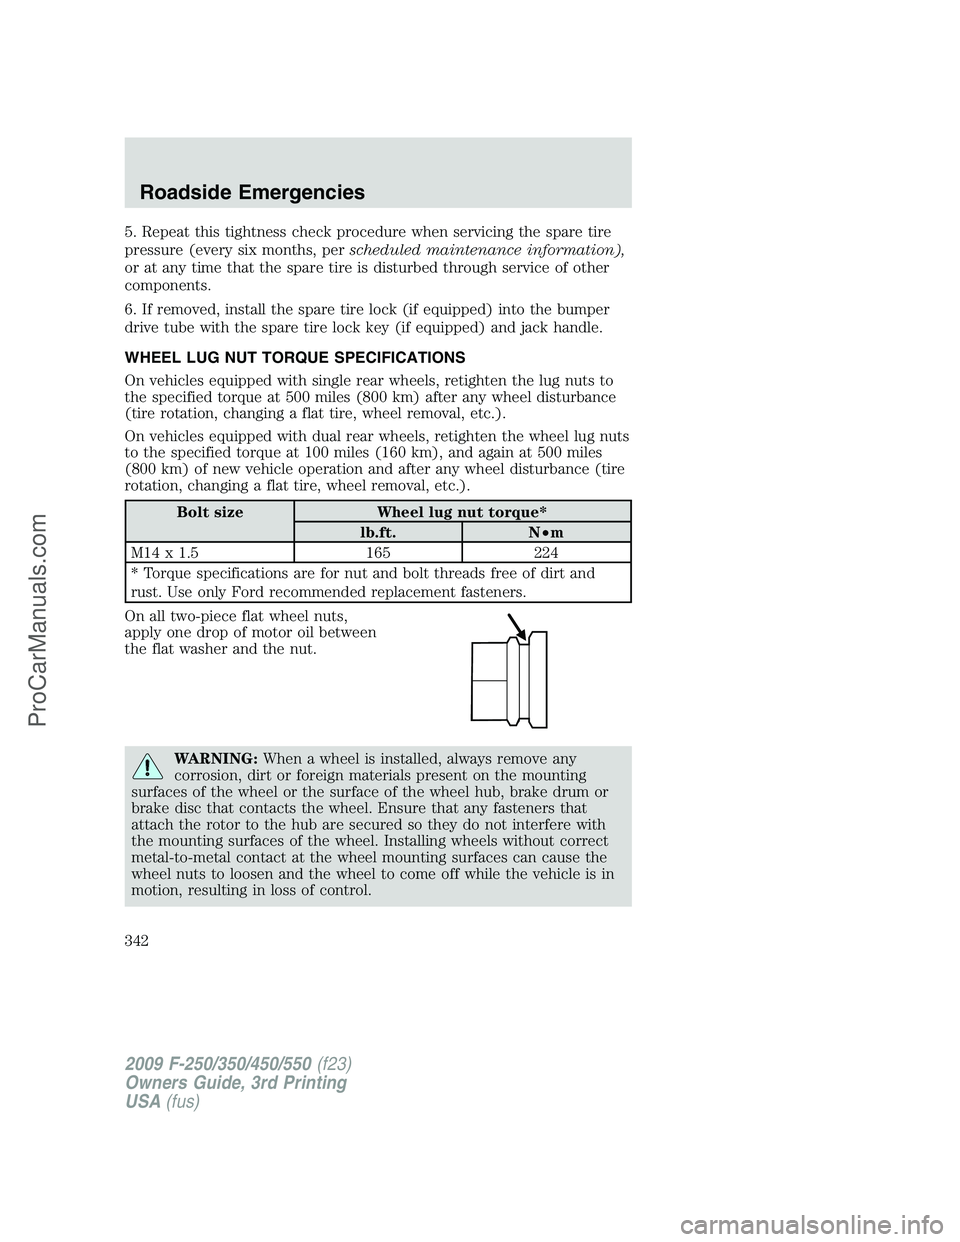
Bolt size Wheel lug nut torque*
lb.ft. N•m
M14 x 1.5 165 224
* Torque specifications are for nut and bolt threads free of dirt and
rust. Use only Ford recommended replacement fasteners.
On all two-piece flat wheel nuts,
apply one drop of motor oil between
the flat washer and the nut.
WARNING:When a wheel is installed, always remove any
corrosion, dirt or foreign materials present on the mounting
surfaces of the wheel or the surface of the wheel hub, brake drum or
brake disc that contacts the wheel. Ensure that any fasteners that
attach the rotor to the hub are secured so they do not interfere with
the mounting surfaces of the wheel. Installing wheels without correct
metal-to-metal contact at the wheel mounting surfaces can cause the
wheel nuts to loosen and the wheel to come off while the vehicle is in
motion, resulting in loss of control.
2009 F-250/350/450/550(f23)
Owners Guide, 3rd Printing
USA(fus)
Roadside Emergencies
342
ProCarManuals.com
Page 361 of 419

•The wiper blades can be cleaned with isopropyl (rubbing) alcohol or
Motorcraft Premium Windshield Washer Concentrate (ZC-32–A),
available from your authorized dealer. This washer fluid contains
special solution in addition to alcohol which helps to remove the hot
wax deposited on the wiper blade and windshield from automated car
wash facilities. Be sure to replace wiper blades when they appear
worn or do not function properly.
•Do not use abrasives, as they may cause scratches.
•Do not use fuel, kerosene, or paint thinner to clean any parts.
INSTRUMENT PANEL/INTERIOR TRIM AND CLUSTER LENS
(EXCEPT HARLEY-DAVIDSON)
Clean the instrument panel, interior trim areas and cluster lens with a
clean and damp, white cotton cloth, then with a clean and dry, white
cotton cloth.
•Avoid cleaners or polishes that increase the gloss of the upper portion
of the instrument panel. The dull finish in this area helps protect the
driver from undesirable windshield reflection.
•Be certain to wash or wipe your hands clean if you have been in
contact with certain products such as insect repellent and suntan
lotion in order to avoid possible damage to the interior painted
surfaces.
•Do not use household or glass cleaners as these may damage the
finish of the instrument panel, interior trim and cluster lens.
WARNING:Do not use chemical solvents or strong detergents
when cleaning the steering wheel or instrument panel to avoid
contamination of the airbag system.
If a staining liquid like coffee/juice has been spilled on the instrument
panel or on interior trim surfaces, clean as follows:
1. Wipe up spilled liquid using a clean white cotton cloth.
2. Wipe the surface with a damp, clean, white cotton cloth. For more
thorough cleaning, use a mild soap and water solution. If the spot cannot
be completely cleaned by this method, the area may be cleaned using a
commercially available cleaning product designed for automotive
interiors.
3. If necessary, apply more soap and water solution or cleaning product
to a clean, white, cotton cloth and press the cloth onto the soiled
area–allow this to set at room temperature for 30 minutes.
2009 F-250/350/450/550(f23)
Owners Guide, 3rd Printing
USA(fus)
Cleaning
361
ProCarManuals.com
Page 362 of 419

4. Remove the soaked cloth, and if it is not soiled badly, use this cloth to
clean the area by using a rubbing motion for 60 seconds.
5. Following this, wipe area dry with a clean, white, cotton cloth.
INSTRUMENT PANEL AND CONSOLE (HARLEY-DAVIDSON ONLY)
Your vehicle’s instrument panel and console are uniquely painted with
both high and low gloss paints that require special care. The high gloss
area is similar to that of the vehicle’s exterior; the low gloss area is
designed to help protect the driver from undesirable windshield
reflection.
High gloss paint area
In order to maintain the finish of the instrument panel and console, the
high gloss areas should be treated similar to the that of exterior paint or
glossy plastic surfaces. When cleaning the high gloss areas:
•Do not usepaper towels or newspaper.
•Do not usesilicone or Teflont (PTFE)-based products.
Dust the high gloss areas with a clean, dry cloth, or use Motorcraft
Dusting Cloth (ZC-24 or ZC-25) or Motorcraft Dusting Cloth Mitts
(ZC-47).
For general cleaning, use mild, soapy water and a soft, damp cloth, then
dry with a clean, dry cloth; or Motorcraft Ultra-Clear Spray Glass Cleaner
(ZC-23).
For removal of fine scuffs and scratches, use Scotch-Britet Microfiber
Cloth or cheese cloth along with Motorcraft Premium Liquid Wax
(ZC-53-A), Motorcraft Paint Sealant (ZC-45), or Motorcraft Custom Clear
Coat Polish (ZC-8-A). Note: Removal of deep scuffs and scratches should
be performed by an authorized dealer or an experienced repair facility.
Low gloss paint area
The low gloss area of the instrument panel’s upper dash should be
cleaned with mild, soapy water and a soft, damp cloth, then dried with a
clean, dry cloth. When cleaning the low gloss areas:
•Do not usepaper towels or newspaper.
•Do not usesilicone or Teflont (PTFE)-based products.
•Do not useexterior paint waxes or sealants.
Dust the low gloss areas with a clean, dry cloth, or use Motorcraft
Dusting Cloth (ZC-24 or ZC-25) or Motorcraft Dusting Cloth Mitts
(ZC-47).
2009 F-250/350/450/550(f23)
Owners Guide, 3rd Printing
USA(fus)
Cleaning
362
ProCarManuals.com
Page 363 of 419
INTERIOR
For fabric, carpets, cloth seats and safety belts:
•Remove dust and loose dirt with a vacuum cleaner.
•Remove light stains and soil with Motorcraft Professional Strength
Carpet & Upholstery Cleaner (ZC-54).
•If grease or tar is present on the material, spot-clean the area first
with Motorcraft Spot and Stain Remover (ZC-14). In Canada, use
Motorcraft Multi-Purpose Cleaner (CXC-101).
•If a ring forms on the fabric after spot cleaning, clean the entire area
immediately (but do not oversaturate) or the ring will set.
•Do not use household cleaning products or glass cleaners, which can
stain and discolor the fabric and affect the flame retardant abilities of
the seat materials.
WARNING:Do not use cleaning solvents, bleach or dye on the
vehicle’s seatbelts, as these actions may weaken the belt
webbing.
LEATHER SEATS
(IF EQUIPPED, EXCEPT FOR THE KING RANCH F–250 AND
F–350 CREW CAB)
Your leather seating surfaces have a clear, protective coating over the
leather.
For King Ranch F-250 and F-350 Crew Cab leather seats, refer to
separate section in this chapter.
•For routine cleaning, wipe the surface with a soft, damp cloth. For
more thorough cleaning, wipe the surface with a mild soap and water
solution. In Canada, use Motorcraft Vinyl Cleaner (CXC-93). Dry the
area with a soft cloth.
•If the leather cannot be completely cleaned using a mild soap and
water solution, the leather may be cleaned using a commercially
available cleaning product designed for automotive interiors.
•Do not use household cleaning products, alcohol solutions, solvents or
cleaners intended for rubber, vinyl and plastics, or oil/petroleum-based
leather conditioners. These products may cause premature wearing of
the clear, protective coating on the seat.
Note:In some instances, color or dye transfer can occur when wet
clothing comes in contact with leather upholstery. If this occurs, the
leather should be cleaned immediately to avoid permanent staining.
2009 F-250/350/450/550(f23)
Owners Guide, 3rd Printing
USA(fus)
Cleaning
363
ProCarManuals.com
Page 364 of 419
LEATHER SEATS FOR THE KING RANCH F-250 AND F-350 CREW
CAB ONLY (IF EQUIPPED)
Your vehicle is equipped with seating covered in premium, top-grain
leather which is extremely durable, but still requires special care and
maintenance in order to ensure longevity and comfort.
Regular cleaning and conditioning will maintain the appearance of the
leather. Failure to care for the leather can result in drying out and fading
of the material.
Note:In some instances, color or dye transfer can occur when wet
clothing comes in contact with leather upholstery. If this occurs, the
leather should be cleaned immediately to avoid permanent staining.
Cleaning
For dirt, use a vacuum cleaner then use a clean, damp cloth or soft
brush.
For routine cleaning, wipe the surface with a soft, damp cloth. For more
thorough cleaning, wipe the surface with a mild soap. If the leather
cannot be completely cleaned using a mild soap and water solution, the
leather may be cleaned using a commercially available cleaning product
“Tanners Preserve Leather Cleaner” and a 3M “Type T” scrubbing pad.
•Clean spills as quickly as possible.
•Test any cleaner or stain remover on an inconspicuous part of the
leather as cleaners may darken the leather. For more specific cleaning
information, contact the King Ranch Saddle Shop at 1–800–282–KING
(5464).
•Do not spill coffee, ketchup, mustard, orange juice or oil-based
products on the leather as they may permanently stain the leather.
•Do not use household cleaning products, alcohol solutions, solvents or
cleaners intended for rubber, vinyl or plastics.
Scratches
Natural Markings - Because the leather in the seat comes from genuine
steer hides, there will be evidence of naturally occurring markings, such
as small scars. These markings give character to the seating covers and
should be considered as proof of a genuine leather product.
In order to lessen the appearance of certain scratches and other wear
marks, apply conditioner on the affected area following the same
instructions as in theConditioningsection.
2009 F-250/350/450/550(f23)
Owners Guide, 3rd Printing
USA(fus)
Cleaning
364
ProCarManuals.com
Page 365 of 419

Conditioning
Bottles of King Ranch Leather Conditioner are available at the King
Ranch Saddle Shop. Visit the Web site atwww.krsaddleshop.com,or
telephone (in the United States) 1–800–282–KING (5464). If you are
unable to obtain King Ranch Leather Conditioner, use another premium
leather conditioner.
•Apply your first conditioning treatment within six months of taking
delivery of your vehicle. Condition twice yearly in order to replenish
lost oils and revitalize the aroma, suppleness and resilience of the
leather.
•Clean the surfaces using the steps outlined in theCleaningsection.
•Ensure the leather is dry then apply a nickel-sized amount of
conditioner to a clean, dry cloth
•Rub the conditioner into leather until it disappears. Allow the
conditioner to dry and repeat the process for the entire interior. If a
film appears, wipe off film with a dry, clean cloth.
UNDERBODY
Flush the complete underside of your vehicle frequently. Keep body and
door drain holes free from packed dirt.
Note:Use care when using a power washer to clean the driveline,
especially the driveshaft and interfacing components. The high-pressure
fluid could penetrate the sealed parts and cause damage.
FORD, LINCOLN AND MERCURY CAR CARE PRODUCTS
Your authorized dealer has many quality products available to clean your
vehicle and protect its finishes. These quality products have been
specifically engineered to fulfill your automotive needs; they are custom
designed to complement the style and appearance of your vehicle. Each
product is made from high quality materials that meet or exceed rigid
specifications. For best results, use the following products or products of
equivalent quality:
Motorcraft Bug and Tar Remover (ZC-42)
Motorcraft Car Care Kit (ZC-26)
Motorcraft Car Wash (Canada only) (CXC-83)
Motorcraft Custom Bright Metal Cleaner (ZC-15)
Motorcraft Custom Clear Coat Polish (ZC–8–A)
Motorcraft Custom Vinyl Protectant (ZC-40-A)
2009 F-250/350/450/550(f23)
Owners Guide, 3rd Printing
USA(fus)
Cleaning
365
ProCarManuals.com