2009 FORD F250 tow
[x] Cancel search: towPage 205 of 419
WARNING:Air bags can kill or injure a child in a child seat.
NEVER place a rear-facing child seat in front of an active air
bag. If you must use a forward-facing child seat in the front seat, move
the vehicle seat all the way back. When possible, all children age 12
and under should be properly restrained in a rear seating position. If
all children cannot be seated and restrained properly in a rear seating
position, properly restrain the largest child in the front seat.
WARNING:Always carefully follow the instructions and
warnings provided by the manufacturer of any child restraint to
determine if the restraint device is appropriate for your child’s size,
height, weight, or age. Follow the child restraint manufacturer’s
instructions and warnings provided for installation and use in
conjunction with the instructions and warnings provided by the vehicle
manufacturer. A safety seat that is improperly installed or utilized, is
inappropriate for your child’s height, age, or weight or does not
properly fit the child may increase the risk of serious injury or death.
WARNING:Never let a passenger hold a child on his or her lap
while the vehicle is moving. The passenger cannot protect the
child from injury in a collision, which may result in serious injury or
death.
WARNING:Never use pillows, books, or towels to boost a child.
They can slide around and increase the likelihood of injury or
death in a collision.
WARNING:Always restrain an unoccupied child seat or booster
seat. These objects may become projectiles in a collision or
sudden stop, which may increase the risk of serious injury.
WARNING:Never place, or allow a child to place, the shoulder
belt under a child’s arm or behind the back because it reduces
the protection for the upper part of the body and may increase the risk
of injury or death in a collision.
2009 F-250/350/450/550(f23)
Owners Guide, 3rd Printing
USA(fus)
Seating and Safety Restraints
205
Page 210 of 419
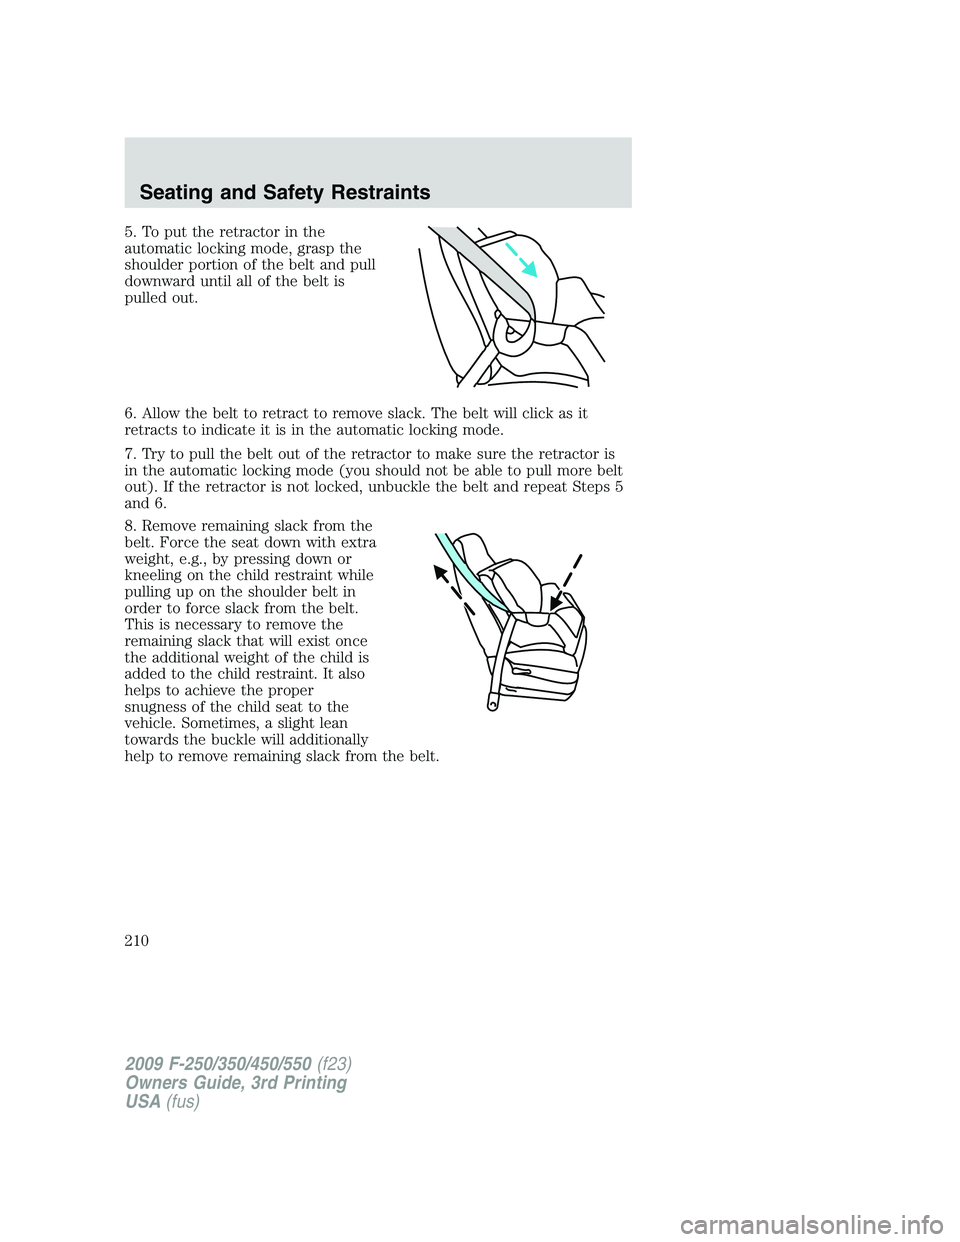
5. To put the retractor in the
automatic locking mode, grasp the
shoulder portion of the belt and pull
downward until all of the belt is
pulled out.
6. Allow the belt to retract to remove slack. The belt will click as it
retracts to indicate it is in the automatic locking mode.
7. Try to pull the belt out of the retractor to make sure the retractor is
in the automatic locking mode (you should not be able to pull more belt
out). If the retractor is not locked, unbuckle the belt and repeat Steps 5
and 6.
8. Remove remaining slack from the
belt. Force the seat down with extra
weight, e.g., by pressing down or
kneeling on the child restraint while
pulling up on the shoulder belt in
order to force slack from the belt.
This is necessary to remove the
remaining slack that will exist once
the additional weight of the child is
added to the child restraint. It also
helps to achieve the proper
snugness of the child seat to the
vehicle. Sometimes, a slight lean
towards the buckle will additionally
help to remove remaining slack from the belt.
2009 F-250/350/450/550(f23)
Owners Guide, 3rd Printing
USA(fus)
Seating and Safety Restraints
210
Page 213 of 419

4. Insert the belt tongue into the
proper buckle for that seating
positions until you hear a snap and
feel it latch. Make sure the tongue is
securely latched to the buckle by
pulling on the tongue.
5. Remove remaining slack from the
belt. Force the seat down with extra
weight, e.g., by pressing down or
kneeling on the child restraint while
pulling up on the shoulder belt in
order to force slack from the belt.
This is necessary to remove the
remaining slack that will exist once
the additional weight of the child is
added to the child restraint. It also
helps to achieve the proper
snugness of the child seat to the vehicle. Sometimes, a slight lean
towards the buckle will additionally help to remove remaining slack from
the belt.
6. Attach the tether strap (if the child seat is equipped). Refer to
Attaching child safety seats with tether strapslater in this chapter.
2009 F-250/350/450/550(f23)
Owners Guide, 3rd Printing
USA(fus)
Seating and Safety Restraints
213
Page 237 of 419
WARNING:If your vehicle is stuck in snow, mud, sand, etc.,do
notrapidly spin the tires; spinning the tires can tear the tire and
cause an explosion. A tire can explode in as little as three to five
seconds.
WARNING:Do not spin the wheels at over 35 mph (56 km/h).
The tires may fail and injure a passenger or bystander.
Highway hazards
No matter how carefully you drive there’s always the possibility that you
may eventually have a flat tire on the highway. Drive slowly to the
closest safe area out of traffic. This may further damage the flat tire, but
your safety is more important.
If you feel a sudden vibration or ride disturbance while driving, or you
suspect your tire or vehicle has been damaged, immediately reduce your
speed. Drive with caution until you can safely pull off the road. Stop and
inspect the tires for damage. If a tire is under-inflated or damaged,
deflate it, remove wheel and replace it with your spare tire and wheel. If
you cannot detect a cause, have the vehicle towed to the nearest repair
facility or tire dealer to have the vehicle inspected.
Tire and wheel alignment
A bad jolt from hitting a curb or pothole can cause the front end of your
vehicle to become misaligned or cause damage to your tires. If your
vehicle seems to pull to one side when you’re driving, the wheels may be
out of alignment. Have an authorized dealer check the wheel alignment
periodically.
Wheel misalignment in the front or the rear can cause uneven and rapid
treadwear of your tires and should be corrected by an authorized dealer.
Front wheel drive (FWD) vehicles and those with an independent rear
suspension (if equipped) may require alignment of all four wheels.
The tires should also be balanced periodically. An unbalanced tire and
wheel assembly may result in irregular tire wear.
2009 F-250/350/450/550(f23)
Owners Guide, 3rd Printing
USA(fus)
Tires, Wheels and Loading
237
Page 248 of 419

When you believe your system is not operating properly
The main function of the Tire Pressure Monitoring System is to warn you
when your tires need air. It can also warn you in the event the system is
no longer capable of functioning as intended. Please refer to the
following chart for information concerning your Tire Pressure Monitoring
System:
Low Tire
Pressure
Warning
LightPossible cause Customer Action Required
Solid
Warning
LightTire(s)
under-inflated1. Check your tire pressure to
ensure tires are properly inflated;
refer toInflating your tiresin this
chapter.
2. After inflating your tires to the
manufacturer’s recommended
inflation pressure as shown on the
Tire Label (located on the edge of
driver’s door or the B-Pillar), the
vehicle must be driven for at least
two minutes over 20 mph (32 km/h)
before the light will turn OFF.
Spare tire in use Your temporary spare tire is in use.
Repair the damaged road wheel/tire
and reinstall it on the vehicle to
restore system functionality. For a
description on how the system
functions, refer toWhen your
temporary spare tire is installedin
this section.
TPMS malfunction If your tires are properly inflated and
your spare tire is not in use and the
light remains ON, have the system
inspected by your authorized dealer.
Tire rotation
without sensor
trainingOn vehicles with different front and
rear tire pressures, the TPMS system
must be retrained following every
tire rotation. Refer toTire rotation
in this chapter.
2009 F-250/350/450/550(f23)
Owners Guide, 3rd Printing
USA(fus)
Tires, Wheels and Loading
248
Page 249 of 419
Low Tire
Pressure
Warning
LightPossible cause Customer Action Required
Flashing
Warning
LightSpare tire in use Your temporary spare tire is in use.
Repair the damaged road wheel and
re-mount it on the vehicle to restore
system functionality. For a
description of how the system
functions under these conditions,
refer toWhen your temporary
spare tire is installedin this
section.
TPMS malfunction If your tires are properly inflated and
your spare tire is not in use and the
TPMS warning light still flashes, have
the system inspected by your
authorized dealer.
When inflating your tires
When putting air into your tires (such as at a gas station or in your
garage), the Tire Pressure Monitoring System may not respond
immediately to the air added to your tires.
It may take up to two minutes of driving over 20 mph (32 km/h) for the
light to turn OFF after you have filled your tires to the recommended
inflation pressure.
How temperature affects your tire pressure
The Tire Pressure Monitoring System (TPMS) monitors tire pressure in
each pneumatic tire. While driving in a normal manner, a typical
passenger tire inflation pressure may increase approximately 2 to 4 psi
(14 to 28 kPa) from a cold start situation. If the vehicle is stationary
over night with the outside temperature significantly lower than the
daytime temperature, the tire pressure may decrease approximately 3 psi
(20.7 kPa) for a drop of 30° F (16.6°C) in ambient temperature. This
lower pressure value may be detected by the TPMS as being significantly
lower than the recommended inflation pressure and activate the TPMS
warning for low tire pressure. If the low tire pressure warning light is
ON, visually check each tire to verify that no tire is flat. (If one or more
tires are flat, repair as necessary.) Check air pressure in the road tires. If
any tire is under-inflated, carefully drive the vehicle to the nearest
location where air can be added to the tires. Inflate all the tires to the
recommended inflation pressure.
2009 F-250/350/450/550(f23)
Owners Guide, 3rd Printing
USA(fus)
Tires, Wheels and Loading
249
Page 254 of 419
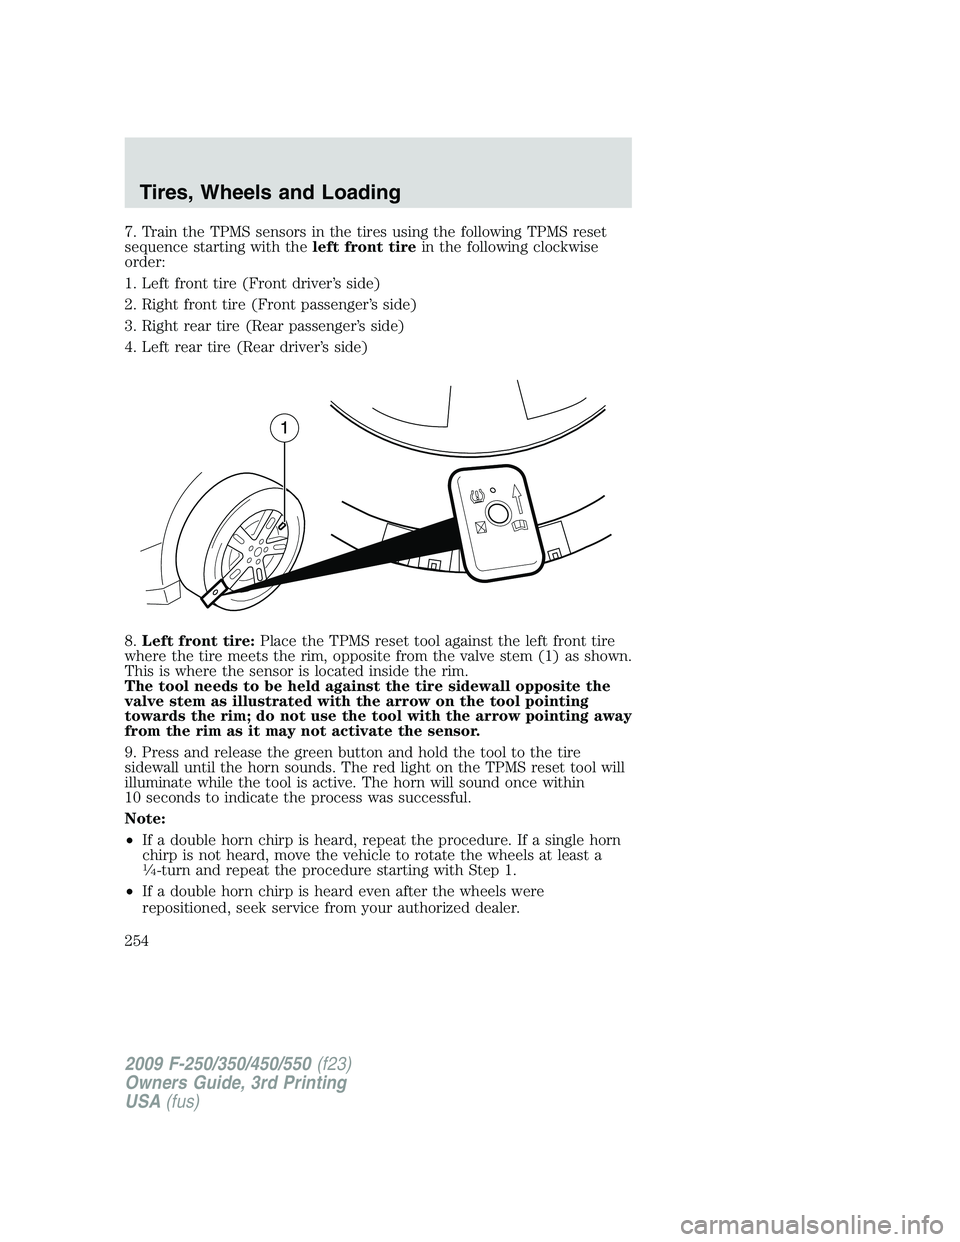
7. Train the TPMS sensors in the tires using the following TPMS reset
sequence starting with theleft front tirein the following clockwise
order:
1. Left front tire (Front driver’s side)
2. Right front tire (Front passenger’s side)
3. Right rear tire (Rear passenger’s side)
4. Left rear tire (Rear driver’s side)
8.Left front tire:Place the TPMS reset tool against the left front tire
where the tire meets the rim, opposite from the valve stem (1) as shown.
This is where the sensor is located inside the rim.
The tool needs to be held against the tire sidewall opposite the
valve stem as illustrated with the arrow on the tool pointing
towards the rim; do not use the tool with the arrow pointing away
from the rim as it may not activate the sensor.
9. Press and release the green button and hold the tool to the tire
sidewall until the horn sounds. The red light on the TPMS reset tool will
illuminate while the tool is active. The horn will sound once within
10 seconds to indicate the process was successful.
Note:
•If a double horn chirp is heard, repeat the procedure. If a single horn
chirp is not heard, move the vehicle to rotate the wheels at least a
1�4-turn and repeat the procedure starting with Step 1.
•If a double horn chirp is heard even after the wheels were
repositioned, seek service from your authorized dealer.
2009 F-250/350/450/550(f23)
Owners Guide, 3rd Printing
USA(fus)
Tires, Wheels and Loading
254
Page 258 of 419
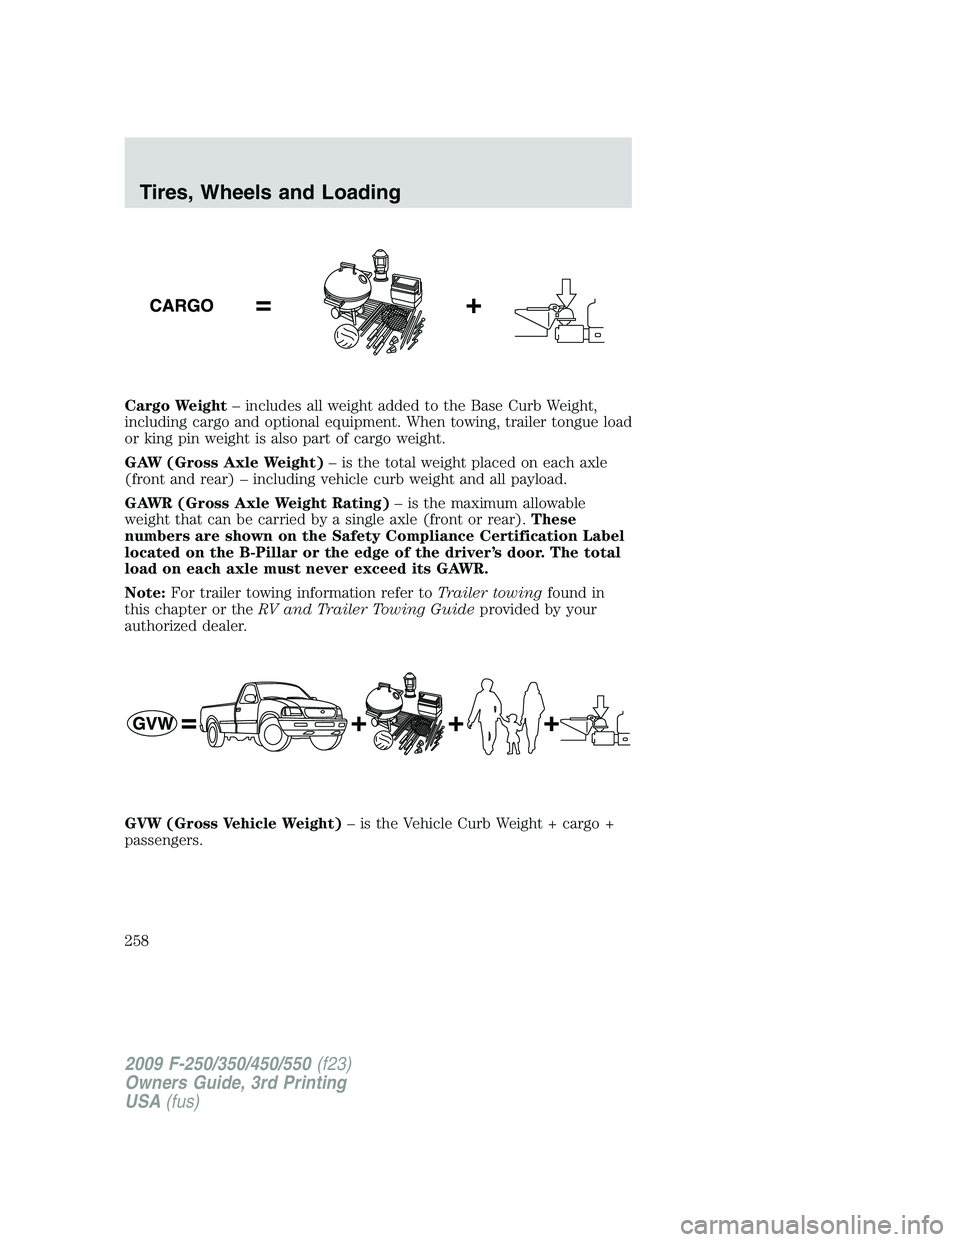
Cargo Weight– includes all weight added to the Base Curb Weight,
including cargo and optional equipment. When towing, trailer tongue load
or king pin weight is also part of cargo weight.
GAW (Gross Axle Weight)– is the total weight placed on each axle
(front and rear) – including vehicle curb weight and all payload.
GAWR (Gross Axle Weight Rating)– is the maximum allowable
weight that can be carried by a single axle (front or rear).These
numbers are shown on the Safety Compliance Certification Label
located on the B-Pillar or the edge of the driver’s door. The total
load on each axle must never exceed its GAWR.
Note:For trailer towing information refer toTrailer towingfound in
this chapter or theRV and Trailer Towing Guideprovided by your
authorized dealer.
GVW (Gross Vehicle Weight)– is the Vehicle Curb Weight + cargo +
passengers.
2009 F-250/350/450/550(f23)
Owners Guide, 3rd Printing
USA(fus)
Tires, Wheels and Loading
258