Page 153 of 419
2. Open the latches to release the
panels.
3. Rotate the panels toward the
tailgate.
Repeat Steps 1–3 for the other side of the bed extender.
4. Connect the two panels, then rotate both knobs a quarter-turn
clockwise to secure the panels.
2009 F-250/350/450/550(f23)
Owners Guide, 3rd Printing
USA(fus)
Driver Controls
153
Page 154 of 419
5. Ensure the latch rod is inserted
into the tailgate hole and the locking
pins on both sides are engaged into
their holes in the pick-up box.
6. Reverse steps for storage of the
bed extender.
Note:When the vehicle is in motion, ensure the locking pins and knobs
are fully engaged.
Note:Ensure all cargo is secured.
Note:When the vehicle is in motion, the tailgate load must not exceed
150 lb (68 kg).
Note:The bed extender should always be kept in the grocery mode or
stowed position with the tailgate closed when not in use.
To open the bed extender into grocery mode, follow Steps 1–4 by
rotating the panels away from the tailgate. Close the tailgate.
2009 F-250/350/450/550(f23)
Owners Guide, 3rd Printing
USA(fus)
Driver Controls
154
Page 160 of 419

The typical operating range for your remote entry transmitter is
approximately 33 feet (10 meters). A decrease in operating range could
be caused by:
•weather conditions,
•nearby radio towers,
•structures around the vehicle, or
•other vehicles parked next to your vehicle.
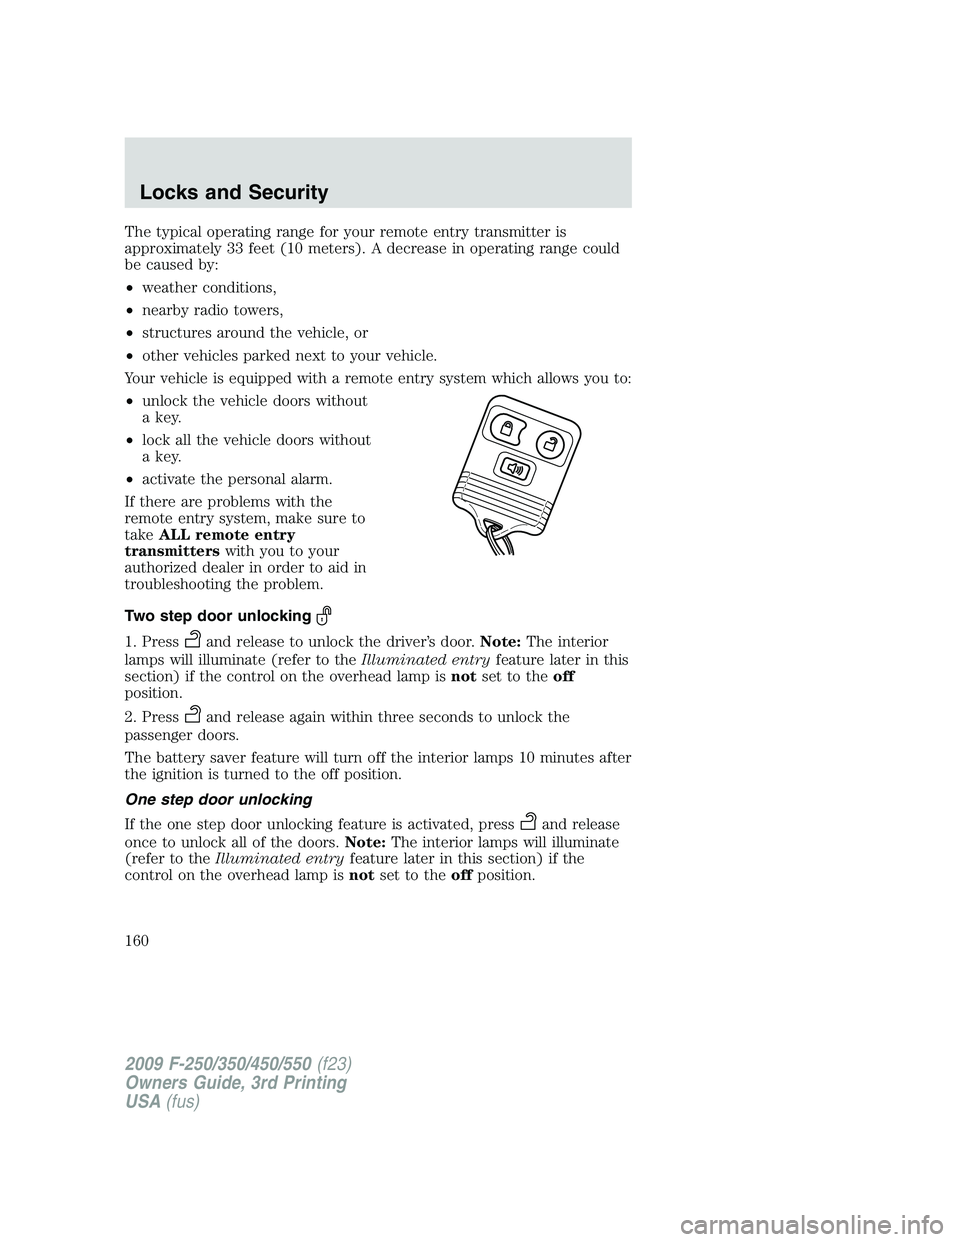
Your vehicle is equipped with a remote entry system which allows you to:
•unlock the vehicle doors without
a key.
•lock all the vehicle doors without
a key.
•activate the personal alarm.
If there are problems with the
remote entry system, make sure to
takeALL remote entry
transmitterswith you to your
authorized dealer in order to aid in
troubleshooting the problem.
Two step door unlocking
1. Pressand release to unlock the driver’s door.Note:The interior
lamps will illuminate (refer to theIlluminated entryfeature later in this
section) if the control on the overhead lamp isnotset to theoff
position.
2. Press
and release again within three seconds to unlock the
passenger doors.
The battery saver feature will turn off the interior lamps 10 minutes after
the ignition is turned to the off position.
One step door unlocking
If the one step door unlocking feature is activated, press
and release
once to unlock all of the doors.Note:The interior lamps will illuminate
(refer to theIlluminated entryfeature later in this section) if the
control on the overhead lamp isnotset to theoffposition.
2009 F-250/350/450/550(f23)
Owners Guide, 3rd Printing
USA(fus)
Locks and Security
160
Page 169 of 419

Vehicles without the SecuriLock™ Passive Anti-theft system behave as
follows:
•When the ignition is in the off position, the indicator will not flash.
•When the ignition is in the on position, the indicator will glow for
three seconds to indicate the engine is enabled.
Automatic arming
The vehicle is armed immediately after switching the ignition to the off
position.
The theft indicator will flash every
two seconds to act as a theft
deterrent when the vehicle is
armed.
Automatic disarming
Switching the ignition to the on position with acoded keydisarms the
vehicle.
Replacement keys
If your keys are lost or stolen and you don’t have an extra coded key,
you will need to have your vehicle towed to an authorized dealer. The
key codes need to be erased from your vehicle and new coded keys will
need to be programmed.
Replacing coded keys can be very costly. Store an extra programmed key
away from the vehicle in a safe place to help prevent any
inconveniences. Please visit an authorized dealer to purchase additional
spare or replacement keys.
Programming spare keys
A maximum of eight keys can be coded to your vehicle. Only
SecuriLock™ keys can be used. To program acoded keyyourself, you
will need two previously programmedcoded keys(keys that already
operate your vehicle’s engine) and the new unprogrammed key(s) readily
accessible for timely implementation of each step in the procedure.
If two previously programmed coded keys are not available, you must
bring your vehicle to your authorized dealer to have the spare coded
key(s) programmed.
Please read and understand the entire procedure before you begin.
2009 F-250/350/450/550(f23)
Owners Guide, 3rd Printing
USA(fus)
Locks and Security
169
Page 171 of 419

PERIMETER ALARM SYSTEM (IF EQUIPPED)
The perimeter anti-theft system will warn you in the event of an
unauthorized entry to your vehicle.
If there is any potential perimeter anti-theft problem with your vehicle,
ensureALL remote entry transmittersare taken to the authorized
dealer to aid in troubleshooting.
Arming the system
When armed, this system will respond if unauthorized entry is
attempted. When unauthorized entry occurs, the system will flash the
park/turn lamps and will sound the horn.
The system is ready to arm whenever the key is removed from the
ignition. Either of the following actions will prearm the alarm system:
•Press the
control on the remote entry transmitter.
•Open a door and press the power door lock control to lock all the
doors, and then close the door.
Disarming the system
You can disarm the system by any of the following actions:
•Unlock the doors by pressing the
control on your remote entry
transmitter.
•Unlock the doors with a key. Turn the key full travel (toward the front
of the vehicle) to ensure the alarm disarms.
•Turn the ignition to the on position with a programmed coded ignition
key.
Triggering the anti-theft system
The armed system will be triggered if any door or hood is opened
without using the key or the remote entry transmitter.
2009 F-250/350/450/550(f23)
Owners Guide, 3rd Printing
USA(fus)
Locks and Security
171
Page 179 of 419

Push control to lower head restraint.
WARNING:To minimize the risk of neck injury in the event of a
crash, the driver and passenger occupants should not sit in
and/or operate the vehicle, until the head restraint is placed in its
proper position. The driver should never adjust the head restraint
while the vehicle is in motion.
Cabela’s seat
If your vehicle is equipped with a Cabela’s seat, you will not have the
load floor option. A lockable stowage box is located under the rear seat.
For more information on the stowage box, seeCenter
console/under-seat storage-Cabela’s editionin theDriver controls
chapter.
Rear folding seat system with load floor (if equipped)
The rear seatback has a split 60/40 seat. Each seat cushion can be
flipped up into the seatback position.
Note:The Crew Cab rear 60/40 split bench seatback isnotintended to
support a cargo load in the forward-folded position.
To fold the seatback down,pull
down the latch lever located on the
bottom seatback to fold the
seatback forward.
2009 F-250/350/450/550(f23)
Owners Guide, 3rd Printing
USA(fus)
Seating and Safety Restraints
179
Page 186 of 419

WARNING:Position the safety belt height adjusters so that the
belt rests across the middle of your shoulder. Failure to adjust
the safety belt properly could reduce the effectiveness of the seat belt
and increase the risk of injury in a collision.
To adjust the shoulder belt height,
push the button and slide the height
adjuster up or down. Release the
button and pull down on the height
adjuster to make sure it is locked in
place.
Safety belt with cinch tongue (Regular cab center seating position
and Super Cab/Crew Cab rear center seating positions)
The cinch tongue will slide up and down the belt webbing when the belt
is stowed or while putting safety belts on. When the lap/shoulder safety
belt is buckled, the cinch tongue will allow the lap portion to be
shortened, but pinches the webbing to keep the lap portion from getting
longer. The cinch tongue is designed to slip during a crash, so always
wear the shoulder belt properly and don’t allow any slack in either the
lap or shoulder portions.
Before you can reach and latch a combination lap and shoulder belt
having a cinch tongue into the buckle, you may have to lengthen the lap
belt portion of it.
1. To lengthen the lap belt, pull
some webbing out of the shoulder
belt retractor.
2. While holding the webbing below
the tongue, grasp the tip (metal
portion) of the tongue so that it is
parallel to the webbing and slide the
tongue upward.
3. Provide enough lap belt length so that the tongue can reach the
buckle.
2009 F-250/350/450/550(f23)
Owners Guide, 3rd Printing
USA(fus)
Seating and Safety Restraints
186
Page 194 of 419

WARNING:Never place your arm over the airbag module as a
deploying airbag can result in serious arm fractures or other
injuries.
To properly position yourself away from the airbag:
•Move your seat to the rear as far as you can while still reaching the
pedals comfortably.
•Recline the seat slightly one or two degrees from the upright position.
WARNING:Do not put anything on or over the airbag module.
Placing objects on or over the airbag inflation area may cause
those objects to be propelled by the airbag into your face and torso
causing serious injury.
WARNING:Do not attempt to service, repair, or modify the
airbag supplemental restraint systems or its fuses. Contact your
authorized dealer as soon as possible.
WARNING:The front passenger airbag is not designed to offer
protection to an occupant in the center front seating position.
WARNING:Modifying or adding equipment to the front end of
the vehicle (including frame, bumper, front end body structure
and tow hooks) may affect the performance of the airbag system,
increasing the risk of injury. Do not modify the front end of the
vehicle.
WARNING:Additional equipment such as snowplow equipment
may effect the performance of the airbag sensors increasing the
risk of injury. Please refer to theBody Builders Layout Bookfor
instructions about the appropriate installation of additional equipment.
WARNING:Removing the blocker beam without installing snow
plow attachment hardware may effect airbag deployment in a
crash. Do not operate the truck unless either the blocker beam or
snow plow attachment hardware is installed on the vehicle.
2009 F-250/350/450/550(f23)
Owners Guide, 3rd Printing
USA(fus)
Seating and Safety Restraints
194