2009 FORD F SERIES MOTORHOME AND COMMERCIAL CHASSIS park assist
[x] Cancel search: park assistPage 51 of 136
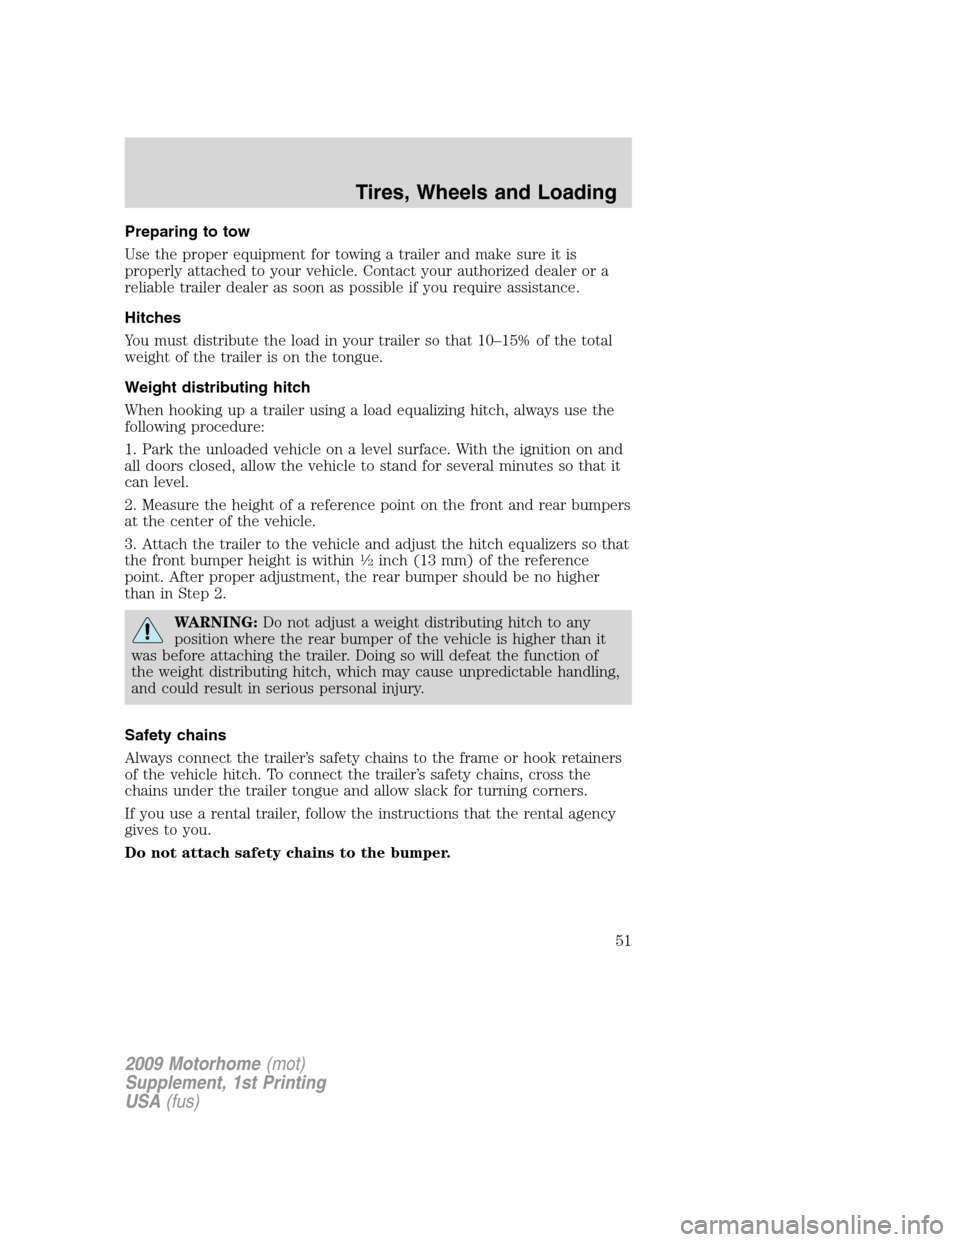
Preparing to tow
Use the proper equipment for towing a trailer and make sure it is
properly attached to your vehicle. Contact your authorized dealer or a
reliable trailer dealer as soon as possible if you require assistance.
Hitches
You must distribute the load in your trailer so that 10–15% of the total
weight of the trailer is on the tongue.
Weight distributing hitch
When hooking up a trailer using a load equalizing hitch, always use the
following procedure:
1. Park the unloaded vehicle on a level surface. With the ignition on and
all doors closed, allow the vehicle to stand for several minutes so that it
can level.
2. Measure the height of a reference point on the front and rear bumpers
at the center of the vehicle.
3. Attach the trailer to the vehicle and adjust the hitch equalizers so that
the front bumper height is within
1�2inch (13 mm) of the reference
point. After proper adjustment, the rear bumper should be no higher
than in Step 2.
WARNING:Do not adjust a weight distributing hitch to any
position where the rear bumper of the vehicle is higher than it
was before attaching the trailer. Doing so will defeat the function of
the weight distributing hitch, which may cause unpredictable handling,
and could result in serious personal injury.
Safety chains
Always connect the trailer’s safety chains to the frame or hook retainers
of the vehicle hitch. To connect the trailer’s safety chains, cross the
chains under the trailer tongue and allow slack for turning corners.
If you use a rental trailer, follow the instructions that the rental agency
gives to you.
Do not attach safety chains to the bumper.
2009 Motorhome(mot)
Supplement, 1st Printing
USA(fus)
Tires, Wheels and Loading
51
Page 72 of 136
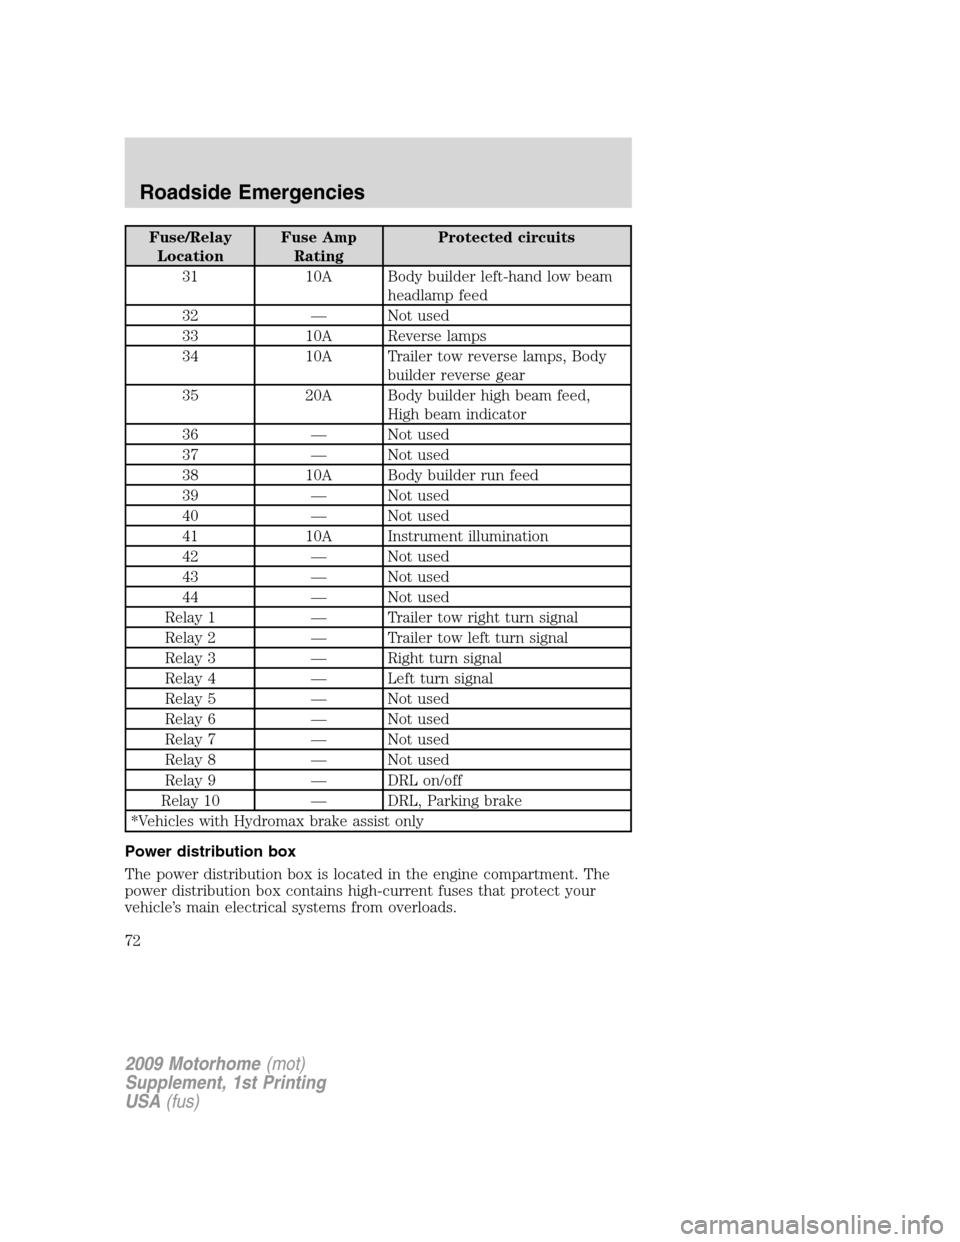
Fuse/Relay
LocationFuse Amp
RatingProtected circuits
31 10A Body builder left-hand low beam
headlamp feed
32 — Not used
33 10A Reverse lamps
34 10A Trailer tow reverse lamps, Body
builder reverse gear
35 20A Body builder high beam feed,
High beam indicator
36 — Not used
37 — Not used
38 10A Body builder run feed
39 — Not used
40 — Not used
41 10A Instrument illumination
42 — Not used
43 — Not used
44 — Not used
Relay 1 — Trailer tow right turn signal
Relay 2 — Trailer tow left turn signal
Relay 3 — Right turn signal
Relay 4 — Left turn signal
Relay 5 — Not used
Relay 6 — Not used
Relay 7 — Not used
Relay 8 — Not used
Relay 9 — DRL on/off
Relay 10 — DRL, Parking brake
*Vehicles with Hydromax brake assist only
Power distribution box
The power distribution box is located in the engine compartment. The
power distribution box contains high-current fuses that protect your
vehicle’s main electrical systems from overloads.
2009 Motorhome(mot)
Supplement, 1st Printing
USA(fus)
Roadside Emergencies
72
Page 74 of 136

Fuse/Relay
LocationFuse Amp
RatingProtected Circuits
3 20A* A/C clutch relay coil, Mass Air
Flow Sensor (MAFS) with Intake
Air Temperature (IAT), Vapor
Management Valve, Engine
Heated Exhaust Gas Oxygen
(HEGO) sensor #11, HEGO #21,
Catalyst Monitor Sensor (CMS)
4 5A* Powertrain Control Module (PCM)
memory
5 20A* PCM power
6 20A* Park lamp feeds, Instrument
Panel (IP) fuse #41, Warning
chime module, Trailer tow
running lamp relay coil, IP
dimmer module
7 20A* Ignition coils, Radio capacitors
8 10A* Stoplamp switch (logic): Power
brake assist module***, Speed
control module, PCM, Anti-lock
Brake System (ABS) module,
Brake shift interlock actuator
9 10A* Starter main relay coil, Starter
ground relay coil
10 20A* Daytime Running Lamps (DRL)
11 20A* Fuel pump relay coil, PCM power
12 25A* Trailer tow back-up lamps feed, IP
- backup lamp feed
13 30A** Trailer tow electric brake
controller feed
14 60A** IP battery feed (fuse #9, 15, 21)
15 20A Trailer tow park lamps
16 60A** ABS module
17 20A** Horn feed
2009 Motorhome(mot)
Supplement, 1st Printing
USA(fus)
Roadside Emergencies
74
Page 83 of 136
Do not attempt to push-start your automatic transmission
vehicle. Automatic transmissions do not have push-start
capability. Attempting to push-start a vehicle with an automatic
transmission may cause transmission damage.
Preparing your vehicle
When the battery is disconnected or a new battery is installed, the
automatic transmission must relearn its shift strategy. As a result, the
transmission may have firm and/or soft shifts. This operation is
considered normal and will not affect function or durability of the
transmission. Over time, the adaptive learning process will fully update
transmission operation.
1.Use only a 12–volt supply to start your vehicle.
2. Do not disconnect the battery of the disabled vehicle as this could
damage the vehicle’s electrical system.
3. Park the booster vehicle close to the hood of the disabled vehicle
making sure the two vehiclesdo nottouch. Set the parking brake on
both vehicles and stay clear of the engine cooling fan and other moving
parts.
4. Check all battery terminals and remove any excessive corrosion before
you attach the battery cables. Ensure that vent caps are tight and level.
5. Turn the heater fan on in both vehicles to protect from any electrical
surges. Turn all other accessories off.
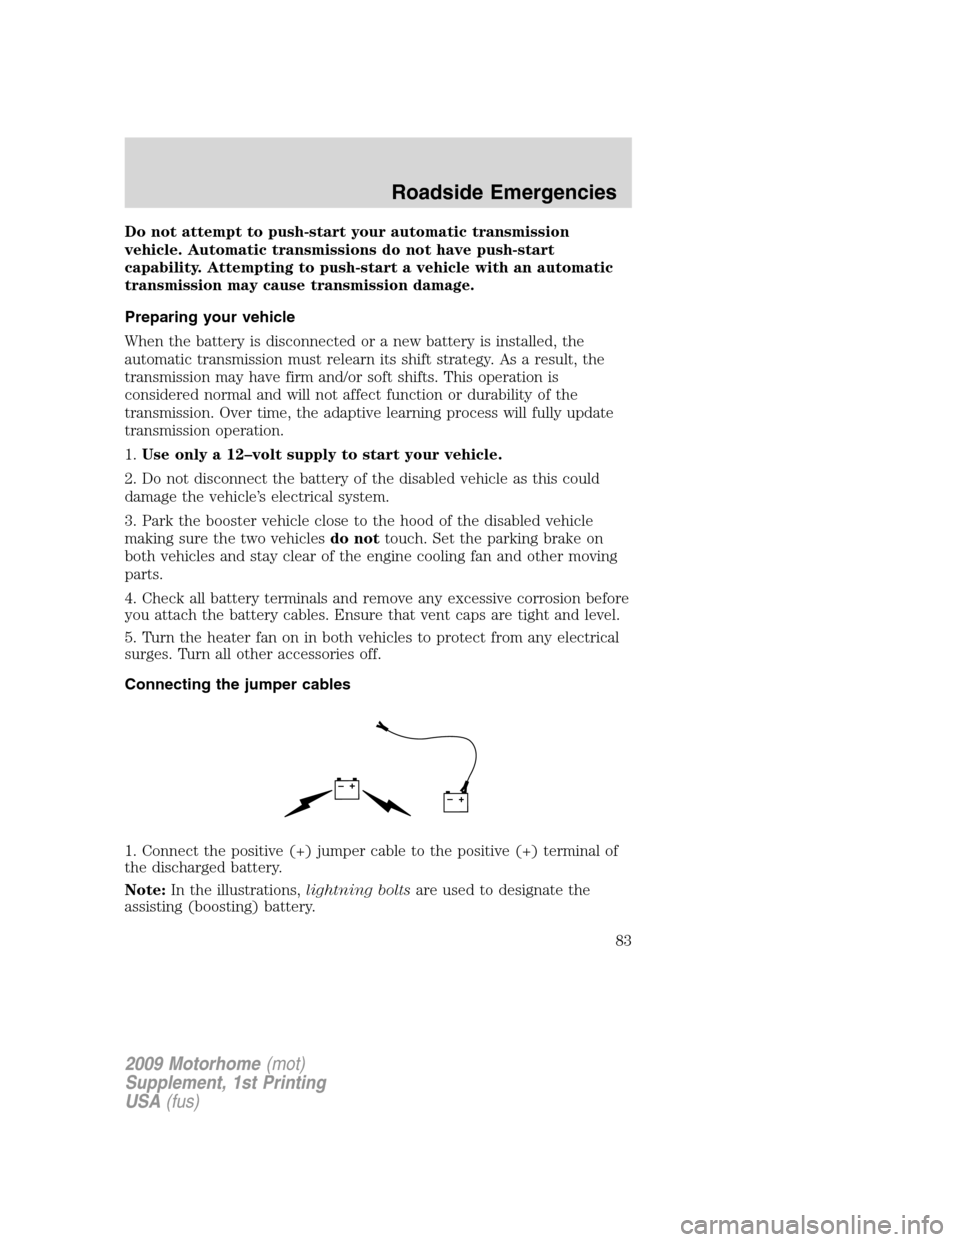
Connecting the jumper cables
1. Connect the positive (+) jumper cable to the positive (+) terminal of
the discharged battery.
Note:In the illustrations,lightning boltsare used to designate the
assisting (boosting) battery.
+–+–
2009 Motorhome(mot)
Supplement, 1st Printing
USA(fus)
Roadside Emergencies
83
Page 84 of 136
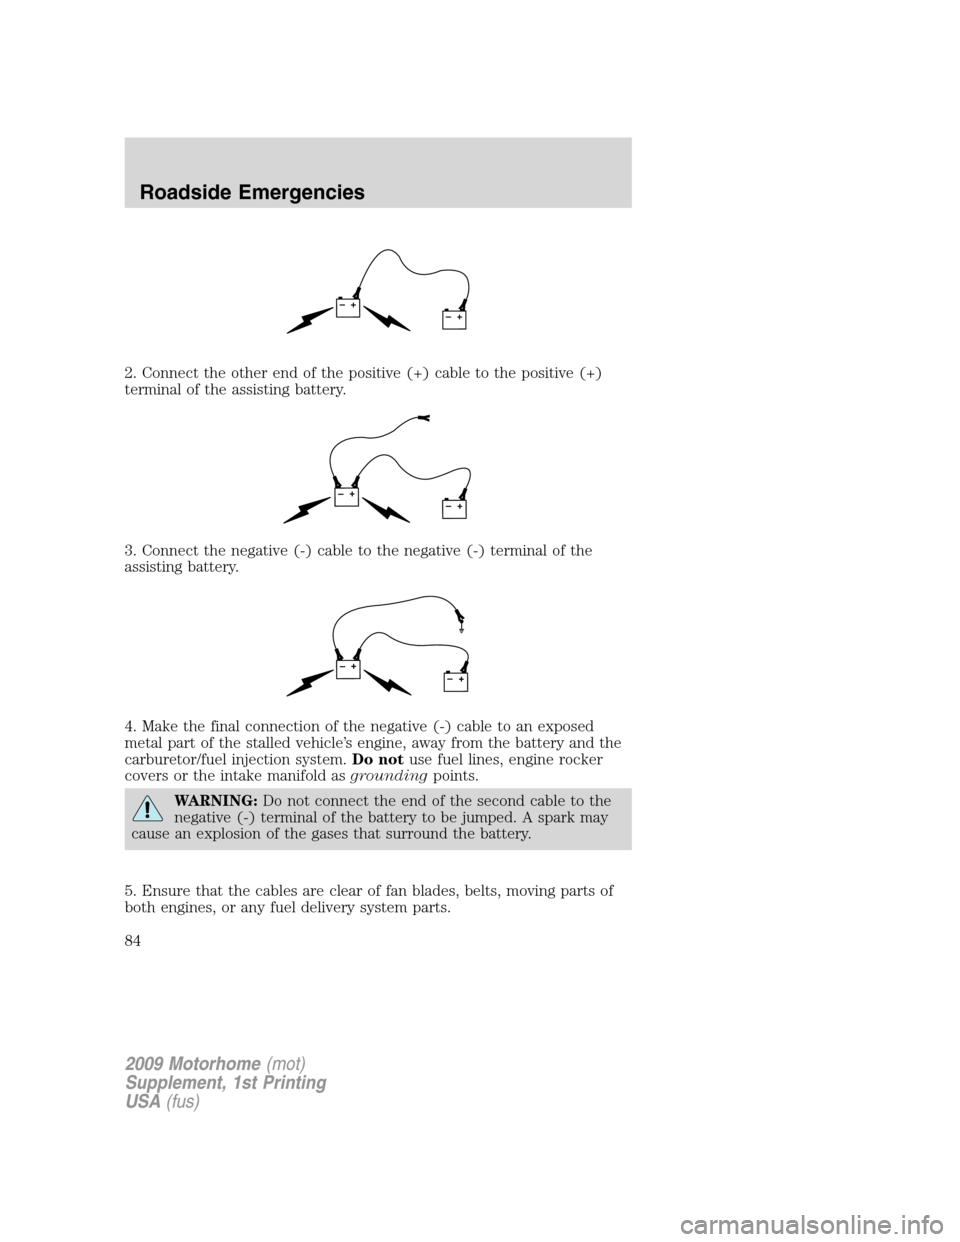
2. Connect the other end of the positive (+) cable to the positive (+)
terminal of the assisting battery.
3. Connect the negative (-) cable to the negative (-) terminal of the
assisting battery.
4. Make the final connection of the negative (-) cable to an exposed
metal part of the stalled vehicle’s engine, away from the battery and the
carburetor/fuel injection system.Do notuse fuel lines, engine rocker
covers or the intake manifold asgroundingpoints.
WARNING:Do not connect the end of the second cable to the
negative (-) terminal of the battery to be jumped. A spark may
cause an explosion of the gases that surround the battery.
5. Ensure that the cables are clear of fan blades, belts, moving parts of
both engines, or any fuel delivery system parts.
+–+–
+–+–
+–+–
2009 Motorhome(mot)
Supplement, 1st Printing
USA(fus)
Roadside Emergencies
84
Page 92 of 136
GETTING ASSISTANCE OUTSIDE THE U.S. AND CANADA
Before exporting your vehicle to a foreign country, contact the
appropriate foreign embassy or consulate. These officials can inform you
of local vehicle registration regulations and where to find unleaded fuel.
If you cannot find unleaded fuel or can only get fuel with an anti-knock
index lower than is recommended for your vehicle, contact a regional
office or owner relations/customer relationship office.
The use of leaded fuel in your vehicle without proper conversion may
damage the effectiveness of your emission control system and may cause
engine knocking or serious engine damage. Ford Motor Company/Ford of
Canada is not responsible for any damage caused by use of improper
fuel. Using leaded fuel may also result in difficulty importing your vehicle
back into the U.S.
If your vehicle must be serviced while you are traveling or living in
Central America, the Caribbean, or the Middle East, contact the nearest
authorized dealer. If the authorized dealer cannot help you, contact:
FORD MOTOR COMPANY
FORD EXPORT OPERATIONS
1555 Fairlane Drive
Fairlane Business Park #3
Allen Park, Michigan 48101
U.S.A.
Telephone: (313) 594-4857
FAX: (313) 390-0804
Email: [email protected]
If you are in another foreign country, contact the nearest authorized
dealer. If the authorized dealer employees cannot help you, they can
direct you to the nearest Ford affiliate office.
If you buy your vehicle in North America and then relocate outside of
the U.S. or Canada, register your vehicle identification number (VIN) and
new address with Ford Motor Company Export Operations.
Customers in the U.S. should call 1-800-392-3673.
2009 Motorhome(mot)
Supplement, 1st Printing
USA(fus)
Customer Assistance
92
Page 135 of 136
Lights, warning and indicator ....10
anti-lock brakes (ABS) ............59
Load limits ...................................45
Loading instructions ...................49
Lubricant specifications ...........128
Lug nuts ......................................82
M
Message center ...........................22
english/metric button ...............25
system check button ................25
warning messages .....................26
Motorcraft parts ................108, 127
O
Octane rating ............................111
Oil (see Engine oil) ....................97
P
Parking brake ..............................60
Parts (see Motorcraft parts) ....127
Power distribution box
(see Fuses) .................................72
Power steering
fluid, checking and adding ....119
fluid, refill capacity ................128
fluid, specifications .................128
R
Relays ....................................69, 76
Roadside assistance ....................67
S
Safety defects, reporting ......93–94Servicing your vehicle ................96
Spark plugs,
specifications .....................127, 131
Special notice ................................5
Specification chart,
lubricants ...................................128
Speed control ..............................20
Starting your vehicle ............54–56
jump starting ............................82
Steering wheel
tilting .........................................19
T
Tilt steering wheel ......................19
Tires .......................................28–29
alignment ..................................38
care ............................................34
changing ....................................78
checking the pressure ..............33
inflating .....................................30
replacing ..............................36, 80
rotating ......................................38
safety practices .........................37
sidewall information .................39
snow tires and chains ..............44
spare tire ...................................76
terminology ...............................29
tire grades .................................29
treadwear ............................28, 35
Towing .........................................50
trailer towing ............................50
wrecker ......................................86
Transmission ...............................61
brake-shift interlock (BSI) ......61
fluid, checking and adding
(automatic) .............................122
fluid, refill capacities ..............128
lubricant specifications ..........128
2009 Motorhome(mot)
Supplement, 1st Printing
USA(fus)
Index
135