Page 271 of 351
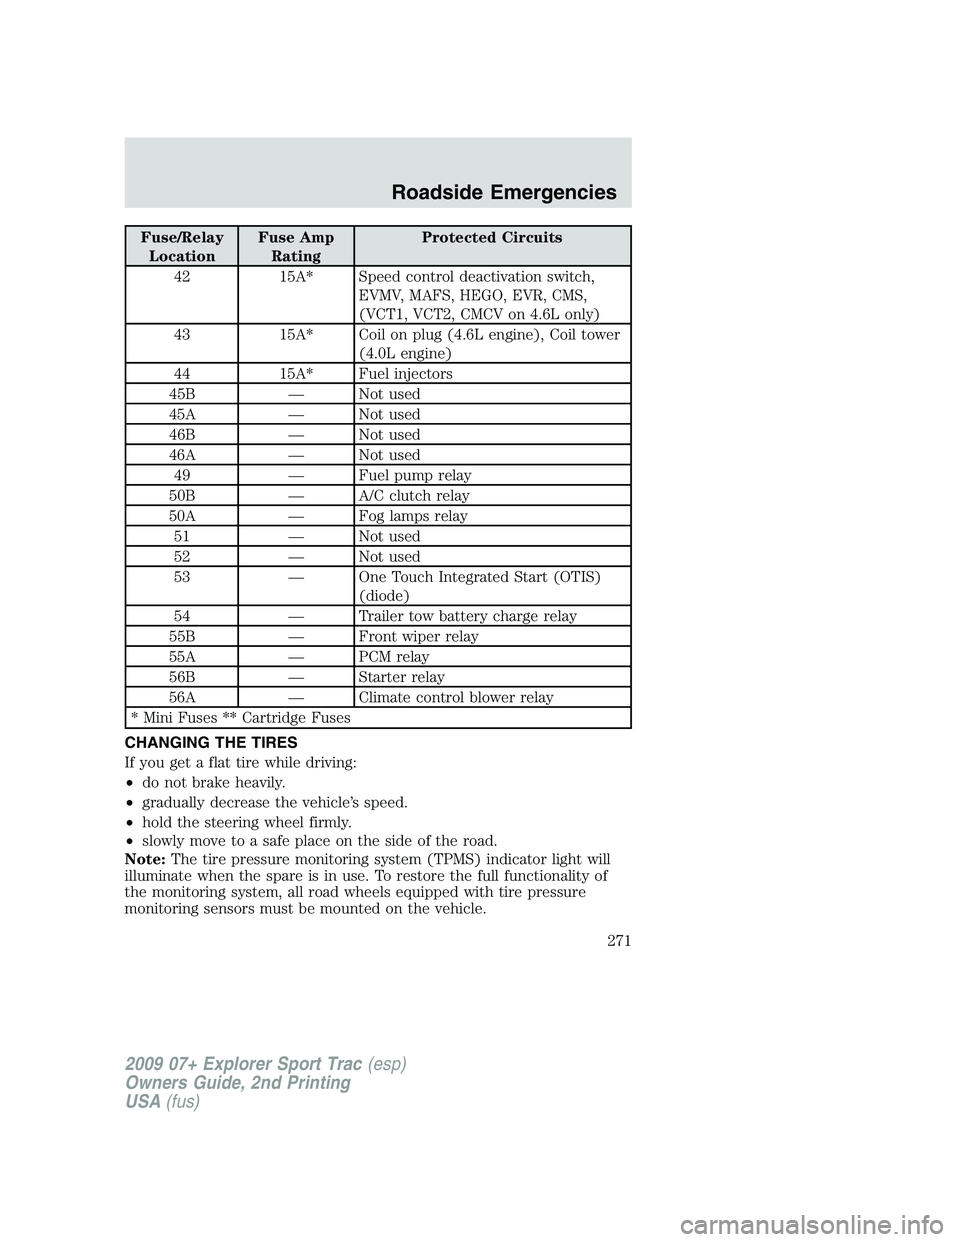
Fuse/Relay
LocationFuse Amp
RatingProtected Circuits
42 15A* Speed control deactivation switch,
EVMV, MAFS, HEGO, EVR, CMS,
(VCT1, VCT2, CMCV on 4.6L only)
43 15A* Coil on plug (4.6L engine), Coil tower
(4.0L engine)
44 15A* Fuel injectors
45B — Not used
45A — Not used
46B — Not used
46A — Not used
49 — Fuel pump relay
50B — A/C clutch relay
50A — Fog lamps relay
51 — Not used
52 — Not used
53 — One Touch Integrated Start (OTIS)
(diode)
54 — Trailer tow battery charge relay
55B — Front wiper relay
55A — PCM relay
56B — Starter relay
56A — Climate control blower relay
* Mini Fuses ** Cartridge Fuses
CHANGING THE TIRES
If you get a flat tire while driving:
•do not brake heavily.
•gradually decrease the vehicle’s speed.
•hold the steering wheel firmly.
•slowly move to a safe place on the side of the road.
Note:The tire pressure monitoring system (TPMS) indicator light will
illuminate when the spare is in use. To restore the full functionality of
the monitoring system, all road wheels equipped with tire pressure
monitoring sensors must be mounted on the vehicle.
2009 07+ Explorer Sport Trac(esp)
Owners Guide, 2nd Printing
USA(fus)
Roadside Emergencies
271
Page 300 of 351

If a staining liquid like coffee/juice has been spilled on the instrument
panel or on interior trim surfaces, clean as follows:
1. Wipe up spilled liquid using a clean, white, cotton cloth.
2. Apply Motorcraft Deluxe Leather and Vinyl Cleaner (ZC-11-A) [In
Canada use Motorcraft Multi-Purpose Cleaner (CXC-101)] to the wiped
area and spread around evenly.
3. Apply more Motorcraft cleaner to a clean, white, cotton cloth and
press the cloth onto the soiled area–allow this to set at room
temperature for 30 minutes.
4. Remove the soaked cloth, and if it is not soiled badly, use this cloth to
clean the area by using a rubbing motion for 60 seconds.
5. Following this, wipe area dry with a clean, white, cotton cloth.
INTERIOR
For fabric, carpets, cloth seats, safety belts and seats equipped with side
airbags:
•Remove dust and loose dirt with a vacuum cleaner.
•Remove light stains and soil with Motorcraft Professional Strength
Carpet & Upholstery Cleaner (ZC-54).
•If grease or tar is present on the material, spot-clean the area first
with Motorcraft Spot and Stain Remover (ZC-14). In Canada, use
Motorcraft Multi-Purpose Cleaner (CXC-101).
•If a ring forms on the fabric after spot cleaning, clean the entire area
immediately (but do not oversaturate) or the ring will set.
•Do not use household cleaning products or glass cleaners, which can
stain and discolor the fabric and affect the flame retardant abilities of
the seat materials.
WARNING:Do not use cleaning solvents, bleach or dye on the
vehicle’s safety belts, as these actions may weaken the belt
webbing.
WARNING:On vehicles equipped with seat-mounted airbags, do
not use chemical solvents or strong detergents. Such products
could contaminate the side-airbag system and affect performance of
the side airbag in a collision.
2009 07+ Explorer Sport Trac(esp)
Owners Guide, 2nd Printing
USA(fus)
Cleaning
300
Page 301 of 351

LEATHER SEATS (IF EQUIPPED)
Your leather seating surfaces have a clear, protective coating over the
leather.
•For routine cleaning, wipe the surface with a soft, damp cloth. For
more thorough cleaning, wipe the surface with a mild soap and water
solution. In Canada, use Motorcraft Vinyl Cleaner (CXC-93). Dry the
area with a soft cloth.
•If the leather cannot be completely cleaned using a mild soap and
water solution, the leather may be cleaned using a commercially
available cleaning product designed for automotive leather.
•Do not use household cleaning products, alcohol solutions, solvents or
cleaners intended for rubber, vinyl and plastics, or oil/petroleum-based
leather conditioners. These products may cause premature wearing of
the clear, protective coating.
Note:In some instances, color or dye transfer can occur when wet
clothing comes in contact with leather upholstery. If this occurs, the
leather should be cleaned immediately to avoid permanent staining.
UNDERBODY
Flush the complete underside of your vehicle frequently. Keep body and
door drain holes free from packed dirt.
FORD AND LINCOLN MERCURY CAR CARE PRODUCTS
Your Ford or Lincoln Mercury authorized dealer has many quality
products available to clean your vehicle and protect its finishes. These
quality products have been specifically engineered to fulfill your
automotive needs; they are custom designed to complement the style
and appearance of your vehicle. Each product is made from high quality
materials that meet or exceed rigid specifications. For best results, use
the following products or products of equivalent quality:
Motorcraft Bug and Tar Remover (ZC-42)
Motorcraft Car Wash (Canada only) (CXC-83)
Motorcraft Custom Bright Metal Cleaner (ZC-15)
Motorcraft Custom Clear Coat Polish (ZC-8-A)
Motorcraft Custom Vinyl Protectant (ZC-40-A)
Motorcraft Dash and Vinyl Cleaner (ZC-38-A)
Motorcraft Deluxe Leather and Vinyl Cleaner (U.S. only) (ZC-11-A)
Motorcraft Leather Care Kit (U.S. only) (ZC-11-D)
2009 07+ Explorer Sport Trac(esp)
Owners Guide, 2nd Printing
USA(fus)
Cleaning
301
Page 305 of 351
IDENTIFYING COMPONENTS IN THE ENGINE COMPARTMENT
4.0L SOHC V6 engine
1. Engine oil filler cap
2. Engine oil dipstick (out of view)
3. Brake fluid reservoir
4. Power distribution box
5. Battery
6. Power steering fluid reservoir
7. Radiator cap
8. Engine coolant reservoir
9. Air filter assembly
10. Washer fluid reservoir
2009 07+ Explorer Sport Trac(esp)
Owners Guide, 2nd Printing
USA(fus)
Maintenance and Specifications
305
Page 306 of 351
4.6L V8 engine
1. Air filter assembly
2. Engine oil filler cap
3. Engine oil dipstick
4. Brake fluid reservoir
5. Power distribution box
6. Battery
7. Power steering fluid reservoir
8. Radiator cap
9. Engine coolant reservoir
10. Windshield washer fluid reservoir
2009 07+ Explorer Sport Trac(esp)
Owners Guide, 2nd Printing
USA(fus)
Maintenance and Specifications
306
Page 308 of 351

CHANGING THE WIPER BLADES
1. Pull the wiper arm away from the
vehicle. Turn the blade at an angle
from the wiper arm. Push the lock
pin manually to release the blade
and pull the wiper blade down
toward the windshield to remove it
from the arm.
2. Attach the new wiper to the
wiper arm and press it into place
until a click is heard.
Replace wiper blades at least once
per year for optimum performance.
Poor wiper quality can be improved
by cleaning the wiper blades and
the windshield. Refer toWindows
and wiper bladesin theCleaningchapter.
To prolong the life of the wiper blades, it is highly recommended to
scrape off the ice on the windshield before turning on the wipers. The
layer of ice has many sharp edges and can damage the micro edge of the
wiper rubber element.
ENGINE OIL
Checking the engine oil
Refer to thescheduled maintenance informationfor the appropriate
intervals for checking the engine oil.
1. Make sure the vehicle is on level ground.
2. Turn the engine off and wait 15 minutes for the oil to drain into the
oil pan.
3. Set the parking brake and ensure the gearshift is securely latched in P
(Park).
4. Open the hood. Protect yourself from engine heat.
2009 07+ Explorer Sport Trac(esp)
Owners Guide, 2nd Printing
USA(fus)
Maintenance and Specifications
308
Page 309 of 351
5. Locate and carefully remove the engine oil level dipstick.
•4.0L V6 engine
•4.6L V8 engine
6. Wipe the dipstick clean. Insert the dipstick fully, then remove it again.
•If the oil level isbetween the lower and upper holes,the oil level
is acceptable,DO NOT ADD OIL.
•If the oil level is below the lower hole, add enough oil to raise the
level within the lower and upper holes.
2009 07+ Explorer Sport Trac(esp)
Owners Guide, 2nd Printing
USA(fus)
Maintenance and Specifications
309
Page 310 of 351
•4.0L V6 engine
•4.6L V8 engine
•Oil levels above the upper hole may cause engine damage. Some oil
must be removed from the engine by an authorized dealer.
7. Put the dipstick back in and ensure it is fully seated.
Adding engine oil
1. Check the engine oil. For instructions, refer toChecking the engine
oilin this chapter.
2. If the engine oil level is not within the normal range, add only certified
engine oil of the recommended viscosity. Remove the engine oil filler cap
and use a funnel to pour the engine oil into the opening.
3. Recheck the engine oil level. Make sure the oil level is not above the
upper hole on the engine oil level dipstick.
4. Install the dipstick and ensure it is fully seated.
5. Fully install the engine oil filler cap by turning the filler cap clockwise
until three clicks can be heard.
2009 07+ Explorer Sport Trac(esp)
Owners Guide, 2nd Printing
USA(fus)
Maintenance and Specifications
310


