Page 117 of 407

To open the moon roof:Press and
release the SLIDE control, the moon
roof will open automatically. Press
the switch again to stop the moon
roof.
To close the moon roof:Pull and
release the SLIDE control, the moon
roof will close automatically. Press
the switch again to stop the moon
roof.
Bounce-back:When an obstacle has been detected in the moon roof
opening as the moon roof is closing, the moon roof will automatically
open and stop at a prescribed position.
Bounce-back override:To override bounce-back function, pull and hold
the SLIDE switch within two seconds of a bounce-back event. The
closing force will begin to increase each time the moon roof is closed for
the first three closing cycles, with bounce-back active. For example:
Bounce-back can be used to overcome the resistance of ice on the moon
roof or seals
To vent the moon roof:Press and release the TILT control, the moon
roof will move to the vent position automatically from any moon roof
position. Press the switch again to stop the moon roof. Pull and hold the
TILT control to close the moon roof.
The moon roof has a built-in sliding shade that can be manually opened
or closed when the glass panel is shut. To close the shade, pull it toward
the front of the vehicle.
Accessory delay:
With accessory delay, the window switches, audio system, and moon roof
may be used for up to 10 minutes after the ignition switch is turned to
the off position or until either front door is opened.
HOMELINK�WIRELESS CONTROL SYSTEM (IF EQUIPPED)
The HomeLink�Wireless Control System, located on the overhead
console or on the driver’s visor, provides a convenient way to replace up
to three hand-held transmitters with a single built-in device. This feature
will learn the radio frequency codes of most transmitters to operate
garage doors, entry gate operators, security systems, entry door locks,
and home or office lighting.
2009 Explorer(exp)
Owners Guide, 1st Printing
USA(fus)
Driver Controls
117
Page 119 of 407

away from the HomeLink�button you wish to program while keeping the
indicator light in view.
2. Simultaneously pre")
Visor mount
1. Position the end of your hand-held transmitter 1–3 inches (2–8 cm)
away from the HomeLink�button you wish to program while keeping the
indicator light in view.
2. Simultaneously press and hold both the chosen HomeLink�and
hand-held transmitter buttons until the HomeLink�indicator light
changes from a slow to a rapidly blinking light. Now you may release
both the HomeLink�and hand-held transmitter buttons.
Note:Some entry gates and garage door openers may require you to
replace Step 2 with procedures noted in theGate Operator and
Canadian Programmingsection for Canadian residents.
3. Firmlypress and hold for five seconds and releasethe
programmed HomeLink�button up to two separate times to activate the
door. If the door does not activate, press and hold the just-trained
HomeLink�button and observe the indicator light.
•If the indicator lightstays on constantly, programming is complete
and your device should activate when the HomeLink�button is pressed
and released.
•If the indicator light blinksrapidly for two seconds and then turns
to a constant light continue with “Programming” Steps 4 through
6to complete programming of a rolling code equipped device (most
commonly a garage door opener).
4. At the garage door opener receiver (motor-head unit) in the garage,
locate the “learn” or “smart” button (usually near where the hanging
antenna wire is attached to the unit).
5. Firmly press and release the “learn” or “smart” button. (The name and
color of the button may vary by manufacturer.)
Note:There are 30 seconds in which to initiate Step 6.
6. Return to the vehicle and firmlypress, hold for two seconds and
releasethe HomeLink�button. Repeat thepress/hold/release
sequence again and, depending on the brand of the garage door opener
(or other rolling code equipped device), repeat this sequence a third
time to complete the programming.
2009 Explorer(exp)
Owners Guide, 1st Printing
USA(fus)
Driver Controls
119
Page 120 of 407

HomeLink�should now activate your rolling code equipped device. To
program additional HomeLink�buttons begin with Step 1 in this section.
For questions or comments, please contact HomeLink at
www.homelink.comor1–800–355–3515.
Gate Operator & Canadian Programming
Console mount
Visor mount
During programming, your hand-held transmitter may automatically stop
transmitting — not allowing enough time for HomeLink�to accept the
signal from the hand-held transmitter.
After completing Step 1 outlined in theProgrammingsection, replace
Step 2 with the following:
Note:If programming a garage door opener or gate operator, it is
advised to unplug the device during the “cycling” process to prevent
overheating.
•Continue to press and hold the HomeLink�button (note Step 2 in the
Programmingsection) while you press and release —every two
seconds(“cycle”) your hand-held transmitter until the frequency
signal has been accepted by the HomeLink�. The indicator light will
flash slowly and then rapidly after HomeLink�accepts the radio
frequency signal.
•Proceed with Step 3 in theProgrammingsection.
2009 Explorer(exp)
Owners Guide, 1st Printing
USA(fus)
Driver Controls
120
Page 121 of 407
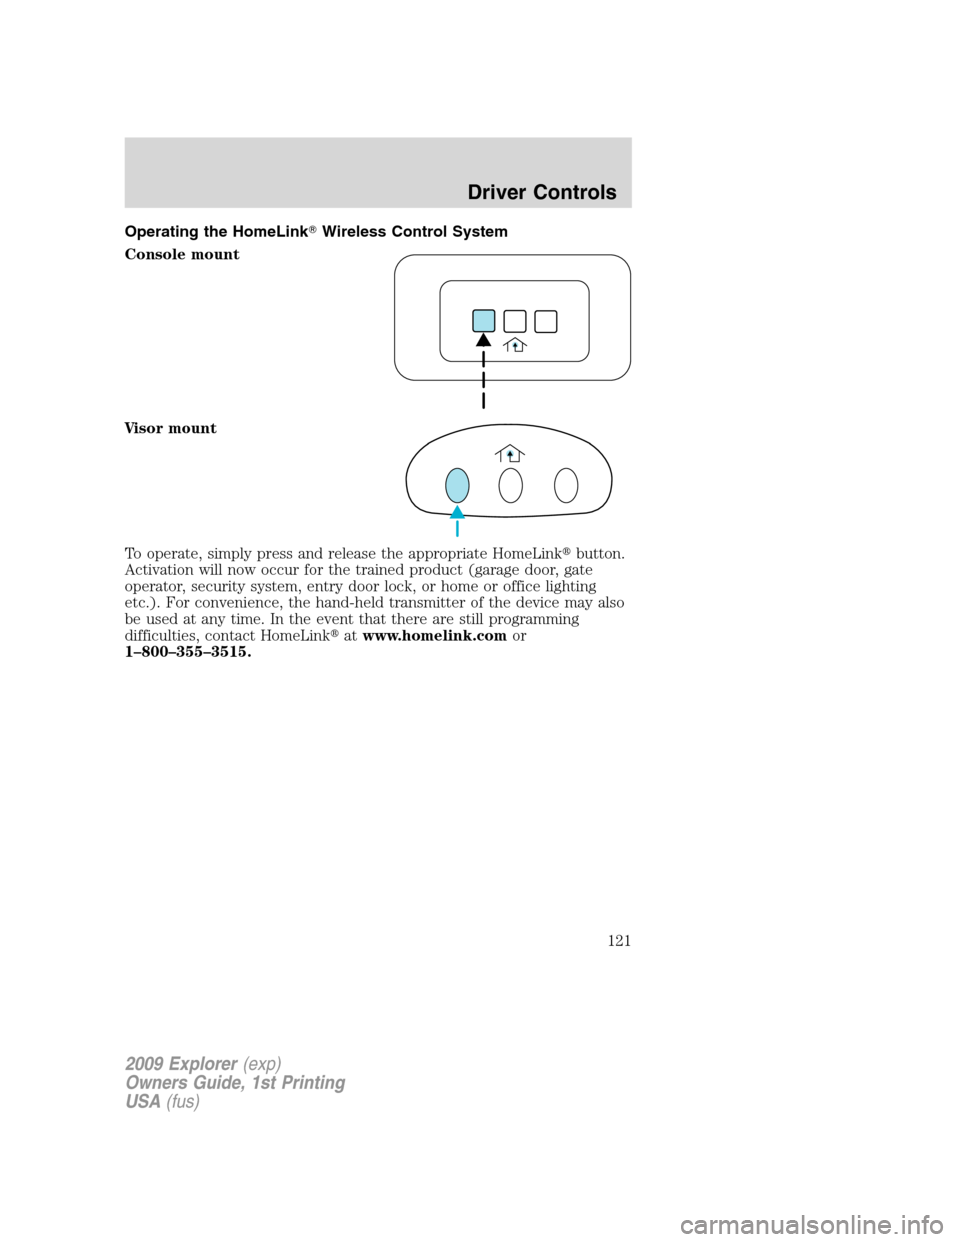
Operating the HomeLink�Wireless Control System
Console mount
Visor mount
To operate, simply press and release the appropriate HomeLink�button.
Activation will now occur for the trained product (garage door, gate
operator, security system, entry door lock, or home or office lighting
etc.). For convenience, the hand-held transmitter of the device may also
be used at any time. In the event that there are still programming
difficulties, contact HomeLink�atwww.homelink.comor
1–800–355–3515.
2009 Explorer(exp)
Owners Guide, 1st Printing
USA(fus)
Driver Controls
121
Page 122 of 407
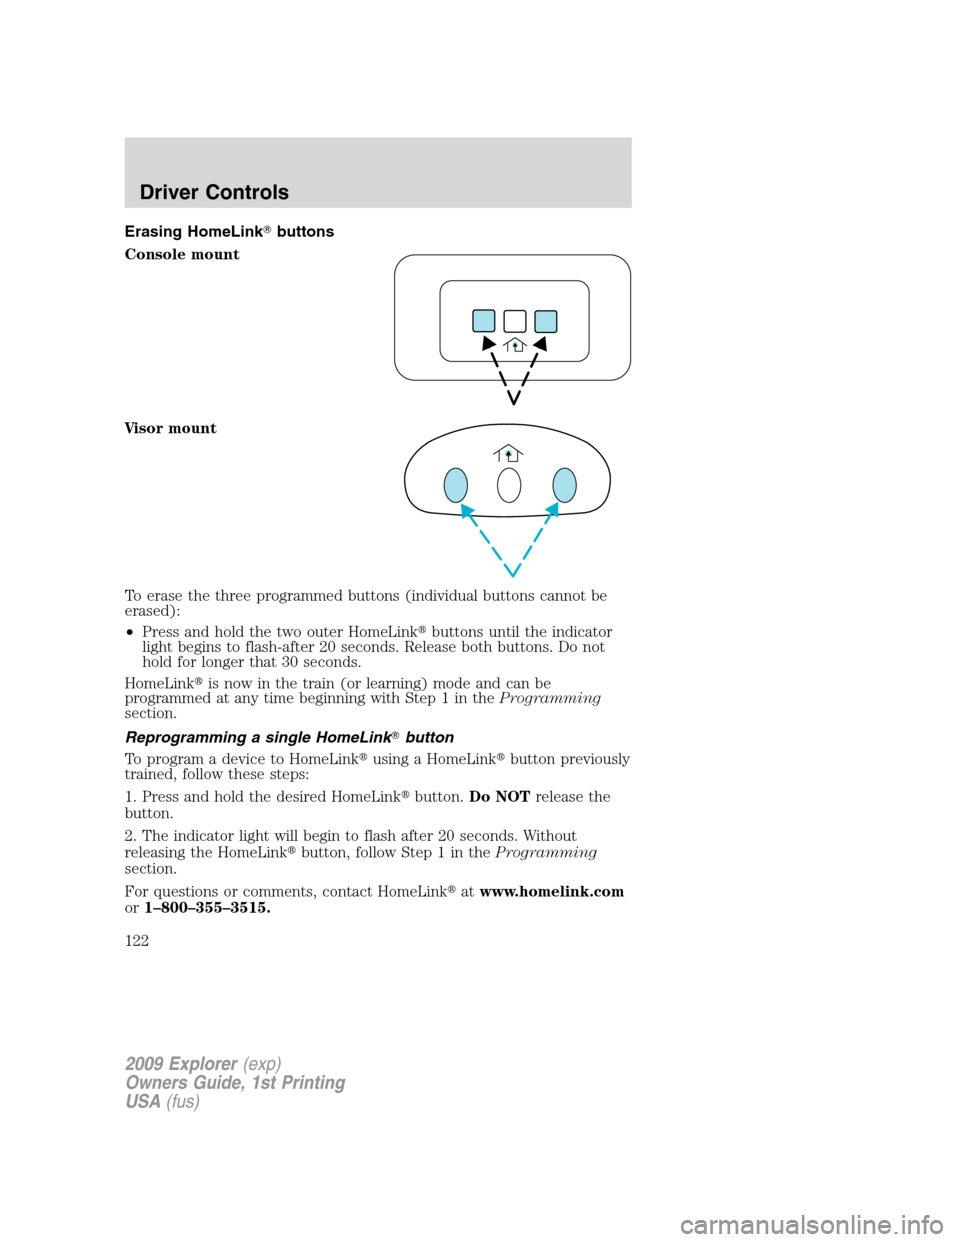
Erasing HomeLink�buttons
Console mount
Visor mount
To erase the three programmed buttons (individual buttons cannot be
erased):
•Press and hold the two outer HomeLink�buttons until the indicator
light begins to flash-after 20 seconds. Release both buttons. Do not
hold for longer that 30 seconds.
HomeLink�is now in the train (or learning) mode and can be
programmed at any time beginning with Step 1 in theProgramming
section.
Reprogramming a single HomeLink�button
To program a device to HomeLink�using a HomeLink�button previously
trained, follow these steps:
1. Press and hold the desired HomeLink�button.Do NOTrelease the
button.
2. The indicator light will begin to flash after 20 seconds. Without
releasing the HomeLink�button, follow Step 1 in theProgramming
section.
For questions or comments, contact HomeLink�atwww.homelink.com
or1–800–355–3515.
2009 Explorer(exp)
Owners Guide, 1st Printing
USA(fus)
Driver Controls
122
Page 127 of 407

Autolamp
This feature keeps your headlights on for up to three minutes after the
ignition is switched off.
1. To change the time delay of the
autolamp feature, select this
function from the SETUP MENU.
2. Press and hold the
SELECT/RESET control switch to
select the new autolamp delay time
(in seconds) values of 0, 10, 20, 30, 60, 90, 120 or 180 and wraps back to
0. Selecting 0 will result in no delay feature.
Note:“>” in front of a number indicates current selection.
3. Press the SELECT/RESET control switch for the next SETUP MENU
item or wait for more than four seconds to return to the INFO MENU.
Autolock
This feature automatically locks all vehicle doors when the vehicle is
shifted into any gear and when the vehicle is in motion over 13 mph
(20 km/h) or higher.
1. To disable/enable the autolock
feature, select this function from the
SETUP MENU.
2. Press and hold the
SELECT/RESET control switch to
turn the autolock feature ON or OFF.
3. Press the SELECT/RESET control switch for the next SETUP MENU
item or wait for more than four seconds to return to the INFO MENU.
Autounlock
This feature automatically unlocks all vehicle doors when the driver’s
door is opened within 10 minutes of the ignition being turned off.
1. To disable/enable the autounlock
feature, select this function from the
SETUP MENU.
2. Press and hold the
SELECT/RESET control switch to
turn the autounlock ON or OFF.
3. Press the SELECT/RESET control switch for the next SETUP MENU
item or wait for more than four seconds to return to the INFO MENU.
2009 Explorer(exp)
Owners Guide, 1st Printing
USA(fus)
Driver Controls
127
Page 129 of 407

3. Once “OIL LIFE SET TO 100%” is
displayed, release, press and hold
the SELECT/RESET control switch
for more than two seconds to
change the Oil Life Start Value.
Each release, press and hold will
reduce the value by 10%.
4. After setting the Oil Life Start Value, press and release the
SELECT/RESET control switch for the next SETUP MENU item or wait
for more than four seconds to return to the INFO MENU.
Note:Oil Life Start Value of 100% equals 7,500 miles (12,000 km) or six
months. For example, setting Oil Life Start Value to 60% sets the Oil Life
Start Value to 3,000 miles (4,800 km) and 120 days.
Compass display (if equipped)
The compass heading is displayed as one of N, NE, E, SE, S, SW, W and
NW in the message center display.
The compass reading may be affected when you drive near large
buildings, bridges, power lines and powerful broadcast antenna. Magnetic
or metallic objects placed in, on or near the vehicle may also affect
compass accuracy.
Usually, when something affects the compass readings, the compass will
correct itself after a few days of operating your vehicle in normal
conditions. If the compass still appears to be inaccurate, a manual
calibration may be necessary. Refer toCompass zone adjustment.
Most geographic areas (zones) have a magnetic north compass point that
varies slightly from the northerly direction on maps. This variation is up
to four degrees between adjacent zones and will become noticeable as
the vehicle crosses multiple zones. A correct zone setting will eliminate
this error. Refer toCompass calibration adjustment.
2009 Explorer(exp)
Owners Guide, 1st Printing
USA(fus)
Driver Controls
129
Page 140 of 407

1. Select this function from the
SETUP MENU for the current")
3. WASHER FLUID
4. DOOR AJAR
5. EXTERIOR LAMP
6. BRAKE FLUID LEVEL
7. PARK BRAKE
8. FUEL LEVEL AND DISTANCE TO EMPTY
Units (English/Metric)
1. Select this function from the
SETUP MENU for the current units
to be displayed.
2. Press the RESET control to
change from English to Metric.
3. Press the RESET control for the
next SETUP MENU item or wait for
more than four seconds to return to
the INFO menu.
Language
Note:When entering the SETUP MENU and a non-English language has
been selected, “PRESS RESET FOR ENGLISH” will be displayed to
change back to English.
1. Select this function from the
SETUP MENU for the current
language to be displayed.
2. Press the RESET control to cycle
the message center through each of
the language choices to the desired
language.
Selectable languages are English, Spanish, French, Japanese, or Arabic.
3. Press the RESET control for the next SETUP MENU item or wait for
more than four seconds to return to the INFO menu.
Autolamp
This feature keeps your headlights on for up to three minutes after the
ignition is switched off.
2009 Explorer(exp)
Owners Guide, 1st Printing
USA(fus)
Driver Controls
140