2009 FORD EXPEDITION EL set clock
[x] Cancel search: set clockPage 26 of 415

The song will appear in the display for confirmation. Press OK again
and the display will read SONG DELETED. If you do not want to
delete the currently listed song, press / to select either
RETURN or CANCEL.
Note: If there are no songs presently saved, the display will read NO
SONGS.
• DELETE ALL SONGS: Press OK to delete all song’s from the
system’s memory. The display will read ARE YOU SURE ? Press OK to
confirm deletion of all saved songs and the display will read ALL
DELETED.
Note: If there are no songs presently saved, the display will read NO
SONGS.
• ENABLE ALERTS / DISABLE ALERTS: Press OK to enable/disable
the satellite alert status which alerts you when your selected songs are
playing on a satellite radio channel. (The system default is disabled.)
SONG ALERTS ENABLED/DISABLED will appear in the display. The
menu listing will display the opposite state. For example, if you have
chosen to enable the song alerts, the menu listing will read DISABLE
as the alerts are currently on, so your other option is to turn them off.
Satellite radio is available only with a valid SIRIUS radio
subscription. Check with your authorized dealer for availability.
Setting the clock: Press MENU until SELECT HOUR or SELECT MINS
is displayed. Use / to adjust hours/minutes. Press OK to close and
return to the main menu.
AUTOSET: In radio mode, press MENU until the display reads
AUTOSET. Autoset allows you to set the strongest local radio stations
without losing your original manually set preset stations for
AM/FM1/FM2. Use / / SEEK, SEEK to turn on/off. Press
OK to close and return to the main menu.
When the six strongest stations are filled, the station stored in preset 1
will begin playing. If there are less than six strong stations, the system
will store the last one in the remaining presets.
RBDS: Available only in FM mode. This feature allows you to display
text transmitted by RBDS-equipped stations and to search for a certain
category of music format: CLASSIC, COUNTRY, INFORM, JAZZ/RB,
ROCK, etc.
2009 Expedition (exd)
Owners Guide, 2nd Printing
USA (fus)Entertainment Systems
26
Page 34 of 415

and the display will read SONG DELETED. If you do not want to
delete the currently listed song, press
/ to select either
RETURN or CANCEL.
Note: If there are no songs presently saved, the display will read NO
SONGS.
• DELETE ALL SONGS: Press OK to delete all song’s from the
system’s memory. The display will read ARE YOU SURE ? Press OK to
confirm deletion of all saved songs and the display will read ALL
DELETED.
Note: If there are no songs presently saved, the display will read NO
SONGS.
• ENABLE ALERTS / DISABLE ALERTS: Press OK to enable/disable
the satellite alert status which alerts you when your selected songs are
playing on a satellite radio channel. (The system default is disabled.)
SONG ALERTS ENABLED/DISABLED will appear in the display. The
menu listing will display the opposite state. For example, if you have
chosen to enable the song alerts, the menu listing will read DISABLE
as the alerts are currently on, so your other option is to turn them off.
Satellite radio is available only with a valid SIRIUS radio
subscription. Check with your authorized dealer for availability.
Setting the clock: Press until SELECT HOURS or SELECT MINUTES is
displayed. Press
/ to adjust the hours/minutes.
AUTOSET: In radio mode, press MENU until the display reads
AUTOSET. Autoset allows you to set the strongest local radio stations
without losing your original manually set preset stations for
AM/FM1/FM2. Use / to turn on/off.
When the six strongest stations are filled, the station stored in preset 1
will begin playing. If there are less than six strong stations, the system
will store the last one in the remaining presets.
RBDS: Available only in FM mode. This feature allows you to display
text transmitted by RBDS-equipped stations and to search for a certain
category of music format: CLASSIC, COUNTRY, INFORM, JAZZ/RB,
ROCK, etc.
To activate, press MENU repeatedly until RBDS (ON/OFF) appears in
the display. Use / / SEEK to toggle RBDS ON/OFF. (When
RBDS is OFF, you will not be able to search for RBDS equipped stations
or view the station name or type.)
2009 Expedition (exd)
Owners Guide, 2nd Printing
USA (fus)Entertainment Systems
34
Page 116 of 415

EXTERIOR MIRRORS
Power side view mirrors
The ignition can be in any position to adjust the power side view mirrors.
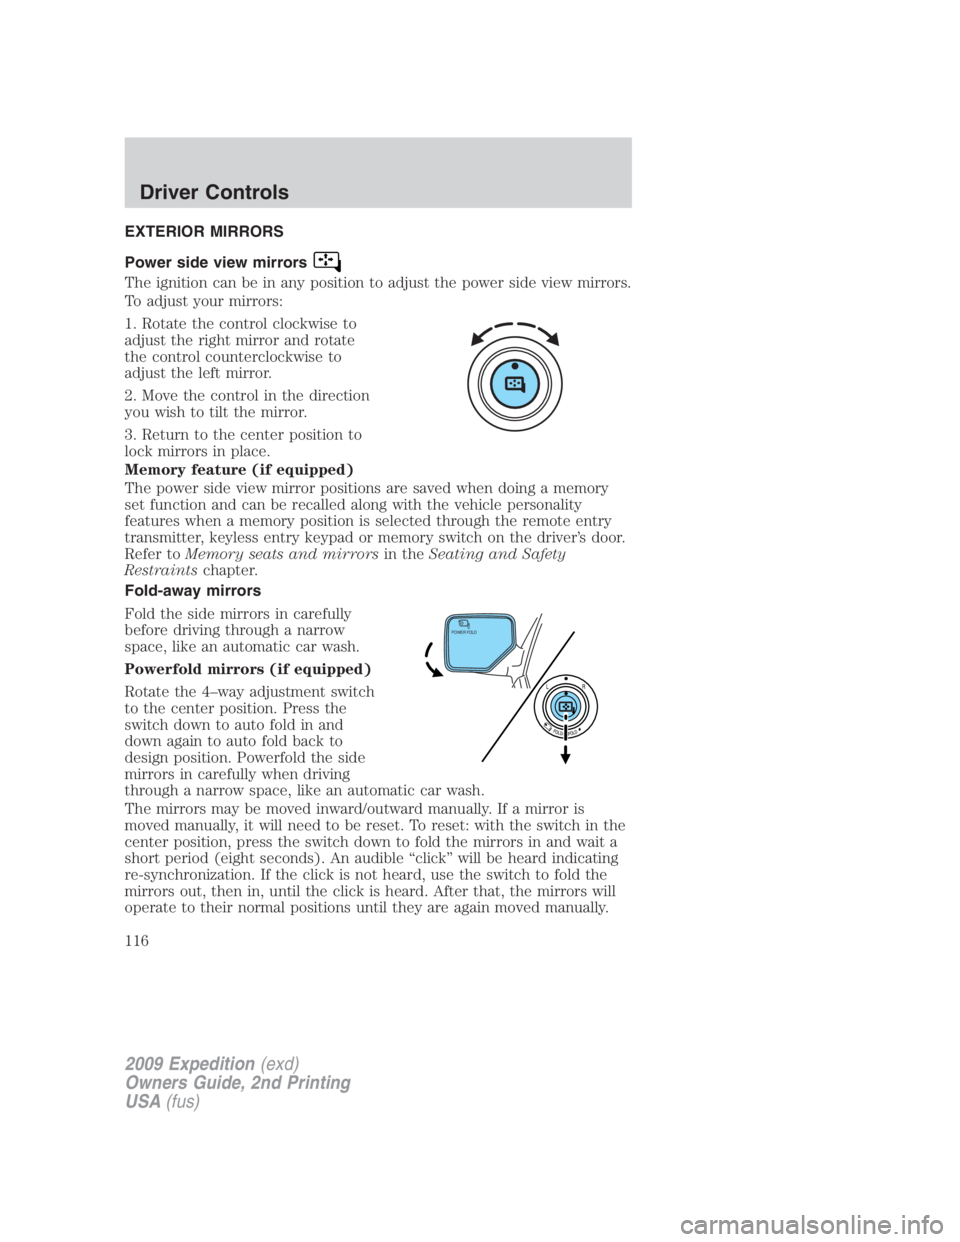
To adjust your mirrors:
1. Rotate the control clockwise to
adjust the right mirror and rotate
the control counterclockwise to
adjust the left mirror.
2. Move the control in the direction
you wish to tilt the mirror.
3. Return to the center position to
lock mirrors in place.
Memory feature (if equipped)
The power side view mirror positions are saved when doing a memory
set function and can be recalled along with the vehicle personality
features when a memory position is selected through the remote entry
transmitter, keyless entry keypad or memory switch on the driver’s door.
Refer to Memory seats and mirrors in the Seating and Safety
Restraints chapter.
Fold-away mirrors
Fold the side mirrors in carefully
before driving through a narrow
space, like an automatic car wash.
Powerfold mirrors (if equipped)
Rotate the 4–way adjustment switch
to the center position. Press the
switch down to auto fold in and
down again to auto fold back to
design position. Powerfold the side
mirrors in carefully when driving
through a narrow space, like an automatic car wash.
The mirrors may be moved inward/outward manually. If a mirror is
moved manually, it will need to be reset. To reset: with the switch in the
center position, press the switch down to fold the mirrors in and wait a
short period (eight seconds). An audible “click” will be heard indicating
re-synchronization. If the click is not heard, use the switch to fold the
mirrors out, then in, until the click is heard. After that, the mirrors will
operate to their normal positions until they are again moved manually. POWER FOLD
2009 Expedition (exd)
Owners Guide, 2nd Printing
USA (fus)Driver Controls
116
Page 332 of 415

Stopping and securing the vehicle
1. Park on a level surface, activate
the hazard flashers and set the
parking brake.
2. Place the gearshift in P (Park)
and turn the engine off.
Location of the spare tire and tools
The spare tire and tools for your vehicle are stowed in the following
locations:
Item Location
Spare tire Under the vehicle, just forward of
the rear bumper
Jack tools and jacking instructions Under the access panel located in
the floor compartment behind the
rear seat
Removing the jack and tools
1. Open the liftgate, then locate the
access panel on the floor behind the
3rd row seat. Unlatch and remove
the panel.
2. Remove the jack and tools
assembly tray from the
compartment by turning the
wing-nut counterclockwise to relieve
tension against the jack assembly
tray. Remove the bag from the jack
and tool assembly tray by loosening
the strap.
Note: Pay close attention to the orientation of the bag, because it will
have to be reinstalled after changing the tire.
3. Unsnap the wheel lug nut wrench, jack extension and handle from the
plastic tray. Remove the jack and instruction sheet from the tray
assembly.
2009 Expedition (exd)
Owners Guide, 2nd Printing
USA (fus)Roadside Emergencies
332
Page 333 of 415

Removing the spare tire
1. Remove the jack handle and
winch extension from the tray and
assemble them.
2. Open the spare tire winch access
plug in the bottom of the
compartment for the jack and tools
tray.
3. Insert the winch extension tool
assembly through the access hole in
the floor and engage the winch.
4. To remove the spare tire, turn the
handle counterclockwise until the
tire is lowered to the ground and
the cable is slightly slack.
5. Slide the retainer through the center of the spare tire wheel.
Tire change procedure
WARNING: To help prevent the vehicle from moving when you
change a tire, be sure the parking brake is set, then block the
wheels (both front or both rear) on the opposite end of the vehicle
from the wheel being changed. If on a grade, block both opposite
wheels on the downward side of the hill.
WARNING: If the vehicle slips off the jack, you or someone else
could be seriously injured.
WARNING: On vehicles equipped with air suspension, turn off
the Air Suspension system prior to jacking, hoisting or towing
your vehicle.
WARNING: Turn off the running boards (if equipped) before
jacking or placing any object under the vehicle. Never place your
hand between the extended running board and the vehicle. A moving
running board may cause injury.
2009 Expedition (exd)
Owners Guide, 2nd Printing
USA (fus) Roadside Emergencies
333
Page 335 of 415

5. Position the jack according to the
jack locator arrows found on the
frame and turn the jack handle and
extension tool assembly clockwise.
Note: Use the frame rail as the
jacking location point, NOT the
control arm.
6. Raise the vehicle to provide sufficient ground clearance when
installing the spare tire; approximately 1/4 inch (6 mm).
WARNING: When one of the rear wheels is off the ground, the
transmission alone will not prevent the vehicle from moving or
slipping off the jack, even if the transmission is in P (Park). To prevent
the vehicle from moving when you change the tire, be sure that the
parking brake is set and block the wheels (both front or both rear) on
the opposite end of the vehicle from the wheel being changed. If on a
grade, block both opposite wheels on the downward side of the hill. If
the vehicle slips off the jack, someone could be seriously injured.
• Front
• Rear
2009 Expedition (exd)
Owners Guide, 2nd Printing
USA (fus) Roadside Emergencies
335
Page 374 of 415

• If you do not allow the engine to relearn its idle trim, the idle
quality of your vehicle may be adversely affected until the idle
trim is eventually relearned.
If the battery has been disconnected or a new battery has been installed,
the clock and the preset radio stations must be reset once the battery is
reconnected.
• Always dispose of automotive
batteries in a responsible manner.
Follow your local authorized
standards for disposal. Call your
local authorized recycling center
to find out more about recycling
automotive batteries.
ENGINE COOLANT
Checking engine coolant
The concentration and level of engine coolant should be checked at the
intervals listed in scheduled maintenance information. The coolant
concentration should be maintained at 50/50 coolant and distilled water,
which equates to a freeze point of -34°F (-36°C). Coolant concentration
testing is possible with a hydrometer or antifreeze tester. The level of
coolant should be maintained at the “FULL COLD” level or within the
“COLD FILL RANGE” in the coolant reservoir. If the level falls below, add
coolant per the instructions in the Adding engine coolant section.
Your vehicle was factory-filled with a 50/50 engine coolant and water
concentration. If the concentration of coolant falls below 40% or above
60%, the engine parts could become damaged or not work properly. A
50/50 mixture of coolant and water provides the following:
• Freeze protection down to -34°F (-36°C).
• Boiling protection up to 265°F (129°C).
• Protection against rust and other forms of corrosion.
• Proper function of calibrated gauges.
L E A D
RETURN
RECYCLE
2009 Expedition (exd)
Owners Guide, 2nd Printing
USA (fus)Maintenance and Specifications
374
Page 410 of 415

Child safety seats - booster
seats ...........................................242
Cleaning your vehicle
engine compartment ..............357
instrument panel ....................358
interior .............................359–360
plastic parts ............................357
washing ....................................355
waxing .....................................356
wheels ......................................356
wiper blades ............................358
Clock adjust
6-CD in dash .............................34
AM/FM/CD .................................26
Compass, electronic ..................132
calibration ...............................133
set zone adjustment .......132, 148
Console ......................................110
overhead ..........................108–109
Controls
power seat ...............................188
steering column ......................123
Coolant
checking and adding ..............374
refill capacities ................378, 399
specifications ..........................399
Cruise control
(see Speed control) ..................120
Customer Assistance ................319
Ford Extended
Service Plan ............................352
Getting assistance outside the
U.S. and Canada .....................352
Getting roadside assistance ...319
Getting the service
you need .................................348
Ordering additional owner’s
literature .................................353 Utilizing the
Mediation/Arbitration
Program ...................................351
D
Daytime running lamps
(see Lamps) ................................95
Dipstick
automatic transmission
fluid ..........................................395
engine oil .................................369
Driving under special
conditions ..................304, 313, 316
sand .........................................315
snow and ice ...........................317
through water .................315, 318
DVD system .................................51
E
Electronic message
center .................................130, 140
Emergencies, roadside
jump-starting ..........................339
running out of fuel .........339, 386
Emission control system ..........391
Engine ................................403–404
cleaning ...................................357
coolant .....................................374
fail-safe cooling .......................379
idle speed control ...................372
lubrication specifications .......399
refill capacities ........................399
service points ..........................366
starting after a collision .........321
Engine block heater .................286
Engine oil ..................................369
change oil soon warning,
message center .......................369
2009 Expedition (exd)
Owners Guide, 2nd Printing
USA (fus)Index
410