Page 17 of 26

Proceed as follows to play a track rapid-
ly:
To play a track quickly, press and hold
down ˜or ÷to play CD tracks for-
ward or backward at a fast speed; rele")
16
RADIO
Fast track play (forward/back)
Proceed as follows to play a track rapid-
ly:
To play a track quickly, press and hold
down ˜or ÷to play CD tracks for-
ward or backward at a fast speed; release
to go back to normal playing speed.
Random track reproduction
(RDM)
Proceed as follows to play tracks in ran-
dom order.
1)select CD mode with the
m(C) but-
ton;
2)press the
m(C) button again and
hold it down for two seconds. CD tracks
will be played in random order.
Press
m(C) and hold it down for two
seconds to return to standard play.
Displaying tracklist
Press the LIST/REFRESH(G) button
to show the list of CD tracks or MP3 files
(for versions/markets, where provided).
Select the desired station with the
NorObutton and confirm by pressing
OK(N).MP3 CDS – Information
and suggestions
MP3 format (MPEG 1, 2 & 2.5 Audio Lay-
er 3) is a standard audio compression sys-
tem able to record many music files on the
same CD. Whether an MP3 disk can be
read and the titles displayed may depend
on the burning program and/or parame-
ters used.
When burning, select the standard ISO
966 0 level 1, 2 or Joliet to ensure that the
burned CDR or CDRW will be playable.
If CD is burned in another format, a read-
ing malfunction may occur.
For a perfect sound quality, we suggest
you use the same burning standard for all
pieces on the CD, with the lowest possi-
ble writing speed. In the particular case
of a multi-session CD, use of the Joliet
standard is recommended.
The radio plays audio files with the .mp3
extension only. All other kinds of files
(.wma, .mp4...) cannot be read.
We suggest use of file names with less
than 20 characters, excluding special char-
acters (e.g.: “ ” ? ; ù) to prevent problems
during reading or displaying.CD MP3 – File listening
Insert the CD MP3 in the player: the ra-
dio automatically starts searching for au-
dio tracks. The operation may last a few
seconds or even a few dozen seconds be-
fore beginning to play, depending on the
number of tracks present.
On a same CD, the CD player can read
up to 255 MP3 files distributed on 8 fold-
er levels. We suggest you use two levels
only in order to reduce access time for
reading the CD.
If you are playing another audio source
and an MP3 CD is already present in the
player, press SOURCE(C): The CD will
start to play automatically. Press the
LIST/REFRESH (G) button to show the
MP3 folder list.
603_97_184 SCUDO RADIO GB 1E:Radio Scudo G9 EN 1-07-2009 15:18 Pagina 16
Page 18 of 26

(for versions/markets, where provided)
Fast track play (forward/back)
Proceed as follows to play rapidly
a track:
To play a track quickly, press ˜")
17
RADIO
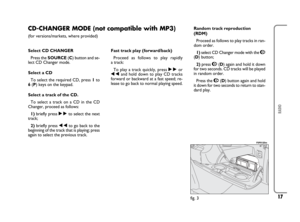
CD-CHANGER MODE (not compatible with MP3)
(for versions/markets, where provided)
Fast track play (forward/back)
Proceed as follows to play rapidly
a track:
To play a track quickly, press ˜or
÷and hold down to play CD tracks
forward or backward at a fast speed; re-
lease to go back to normal playing speed.Random track reproduction
(RDM)
Proceed as follows to play tracks in ran-
dom order.
1)select CD Changer mode with the
I
(D) button;
2)press
I(D) again and hold it down
for two seconds. CD tracks will be played
in random order.
Press the
I(D) button again and hold
it down for two seconds to return to stan-
dard play.
fig. 3
F0P0120m
Select CD CHANGER
Press the SOURCE(C) button and se-
lect CD Changer mode.
Select a CD
To select the required CD, press 1to
6(P) keys on the keypad.
Select a track of the CD.
To select a track on a CD in the CD
Changer, proceed as follows:
1)briefly press ˜to select the next
track;
2)briefly press ÷to go back to the
beginning of the track that is playing; press
again to select the previous track.
603_97_184 SCUDO RADIO GB 1E:Radio Scudo G9 EN 1-07-2009 15:18 Pagina 17
Page 19 of 26
18
RADIO
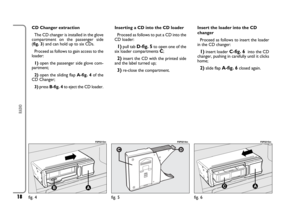
CD Changer extraction
The CD changer is installed in the glove
compartment on the passenger side
(fig. 3) and can hold up to six CDs.
Proceed as follows to gain access to the
loader:
1)open the passenger side glove com-
partment;
2)open the sliding flap A-fig. 4of the
CD Changer;
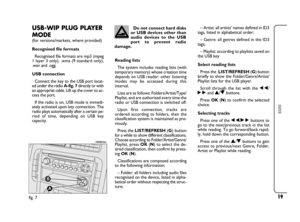
3)press B-fig. 4to eject the CD loader.Inserting a CD into the CD loader
Proceed as follows to put a CD into the
CD loader:
1)pull tab D-fig. 5to open one of the
six loader compartments C;
2)insert the CD with the printed side
and the label turned up;
3)re-close the compartment.Insert the loader into the CD
changer
Proceed as follows to insert the loader
in the CD changer:
1)insert loader C-fig. 6 into the CD
changer, pushing in carefully until it clicks
home;
2)slide flap A-fig. 6closed again.
fig. 5
F0P0214m
fig. 6
F0P0215m
fig. 4
F0P0213m
603_97_184 SCUDO RADIO GB 1E:Radio Scudo G9 EN 1-07-2009 15:18 Pagina 18
Page 20 of 26

Recognised file formats
Recognised file formats are mp3 (mpeg
1 layer 3 only), .wma (9 standard only),
.wav and .ogg.
USB conne")
19
RADIO
USB-WIP PLUG PLAYER
MODE
(for versions/markets, where provided)
Recognised file formats
Recognised file formats are mp3 (mpeg
1 layer 3 only), .wma (9 standard only),
.wav and .ogg.
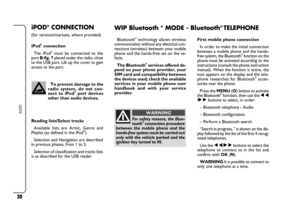
USB connection
Connect the key to the USB port locat-
ed under the radio A-fig. 7directly or with
an appropriat cable. Lift up the cover to ac-
cess the port.
If the radio is on, USB mode is immedi-
ately activated upon key connection. The
radio plays automatically after a certain pe-
riod of time, depending on USB key
capacity.Reading lists
The system includes reading lists (with
temporary memory) whose creation time
depends on USB reader: other listening
modes may be accessed during this
interval.
Lists are as follows: Folders/Artist/Type/
Playlist, and are authorised every time the
radio or USB connection is switched off.
Upon first connection, tracks are
ordered according to folders, then the
classification system is maintained as pre-
viously.
Press the LIST/REFRESH(G) button
for a while to show different classifications.
Choose according to Folder/Artist/Genre/
Playlist, press OK(N) to select the de-
sired classification, then confirm by press-
ing OK(N).
Classifications are composed according
to the following information:
– Folder: all folders including audio files
recognised on the device, listed in alpha-
betical order without respecting the struc-
ture;– Artist: all artists’ names defined in ID3
tags, listed in alphabetical order;
– Genre: all genres defined in the ID3
tags;
– Playlist: according to playlists saved on
the USB key
Select reading lists
Press the LIST/REFRESH(G) button
briefly to show the Folder/Genre/Artist/
Playlist lists for the USB player.
Scroll through the list with the ÷/
˜and
N/Obuttons.
Press OK(N) to confirm the selected
choice.
Selecting tracks
Press one of the ÷/˜buttons to
go to the next/previous track in the list
while reading. To go forward/back rapid-
ly, hold down the corresponding button.
Press one of the
N/Obuttons to gain
access to previous/next Genre, Folder,
Artist or Playlist while reading.
fig. 7
F0P0615m
Do not connect hard disks
or USB devices other than
audio devices to the USB
port to prevent radio
damage.
603_97_184 SCUDO RADIO GB 1E:Radio Scudo G9 EN 1-07-2009 15:18 Pagina 19
Page 21 of 26

iPod
®connection
The iPod
®must be connected to the
port B-fig. 7 placed under the radio, close
to the USB port. Lift up the cover to")
20
RADIO
iPOD®CONNECTION
(for versions/markets, where provided)
iPod
®connection
The iPod
®must be connected to the
port B-fig. 7 placed under the radio, close
to the USB port. Lift up the cover to gain
access to the port.
To prevent damage to the
radio system, do not con-
nect to iPod
®port devices
other than audio devices.
Reading lists/Select tracks
Available lists are Artist, Genre and
Playlist (as defined in the iPod
®).
Selection and Navigation are described
in previous phases, from 1 to 5.
Selection of classification and tracks lists
is as described for the USB reader.
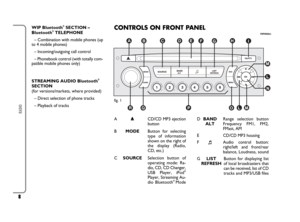
WIP Bluetooth ®MODE - Bluetooth®TELEPHONE
Bluetooth®technology allows wireless
communication without any electrical con-
nections (wireless) between your mobile
phone and the hands-free set on the ve-
hicle.
The Bluetooth
®services offered de-
pend on your phone provider, your
SIM card and compatibility between
the devices used; check the available
services in your mobile phone user
handbook and with your service
provider.First mobile phone connection
In order to make the initial connection
between a mobile phone and the hands-
free system, the Bluetooth
®function on the
phone must be activated according to the
instructions (consult the phone instruction
manual). When the function is active, the
icon appears on the display and the tele-
phone researches for Bluetooth
®acces-
sories near the phone.
Press the MENU(O) button to activate
the Bluetooth
®function, then use the ÷
/˜buttons to select, in order:
– Bluetooth telephony - Audio
– Bluetooth configuration.
– Perform a Bluetooth search
“Search in progress..” is shown on the dis-
play followed by the list of the first 4 recog-
nised telephones.
Use the ÷/˜buttons to select the
telephone to connect to in the list and
confirm with OK(N).
WARNINGIt is possible to connect to
only one telephone at a time.
For safety reasons, the Blue-
tooth®connection procedure
between the mobile phone and the
hands-free system must be carried out
only with the vehicle parked and the
ignition key turned to M.
WARNING
603_97_184 SCUDO RADIO GB 1E:Radio Scudo G9 EN 1-07-2009 15:18 Pagina 20
Page 22 of 26
 button.
Now, a message of connection accep-
tance will appear on")
21
RADIO
A keyboard appears on the display
through which you have to dial a code of
at least 4 letters. Confirm the code with
the OK(N) button.
Now, a message of connection accep-
tance will appear on the selected tele-
phone. Dial the previous radio code to
accept and confirm.
If the operation fails, repeat it: the num-
ber of tests is unlimited.
If the operation is successfully completed,
“Connection Telephone_Name Succeeded”
appears on the radio display.
WARNINGSThe authorised auto-
matic connection is activated only after
having configured the telephone. The
phone book and the list of calls are ac-
cessible after timed synchronisation. De-
pending on mobile telephone compatibil-
ity, the “TELEPHONE” menu allows you
to access the “Phone book” function (in
the case of total compatibility only) and
the “List of calls” and “Connection set-
tings” functions.
WARNINGThe initial connection may
also be done by the mobile phone.Receiving a call
A phone called is indicated by an acoustic
warning and a message on the multi-func-
tion display.
Use the ˜or ÷(L) button to se-
lect SI mode on the radio display and con-
firm with OK(N).
The phone call can also be accepted by
holding down(5) button at the end of ra-
dio controls lever on the steering-wheel
for at least two seconds.
Making a call
Press the MENU(Obutton, then
through the ˜/÷buttons select in
sequence:
– Bluetooth telephony - Audio
– Manage the phone call
– Call
– List of calls
or
– Contact list
Use the ˜/÷buttons to select the
number to call in the list and then press
OK(N). Bluetooth
®AUDIO STREAMING
MODE
(for versions/markets, where provided)
This mode allows wireless broadcasting
of music files stored on the mobile phone
through the radio device.
To use this mode, the telephone must
manage the right Bluetooth
® profiles
(A2DP/AVRCP profiles).
The telephone number must
be dialled on the mobile
phone when the vehicle is completely
stationary.
WARNING
Hold down the (5) button at the end of
the radio controls lever on the steering-
wheel for at least two seconds to show
the contact list of the mobile telephone di-
rectly on the radio display.
Use the mobile phone keypad to dial
a telephone number.
603_97_184 SCUDO RADIO GB 1E:Radio Scudo G9 EN 1-07-2009 15:18 Pagina 21
Page 23 of 26
22
RADIO
Mobile phone connection
Make the initial connection to the mo-
bile phone following the instructions
shown in the paragraph “WIP Blue-
toothth
® MODE – Bluetooth®TELE-
PHONE” or, in case of one or more con-
nected mobile phones, press the button
MENU (O) and select the telephone to
connect.
During the initial connection, the audio
system connects automatically.
Streaming mode activation.
Repeatedly press the button SOURCE
(C) and select Streaming mode.
WARNINGSIn some cases, track
reading must be activated with the key-
pad.
Selecting tracks
If the telephone supports the function,
it is possible to select tracks through the
controls on the radio front or through the
controls on the steering-wheel. Contex-
tual information can be shown on the
display
603_97_184 SCUDO RADIO GB 1E:Radio Scudo G9 EN 1-07-2009 15:18 Pagina 22
Page 24 of 26
NOTES
603_97_184 SCUDO RADIO GB 1E:Radio Scudo G9 EN 1-07-2009 15:18 Pagina 23


 and can hold up to six CDs.
Proceed as follows to gain access to the
loader:
1)open")

