2009 FIAT GRANDE PUNTO spare wheel
[x] Cancel search: spare wheelPage 132 of 210

131
SAFETY
STARTING
AND DRIVING
WARNING
LIGHTS AND
MESSAGES
SERVICE
AND CARE
TECHNICAL
SPECIFICATIONS
INDEX
CONTROLS
AND DEVICES
IN AN
EMERGENCY
CHANGING A TYRE
GENERAL INSTRUCTIONS
Wheel changing and correct use of the
jack and spare wheel call for some pre-
cautions, as listed below.
Use your hazard lights,
warning triangle, etc to show
that your car is stationary. Passengers
should get out of the car, particular-
ly if it is heavily loaded, and wait for
the wheel to be changed away from
the traffic. Apply the handbrake.
WARNING
The spare wheel provided is
specific for your vehicle.
Therefore, it must not be used on dif-
ferent models and you should not use
spare wheels from other models on
your vehicle. The wheel bolts are spe-
cific for your vehicle: do not use them
on different models and do not use
bolts from other models on your car.
WARNING
Repair and refit the standard
wheel as soon as possible.
Do not apply grease to the bolt
threads before assembly: they might
spontaneously unscrew.
WARNING
The jack may be used to re-
place wheels only on the car
which it equips or other cars of the
same model. Never use the jack for
other purposes, such as lifting other
models. Never use the jack to carry
out repairs under the car. Incorrect
positioning of the jack may cause the
car to fall. Do not use the jack for
loads higher than the one shown on
its label.
WARNING
Incorrect hub cap assembly
may cause it to come off
when the car is moving. Never tam-
per with the inflation valve. Never in-
troduce tools of any kind between the
rim and the tyre. Check tyre and
spare wheel pressure regularly, refer-
ring to the values shown in the “Tech-
nical specifications” section.
WARNING
129-160 ACTUAL 1ed EN 28-08-2009 13:47 Pagina 131
Page 133 of 210

132
SAFETY
STARTING
AND DRIVING
WARNING
LIGHTS AND
MESSAGES
SERVICE
AND CARE
TECHNICAL
SPECIFICATIONS
INDEX
CONTROLS
AND DEVICES
IN AN
EMERGENCY
To change a wheel proceed
as follows:
❒stop the car where it is not a danger to
other road users and you can replace
the wheel safely. The ground should be
flat and solid;
❒turn the engine off and pull up the hand-
brake.
❒engage first gear or reverse;
❒ wear the reflective safety jacket (com-
pulsory by law in certain countries) be-
fore getting out of the car;
❒open the boot and lift the carpet or re-
move the cargo box (where provided);
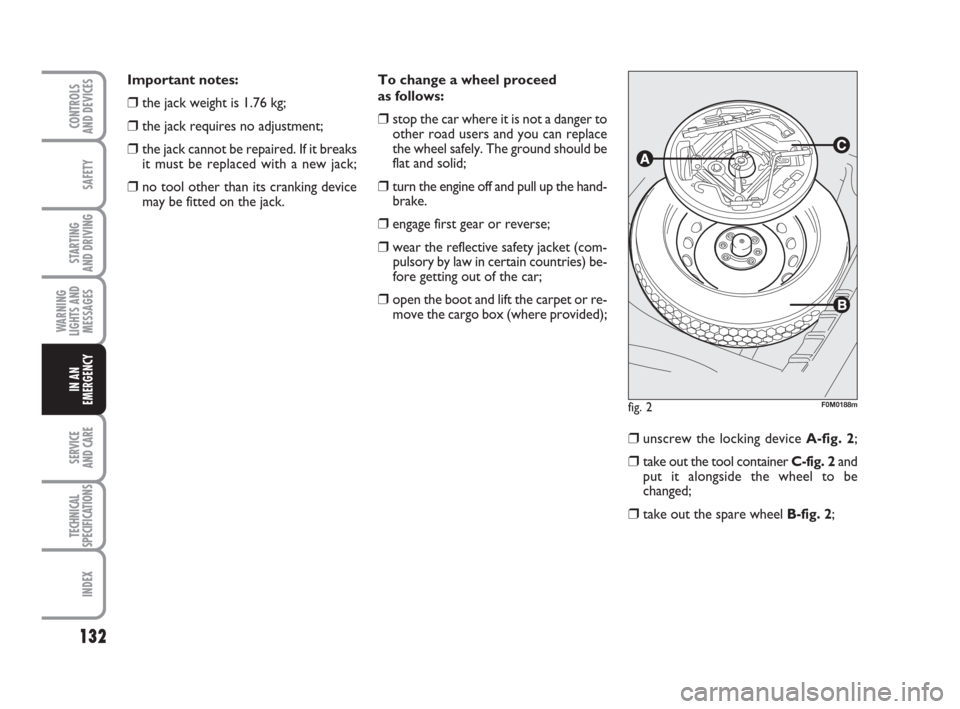
❒unscrew the locking device A-fig. 2;
❒take out the tool container C-fig. 2and
put it alongside the wheel to be
changed;
❒take out the spare wheel B-fig. 2;
fig. 2F0M0188m
Important notes:
❒the jack weight is 1.76 kg;
❒the jack requires no adjustment;
❒the jack cannot be repaired. If it breaks
it must be replaced with a new jack;
❒no tool other than its cranking device
may be fitted on the jack.
129-160 ACTUAL 1ed EN 28-08-2009 13:47 Pagina 132
Page 135 of 210

134
SAFETY
STARTING
AND DRIVING
WARNING
LIGHTS AND
MESSAGES
SERVICE
AND CARE
TECHNICAL
SPECIFICATIONS
INDEX
CONTROLS
AND DEVICES
IN AN
EMERGENCY
❒ for versions with hub caps, remove the
cap after unscrewing the 3 fastening
bolts and finally unscrew the fourth bolt
L-fig. 5and remove the wheel;
❒make sure the contact surfaces be-
tween spare wheel and hub are clean
so that the fastening bolts will not come
loose;
❒fit the spare wheel by inserting the first
bolt two threads into the hole closest
to the inflation valve;
❒fit the hub cap by aligning the crescent
hole with the bolt you have fitted us-
ing the wrench;
❒tighten the fastening bolts;
❒turn the jack handle L-fig. 4to lower
the car and remove the jack;
❒use the wrench provided to fasten the
bolts completely in a criss-cross fash-
ion as per the order illustrated in fig. 6;
❒if you are replacing an alloy wheel and
wish to store it temporarily in the spare
wheel compartment, you should posi-
tion it upside down.REFITTING A STANDARD
WHEEL
Following the procedure described previ-
ously, raise the car and remove the spare
wheel.
fig. 5F0M0192mfig. 6F0M0194m
129-160 ACTUAL 1ed EN 28-08-2009 13:47 Pagina 134
Page 136 of 210

135
SAFETY
STARTING
AND DRIVING
WARNING
LIGHTS AND
MESSAGES
SERVICE
AND CARE
TECHNICAL
SPECIFICATIONS
INDEX
CONTROLS
AND DEVICES
IN AN
EMERGENCY
Versions with steel rims
Proceed as follows:
❒make sure the contact surfaces be-
tween standard wheel and hub are
clean so that the fastening bolts will not
come loose;
❒fit the standard wheel by inserting the
first bolt two threads into the hole clos-
est to the inflation valve;
❒fit the hub cap by aligning the crescent
hole with the bolt you have fitted, then
insert the other 3 bolts;
❒using the wrench provided, tighten the
fastening bolts;
❒lower the car and remove the jack;
❒using the wrench provided, fully tight-
en the bolts in the sequence shown
previously.Versions with alloy rims
Proceed as follows:
❒place the wheel onto the hub and tight-
en the bolts using the wrench provided;
❒lower the car and remove the jack;
❒using the wrench provided, fully tight-
en the bolts in the sequence shown
previously.When you have finished
❒stow the spare wheel in the space pro-
vided in the boot;
❒put the jack back in its container C-fig.
2partially open by forcing it slightly
against the container walls to prevent
it from rattling around when travelling;
❒put the tools back into their places in
the container;
❒stow the container C-fig. 2, complete
with tools, inside the spare wheel;
❒tighten the tool container clamping de-
vice A-fig. 2;
❒refit the boot carpet or the Cargo box
(where provided).
129-160 ACTUAL 1ed EN 28-08-2009 13:47 Pagina 135
Page 176 of 210

175
SAFETY
STARTING
AND DRIVING
WARNING
LIGHTS AND
MESSAGES
IN AN
EMERGENCY
TECHNICAL
SPECIFICATIONS
INDEX
CONTROLS
AND DEVICES
SERVICE
AND CARE
WHEELS AND TYRES
Check the pressure of each tyre, includ-
ing the spare, every two weeks and before
long journeys. The pressure should be
checked with the tyre rested and cold.
It is normal for the pressure to increase
when the car is used; for the correct tyre
inflation pressure, see “Wheels” in the
“Technical specifications” section.
Incorrect pressure causes abnormal tyre
wearfig. 8:
Anormal pressure: tread evenly worn.
Blow pressure: tread particularly worn
at the edges.
Chigh pressure: tread particularly worn
in the centre.
The tyres must be replaced when the
tread is less than 1.6 mm thick. In all cas-
es, follow the laws in force in the coun-
try where you are driving.
fig. 8F0M0160m
IMPORTANT NOTES
❒Where possible, avoid braking sudden-
ly, wheel-spinning and crashing into
curbs, potholes or other obstacles.
Long distances on uneven roads can
damage the tyres;
❒check the tyres regularly for cuts on the
sides, swelling or irregular tread wear.
Go to a Fiat Dealership if required.
❒avoid overloading the car when travel-
ling: this may cause serious damage to
the wheels and tyres;
❒if a tyre is punctured, stop the vehicle
immediately and change it to avoid
damage to the tyre, the rim, and the
suspension and steering systems;
❒a tyre will age even if it is not used much.
Cracks in the tread and on the sidewalls
are a sign of ageing. In any event, have
the tyres checked by specialised per-
sonnel if they have been fitted for longer
than 6 years. Remember to check the
spare wheel very carefully;
❒in case of replacement, always fit new
tyres, avoiding those with an unknown
origin;
❒if a tyre is replaced, you should also
change the inflation valve;
❒to allow even wear between the front
and rear tyres, it is advisable to switch
them every 10–15 thousand kilometres,
keeping them on the same side of the
car so as not to reverse the direction
of rotation.
Remember that the road
holding qualities of your car
also depend on correct tyre pressures.
WARNING
161-180 ACTUAL 1ed EN 28-08-2009 8:19 Pagina 175
Page 189 of 210

188
SAFETY
STARTING
AND DRIVING
WARNING
LIGHTS AND
MESSAGES
IN AN
EMERGENCY
SERVICE
AND CARE
INDEX
CONTROLS
AND DEVICES
TECHNICAL
SPECIFICATIONS
READING TYRE
MARKINGS fig. 4
Example: 175/65 R 15 84T
175 = Nominal width (S, distance in mm
between sidewalls).
65 = Height/width ratio (H/S) as a per-
centage.
R = Radial tyre.
15 = Rim diameter in inches (Ø).
84 = Load index.
T = Maximum speed index.
WHEELS
RIMS AND TYRES
Pressed steel or alloy rims. Tubeless ra-
dial carcass tyres. All approved tyres are
listed in the Log Book.
IMPORTANT In the event of discrepan-
cies between the information provided in
this Owner Handbook and the Log Book,
the latter takes precedence.
For safety when driving, it is essential that
the car is fitted with tyres of the same
make and type on all wheels.
IMPORTANT Do not use inner tubes
with tubeless tyres.
fig. 4F0M0169m
SPARE WHEEL
Pressed steel rim Tubeless tyre.
WHEEL GEOMETRY
Total front toe-in: 1 ± 1 mm
Total rear toe-in: 1.7 ± 2 mm.
The values refer to the car in running
order.
181-197 ACTUAL 1ed EN 31-08-2009 12:02 Pagina 188
Page 191 of 210

190
SAFETY
STARTING
AND DRIVING
WARNING
LIGHTS AND
MESSAGES
IN AN
EMERGENCY
SERVICE
AND CARE
INDEX
CONTROLS
AND DEVICES
TECHNICAL
SPECIFICATIONS
175/65 R15 84T (M+S)
185/65 R15 88T (M+S) 175/65 R15 84T
185/65 R15 88T6J × 15'' – ET 43175/65 R15 84T
185/65 R15 88T 6J × 15'' – ET 43
6J × 15'' – ET 43 (alloy)
Version Rims (*) Tyres Spare wheel (ç)
provided snow Rim (*) Tyre
1.2 - 1.4 -
1.3 Multijet
(*) 100 mm wheel stud distance and M12 x 1.5 studs; use only wheels specified for this car.
(
ç) Depending on the configuration, the spare wheel has a 175/65 R15 84T tyre and a 6J×15''- ET43 rim. In this case the
175/65 R15 84T tyre has the same specifications as the spare wheel: the information in “Changing a tyre” therefore refers to
the 175/65 R15 84T tyre.
181-197 ACTUAL 1ed EN 31-08-2009 12:02 Pagina 190
Page 203 of 210

202
SAFETY
STARTING
AND DRIVING
WARNING
LIGHTS AND
MESSAGES
IN AN
EMERGENCY
SERVICE
AND CARE
TECHNICAL
SPECIFICATIONS
INDEX
CONTROLS
AND DEVICES
Windows (cleaning) ..................... 179
Windscreen and rear window
wiper blades ................................ 177
Windscreen washer
– control ..................................... 49
– fluid level ................................... 172
Windscreen wipers
– control ..................................... 49
– blades ........................................ 177
– nozzles ...................................... 177
Windscreen/rear window
washer level ................................. 172 Transmission .................................. 186
Trip computer ............................... 30
Tyre pressures .............................. 191
Tyres
– standard tyres provided ........ 190
– reading tyre markings ............ 188
– maintenance ............................. 175
– pressure .................................... 191
– changing .................................... 131
Using the manual gearbox ......... 110
Warning lights and messages ... 117
Weights .......................................... 193
Wheel rims
– reading rim markings ............. 189
Wheel trim .................................... 188
Wheels
– trim ............................................ 188
– spare .......................................... 188
– changing .................................... 131
When parked ................................ 109
Window washing .......................... 49
198-208 ACTUAL 1ed EN 31-08-2009 12:12 Pagina 202