2009 FIAT GRANDE PUNTO rear light
[x] Cancel search: rear lightPage 65 of 210

64
SAFETY
STARTING
AND DRIVING
WARNING
LIGHTS AND
MESSAGES
IN AN
EMERGENCY
SERVICE
AND CARE
TECHNICAL
SPECIFICATIONS
INDEX
CONTROLS
AND DEVICES
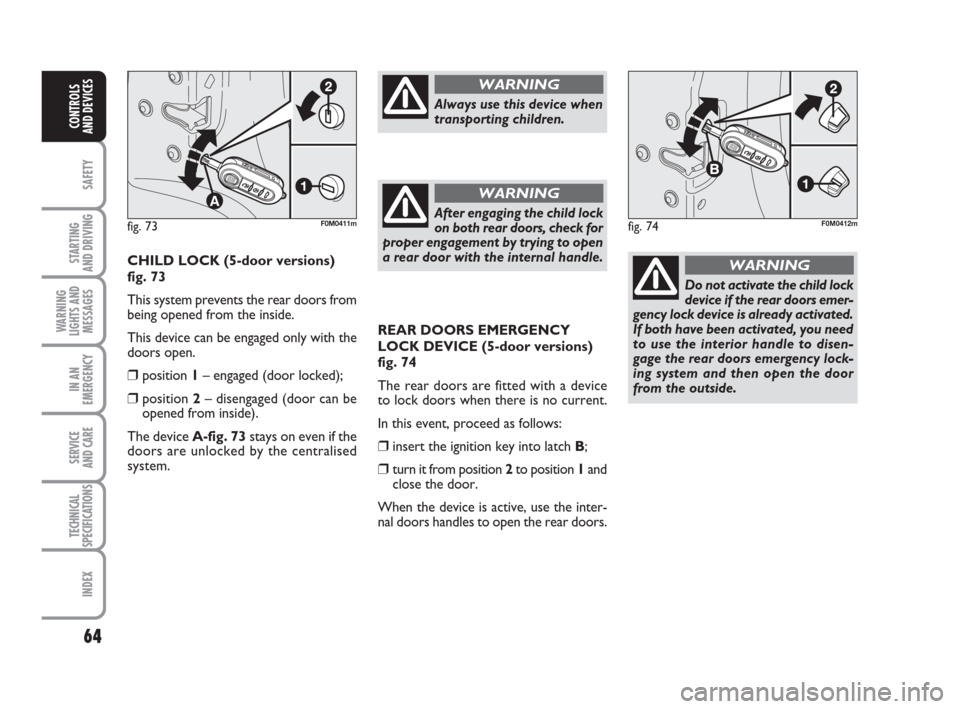
REAR DOORS EMERGENCY
LOCK DEVICE (5-door versions)
fig. 74
The rear doors are fitted with a device
to lock doors when there is no current.
In this event, proceed as follows:
❒insert the ignition key into latch B;
❒turn it from position 2 to position 1and
close the door.
When the device is active, use the inter-
nal doors handles to open the rear doors.
Do not activate the child lock
device if the rear doors emer-
gency lock device is already activated.
If both have been activated, you need
to use the interior handle to disen-
gage the rear doors emergency lock-
ing system and then open the door
from the outside.
WARNINGCHILD LOCK (5-door versions)
fig. 73
This system prevents the rear doors from
being opened from the inside.
This device can be engaged only with the
doors open.
❒position 1– engaged (door locked);
❒position 2– disengaged (door can be
opened from inside).
The device A-fig. 73stays on even if the
doors are unlocked by the centralised
system.
Always use this device when
transporting children.
WARNING
After engaging the child lock
on both rear doors, check for
proper engagement by trying to open
a rear door with the internal handle.
WARNING
fig. 74F0M0412mfig. 73F0M0411m
033-071 ACTUAL 1ed EN 28-08-2009 13:44 Pagina 64
Page 67 of 210

66
SAFETY
STARTING
AND DRIVING
WARNING
LIGHTS AND
MESSAGES
IN AN
EMERGENCY
SERVICE
AND CARE
TECHNICAL
SPECIFICATIONS
INDEX
CONTROLS
AND DEVICES
Electric window system
initialisation
The system must be re-initialised after dis-
connecting the battery or if the relevant
protection fuse is blown.
Initialisation procedure:
❒fully close the window to be initialised
manually;
❒once fully closed, keep holding down the
closing control for at least 1 second.
Improper use of the electric
windows can be dangerous.
Before and during operation, always
check that no-one is exposed to the
risk of being injured either directly by
the moving window or through objects
getting caught and being dragged by
it. When leaving the vehicle, always
remove the key from the ignition to
avoid the risk of injury to anyone re-
maining in the car due to accidental
operation of the electric windows.
WARNING
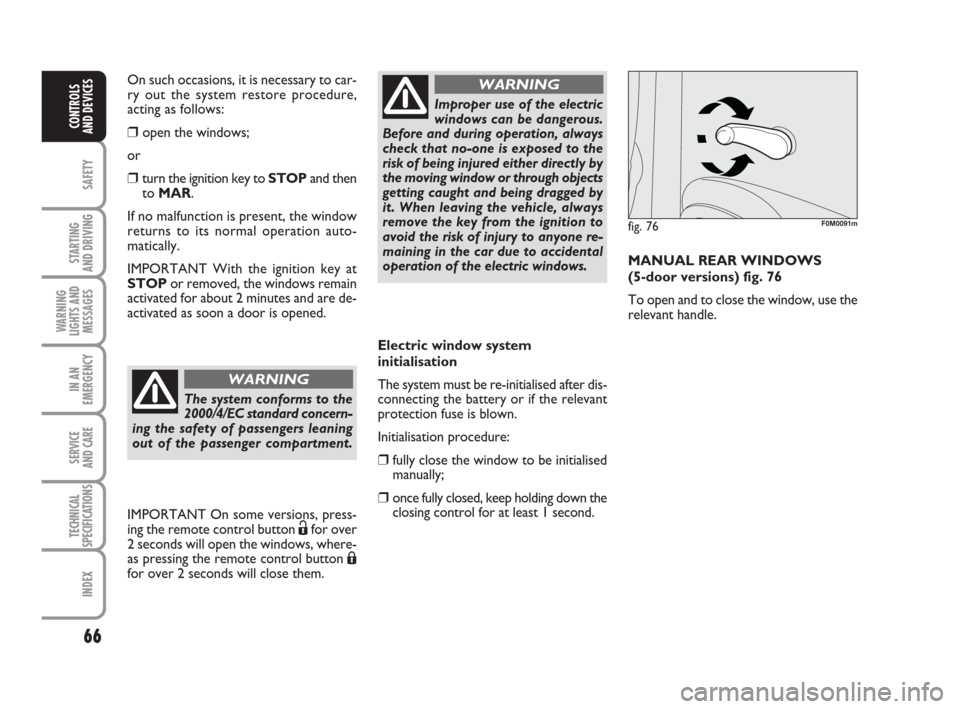
MANUAL REAR WINDOWS
(5-door versions) fig. 76
To open and to close the window, use the
relevant handle.
fig. 76F0M0091m
On such occasions, it is necessary to car-
ry out the system restore procedure,
acting as follows:
❒ open the windows;
or
❒turn the ignition key to STOPand then
to MAR.
If no malfunction is present, the window
returns to its normal operation auto-
matically.
IMPORTANT With the ignition key at
STOPor removed, the windows remain
activated for about 2 minutes and are de-
activated as soon a door is opened.
The system conforms to the
2000/4/EC standard concern-
ing the safety of passengers leaning
out of the passenger compartment.
WARNING
IMPORTANT On some versions, press-
ing the remote control button Ëfor over
2 seconds will open the windows, where-
as pressing the remote control button
Áfor over 2 seconds will close them.
033-071 ACTUAL 1ed EN 28-08-2009 13:44 Pagina 66
Page 68 of 210

67
SAFETY
STARTING
AND DRIVING
WARNING
LIGHTS AND
MESSAGES
IN AN
EMERGENCY
SERVICE
AND CARE
TECHNICAL
SPECIFICATIONS
INDEX
CONTROLS
AND DEVICES
fig. 80F0M0095m
BOOT
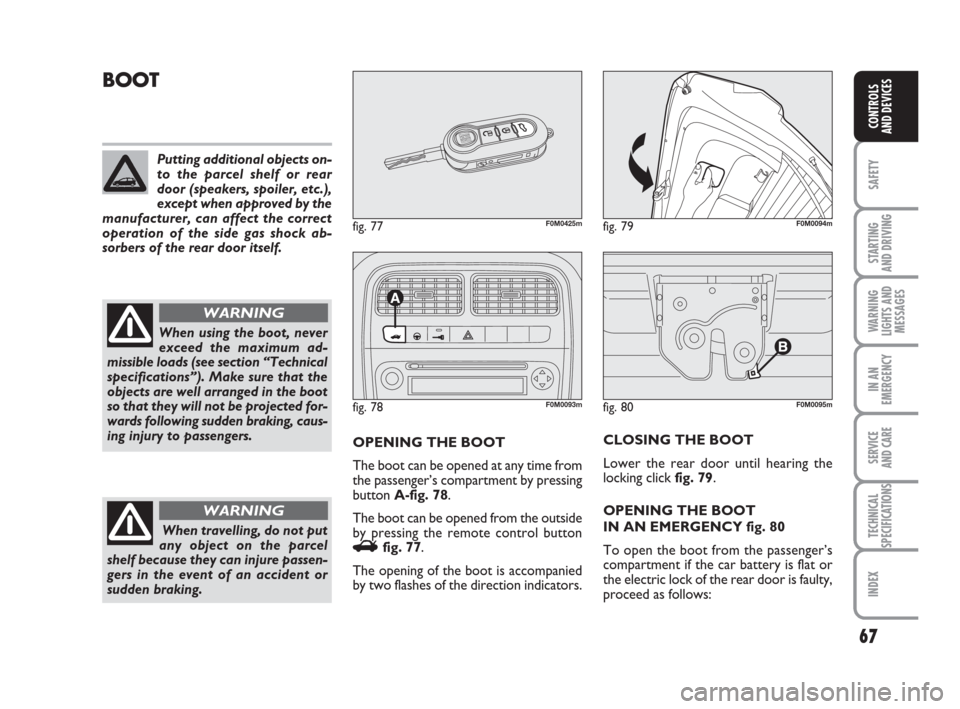
OPENING THE BOOT
The boot can be opened at any time from
the passenger’s compartment by pressing
button A-fig. 78.
The boot can be opened from the outside
by pressing the remote control button
Rfig. 77.
The opening of the boot is accompanied
by two flashes of the direction indicators.CLOSING THE BOOT
Lower the rear door until hearing the
locking click fig. 79.
OPENING THE BOOT
IN AN EMERGENCY fig. 80
To open the boot from the passenger’s
compartment if the car battery is flat or
the electric lock of the rear door is faulty,
proceed as follows:
fig. 78F0M0093m
fig. 79F0M0094m
Putting additional objects on-
to the parcel shelf or rear
door (speakers, spoiler, etc.),
except when approved by the
manufacturer, can affect the correct
operation of the side gas shock ab-
sorbers of the rear door itself.
When using the boot, never
exceed the maximum ad-
missible loads (see section “Technical
specifications”). Make sure that the
objects are well arranged in the boot
so that they will not be projected for-
wards following sudden braking, caus-
ing injury to passengers.
WARNING
When travelling, do not put
any object on the parcel
shelf because they can injure passen-
gers in the event of an accident or
sudden braking.
WARNING
fig. 77F0M0425m
033-071 ACTUAL 1ed EN 28-08-2009 13:44 Pagina 67
Page 69 of 210

68
SAFETY
STARTING
AND DRIVING
WARNING
LIGHTS AND
MESSAGES
IN AN
EMERGENCY
SERVICE
AND CARE
TECHNICAL
SPECIFICATIONS
INDEX
CONTROLS
AND DEVICES
❒tilt the rear seats fully forward (see
paragraph “Extending the boot” in this
section);
❒press lever Binside the boot.
EXTENDING THE BOOT
Partial extension (1/3 or 2/3) fig. 83
(for versions/markets where provided)
The boot can be partially (1/3 or 2/3) or
totally extended by splitting the rear seat.
Proceed as follows:
❒ fully lower the rear seat head restraints;
❒check that the seat belt is not twisted;
❒tilt the cushions forward as shown by
the arrow fig. 81;
❒lift handle Aor B-fig. 82to release re-
spectively the left or right part of the
backrest and guide the backrest onto
the cushion.The boot extension to the right makes it
possible to carry two passengers on the
left part of the rear seat. The boot ex-
tension to the left makes it possible to car-
ry one passenger on the right side of the
rear seat.
fig. 81F0M0096mfig. 82F0M0097m
fig. 83F0M0137m
Maximum extension fig. 84
Tilting the whole rear seat forwards gives
maximum loading volume.
Proceed as follows:
❒ fully lower the rear seat head restraints;
❒check that the seat belts are not twisted;
❒tilt the cushions forward as shown by
the arrow fig. 81;
❒lift handles Aand B-fig. 82to release
the backrests and guide them onto the
cushion.
IMPORTANT If, after tilting the rear seat,
you have to remove the parcel shelf, po-
sition it as shown in fig. 86.
fig. 84F0M0098m
033-071 ACTUAL 1ed EN 28-08-2009 13:44 Pagina 68
Page 70 of 210

69
SAFETY
STARTING
AND DRIVING
WARNING
LIGHTS AND
MESSAGES
IN AN
EMERGENCY
SERVICE
AND CARE
TECHNICAL
SPECIFICATIONS
INDEX
CONTROLS
AND DEVICES
fig. 87F0M0101mfig. 86F0M0099mfig. 85F0M0221m
REMOVING THE PARCEL SHELF
To remove the parcel shelf in order to ex-
tend the boot: release the upper ends A-
fig. 87by removing the eyelets from the
pins, unhook and swivel the parcel shelf in
its seat and then release both pins fig. 88
from the side holes.
Once removed, the parcel shelf can be po-
sitioned between the back of the front
seats and the folded cushion of the rear
seat fig. 86.
fig. 88F0M0222m
Repositioning the rear seat fig. 85
Raise the backrests and push them back
until hearing the locking click of both retainers.
Position seat belt buckles upwards and set
the cushion in the normal position of use.
IMPORTANT The backrest is correctly
secured when the red band next to the
handles disappears. This red band indicates
that the backrest is not secured. When re-
turning the backrest to its normal posi-
tion, make sure it is correctly fastened and
you hear the lock click.
Make sure the backrest is properly se-
cured at both sides to prevent it moving
forward in the event of sharp braking that
may cause injuries to passengers.
033-071 ACTUAL 1ed EN 28-08-2009 13:44 Pagina 69
Page 72 of 210

71
SAFETY
STARTING
AND DRIVING
WARNING
LIGHTS AND
MESSAGES
IN AN
EMERGENCY
SERVICE
AND CARE
TECHNICAL
SPECIFICATIONS
INDEX
CONTROLS
AND DEVICES
For safety reasons, the bon-
net must always be perfect-
ly closed while travelling. Make sure
that the bonnet is perfectly closed
and that the lock is engaged. If you
discover during travel that the lock
is not fully engaged, stop immediate-
ly and close the bonnet in the correct
manner.
WARNING
If the supporting rod is not
positioned correctly, the
bonnet may fall violently.
WARNING
Perform these operations on-
ly when the car is stationary.
WARNING
ROOF RACK/SKI RACK
3-door versions
The front hooks are located at points
A-fig. 93.
The rear hooks are set at points Bmarked
by the (
O) symbols on the rear side win-
dows.
5-door versions
The front hooks are located at points
A-fig. 93.
The rear hooks are set at points Band are
marked by a groove on the upper part of
the door frame.IMPORTANT Follow the instructions
contained in the assembly kit carefully. As-
sembly must be performed by qualified
personnel.
fig. 93F0M0102m
After travelling for a short
distance, check that the fas-
tening screws are correctly tightened.
WARNING
Strictly adhere to the laws in
force concerning maximum
clearance.
Distribute the load evenly
and, when driving, bear in
mind the increased sensitivity of the
vehicle to side wind.
WARNING
Never exceed the permitted
load (see “Technical data”
section).
033-071 ACTUAL 1ed EN 28-08-2009 13:44 Pagina 71
Page 75 of 210

74
SAFETY
STARTING
AND DRIVING
WARNING
LIGHTS AND
MESSAGES
IN AN
EMERGENCY
SERVICE
AND CARE
TECHNICAL
SPECIFICATIONS
INDEX
CONTROLS
AND DEVICES
ABS SYSTEM
If you have never driven a vehicle with
ABS before, it is advisable to perform
a few tests on slippery ground, naturally in
conditions of safety and respecting the
highway code of the country where you
are driving. Read the following informa-
tion carefully.
ABS is an integral part of the braking sys-
tem which prevents, whatever the road
conditions and force applied to the brake
pedal, the wheels from locking and con-
sequently sliding under braking, thus en-
suring that the vehicle remains under con-
trol even during emergency braking.
The system is completed by EBD (Elec-
tronic Brakeforce Distribution), which dis-
tributes the braking action between front
and rear wheels.
IMPORTANT For the maximum efficien-
cy of the braking system, a bedding-in pe-
riod of about 500 km is needed (for a new
vehicle or after having replaced the brake
pads/discs): during this period it is better
to avoid sharp, repeated and prolonged
braking.The ABS gets the most from
the available grip, but it can-
not improve it; you should therefore
take every care when driving on slip-
pery surfaces and not take unneces-
sary risks.
WARNING
SYSTEM INTERVENTION
The driver can tell the ABS system has
been activated because the brake pedal
pulsates slightly and the system gets nois-
ier: this means that the car speed should
be altered to fit the type of road surface.
If the ABS cuts in, it is a sign
that the grip between tyre
and the road surface has reached the
limit: you must slow down to match
the speed to the road grip available.
WARNING
FAILURE INDICATIONS
ABS failure
This is indicated by the
>warning light
on the instrument panel together with the
dedicated message on the multifunction
display (for versions/markets where pro-
vided) coming on (see “Warning lights and
messages” section).
In this case, the braking system will work
as normal, but without the extra capacity
offered by the ABS system. Drive care-
fully to the nearest Fiat Dealership to have
the system checked.
072-086 ACTUAL 1ed EN 28-08-2009 8:55 Pagina 74
Page 76 of 210

75
SAFETY
STARTING
AND DRIVING
WARNING
LIGHTS AND
MESSAGES
IN AN
EMERGENCY
SERVICE
AND CARE
TECHNICAL
SPECIFICATIONS
INDEX
CONTROLS
AND DEVICES
BRAKE ASSIST (integrated ESP
emergency braking assistance)
(for versions/markets where provided)
This system (which is compulsory) recog-
nises emergency braking according to the
speed of operation of the brake pedal and
provides additional hydraulic braking pres-
sure to support that applied by the driver.
This allows faster and more powerful op-
eration of the braking system.
The Brake Assist is deactivated on ver-
sions equipped with ESP, in the event of
an ESP system failure (indicated by warn-
ing light
áswitching on together with the
message in the multifunctional display, for
versions/markets where provided).
ESP SYSTEM (Electronic
Stability Program)
(for versions/markets where provided)
This is an electronic system that controls
car stability in the event of tyre grip loss,
helping to maintain directional control.
The ESP system is therefore particularly
useful when road surface grip changes.
In addition to the ESP system, ASR system
and Hill Holder, the MSR system (adjusting
the engine braking torque) and the HBA
system (improving the braking force dur-
ing emergency braking) are also provided
(for versions/markets where provided).
SYSTEM INTERVENTION
This is signalled by the flashing of warn-
ing light
áon the instrument panel, to in-
form the driver that the car is in critical
stability and grip conditions.When the ABS cuts in and
you feel the brake pedal pul-
sating, do not remove your foot, but
keep the pedal pushed down; in do-
ing so you, will stop in the shortest
distance possible under the road con-
ditions at the time.
WARNING
EBD failure
This is indicated by the
>and xwarn-
ing lights on the instrument panel togeth-
er with the dedicated message on the mul-
tifunction display (for versions/markets
where avaible) coming on (see “Warning
lights and messages” section).
In this case, the rear wheels may sudden-
ly lock and the vehicle may swerve when
braking sharply. Drive carefully to the
nearest Fiat Dealership to have the system
checked.
If only the xwarning light
on the instrument panel
lights up (together with a message in
the multifunction display, for ver-
sions/markets where provided) stop
the vehicle immediately and contact
the nearest Fiat Dealership. Fluid
leaking from the hydraulic system will
compromise the operation of the
braking system, whether it is of the
conventional type or with ABS.
WARNING
072-086 ACTUAL 1ed EN 28-08-2009 8:55 Pagina 75