Page 78 of 532

DefrosterCheck operation by selecting the defrost mode and place
the blower control on high speed. You should be able to
feel the air directed against the windshield. See your
authorized dealer for service if your defroster is
inoperable.Periodic Safety Checks You Should Make Outside
the Vehicle
TiresExamine tires for excessive tread wear and uneven wear
patterns. Check for stones, nails, glass, or other objects
lodged in the tread. Inspect the tread and sidewall for
cuts and cracks. Check the wheel nuts for tightness.
Check the tires (including spare) for proper pressure.
LightsHave someone observe the operation of exterior lights
while you work the controls. Check turn signal and high
beam indicator lights on the instrument panel.Door LatchesCheck for positive closing, latching, and locking.Fluid LeaksCheck area under vehicle after overnight parking for fuel,
engine coolant, oil, or other fluid leaks. Also, if gasoline
fumes are detected or if fuel, power steering fluid, or
brake fluid leaks are suspected, the cause should be
located and corrected immediately.
76 THINGS TO KNOW BEFORE STARTING YOUR VEHICLE
Page 251 of 532

▫Understanding The Features Of Your
Winch ............................ 310
▫ Winch Accessories .................. 312
▫ Operating Your Winch ............... 313
▫ Rigging Techniques .................. 325
� Power Steering ...................... 327
▫ Power Steering Fluid Check ........... 328
� Parking Brake ....................... 329
� Brake System ....................... 330
▫ 3500 Dual Rear Wheel Models Only ...... 331
▫ Four-Wheel Anti-Lock Brake System ..... 331
� Electronic Brake Control System —
If Equipped .......................... 333
▫ Anti-Lock Brake System (ABS) .......... 333▫
Traction Control System (TCS) .......... 334
▫ Brake Assist System (BAS) ............. 335
▫ Hill Start Assist (HSA) ............... 336
▫ Electronic Roll Mitigation (ERM) ........ 339
▫ Electronic Stability Program (ESP) ....... 340
▫ TSC (Trailer Sway Control) ............ 345
� Tire Safety Information ................ 346
▫ Tire Markings ..................... 346
▫ Tire Identification Number (TIN) ........ 349
▫ Tire Loading And Tire Pressure ......... 350
� Tires — General Information ............ 354
▫ Tire Pressure ...................... 354
▫ Tire Inflation Pressures ............... 355
STARTING AND OPERATING 249
5
Page 330 of 532

NOTE:Increased noise levels at the end of the steering
wheel travel are considered normal and do not indicate
that there is a problem with the power steering system.
Upon initial start-up in cold weather, the power steering
pump may make noise for a short amount of time. This is
due to the cold, thick fluid in the steering system. This
noise should be considered normal, and it does not in any
way damage the steering system.
WARNING!
Continued operation with reduced power steering
assist could pose a safety risk to yourself and others.
Service should be obtained as soon as possible.
CAUTION!
Prolonged operation of the steering system at the end
of the steering wheel travel will increase the steering
fluid temperature and it should be avoided when
possible. Damage to the power steering pump may
occur.Power Steering Fluid CheckChecking the power steering fluid level at a defined
service interval is not required. The fluid should only be
checked if a leak is suspected, abnormal noises are
apparent, and/or the system is not functioning as antici-
pated. Coordinate inspection efforts through an autho-
rized dealer.
No chemical flushes should be used in any power
steering system; only the approved lubricant may be
used.
328 STARTING AND OPERATING
Page 331 of 532
WARNING!
Fluid level should be checked on a level surface and
with the engine off to prevent injury from moving
parts and to ensure accurate fluid level reading. Do
not overfill. Use only manufacturer’s recommended
power steering fluid.
If necessary, add fluid to restore to the proper indicated
level. With a clean cloth, wipe any spilled fluid from all
surfaces. Refer to “Fluids, Lubricants, and Genuine
Parts” in Section 7 for the correct fluid type.PARKING BRAKEThe foot-operated parking brake is positioned below the
lower left corner of the instrument panel. To release the
parking brake, pull the parking brake release handle. NOTE:
The “Brake Warning Light” will come on and
flash to indicate that the parking brake is applied. You
must be sure that the parking brake is fully applied
before leaving the vehicle.
Be sure the parking brake is firmly set when parked and
the shift lever is in the PARK position. When parking on
Parking Brake
STARTING AND OPERATING 329
5
Page 333 of 532

If either the front or rear hydraulic system loses normal
braking capability, the remaining system will still func-
tion with some loss of overall braking effectiveness. This
will be evident by increased pedal travel during applica-
tion, greater pedal force required to slow or stop, and
activation of the “Brake Warning Light” and the “ABS
Warning Light” (If Equipped) during brake use.3500 Dual Rear Wheel Models OnlyThe brake system power assist is provided by a hydro-
boost unit which shares fluid with the power steering
system. You may experience some clicking or hissing
noises from the hydro-boost system during hard braking
conditions.
NOTE:Under cold temperatures, pedal effort will be
higher than normal until the power steering fluid reaches
operating temperature.
Four-Wheel Anti-Lock Brake System
WARNING!
The Four-Wheel Anti-Lock Brake System contains
sophisticated electronic equipment. It may be sus-
ceptible to interference caused by improperly in-
stalled or high output radio transmitting equipment.
This interference can cause possible loss of anti-lock
braking capability. Installation of such equipment
should be performed by qualified professionals.
The Four-Wheel Anti-lock Brake System (ABS) is de-
signed to aid the driver in maintaining vehicle control
under adverse braking conditions. The system operates
with a separate computer to modulate hydraulic pressure
to prevent wheel lockup and help avoid skidding on
slippery surfaces.
STARTING AND OPERATING 331
5
Page 429 of 532
ENGINE COMPARTMENT— 5.7L1 — Air Cleaner Filter7 — Power Steering Fluid Reservoir
2 — Automatic Transmission Dipstick 8 — Engine Oil Dipstick
3 — Engine Oil Fill 9 — Washer Fluid Reservoir
4 — Brake Fluid Reservoir 10 — Engine Coolant Reservoir
5 — Battery 11 — Coolant Pressure Cap
6 — Integrated Power Module MAINTAINING YOUR VEHICLE 427
7
Page 482 of 532
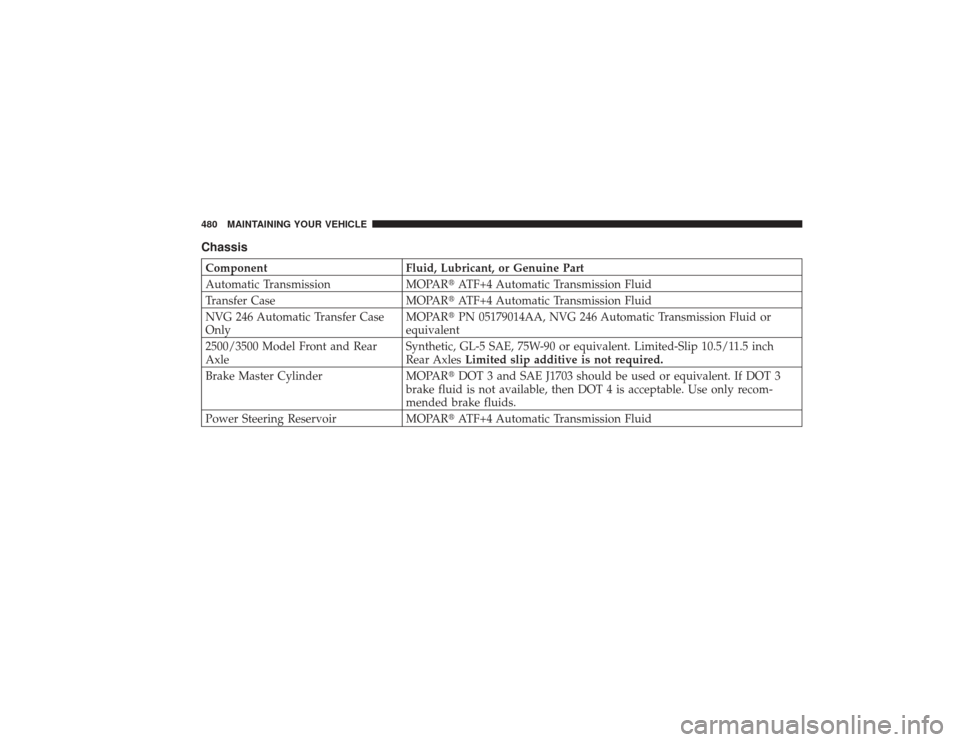
ChassisComponentFluid, Lubricant, or Genuine Part
Automatic Transmission MOPAR�ATF+4 Automatic Transmission Fluid
Transfer Case MOPAR�ATF+4 Automatic Transmission Fluid
NVG 246 Automatic Transfer Case
Only MOPAR�
PN 05179014AA, NVG 246 Automatic Transmission Fluid or
equivalent
2500/3500 Model Front and Rear
Axle Synthetic, GL-5 SAE, 75W-90 or equivalent. Limited-Slip 10.5/11.5 inch
Rear Axles
Limited slip additive is not required.
Brake Master Cylinder MOPAR�DOT 3 and SAE J1703 should be used or equivalent. If DOT 3
brake fluid is not available, then DOT 4 is acceptable. Use only recom-
mended brake fluids.
Power Steering Reservoir MOPAR�ATF+4 Automatic Transmission Fluid480 MAINTAINING YOUR VEHICLE
Page 486 of 532

At Each Stop for Fuel•
Check the engine oil level about 5 minutes after a fully
warmed engine is shut off. Checking the oil level while
the vehicle is on level ground will improve the accu-
racy of the oil level reading. Add oil only when the
level is at or below the ADD or MIN mark.
•
Check the windshield washer solvent and add if
required.
Once a Month
•
Check tire pressure and look for unusual wear or
damage.
•
Inspect the battery, clean and tighten the terminals as
required.
•
Check the fluid levels of the coolant reservoir, brake
master cylinder, power steering and transmission and
add as needed.
•
Check all lights and other electrical items for correct
operation.
At Each Oil Change
•
Change the engine oil filter.
•
Inspect the brake hoses and lines.
CAUTION!
Failure to perform the required maintenance items
may result in damage to the vehicle.Required Maintenance IntervalsRefer to the Maintenance Schedules on the following
pages for the required maintenance intervals.
484 MAINTENANCE SCHEDULES
8M A I
N T
E
N A
N CE
S
C
H E
D
U L
E
S