Page 78 of 532

DefrosterCheck operation by selecting the defrost mode and place
the blower control on high speed. You should be able to
feel the air directed against the windshield. See your
authorized dealer for service if your defroster is
inoperable.Periodic Safety Checks You Should Make Outside
the Vehicle
TiresExamine tires for excessive tread wear and uneven wear
patterns. Check for stones, nails, glass, or other objects
lodged in the tread. Inspect the tread and sidewall for
cuts and cracks. Check the wheel nuts for tightness.
Check the tires (including spare) for proper pressure.
LightsHave someone observe the operation of exterior lights
while you work the controls. Check turn signal and high
beam indicator lights on the instrument panel.Door LatchesCheck for positive closing, latching, and locking.Fluid LeaksCheck area under vehicle after overnight parking for fuel,
engine coolant, oil, or other fluid leaks. Also, if gasoline
fumes are detected or if fuel, power steering fluid, or
brake fluid leaks are suspected, the cause should be
located and corrected immediately.
76 THINGS TO KNOW BEFORE STARTING YOUR VEHICLE
Page 108 of 532
Things You Should Know About Your uconnect�
phone
uconnect� phone TutorialTo hear a brief tutorial of the system features, press the
PHONE button and say “uconnect� Tutorial.”Voice TrainingFor users experiencing difficulty with the system recog-
nizing their voice commands or numbers, the uconnect �
phone Voice Training feature may be used. To enter this
training mode, follow one of the two following proce-
dures:
From outside the uconnect� phone mode (e.g., from radio
mode):•
Press and hold the VOICE RECOGNITION button for
five seconds until the session begins, or,
•
Press the VOICE RECOGNITION button and say the
�Setup, Voice Training� command. Repeat the words and phrases when prompted by the
uconnect�
phone. For best results, the Voice Training
session should be completed when the vehicle is parked
with the engine running, all windows closed, and the
blower fan switched off.
This procedure may be repeated with a new user. The
system will adapt to the last trained voice only.
To restore the Voice Recognition system to factory default
settings, enter the Voice Training session via the above
procedure and follow the prompts.
Voice Recognition (VR)
•
For best performance, adjust the rearview mirror to
provide at least
1�2in (1 cm) gap between the overhead
console (if equipped) and the mirror.
•
Always wait for the beep before speaking.
106 UNDERSTANDING THE FEATURES OF YOUR VEHICLE
Page 121 of 532
NOTE:Keep in mind that you have to press the VR
button first and wait for the beep before speaking the
“Barge In” commands.Voice TrainingFor users experiencing difficulty with the system recog-
nizing their voice commands or numbers, uconnect �
phone Voice Training feature may be used.
1. Press the VR button, say “System Setup” and once you
are in that menu then say “Voice Training.” This will train
your own voice to the system and will improve recogni-
tion.
2. Repeat the words and phrases when prompted by
uconnect� phone. For best results, the Voice Training
session should be completed when the vehicle is parked,
engine running, all windows closed, and the blower fan
switched off. This procedure may be repeated with a new
user. The system will adapt to the last trained voice only.
SEATSSeats are a primary part of the Occupant Restraint System
of the vehicle. Proper use of the seats is needed for safe
operation of the vehicle.
WARNING!
•
It is extremely dangerous to ride in a cargo area,
inside or outside of a vehicle. In a collision, people
riding in these areas are more likely to be seri-
ously injured or killed.
•
Do not allow people to ride in any area of your
vehicle that is not equipped with seats and seat
belts.
•
Be sure everyone in your vehicle is in a seat and
using a seat belt properly.UNDERSTANDING THE FEATURES OF YOUR VEHICLE 119
3
Page 136 of 532
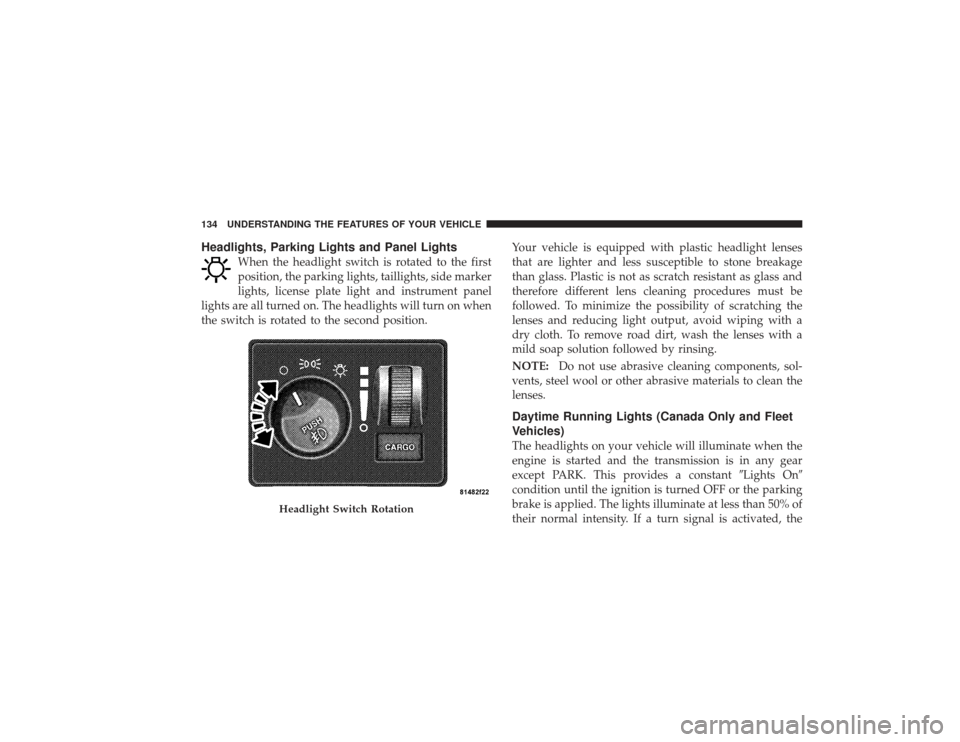
Headlights, Parking Lights and Panel Lights
When the headlight switch is rotated to the first
position, the parking lights, taillights, side marker
lights, license plate light and instrument panel
lights are all turned on. The headlights will turn on when
the switch is rotated to the second position. Your vehicle is equipped with plastic headlight lenses
that are lighter and less susceptible to stone breakage
than glass. Plastic is not as scratch resistant as glass and
therefore different lens cleaning procedures must be
followed. To minimize the possibility of scratching the
lenses and reducing light output, avoid wiping with a
dry cloth. To remove road dirt, wash the lenses with a
mild soap solution followed by rinsing.
NOTE:
Do not use abrasive cleaning components, sol-
vents, steel wool or other abrasive materials to clean the
lenses.
Daytime Running Lights (Canada Only and Fleet
Vehicles)The headlights on your vehicle will illuminate when the
engine is started and the transmission is in any gear
except PARK. This provides a constant �Lights On�
condition until the ignition is turned OFF or the parking
brake is applied. The lights illuminate at less than 50% of
their normal intensity. If a turn signal is activated, the
Headlight Switch Rotation
134 UNDERSTANDING THE FEATURES OF YOUR VEHICLE
Page 153 of 532

WARNING!
Even if the display still reads a few degrees above
32°F ( 0°C), the road surface may be icy, particularly
in woods or on bridges. Drive carefully under such
conditions to prevent an accident and possible per-
sonal injury or property damage.Automatic Compass CalibrationThis compass is self-calibrating which eliminates the
need to manually set the compass. When the vehicle is
new, the compass may appear erratic and the CAL
symbol will be displayed.
After completing up to three 360 degree turns, with the
vehicle traveling less than 5 mph (8 km/h), in an area free
from large metal or metallic objects, the CAL symbol will
turn off and the compass will function normally.
Manual Compass CalibrationNOTE:To ensure proper compass calibration, make
sure the compass variance is properly set before manu-
ally calibrating the compass.
If the compass appears erratic and the CAL symbol does
not appear, you must manually put the compass into the
“Calibration” mode.Recalibrating The CompassStart the engine and leave the transmission in the PARK
position then set the display to “Compass/Temperature.”
Press and hold the RESET button to change the display
between VAR (compass variance) and CAL (compass
calibration) modes. When the CAL symbol is displayed,
complete one 360 degree turn in an area free from large
metal objects or power lines. The CAL symbol will turn
off and the compass will function normally.UNDERSTANDING THE FEATURES OF YOUR VEHICLE 151
3
Page 155 of 532

RESET button approximately five seconds. The last vari-
ance zone number will be displayed. Press the STEP
button to select the new variance zone and press the
RESET button to resume normal operation.Outside TemperatureBecause the ambient temperature sensor is located under
the hood, engine temperature can influence the displayed
temperature, therefore, temperature readings are slowly
updated when the vehicle speed is below 20 mph
(30 km/h) or during stop and go driving.GARAGE DOOR OPENER — IF EQUIPPEDHomeLink�replaces up to three remote controls (hand-
held transmitters) that operate devices such as garage
door openers, motorized gates, lighting, or home security
systems. The HomeLink� unit operates off of your vehi-
cle’s battery. The HomeLink�
buttons are located in the overhead
console, and contain one, two, or three dots/lines desig-
nating the different HomeLink� channels.
NOTE: HomeLink� is disabled when the Vehicle Theft
Alarm is active.
HomeLink Buttons
UNDERSTANDING THE FEATURES OF YOUR VEHICLE 153
3
Page 166 of 532
CAUTION!
•
Many accessories that can be plugged in draw
power from the vehicle’s battery, even when not in
use (i.e., cellular phones, etc.). Eventually, if
plugged in long enough, the vehicle’s battery will
discharge sufficiently to degrade battery life
and/or prevent the engine from starting.
•
Accessories that draw higher power (i.e., coolers,
vacuum cleaners, lights, etc.), will discharge the
battery even more quickly. Only use these inter-
mittently and with greater caution.
•
After the use of high power draw accessories, or
long periods of the vehicle not being started (with
accessories still plugged in), the vehicle must be
driven a sufficient length of time to allow the
generator to recharge the vehicle’s battery.
CIGAR LIGHTER AND ASH RECEIVERThe removable ash receiver is located in the instrument
panel cupholder tray.
The cigar lighter is located on the instrument panel,
above and to the left of the ash receiver.
As a child safety precaution, the lighter only operates
with the ignition switch ON. It heats when pushed in and
pops out automatically when ready for use.To preserve
the heating element, do not hold the lighter in the
heating position.
164 UNDERSTANDING THE FEATURES OF YOUR VEHICLE
Page 170 of 532
WARNING!
•
This armrest is not a seat. Anyone seated on the
armrest could be seriously injured during vehicle
operation, or an accident. Only use the center
seating position when the armrest is fully upright.
•
In an accident, the latch may open if the total
weight of the items stored exceeds about 10 lbs
(4.5 kg). These items could be thrown about en-
dangering occupants of the vehicle. Items stored
should not exceed a total of 10 lbs (4.5 kg).
CAUTION!
•
Many accessories that can be plugged in draw
power from the vehicle’s battery, even when not in
use (i.e., cellular phones, etc.). Eventually, if
plugged in long enough, the vehicle’s battery will
discharge sufficiently to degrade battery life
and/or prevent engine starting.
•
Accessories that draw higher power (i.e., coolers,
vacuum cleaners, lights, etc.), will degrade the
battery even more quickly. Only use these inter-
mittently and with greater caution.
•
After the use of high power draw accessories, or
long periods of the vehicle not being started (with
accessories still plugged in), the vehicle must be
driven a sufficient length of time to allow the
generator to recharge the vehicle’s battery.
168 UNDERSTANDING THE FEATURES OF YOUR VEHICLE