Page 215 of 532
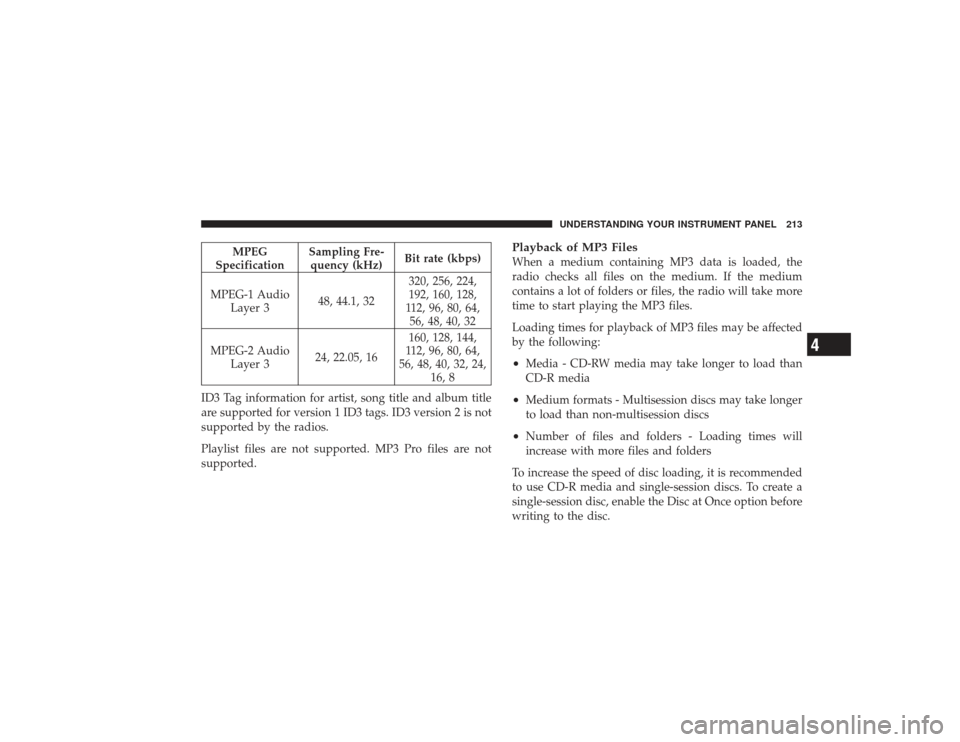
MPEG
Specification Sampling Fre-
quency (kHz) Bit rate (kbps)
MPEG-1 Audio Layer 3 48, 44.1, 32 320, 256, 224,
192, 160, 128,
112, 96, 80, 64, 56, 48, 40, 32
MPEG-2 Audio Layer 3 24, 22.05, 16 160, 128, 144,
112, 96, 80, 64,
56, 48, 40, 32, 24, 16, 8
ID3 Tag information for artist, song title and album title
are supported for version 1 ID3 tags. ID3 version 2 is not
supported by the radios.
Playlist files are not supported. MP3 Pro files are not
supported.
Playback of MP3 FilesWhen a medium containing MP3 data is loaded, the
radio checks all files on the medium. If the medium
contains a lot of folders or files, the radio will take more
time to start playing the MP3 files.
Loading times for playback of MP3 files may be affected
by the following:•
Media - CD-RW media may take longer to load than
CD-R media
•
Medium formats - Multisession discs may take longer
to load than non-multisession discs
•
Number of files and folders - Loading times will
increase with more files and folders
To increase the speed of disc loading, it is recommended
to use CD-R media and single-session discs. To create a
single-session disc, enable the Disc at Once option before
writing to the disc.
UNDERSTANDING YOUR INSTRUMENT PANEL 213
4
Page 216 of 532
Operation Instructions - (CD Mode for MP3 Audio
Play)
SEEK Button (CD Mode for MP3 Play)Pressing the right side of the SEEK button plays the next
MP3 File. Pressing the left side of the SEEK button plays
the beginning of the MP3 file. Pressing the button within
the first ten seconds plays the previous file.LOAD/EJECT Button (CD Mode for MP3 Play)
LOAD/ EJECT - Load
Press the LOAD/ EJECT button and the push-
button with the corresponding number where
the CD is being loaded. The radio will display
“PLEASE WAIT” and prompt when to INSERT
DISC. After the radio displays �LOAD DISC�insert the
CD into the player.
The radio display will show �LOADING DISC�when the
disc is loading.
LOAD/ EJECT - Eject
Press the LOAD/ EJECT button and the push-
button with the corresponding number where
the CD was loaded and the disc will unload
and move to the entrance for easy removal. The
radio display will show �EJECTING DISC�when the disc
is being ejected and prompt the user to remove the disc.
If you have ejected a disc and have not removed it within
15 seconds, it will be reloaded. If the CD is not removed,
the radio will continue to play the non-removed CD. If
the CD is removed and there are other CD’s in the radio,
the radio will play the next CD after a 2 minute timeout.
If the CD is removed and there are no other CD’s in the
radio, the radio will remain in CD mode and display
�INSERT DISC” for 2 minutes. After 2 minutes the radio
will go to the previous tuner mode.
214 UNDERSTANDING YOUR INSTRUMENT PANEL
Page 219 of 532
Power Switch/Volume Control (Rotary)Push the ON/VOL control to turn the radio ON. Push the
ON/VOL a second time to turn OFF the radio.Electronic Volume ControlThe electronic volume control turns continuously (360–
degrees) in either direction without stopping. Turning the
volume control to the right increases the volume and to
the left decreases it.
When the audio system is turned on, the sound will be
set at the same volume level as last played.
For your convenience, the volume can be turned down,
but not up, when the audio system is OFF and the
ignition is ON.MODE Button (Radio Mode)Press the MODE button repeatedly to select between the
CD player and Satellite Radio (if equipped).
SEEK Button (Radio Mode)Press and release the SEEK button to search for the next
listenable station in either AM/FM or Satellite (if
equipped) mode. Press the right side of the button to seek
up and the left side to seek down. The radio will remain
tuned to the new station until you make another selec-
tion. Holding the button will bypass stations without
stopping until you release it.MUTE Button (Radio Mode)Press the MUTE button to cancel the sound from the
speakers. “MUTE” will display. Press the MUTE button a
second time and the sound from the speakers will return.
Rotating the volume control, turning the radio ON/OFF,
or turning the ignition ON/OFF, will cancel the MUTE
feature.
NOTE:In Hands-Free Phone (if equipped) mode, the
MUTE button mutes the microphone.
UNDERSTANDING YOUR INSTRUMENT PANEL 217
4
Page 220 of 532

SCAN Button (Radio Mode)Pressing the SCAN button causes the tuner to search for
the next listenable station in either, AM, FM, or Satellite
(if equipped) frequencies, pausing for five seconds at
each listenable station before continuing to the next. To
stop the search, press SCAN a second time.PSCAN Button (Radio Mode)Pressing the PSCAN button causes the tuner to scan
through preset stations in either AM, FM, or Satellite (if
equipped) frequencies, pausing for five seconds at each
preset station before continuing to the next. To stop the
search, press PSCAN a second time.TIME ButtonPress the TIME button and the time of day will display
for five seconds.Clock Setting Procedure1. Press and hold the TIME button until the hours blink.2. Adjust the hours by turning the TUNE/AUDIO con-
trol.
3. After the hours are adjusted, press the TUNE/AUDIO
control to set the minutes. The minutes will begin to
blink.
4. Adjust the minutes using the TUNE/AUDIO control.
5. To exit, press any button/knob or wait five seconds.
RW/FF (Radio Mode)Pressing the Rewind/Fast Forward button causes the
tuner to search for the next frequency in the direction of
the arrows. This feature operates in either AM, FM or
Satellite (if equipped) frequencies.TUNE Control (Radio Mode)Turn the rotary TUNE control clockwise to increase or
counterclockwise to decrease the frequency.
218 UNDERSTANDING YOUR INSTRUMENT PANEL
Page 224 of 532
RND/SET Button (Random Play Button) (CD
Mode)Press this button while the CD is playing to activate
Random play. This feature plays the selections on the
compact disc in random order to provide an interesting
change of pace.
Press the SEEK button to move to the next randomly
selected track.
Press the RND button a second time to stop Random
play.Operating Instructions - Auxiliary ModeThe auxiliary (AUX) jack is an audio input jack, which
allows the user to plug in a portable device such as an
MP3 player, cassette player, or microphone and utilize
the vehicle’s audio system to amplify the source and play
through the vehicle speakers.The auxiliary mode becomes active when an electrical
device is plugged into the AUX jack using a standard
3.5 mm stereo audio cable and the user presses and
releases the MODE button until “AUX” appears on the
display.
NOTE:
The radio will return to the last stored mode if
the ignition switch is turned from the OFF/LOCK posi-
tion to the ACC position, the radio is turned on, and the
radio was previously in the AUX mode.
SEEK Button (Auxiliary Mode)No function.MUTE Button (Auxiliary Mode)Press the MUTE button to cancel the sound from the
speakers. �MUTE�will display. Press the MUTE button a
second time and the sound from the speakers will return.
Rotating the volume control or turning the ignition
OFF/ON will also return the sound from the speakers.
222 UNDERSTANDING YOUR INSTRUMENT PANEL
Page 229 of 532
uconnect�studios (SATELLITE RADIO) — IF
EQUIPPEDSatellite radio uses direct satellite to receiver broadcast-
ing technology to provide clear digital sound, coast to
coast. The subscription service provider is Sirius Satellite
Radio. This service offers over 130 channels of music,
sports, news, entertainment, and programming for chil-
dren, directly from its satellites and broadcasting studios.
NOTE: Sirius service is not available in Hawaii and has
limited coverage in Alaska.System ActivationSirius Satellite Radio service is pre-activated, and you
may begin listening immediately to the one year of audio
service that is included with the factory-installed satellite
radio system in your vehicle. Sirius will supply a wel-
come kit that contains general information, including
how to setup your on-line listening account at no addi-
tional charge. For further information, call the toll-free number 888-539-7474, or visit the Sirius web site at
www.sirius.com, or at www.siriuscanada.ca for Cana-
dian residents.
Electronic Serial Number/Sirius Identification
Number (ESN/SID)Please have the following information available when
calling:
1. The Electronic Serial Number/Sirius Identification
Number (ESN/SID).
2. Your Vehicle Identification Number.
To access the ESN/SID, refer to the following procedure.ESN/SID Access with REF RadiosWith the ignition switch in the ACC position and the
radio OFF, press the CD Eject and TIME buttons simul-
taneously for three seconds. The first four digits of the
12-digit ESN/SID number will display. Press the SEEK
UP button to display the next four digits. Continue to
UNDERSTANDING YOUR INSTRUMENT PANEL 227
4
Page 461 of 532
Cavity CartridgeFuseMini
Fuse Description
1 20 Amp
YellowPower Outlet Console
2 20 Amp
YellowCabin Compartment
Node (CCN) Door
Locks
3——
4 15 Amp
BlueAisin Transmission
Controls (Diesel Only)
5 20 Amp
YellowPower Sunroof
6 10 Amp
RedVistronic Fan/
Wastegate Solenoid
7——
8 10 Amp
RedHeated Mirrors
Cavity Cartridge
FuseMini
Fuse Description
9 30 Amp Pink Off Road Module
Power
10 5 Amp
OrangeTrx-Off Rd Pkg Sen
(Gas Engine Only)
NOTE: Insert 5 amp
fuse in this cavity to
enable the TRX capa-
bility (If Equipped).
11 20 Amp
Yellow Ignition Off Draw
(IOD)-Cabin Com-
partment Node
(CCN)/Radio/Under
Hood Lamp/Wireless
Control Module
(WCM)/Satellite Digi-
tal Audio Receiver
(SDARS)/Hands Free
Module (HFM)/EOM
MAINTAINING YOUR VEHICLE 459
7
Page 463 of 532
Cavity CartridgeFuseMini
Fuse Description
27 40 Amp Green Power Seats
28 10 Amp
RedPower Run/Start-
PCM/Steering Angle
Sensor
29 10 Amp
Red4X4 Switch/Pass Dr
Switch/EC Mirror
30 15 Amp
BluePower Run/Start-
ABS/RWAL/Smart
Bar/YAW Sensor/
Universal Exhaust
Gas Oxygen (Uego)
Sensor Controller
31 10 Amp
RedPCM (Gas)/TCM
(Diesel 58RFE)
Cavity Cartridge
FuseMini
Fuse Description
32 10 Amp
RedPower Ignition Run
— Adjustable Pedals
LED
33 10 Amp
RedPower-IGN Run —
HVAC
34 — —
35 15 Amp
BlueCabin Compartment
Node (CCN) Illumi-
nation
36 25 Amp
NaturalAudio_Amplifier
37 15 Amp
BlueVariable Gate Turbo
(VGT) — Turbo Die-
sel
38 20 Amp
YellowPower Outlet IP
MAINTAINING YOUR VEHICLE 461
7