Page 405 of 532
•
The ignition key must be ON for a transfer case shift to
take place and for the position indicator lights to be
operable. If the key is not ON, the shift will not take
place and no position indicator lights will be on or
flashing.
•
Flashing Neutral position indicator light indicates that
shift requirements have not been met.
WARNING!
You or others could be injured if you leave the
vehicle unattended with the transfer case in the
NEUTRAL position without first fully engaging the
parking brake. The transfer case NEUTRAL position
disengages both the front and rear driveshafts from
the powertrain and will allow the vehicle to move
despite the transmission position. The parking brake
should always be applied when the driver is not in
the vehicle.
CAUTION!
•
Do not use a bumper-mounted clamp-on tow bar
on your vehicle. The bumper face bar will be
damaged.
•
Do not disconnect the rear driveshaft because
fluid will leak from the transfer case and fluid loss
will damage internal parts.
EQUIPMENT IDENTIFICATION PLATEThe equipment Identification Plate is located on the hood
inner surface.
The following information about your vehicle is dis-
played on this plate: Model, Wheelbase, Vehicle Identifi-
cation Number, Truck Order Number, and code numbers
with descriptions of all production and special equip-
ment on the truck as shipped from the factory.
NOTE:Always refer to the Equipment Identification
Plate When Ordering Parts.
STARTING AND OPERATING 403
5
Page 408 of 532
HAZARD WARNING FLASHERThe Hazard Warning flasher switch is mounted on the
top of the steering column.Press the switch to turn on the Hazard Warning
flasher. When the switch is activated, all directional
turn signals will flash on and off to warn oncoming
traffic of an emergency. Press the switch a second time to
turn off the Hazard Warning flasher.
This is an emergency warning system and should not be
used when the vehicle is in motion. Use it when your
vehicle is disabled and is creating a safety hazard for
other motorists.
When you must leave the vehicle to seek assistance, the
Hazard Warning flasher will continue to operate even
though the ignition switch is OFF.
NOTE: With extended use, the Hazard Warning flasher
may discharge your battery.
Hazard Warning Flasher Switch
406 WHAT TO DO IN EMERGENCIES
Page 412 of 532
3. Place the shift lever into PARK. On four-wheel drive
vehicles, shift the transfer case to the 4L position.
4. Turn the ignition OFF.
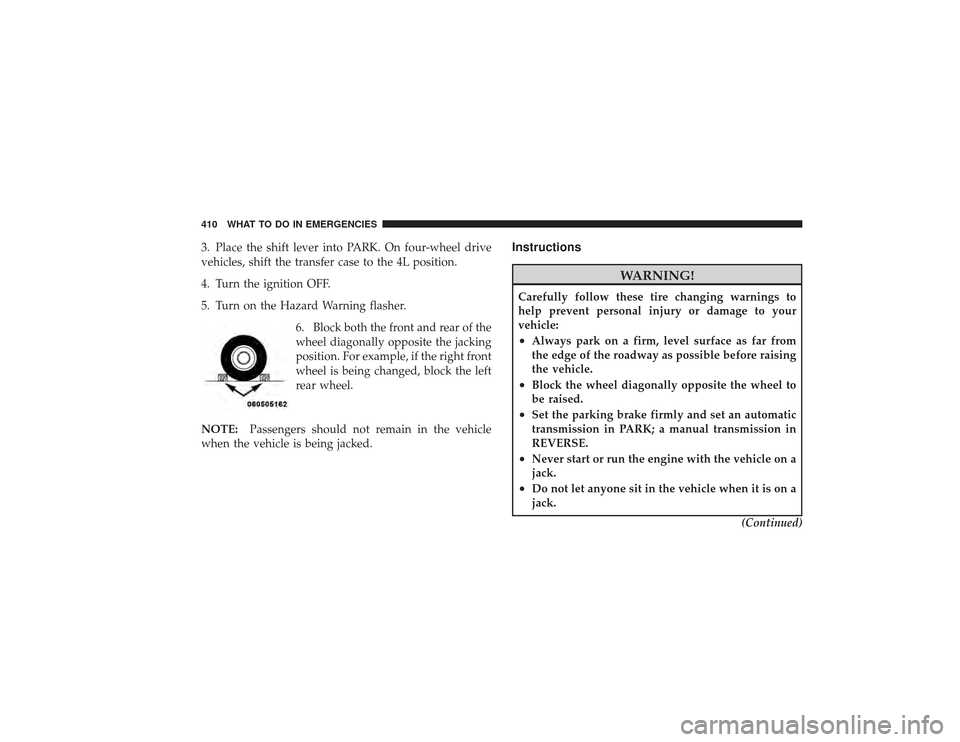
5. Turn on the Hazard Warning flasher.6. Block both the front and rear of the
wheel diagonally opposite the jacking
position. For example, if the right front
wheel is being changed, block the left
rear wheel.
NOTE: Passengers should not remain in the vehicle
when the vehicle is being jacked.
Instructions
WARNING!
Carefully follow these tire changing warnings to
help prevent personal injury or damage to your
vehicle:•
Always park on a firm, level surface as far from
the edge of the roadway as possible before raising
the vehicle.
•
Block the wheel diagonally opposite the wheel to
be raised.
•
Set the parking brake firmly and set an automatic
transmission in PARK; a manual transmission in
REVERSE.
•
Never start or run the engine with the vehicle on a
jack.
•
Do not let anyone sit in the vehicle when it is on a
jack.
(Continued)
410 WHAT TO DO IN EMERGENCIES
Page 422 of 532
2. Park the booster vehicle within cable reach but with-
out letting the vehicles touch. Set the parking brake on
both vehicles, place the automatic transmission in PARK
and turn the ignition OFF.
3. Turn off the heater, radio, and all unnecessary electri-
cal loads.
4. Connect one end of a jumper cable to the positive
terminal of the booster battery. Connect the other end of
the same cable to the positive terminal of the discharged
battery.
WARNING!
Do not permit vehicles to touch each other as this
could establish a ground connection and personal
injury could result.5. Connect the other cable; first to the negative terminal
of the booster battery, and then to the engine of the
vehicle with the discharged battery. Make sure you have
a good contact on the engine.
WARNING!
•
You should not try to start your vehicle by pushing
or towing.
•
Do not connect the cable to the negative post of the
discharge battery. The resulting electrical spark
could cause the battery to explode.
•
During cold weather when temperatures are be-
low freezing point, electrolyte in a discharged
battery may freeze. Do not attempt jump-starting
because the battery could rupture or explode. The
battery temperature must be brought up above
freezing point before attempting jump-start.
420 WHAT TO DO IN EMERGENCIES
Page 425 of 532
4-Wheel Drive Vehicles
CAUTION!
To avoid damage to the transfer case while towing,
always use one of the following methods.•
The transfer case must be in the neutral position, and
the transmission must be in PARK to tow a 4-Wheel
Drive vehicle with one end of the vehicle raised.
•
The manufacturer recommends towing with all wheels
OFFthe ground. Acceptable methods are to tow the
vehicle on a flatbed or with one end of vehicle raised
and the opposite end on a towing dolly.
2–Wheel Drive VehiclesProvided that the transmission is operable, tow with the
transmission in NEUTRAL and the ignition key in the
OFF position along with the front wheels raised and the
rear wheels on the ground. Speed must not exceed
30 mph (50 km/h) and distance must not exceed 15 miles
(25 km).
If the vehicle is to be towed faster than 30 mph (50 km/h)
or more than 15 miles (25 km) the vehicle must be towed
with the rear wheels raised and the front wheels on the
ground. It may also be towed on a flatbed or with the
front wheels raised and the rear wheels on a dolly.
CAUTION!
Towing faster than 30 mph (50 km/h) or for more than
15 miles (25 km) can cause severe damage to the
transmission.
WHAT TO DO IN EMERGENCIES 423
6
Page 431 of 532
appear the next time the vehicle is started. This might
indicate a damaged cap. If the problem is detected twice
in a row, the system will turn on the MIL. Resolving the
problem will turn the MIL light off.EMISSIONS INSPECTION AND MAINTENANCE
PROGRAMSIn some localities, it may be a legal requirement to pass
an inspection of your vehicle’s emissions control system.
Failure to pass could prevent vehicle registration.For states that require an Inspection and Mainte-
nance (I/M), this check verifies the Malfunction
Indicator Light (MIL) is functioning and is not on
when the engine is running, and that the OBD II system
is ready for testing.
Normally, the OBD II system will be ready. The OBD II
system may notbe ready if your vehicle was recently serviced, recently had a dead battery or a battery replace-
ment. If the OBD II system should be determined not
ready for the I/M test, your vehicle may fail the test.
Your vehicle has a simple ignition key-actuated test,
which you can use prior to going to the test station. To
check if your vehicle’s OBD II system is ready, you must
do the following:
1. Insert your ignition key into the ignition switch.
2. Turn the ignition to the ON position, but do not crank
or start the engine.
3. If you crank or start the engine, you will have to start
this test over.
4. As soon as you turn your key to the ON position, you
will see the MIL symbol come on as part of a normal bulb
check.
MAINTAINING YOUR VEHICLE 429
7
Page 432 of 532
5. Approximately 15 seconds later, one of two things will
happen:a. The MIL will flash for about 10 seconds and then
return to being fully illuminated until you turn OFF
the ignition or start the engine. This means that your
vehicle’s OBD II system is not readyand you should
not proceed to the I/M station.
b. The MIL will not flash at all and will remain fully
illuminated until you turn OFF the ignition or start the
engine. This means that your vehicle’s OBD II system
is ready and you can proceed to the I/M station.
If your OBD II system is not ready,you should see your
authorized dealer or repair facility. If your vehicle was
recently serviced or had a battery failure or replacement,
you may need to do nothing more than drive your
vehicle as you normally would in order for your OBD II
system to update. A recheck with the above test routine
may then indicate that the system is now ready. Regardless of whether your vehicle’s OBD II system is
ready or not, if the MIL is illuminated during normal
vehicle operation you should have your vehicle serviced
before going to the I/M station. The I/M station can fail
your vehicle because the MIL is on with the engine
running.
REPLACEMENT PARTSUse of genuine MOPAR�
parts for normal/scheduled
maintenance and repairs is highly recommended to en-
sure the designed performance. Damage or failures
caused by the use of non-MOPAR� parts for maintenance
and repairs will not be covered by the manufacturer’s
warranty.DEALER SERVICEYour authorized dealer has the qualified service person-
nel, special tools and equipment to perform all service
operations in an expert manner. Service Manuals are
available which include detailed service information for
430 MAINTAINING YOUR VEHICLE
Page 443 of 532
To minimize the possibility of catalyst damage:•
Do not shut off the engine or interrupt the ignition
when the transmission is in gear and the vehicle is in
motion.
•
Do not try to start the engine by pushing or towing the
vehicle.
•
Do not idle the engine with any spark plug wires
disconnected or removed, such as when diagnostic
testing, or for prolonged periods during very rough
idling or malfunctioning operating conditions.
Cooling System
WARNING!
You or others can be badly burned by hot engine
coolant (antifreeze) or steam from your radiator. If
you see or hear steam coming from under the hood,
do not open the hood until the radiator has had time
to cool. Never try to open a cooling system pressure
cap when the radiator is hot.Engine Coolant ChecksCheck the engine coolant (antifreeze) protection every
12 months (before the onset of freezing weather, where
applicable). If the engine coolant (antifreeze) is dirty or
rusty in appearance, the system should be drained,
flushed and refilled with fresh engine coolant (anti-
freeze). Check the front of the A/C condenser for any
MAINTAINING YOUR VEHICLE 441
7