Page 39 of 523
Window Lockout Switch
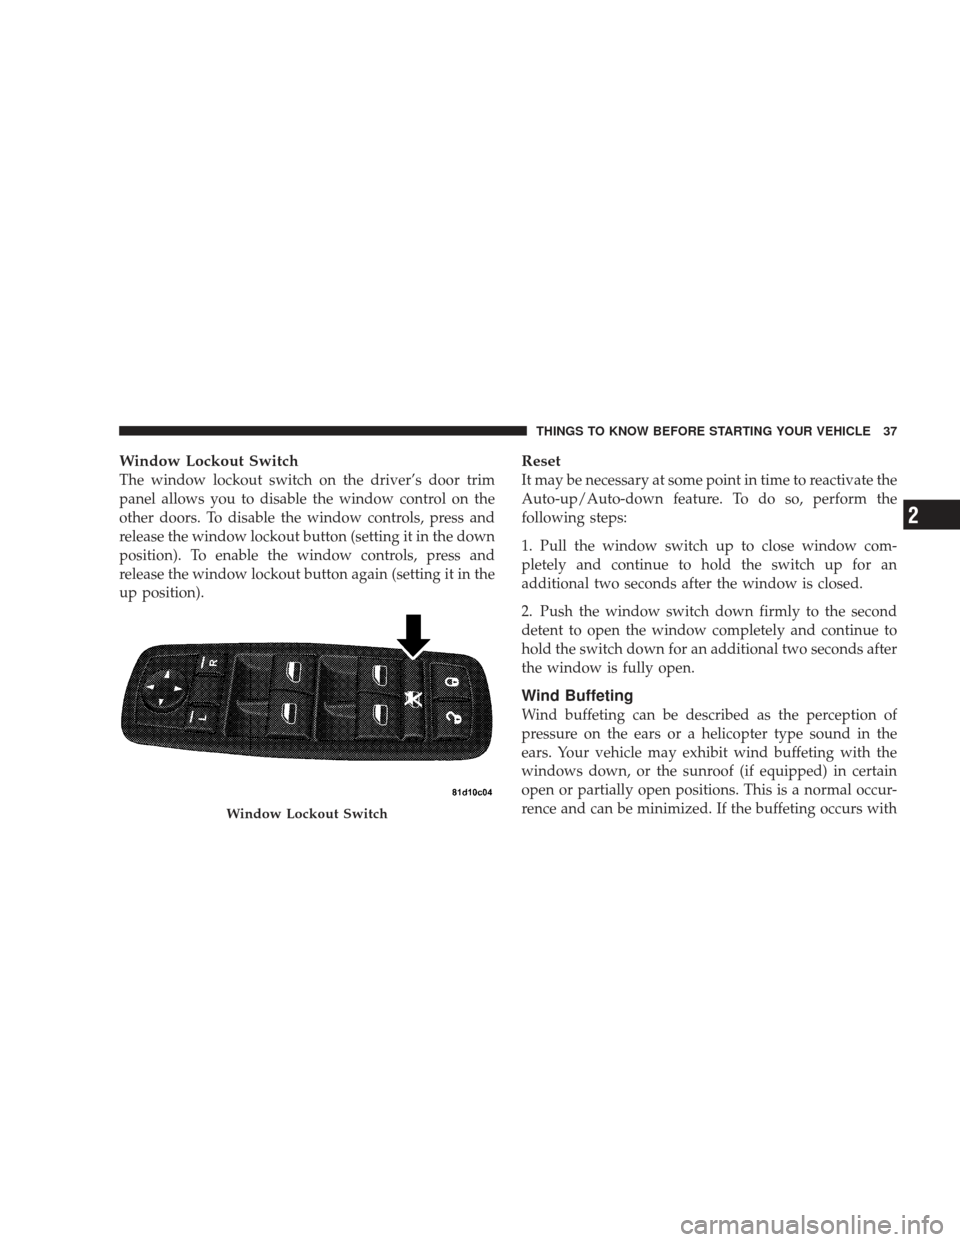
The window lockout switch on the driver’s door trim
panel allows you to disable the window control on the
other doors. To disable the window controls, press and
release the window lockout button (setting it in the down
position). To enable the window controls, press and
release the window lockout button again (setting it in the
up position).
Reset
It may be necessary at some point in time to reactivate the
Auto-up/Auto-down feature. To do so, perform the
following steps:
1. Pull the window switch up to close window com-
pletely and continue to hold the switch up for an
additional two seconds after the window is closed.
2. Push the window switch down firmly to the second
detent to open the window completely and continue to
hold the switch down for an additional two seconds after
the window is fully open.
Wind Buffeting
Wind buffeting can be described as the perception of
pressure on the ears or a helicopter type sound in the
ears. Your vehicle may exhibit wind buffeting with the
windows down, or the sunroof (if equipped) in certain
open or partially open positions. This is a normal occur-
rence and can be minimized. If the buffeting occurs with
Window Lockout Switch
THINGS TO KNOW BEFORE STARTING YOUR VEHICLE 37
2
Page 212 of 523
off the message. If the problem persists, the message will
appear the next time the vehicle is started.
A loose, improperly installed, or damaged fuel filler cap
may also turn on the MIL. (See page 421 for more
information.)
Change Oil Message (Base And Mid Line Clusters
Only)
Your vehicle is equipped with an engine oil change
indicator system. The “CHANgE OIL” message will flash
in the instrument cluster odometer for approximately 12
seconds after a single chime has sounded to indicate the
next scheduled oil change interval. The engine oil change
indicator system is duty cycle based, which means the
engine oil change interval may fluctuate dependent upon
your personal driving style.Unless reset, this message will continue to display each
time you turn the ignition switch to the ON position. To
turn off the message temporarily, press and release the
TRIP ODOMETER button on the instrument cluster. To
reset the oil change indicator system (after performing
the scheduled maintenance) perform the following pro-
cedure:
1. Turn the ignition switch to the ON position. (Do not
start the engine).
2. Fully depress the accelerator pedal slowly three
times within 10 seconds.
3. Turn the ignition switch to the LOCK position.
NOTE: If the indicator message illuminates when you
start the vehicle, the oil change indicator system did not
reset. If necessary, repeat this procedure.
210 UNDERSTANDING YOUR INSTRUMENT PANEL
Page 214 of 523
18. Charging System Warning LightThis light shows the status of the electrical charg-
ing system. The light should turn on when the
ignition switch is first turned ON and remain on briefly
as a bulb check. If the light stays on or turns on while
driving, turn off some of the vehicle’s electrical devices,
such as the fog lights or rear defroster. If the light remains
on, it means that the charging system is experiencing a
problem. See your local authorized dealer to obtain
service immediately.
19. Cruise Indicator Light — If Equipped This indicator lights when the electronic speed
control system is turned on. (See page 159 for
more information.) 20. Trip Odometer Button
Changing the Display
Press and release this button once to change the display
from odometer to “Trip A.” Press and release it again to
change the display from “Trip A” to “Trip B.”
Resetting the Trip Odometer
Display the trip mileage that you want to reset, “Trip A”
or “Trip B.” Then push and hold the button (approxi-
mately two seconds) until the display resets to 0. The
odometer must be in Trip Mode to reset the trip odom-
eter.
212 UNDERSTANDING YOUR INSTRUMENT PANEL
Page 225 of 523
![DODGE JOURNEY 2009 1.G Owners Manual Press this button to reset Trip Functions and
change Personal Settings.
Press this button to scroll through Trip Func-
tions (Average Fuel Economy, Distance To
Empty [DTE], Elapsed Time, Units In), Sy DODGE JOURNEY 2009 1.G Owners Manual Press this button to reset Trip Functions and
change Personal Settings.
Press this button to scroll through Trip Func-
tions (Average Fuel Economy, Distance To
Empty [DTE], Elapsed Time, Units In), Sy](/manual-img/12/5639/w960_5639-224.png)
Press this button to reset Trip Functions and
change Personal Settings.
Press this button to scroll through Trip Func-
tions (Average Fuel Economy, Distance To
Empty [DTE], Elapsed Time, Units In), System
Status Messages, and Personal Settings (Cus-
tomer Programmable Features).Press this button to display the
Compass/Outside Temperature.Electronic Vehicle Information Center (EVIC)
Displays
When the appropriate conditions exist, the EVIC displays
the following messages:
•Turn Signal On (with a continuous warning chime if
the vehicle is driven more than 1 mi [1.6 km] with
either turn signal on)
•Left Front Turn Signal Light Out (with a single chime)
•Left Rear Turn Signal Light Out (with a single chime)
•Right Front Turn Signal Light Out (with a single
chime)
•Right Rear Turn Signal Light Out (with a single chime)
•RKE Battery Low (with a single chime)
•Personal Settings Not Available – Vehicle Not in PARK
RESETButton
SCROLL Button
COMPASS/TEMPERA-
TURE Button
UNDERSTANDING YOUR INSTRUMENT PANEL 223
4
Page 227 of 523
•Coolant Low
•Key in Ignition
•Lights On
Oil Change Required
Your vehicle is equipped with an engine oil change
indicator system. The “Oil Change Required” message
will display in the EVIC for approximately 5 seconds
after a single chime has sounded to indicate the next
scheduled oil change interval. The engine oil change
indicator system is duty cycle based, which means the
engine oil change interval may fluctuate dependent upon
your personal driving style.
Unless reset, this message will continue to display each
time you turn the ignition switch to the ON position. To
turn off the message temporarily, press and release theMENU button. To reset the oil change indicator system
(after performing the scheduled maintenance) perform
the following procedure:
1. Turn the ignition switch to the ON position (Do not
start the engine).
2. Fully depress the accelerator pedal slowly three times
within 10 seconds.
3. Turn the ignition switch to the LOCK position.
NOTE:
If the indicator message illuminates when you
start the vehicle, the oil change indicator system did not
reset. If necessary, repeat this procedure.
UNDERSTANDING YOUR INSTRUMENT PANEL 225
4
Page 228 of 523
Trip Functions
Press and release the MENU button until one of the
following Trip Functions displays in the EVIC:
•Average Fuel Economy
•Distance To Empty
•Elapsed Time
•Units In
Press the SCROLL button to cycle through all the Trip
Computer functions.
The Trip Functions mode displays the following informa-
tion.
•Average Fuel Economy
Shows the average fuel economy since the last reset.
When the fuel economy is reset, the display will read
“RESET” or show dashes for two seconds. Then, the history information will be erased, and the averaging will
continue from the last fuel average reading before the
reset.
•Distance To Empty (DTE)
Shows the estimated distance that can be traveled with
the fuel remaining in the tank. This estimated distance is
determined by a weighted average of the instantaneous
and average fuel economy, according to the current fuel
tank level. DTE cannot be reset through the RESET
button.
NOTE: Significant changes in driving style or vehicle
loading will greatly affect the actual drivable distance of
the vehicle, regardless of the DTE displayed value.
•When the DTE value is less than 30 mi (48 km)
estimated driving distance, the DTE display will
change to a text display of �LOW FUEL.�This display
will continue until the vehicle runs out of fuel. Adding
226 UNDERSTANDING YOUR INSTRUMENT PANEL
Page 229 of 523
a significant amount of fuel to the vehicle will turn off
the�LOW FUEL� text and a new DTE value will
display.
•Elapsed Time
Shows the total elapsed time of travel since the last reset
when the ignition switch is in the ACC position. Elapsed
time will increment when the ignition switch is in the ON
or START position.
•Units In
The EVIC, odometer, and navigation system (if
equipped) can be changed between English and Metric
units of measure. To make your selection, press and
release the RESET button until “U.S.” or “METRIC”
appears.
To Reset The Display
Reset will only occur while a resettable function is being
displayed. Press and release the RESET button once to
clear the resettable function being displayed. To reset all
resettable functions, press and release the RESET button
a second time within three seconds of resetting the
currently-displayed function. (>Reset ALL will display
during this three-second window).
Compass Display
Press and release this button to display
one of eight compass readings and the
outside temperature. The compass read-
ings indicate the direction the vehicle is
facing.
COMPASS/
TEMPERA-
TURE Button
UNDERSTANDING YOUR INSTRUMENT PANEL 227
4
Page 230 of 523
Automatic Compass Calibration
This compass is self-calibrating, which eliminates the
need to calibrate the compass manually. When the ve-
hicle is new, the compass may appear erratic and the
EVIC will display “CAL” until the compass is calibrated.
You may calibrate the compass by slowly completing one
or more 360-degree turns (in an area free from large metal
or metallic objects) until the “CAL” message displayed in
the EVIC turns off. The compass will now function
normally.
Manual Compass Calibration
If the compass appears erratic or is inaccurate, you can
calibrate the compass manually by performing the fol-
lowing steps.1. Turn the ignition switch ON.
2. Press and release the MENU button until Personal
Settings displays in the EVIC.
3. Press the SCROLL button until “CALIBRATE COM-
PASS” displays in the EVIC.
4. Press and release the RESET button to start the cali-
bration. The message “CAL” will display in the EVIC.
5. Slowly complete one or more 360-degree turns (in an
area free from large metal or metallic objects) until the
“CAL” message turns off. The compass will now function
normally.
228 UNDERSTANDING YOUR INSTRUMENT PANEL