2009 DODGE GRAND CARAVAN tire pressure
[x] Cancel search: tire pressurePage 78 of 535

Cruise control status
Traction/stability control status
Tire Pressure Monitoring System status (if equipped)
Integrated Child Booster Seat — If Equipped
The Integrated Child Booster Seat (if equipped) is located
in each second-row passenger seat. The booster seat is
designed for children weighing between 48 and 85 lbs (22
and 39 kg) and between 47 in (119 cm) and 57 in (145 cm)
tall.
The booster seat is designed to raise the child high
enough to use the vehicle lap and shoulder belt. The
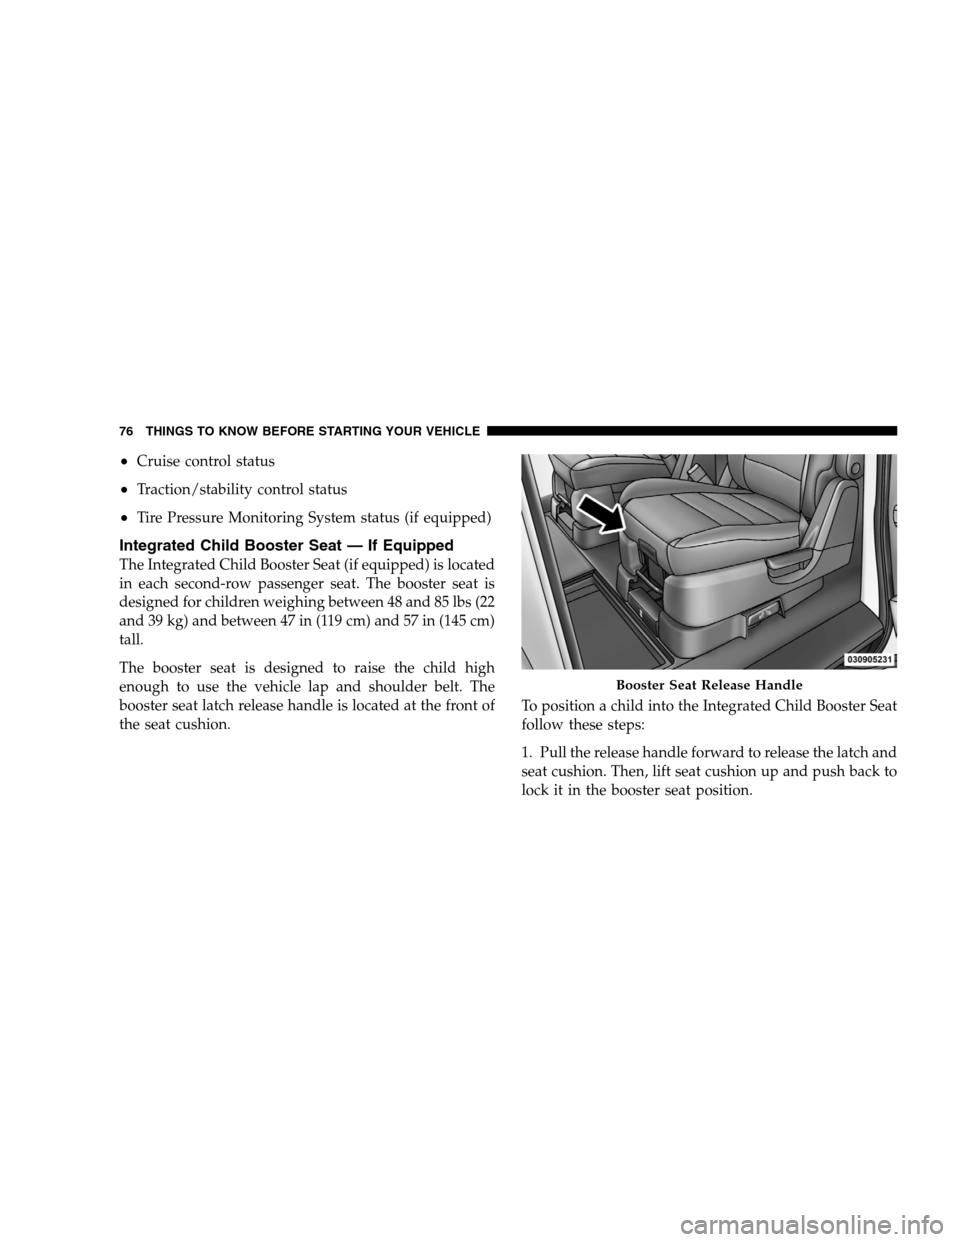
booster seat latch release handle is located at the front of
the seat cushion.
To position a child into the Integrated Child Booster Seat
follow these steps:
1. Pull the release handle forward to release the latch and
seat cushion. Then, lift seat cushion up and push back to
lock it in the booster seat position. Booster Seat Release Handle
76 THINGS
TO KNOW BEFORE STARTING YOUR VEHICLE
Page 96 of 535

DefrosterCheck operation by selecting the defrost mode and place
the blower control on high speed. You should be able to
feel the air directed against the windshield. See your
authorized dealer for service if your defroster is
inoperable.
Periodic Safety Checks You Should Make Outside
the Vehicle
Tires
Examine tires for excessive tread wear and uneven wear
patterns. Check for stones, nails, glass, or other objects
lodged in the tread. Inspect the tread and sidewall for
cuts and cracks. Check the wheel nuts for tightness.
Check the tires (including spare) for proper pressure.
Lights
Have someone observe the operation of exterior lights
while you work the controls. Check turn signal and high
beam indicator lights on the instrument panel.
Door Latches
Check for positive closing, latching, and locking.
Fluid Leaks
Check area under vehicle after overnight parking for fuel,
engine coolant, oil, or other fluid leaks. Also, if gasoline
fumes are detected or if fuel, power steering fluid, or
brake fluid leaks are suspected, the cause should be
located and corrected immediately.
94 THINGS TO KNOW BEFORE STARTING YOUR VEHICLE
Page 246 of 535

11. Odometer / Trip Odometer — If Equipped
The odometer shows the total distance the vehicle has
been driven.
U.S. federal regulations require that upon transfer of
vehicle ownership, the seller certify to the purchaser the
correct mileage that the vehicle has been driven. There-
fore, if the odometer reading is changed during repair or
replacement, be sure to keep a record of the reading
before and after the service so that the correct mileage can
be determined.
The trip odometer shows individual trip mileage. To
switch from odometer to trip odometer, press the Trip
Odometer button.
To reset a trip odometer, display the desired trip odom-
eter to be reset then push and hold the button until the
display resets (approximately two seconds).12. Message Display Area
When the appropriate conditions exist, the following
odometer messages will display:
CHAngE OIL
. . . . . . . . . . . . . . . Oil Change Required
HOTOIL . . . . . . . . . . . . . . . Transaxle Oil Temperature
Exceeds Safe Threshold
CRUISE . . . . . . . . . . . . . . . . . . . . . Cruise Control On
door . . . . . . . . . . . . . . . . . . . . . . . . . . . . . Door Ajar
gATE . . . . . . . . . . . . . . . . . . . . . . . . . . Lift Gate Ajar
gASCAP . . . . . . . . . . . . . . . . . . . . . . . Fuel Cap Fault
hood . . . . . . . . . . . . . . . . . . . . . . . . . . . . Hood Ajar
noFUSE . . . . . . . . . . . . . . . . . . . . . . . . . . Fuse Fault
LoCOOL . . . . . . . . . . . . . . . . . . . . . . . . Low Coolant
LoWASH . . . . . . . . . . . . . . . . . . . . Low Washer Fluid
LoW tirE . . . . . . . . . . . . . . . . . . . . . Low Tire Pressure
244 UNDERSTANDING YOUR INSTRUMENT PANEL
Page 251 of 535

21. Vehicle Security Light — If EquippedThis light will flash at a fast rate for approxi-
mately 15 seconds when the vehicle security
alarm is arming and then will flash slowly until
vehicle is disarmed.
22. Airbag Warning Light This light turns on and remains on for four
seconds as a bulb check when the ignition
switch is first turned ON. If the light is not on
during starting, stays on, or turns on while
driving, have the system inspected by an authorized
dealer as soon as possible.
23. Charging System Light This light shows the status of the electrical charg-
ing system. The light should come on when the
ignition switch is first turned ON and remain on briefly
as a bulb check. If the light stays on or comes on while
driving, turn off some of the vehicle’s non-essential electrical devices or increase engine speed (if at idle). If
the charging system light remains on, it means that the
vehicle is experiencing a problem with the charging
system. Obtain SERVICE IMMEDIATELY. See an autho-
rized dealer.
24. Low Fuel Light
When the fuel level reaches approximately 2.0 gal-
lons (7.8 liters) this light will turn on and remain on
until fuel is added.
25. Tire Pressure Monitoring Telltale Light — If
Equipped
Each tire, including the spare (if provided),
should be checked monthly, when cold and
inflated to the inflation pressure recommended
by the vehicle manufacturer on the vehicle placard or tire
inflation pressure label. (If your vehicle has tires of a
different size than the size indicated on the vehicle placard
or tire inflation pressure label, you should determine the
proper tire inflation pressure for those tires.) UNDERSTANDING YOUR INSTRUMENT PANEL 249
4
Page 252 of 535

As an added safety feature, your vehicle has been
equipped with a Tire Pressure Monitoring System
(TPMS) that illuminates a low tire pressure telltale when
one or more of your tires is significantly under-inflated.
Accordingly, when the low tire pressure telltale illumi-
nates, you should stop and check your tires as soon as
possible, and inflate them to the proper pressure. Driving
on a significantly under-inflated tire causes the tire to
overheat and can lead to tire failure. Under-inflation also
reduces fuel efficiency and tire tread life, and may affect
the vehicle’s handling and stopping ability.
Please note that the TPMS is not a substitute for proper
tire maintenance, and it is the driver ’s responsibility to
maintain correct tire pressure, even if under-inflation has
not reached the level to trigger illumination of the TPMS
low tire pressure telltale.Your vehicle has also been equipped with a TPMS
malfunction indicator to indicate when the system is not
operating properly. The TPMS malfunction indicator is
combined with the low tire pressure telltale. When the
system detects a malfunction, the telltale will flash for
approximately one minute and then remain continuously
illuminated. This sequence will continue upon subse-
quent vehicle start-ups as long as the malfunction exists.
When the malfunction indicator is illuminated, the sys-
tem may not be able to detect or signal low tire pressure
as intended. TPMS malfunctions may occur for a variety
of reasons, including the installation of replacement or
alternate tires or wheels on the vehicle that prevent the
TPMS from functioning properly. Always check the
TPMS malfunction telltale after replacing one or more
tires or wheels on your vehicle, to ensure that the
replacement or alternate tires and wheels allow the TPMS
to continue to function properly.
250 UNDERSTANDING YOUR INSTRUMENT PANEL
Page 253 of 535

CAUTION!The TPMS has been optimized for the original
equipment tires and wheels. TPMS pressures and
warning have been established for the tire size
equipped on your vehicle. Undesirable system opera-
tion or sensor damage may result when using re-
placement equipment that is not of the same size,
type, and/or style. Aftermarket wheels can cause
sensor damage. Do not use tire sealant from a can, or
balance beads if your vehicle is equipped with a
TPMS, as damage to the sensors may result.
26. Electronic Stability Program (ESP) Indicator Light
/ Brake Assist System (BAS) Warning Light The malfunction light for the Electronic Stabil-
ity Program (ESP) is combined with Brake
Assist System (BAS). The yellow “ESP/BAS
Warning Light” comes on when the ignition switch is turned to the “ON” position. They should go
out with the engine running. If the “ESP/BAS Warning
Light” comes on continuously with the engine running, a
malfunction has been detected in either the ESP or the
BAS system. If this light remains on after several ignition
cycles, and the vehicle has been driven several miles/
kilometers at speeds greater than 30 mph (48 km/h), see
an authorized dealer as soon as possible.
27. Compass Mini-Trip Computer (CMTC) Reset
Button
Press the reset button to scroll through sub menus (i.e.,
Outside Temperature, Trip Functions: AVG Fuel
Economy, DTE, Elapsed Time, and Units. Press and hold
the reset button for approximately two seconds to reset
the display shown.
NOTE:
For more detailed operation, refer to “Compass
Mini-Trip Computer” later in this section. UNDERSTANDING YOUR INSTRUMENT PANEL 251
4
Page 258 of 535

ELECTRONIC VEHICLE INFORMATION CENTER
(EVIC) —
IF EQUIPPED
The Electronic Vehicle Information Center (EVIC) fea-
tures a driver-interactive display that is located in the
instrument cluster. This system conveniently allows the driver to select a
variety of useful information by pressing the switches
mounted on the steering wheel. The EVIC consists of the
following:
System Status display
Vehicle information warning message displays
Tire Pressure Monitor System
Personal Settings (Customer-Programmable Features)
Compass display
Outside temperature display
Trip computer functions
Audio Modes displayElectronic Vehicle Information Center (EVIC)
256 UNDERST
ANDING YOUR INSTRUMENT PANEL
Page 260 of 535

Electronic Vehicle Information Center (EVIC)
DisplaysWhen the appropriate conditions exist, the EVIC displays
the following messages:
Door(s) Ajar (with a single chime, if vehicle is in
motion)
Liftgate Ajar (chime will sound when vehicle starts
moving)
Hood Ajar (if equipped with hood switch)
Check TPM System (refer to “Tire Pressure Monitoring
System” in Section 5 of this manual)
Turn Signal On
RKE Battery Low
LOW WASHER FLUID
Oil Change Required
Left Front Turn Signal Light Out
Left Rear Turn Signal Light Out
Right Front Turn Signal Light Out
Right Rear Turn Signal Light Out
Park Assist Disabled
Service Park Assist System
Personal Settings Not Available — Vehicle Not In Park
Blind Spot System Off — This message is displayed
when the ignition is turned to ON to indicate the Blind
Spot System has been turned off.
Blind Spot System Not Available — This message is
displayed to indicate the Blind Spot Monitor (BSM)
system is temporarily unavailable due to sensor block-
age, electronic interference, or other
9temporary9con-
ditions. When this message is displayed both outside
258 UNDERSTANDING YOUR INSTRUMENT PANEL