2009 DODGE DAKOTA instrument cluster
[x] Cancel search: instrument clusterPage 21 of 449
VEHICLE SECURITY ALARM SYSTEM Ð IF
EQUIPPED
The Vehicle Security Alarm system monitors the vehicle
doors and ignition for unauthorized operation. When the
Vehicle Security Alarm system is activated it will provide
both audible and visible signals. The horn will sound
repeatedly for the three minutes and the headlights and
Vehicle Security Light will flash for an additional 15 min-
utes. The engine will not run until the Vehicle Security
Alarm system is disarmed
To Set the Alarm
The Vehicle Security Alarm will set when you use the
power door locks, or use the Remote Keyless Entry (RKE)
transmitter to lock the doors. After all the doors are
locked and closed, the Vehicle Security Light in the
instrument cluster will flash rapidly for approximately
15 seconds to signal that the Vehicle Security Alarmsystem is arming. After the Vehicle Security Alarm is set,
the Vehicle Security Light will flash at a slower rate to
indicate that the system is armed.
NOTE:If the Vehicle Security Light stays on continu-
ously during vehicle operation, have the Vehicle Security
Alarm system checked by an authorized dealer.
To Disarm the System:
Use the RKE transmitter to unlock the door. If something
has triggered the system in your absence, the horn will
sound three times when you unlock the doors. Check the
vehicle for tampering.
The Vehicle Security Alarm system will also disarm if the
vehicle is started with a programmed Sentry Keyt.Ifan
unprogrammed Sentry Keytis used to start a vehicle, the
engine will run for two seconds and then shut down.
After six unsuccessful attempts at starting the engine, the
system will shut down until the correct key is used. To
THINGS TO KNOW BEFORE STARTING YOUR VEHICLE 19
2
Page 53 of 449
position, in the ACC position, or not in the ignition,
the airbags are not on and will not inflate.
During a moderate-to-severe rear impact, the ORC may
only deploy the seat belt pretensioners.
²Also, the ORC turns on the AIRBAG warn-
ing light in the instrument cluster for six to
eight seconds for a self-check when the
ignition is first turned on. After the self-
check, the AIRBAG warning light will turn off. If the
ORC detects a malfunction in any part of the system, it
turns on the AIRBAG warning light either momen-
tarily or continuously. A single chime will sound if the
light comes on again after initial start up.
WARNING!
Ignoring the AIRBAG warning light in your instru-
ment panel could mean you won't have the airbags to
protect you in a collision. If the light does not come
on, stays on after you start the vehicle, or if it comes
on as you drive, have the airbag system checked right
away.
NOTE:Children 12 years and younger should always
ride buckled up in a rear seat, in an appropriate child
restraint.
²TheDriver and Passenger Airbag/Inflator Unitsare
located in the center of the steering wheel and the right
side of the instrument panel. When the ORC detects a
collision requiring the airbags, it signals the inflator
units. A large quantity of nontoxic gas is generated to
inflate the front airbags. Different airbag inflation rates
THINGS TO KNOW BEFORE STARTING YOUR VEHICLE 51
2
Page 101 of 449
Phone and Network Status Indicators
If available on the radio and/or on a premium display
such as the instrument panel cluster, and supported by
your cell phone, the UConnecttsystem will provide
notification to inform you of your phone and network
status when you are attempting to make a phone call
using UConnectt. The status is given for roaming, net-
work signal strength, phone battery strength, etc.
Dialing Using the Cellular Phone Keypad
You can dial a phone number with your cellular phone
keypad and still use the UConnecttsystem (while dial-
ing via the cell phone keypad, the user must exercise
caution and take precautionary safety measures). By
dialing a number with your paired Bluetoothtcellular
phone, the audio will be played through your vehicle's
audio system. The UConnecttsystem will work the same
as if you dial the number using voice recognition.NOTE:Certain brands of mobile phones do not send the
dial ring to the UConnecttsystem to play it on the
vehicle audio system, so you will not hear it. Under this
situation, after successfully dialing a number the user
may feel that the call did not go through even though the
call is in progress. Once your call is answered, you will
hear the audio.
Mute/Un-Mute (Mute Off)
When you mute the UConnecttsystem, you will still be
able to hear the conversation coming from the other
party, but the other party will not be able to hear you. In
order to mute the UConnecttsystem:
²Press the ªVoice Recognitionº button.
²Following the beep, say9Mute.9
In order to un-mute the UConnecttsystem:
²Press the ªVoice Recognitionº button.
UNDERSTANDING THE FEATURES OF YOUR VEHICLE 99
3
Page 128 of 449
Plastic is not as scratch resistant as glass and therefore
different lens cleaning procedures must be followed.
To minimize the possibility of scratching the lenses and
reducing light output, avoid wiping with a dry cloth. To
remove road dirt, wash with a mild soap solution fol-
lowed by rinsing.
Do not use abrasive cleaning components, solvents, steel
wool or other abrasive materials to clean the lenses.
Daytime Running Lights (Canada ± Standard and
U.S. Fleet Vehicles) Ð If Equipped
The headlights on your vehicle will illuminate when the
engine is started, the transmission is out of the PARK
position and the parking brake is released. This provides
a constant9lights on9condition until the ignition is
turned OFF. The lights illuminate at less than normal
intensity. If the parking brake is applied or the transmis-
sion is in the PARK position, the Daytime Running Lights
(DRL) will turn off.
Lights-on Reminder
If the headlights, parking lights, courtesy lights or cargo
lights are left on, after the ignition is turned OFF, a chime
will sound when the driver's door is opened.
Fog Lights Ð If Equipped
The Fog Lights are turned on by placing the
headlight rotary control in the parking light or
headlight position and pushing on the headlight
rotary control. The fog lights will operate only when the
parking lights are on, or when the vehicle headlights are
on low beam. An indicator light located in the instrument
cluster will illuminate when the fog lights are on. The fog
lights will turn off when the switch is pushed a second
time, also when the headlight switch is rotated to the off
position, or the high beam is selected.
Cargo Light Ð If Equipped
The cargo lights are turned on by pressing on the
CARGO button. The cargo lights will also turn on for
126 UNDERSTANDING THE FEATURES OF YOUR VEHICLE
Page 130 of 449
The arrow on either side of the instrument cluster flashes
to indicate the direction of the turn, and proper operation
of the front and rear turn signal lights. If an indicator fails
to light when the multifunction lever is moved, it would
suggest that the switch or indicator lamp is defective.
If a defective bulb or wiring circuit is detected for the
turn signal system, the arrow indicators will flash at a
faster rate.
NOTE:If a turn signal has been left on for at least a mile
duration, a continuous chime will sound.
Turn Signal Auto-Mode
Tap the multifunction lever once and the turn signal (left
or right) will flash three times, and automatically turn off.
Flash-To-Pass
You can signal another vehicle with your headlights by
partially pulling the multifunction lever toward the steer-
ing wheel. This will turn on the high beam headlights
until the multifunction lever is released.
High Beam/Low Beam Select Switch
Pull the multifunction lever fully toward the steering
wheel to switch the headlights from high or low beam.
128 UNDERSTANDING THE FEATURES OF YOUR VEHICLE
Page 135 of 449
To Activate
Push the ON/OFF button to the ON position. In the
instrument cluster, the word ªCRUISEº illuminates to
indicate that the system is on.
NOTE:The Electronic Speed Control has been designed
to shut down if multiple speed control buttons (i.e., SET
and CANCEL) are operated simultaneously in order to
ensure proper operation. The Electronic Speed Control
can be reactivated by pushing the speed control ON/OFF
button and reestablishing the desired vehicle SET speed.
To Set At A Desired Speed
When the vehicle has reached the desired speed, press
and release the SET button. Release the accelerator and
the vehicle will operate at the selected speed.
To Deactivate
A soft tap on the brake pedal, normal braking, or pressing
the CANCEL button will deactivate the speed controlwithout erasing the memory. Pushing the ON/OFF but-
ton to the OFF position or turning off the ignition erases
the memory.
WARNING!
Leaving the Electronic Speed Control ON when not
in use is dangerous. You could accidentally set the
Electronic Speed Control to cause it to go faster than
you want. You could lose control and have an acci-
dent. Always leave the system OFF when you are not
using it.
To Resume Speed
To resume a previously set speed, push and release the
RESUME button. Resume can be used at any speed above
20 mph (32 km/h).
UNDERSTANDING THE FEATURES OF YOUR VEHICLE 133
3
Page 165 of 449
UNDERSTANDING YOUR INSTRUMENT PANEL
CONTENTS
mInstruments And Controls................ 166
mInstrument Cluster..................... 167
mInstrument Cluster Description............ 168
mElectronic Digital Clock................. 179
NClock Setting Procedure................ 179
mSales Code REQ Ð AM/FM Stereo Radio And
6±Disc CD/DVD Changer (MP3/WMA AUX
Jack)................................ 180
NOperating Instructions - Radio Mode....... 180NOperation Instructions - (Disc Mode For CD
And MP3/WMA Audio Play, DVD-Video) . . . 189
NNotes On Playing MP3/WMA Files........ 191
NList Button (Disc Mode For MP3/WMA
Play)............................. 193
NInfo Button (Disc Mode For MP3/WMA
Play)............................. 193
mAM/FM/CD/DVD Multimedia System Radio
(RER/REN) ± If Equipped................ 196
NOperating Instructions Ð Voice Recognition
System (VR) Ð If Equipped............. 1964
Page 168 of 449
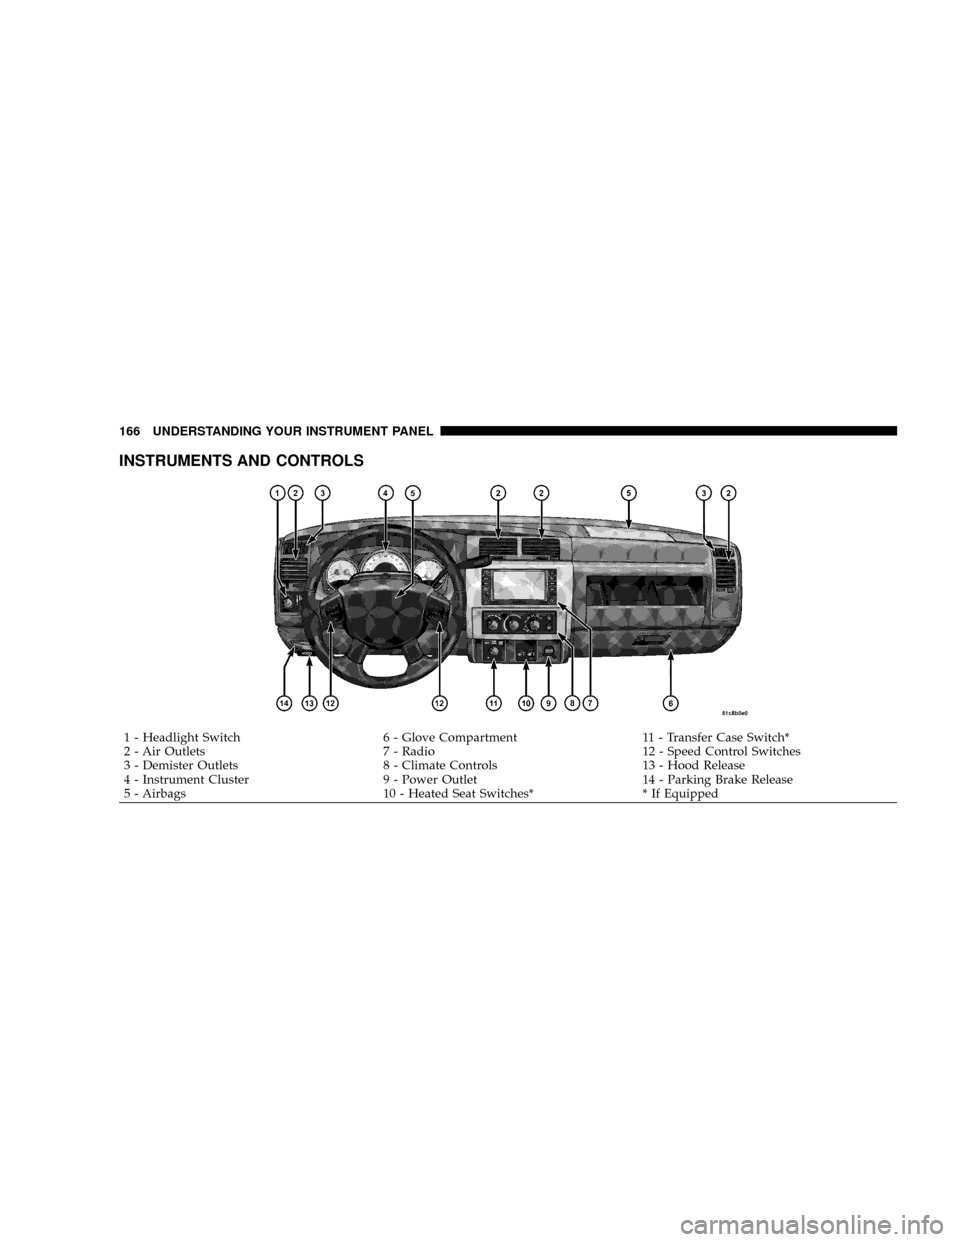
INSTRUMENTS AND CONTROLS
1 - Headlight Switch 6 - Glove Compartment 11 - Transfer Case Switch*
2 - Air Outlets 7 - Radio 12 - Speed Control Switches
3 - Demister Outlets 8 - Climate Controls 13 - Hood Release
4 - Instrument Cluster 9 - Power Outlet 14 - Parking Brake Release
5 - Airbags 10 - Heated Seat Switches* * If Equipped 166 UNDERSTANDING YOUR INSTRUMENT PANEL