Page 157 of 543
WARNING!
DO NOT ride with the seatback reclined so that the
shoulder belt is no longer resting against your chest.
In a collision you could slide under the seat belt and
be seriously or fatally injured. Use the recliner only
when the vehicle is parked.
Manual Lumbar Adjust Lever — If Equipped
The lumbar adjustment lever is located on the outboard
side of the seat. To increase the support, rotate the lever
downward. To decrease the support, rotate the handle
upward.
Stow ’n Go�Seating — If Equipped
On vehicles equipped with Stow ’n Go� seating, the
second and third row seats may be folded into the floor
for convenient storage.
Manual Lumbar Lever
3
UNDERSTANDING THE FEATURES OF YOUR VEHICLE 155
Page 160 of 543
CAUTION!
The storage bin cover must be locked and flat to
avoid damage from contact with the front seat tracks,
which have minimal clearance to the cover.
WARNING!
In an accident, serious injury could result if the seat
storage bin covers are not properly latched.
•DO NOT drive the vehicle with the storage bin
covers open.
•Keep the storage bin covers closed and latched
while the vehicle is in motion.
•DO NOT use a storage bin latch as a tie down.
To Unfold Second Row Seats
1. Pull up on the storage bin latch to open the cover.2. Pull up on the handle to lift the seat out of the storage
bin and push the seat rearward to latch the seat anchors.
3. Pull upward on the seatback recliner lever, located on
the outboard side of the seat, to return the seatback to its
full upright position.
Second Row Seat Release Handle
158 UNDERSTANDING THE FEATURES OF YOUR VEHICLE
Page 162 of 543
WARNING!
In the event of a collision you could be injured if the
seat is not fully latched.
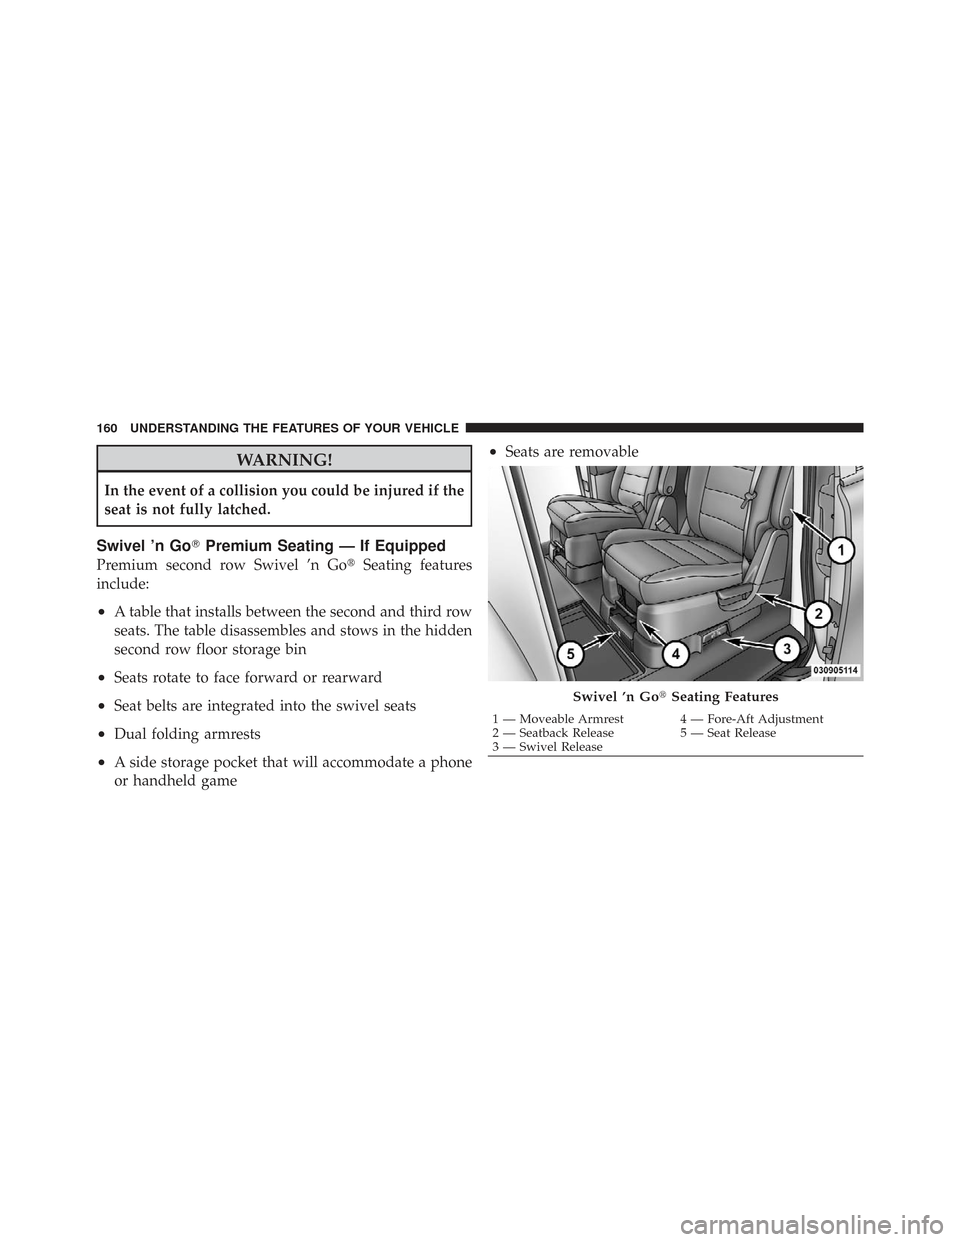
Swivel ’n Go�Premium Seating — If Equipped
Premium second row Swivel ’n Go� Seating features
include:
•A table that installs between the second and third row
seats. The table disassembles and stows in the hidden
second row floor storage bin
•Seats rotate to face forward or rearward
•Seat belts are integrated into the swivel seats
•Dual folding armrests
•A side storage pocket that will accommodate a phone
or handheld game
•Seats are removable
Swivel ’n Go� Seating Features
1 — Moveable Armrest 4 — Fore-Aft Adjustment
2 — Seatback Release 5 — Seat Release
3 — Swivel Release
160 UNDERSTANDING THE FEATURES OF YOUR VEHICLE
Page 163 of 543
WARNING!
When the seatback release handle is lifted, the seat-
back will rotate forward. To avoid injury, if you are
not seated in the seat, stay clear from the area in the
path of the rotating seatback.
To swivel the seat: Pull the lower handle on the outboard
side of the seat and push the side of the seatback to begin
rotation. Once the seat begins to rotate, the handle may
be released. The seat locks in position once reaching the
forward or rearward positions only. Seatbacks fold forward on an angle, not flat. This allows
the seats to swivel when the seatbacks are folded.
Swivel Release
3
UNDERSTANDING THE FEATURES OF YOUR VEHICLE 161
Page 164 of 543
WARNING!
Failure to comply with the following conditions
could result in serious injury or even death:
•NEVER place any child seat or infant carrier in the
Swivel ’n Go�seat while it is in the rearward
facing position.
•The swivel seat should be locked in the forward
position when using any child seat or infant
carriers, with the vehicle in motion.
•Occupants riding in Swivel ’n Go� seating must
be wearing their seat belt and the seat must be
locked in either the forward-facing or rearward-
facing position.
•Make sure the Swivel ’n Go� seat is in a locked
position with the release handle fully engaged.
Test the seat after it is locked to see that it doesn’t
swivel.
Removing Swivel ’n Go� Premium Seating — If
Equipped
1. Remove any obstructions from the floor behind the
seat, and stow the third row seat.
2. Pull up on the release bar located at the bottom front
edge of the swivel seat.
162 UNDERSTANDING THE FEATURES OF YOUR VEHICLE
Page 165 of 543
3. From behind the seat, lift up on the rear of the seat
cushion while pulling the seat in a rearward direction.
4. Remove the seat from vehicle through the liftgate.
Rollers are part of the seat frame and will ease the
removal process.5. Lower the release handle located at the bottom front
edge of the seat.
Each seat weighs about 90 lbs (81 kg).
NOTE:
Electrical contacts for the available heated seats
automatically disengage or engage as the seat is removed
or installed. The contacts slide past each other as the seat
is rolled to and from the strikers.
When reinstalling the seat, make certain to lower the
release handle to ensure the seat is latched securely.
WARNING!
In a collision, you or others in your vehicle could be
injured if seats are not properly latched to their floor
attachments. Always be sure the seats are fully
latched.
Release Bar
3
UNDERSTANDING THE FEATURES OF YOUR VEHICLE 163
Page 167 of 543
4. Insert pole into base by aligning the lock button into
notch of the base.
5. Twist the pole in a clockwise rotation until it stops.NOTE:
You will hear an audible “click” when the lock
button engages the base.
6. Place the table top over the installed pole aligning
with the mating feature of the underside of the table top.
Apply pressure on the table top and press downward.
NOTE: You will hear an audible “click” when the table
latch engages the pole.
WARNING!
Failure to comply with the following conditions
could result in serious injury or even death:
•DO NOT install the table while vehicle is in
motion.
•NEVER drive the vehicle with only the pole in-
stalled.
•DO NOT place heavy or sharp objects on table.
(Continued)
Installing Table Leg Into Base
1 — Table Base2 — Lock/Release Button
3
UNDERSTANDING THE FEATURES OF YOUR VEHICLE 165
Page 168 of 543
WARNING! (Continued)
•DO NOT place liquid drinks on the table, use
available cupholders.
•Second row seats must be locked in the rearward
facing position before installing the table.
To separate the table top from the pole, follow these
steps:
1. Locate the release latch on the underside of the table
top.
2. Pull horizontally on the latch to activate the release
from the pole.
3. While pulling on the latch, pull upward to remove the
table top from the pole.
Table Top Release
166 UNDERSTANDING THE FEATURES OF YOUR VEHICLE


•DO NOT place liquid drinks on the table, use
available cupholders.
•Second row seats must be locked in the rearward
facing position before installing the table.
To separate t")