Page 136 of 410

To Activate
Push the ON/OFF button. The CRUISE indicator in the
instrument cluster will illuminate. To turn the system off,
push the ON/OFF button a second time. The CRUISE
indicator will turn off. The system should be turned off
when not in use.
WARNING!
Leaving the Electronic Speed Control system on
when not in use is dangerous. You could accidentally
set the system or cause it to go faster than you want.
You could lose control and have an accident. Always
leave the system off when you are not using it.
To Set a Desired Speed
When the vehicle has reached the desired speed, pull
down on the lever and release. Release the accelerator
and the vehicle will operate at the selected speed.NOTE:
The vehicle should be traveling at a steady
speed and on level ground before pressing the SET lever.
While in the AutoStick� mode, Electronic Speed Control
will only operate in 3rd and 4th gear.
To Deactivate
A soft tap on the brake pedal, pulling the Electronic
Speed Control lever toward CANCEL, or normal brake
or clutch pressure while slowing the vehicle will deacti-
vate Electronic Speed Control without erasing the set
speed memory. Pressing the ON/OFF button or turning
off the ignition switch erases the set speed memory.
To Resume Speed
To resume a previously set speed, pull the RESUME
ACCEL lever up and release. Resume can be used at any
speed above 20 mph (32 km/h).
134 UNDERSTANDING THE FEATURES OF YOUR VEHICLE
Page 137 of 410

To Vary the Speed Setting
When the Electronic Speed Control is ON, speed can be
increased by pulling up and holding RESUME ACCEL.
Release the lever when the desired speed is reached, and
the new speed will be set.
Tapping RESUME ACCEL once will result ina2mph
(3 km/h) speed increase. Each time the lever is tapped,
speed increases so that tapping the lever three times will
increase speed by 6 mph (10 km/h), etc.
To decrease speed while Electronic Speed Control is ON,
pull down and hold SET DECEL. Release the lever when
the desired speed is reached, and the new speed will be
set.
Tapping the SET DECEL lever once will result ina1mph
(2 km/h) speed decrease. Each time the lever is tapped,
speed decreases.
Manual Transaxle
Depressing the clutch pedal will disengage the Electronic
Speed Control. A slight increase in engine RPM before the
Electronic Speed Control disengages is normal.
Vehicles equipped with manual transaxles may need to
be shifted into a lower gear to climb hills without speed
loss.
WARNING!
Electronic Speed Control can be dangerous where the
system cannot maintain a constant speed. Your ve-
hicle could go too fast for the conditions, and you
could lose control. An accident could be the result.
Do not use Electronic Speed Control in heavy traffic
or on roads that are winding, icy, snow-covered, or
slippery.
3
UNDERSTANDING THE FEATURES OF YOUR VEHICLE 135
Page 226 of 410

STARTING PROCEDURES
Before starting your vehicle, adjust your seat, adjust both
inside and outside mirrors, and fasten your seat belts.
WARNING!
Never leave children alone in a vehicle. Leaving
unattended children in a vehicle is dangerous for a
number of reasons. A child or others could be seri-
ously or fatally injured. Do not leave the key in the
ignition. A child could operate power windows,
other controls, or move the vehicle.
Manual Transaxle — If Equipped
Before starting the engine, fully apply the parking brake,
press the clutch pedal to the floor and place the shift lever
into NEUTRAL.
NOTE:The engine will not start unless the clutch pedal
is pressed to the floor.
Automatic Transaxle — If Equipped
The shift lever must be in the NEUTRAL or PARK
position before you can start the engine. Apply the brakes
and press the shift lever knob button before shifting to
any driving gear.
NOTE: You must press the brake pedal before shifting
out of PARK.
Normal Starting
Normal starting of either a cold or a warm engine does
not require pumping or pressing the accelerator pedal.
Simply turn the ignition switch to the START position
and release when the engine starts. If the engine has not
started within three seconds, slightly press the accelera-
tor pedal while continuing to crank. If the engine fails to
start within 15 seconds, turn the ignition switch to the
OFF position, wait 10 to 15 seconds, then repeat the
“Normal Starting” procedure above.
224 STARTING AND OPERATING
Page 229 of 410
Fully press the clutch pedal before you shift gears. As you
release the clutch pedal, lightly press the accelerator
pedal.Use each gear in numerical order - do not skip a gear. Be
sure the shift lever is in first gear, (not third gear), when
starting from a standing position. Damage to the clutch
can result from starting in third gear.
For most city driving you will find it easier to use only
the lower gears. For steady highway driving with light
accelerations, fifth gear is recommended.
Never drive with your foot resting on the clutch pedal, or
try to hold the vehicle on a hill with the clutch pedal
partially engaged. This will cause abnormal wear on the
clutch.
Never move the shift lever into REVERSE until the
vehicle has come to a complete stop.
NOTE:
During cold weather, until the transaxle lubri-
cant is warm, you may experience slightly higher shift
efforts. This is normal and not harmful to the transaxle.
Shift Pattern
5
STARTING AND OPERATING 227
Page 231 of 410

Downshifting
Proper downshifting will improve fuel economy and
prolong engine life.
CAUTION!
If you skip a gear while downshifting or downshift
at too high of an engine speed, you could damage the
engine, transmission, or clutch.
To maintain a safe speed and prolong brake life, shift
down to second or first gear when descending a steep
grade.
When turning a corner, or driving up a steep grade,
downshift early so that the engine will not be
overburdened.
AUTOMATIC TRANSAXLE — IF EQUIPPED
WARNING!
It is dangerous to move the shift lever out of PARK or
NEUTRAL if the engine speed is higher than idle
speed. If your foot is not firmly on the brake pedal,
the vehicle could accelerate quickly forward or in
reverse. You could lose control of the vehicle and hit
someone or something. Only move the shift lever
into gear when the engine is idling normally and
when your right foot is firmly on the brake pedal.
You must step on the brake pedal and press the shift lever
knob button before you will be able to shift out of PARK.
5
STARTING AND OPERATING 229
Page 331 of 410

Brake System
In order to assure brake system performance, all brake
system components should be inspected periodically.
Refer to the “Maintenance Schedules” in Section 8 for the
proper maintenance intervals.
WARNING!
Riding the brakes can lead to brake failure and
possibly an accident. Driving with your foot resting
or riding on the brake pedal can result in abnormally
high brake temperatures, excessive lining wear, and
possible brake damage. You would not have your full
braking capacity in an emergency.
Master Cylinder - Brake Fluid Level Check
Check the fluid level in the master cylinder immediately
if the Brake System Warning Telltale Light indicates
system failure.Check the fluid level in the master cylinder when per-
forming underhood services.
Clean the top of the master cylinder area before removing
the cap. If necessary, add fluid to bring the fluid level up
to the requirements described on the brake fluid reser-
voir.
Overfilling of fluid is not recommended because it may
cause leaking in the system.
Fluid level can be expected to fall as the brake pads wear.
Brake fluid level should be checked when pads are
replaced. However, low fluid level may be caused by a
leak and a checkup may be needed.
NOTE:
If your vehicle is equipped with a manual
transaxle, the Brake Fluid Reservoir supplies fluid to both
the Brake System and the Clutch Release System. The
two systems are separated in the reservoir and a leak in
one system will not affect the other system. The manual
7
MAINTAINING YOUR VEHICLE 329
Page 332 of 410

transaxle Clutch Release System should not require fluid
replacement during the life of the vehicle. If the Brake
Fluid Reservoir is low, and the brake system does not
indicate any leaks or other problems, it may be a result of
a leak in the Hydraulic Clutch Release System. See your
local authorized dealer for service.
Use only manufacturer’s recommended brake fluid. Re-
fer to “Fluids, Lubricants, and Genuine Parts”, found
later in this section, for the correct fluid type.
WARNING!
Use of a brake fluid that has a lower initial boiling
point than the recommended MOPAR�DOT 3 prod-
uct, or a brake fluid that is unidentified as to FMVSS
specification, may result in sudden brake failure
during hard, prolonged braking. You could have an
accident.
CAUTION!
Use of improper brake fluids will affect overall
clutch system performance. Improper brake fluids
may damage the clutch system resulting in loss of
clutch function and the ability to shift the transaxle.
WARNING!
Overfilling the brake fluid reservoir can result in
spilling brake fluid on hot engine parts and the
brake fluid catching fire.
330 MAINTAINING YOUR VEHICLE
Page 353 of 410
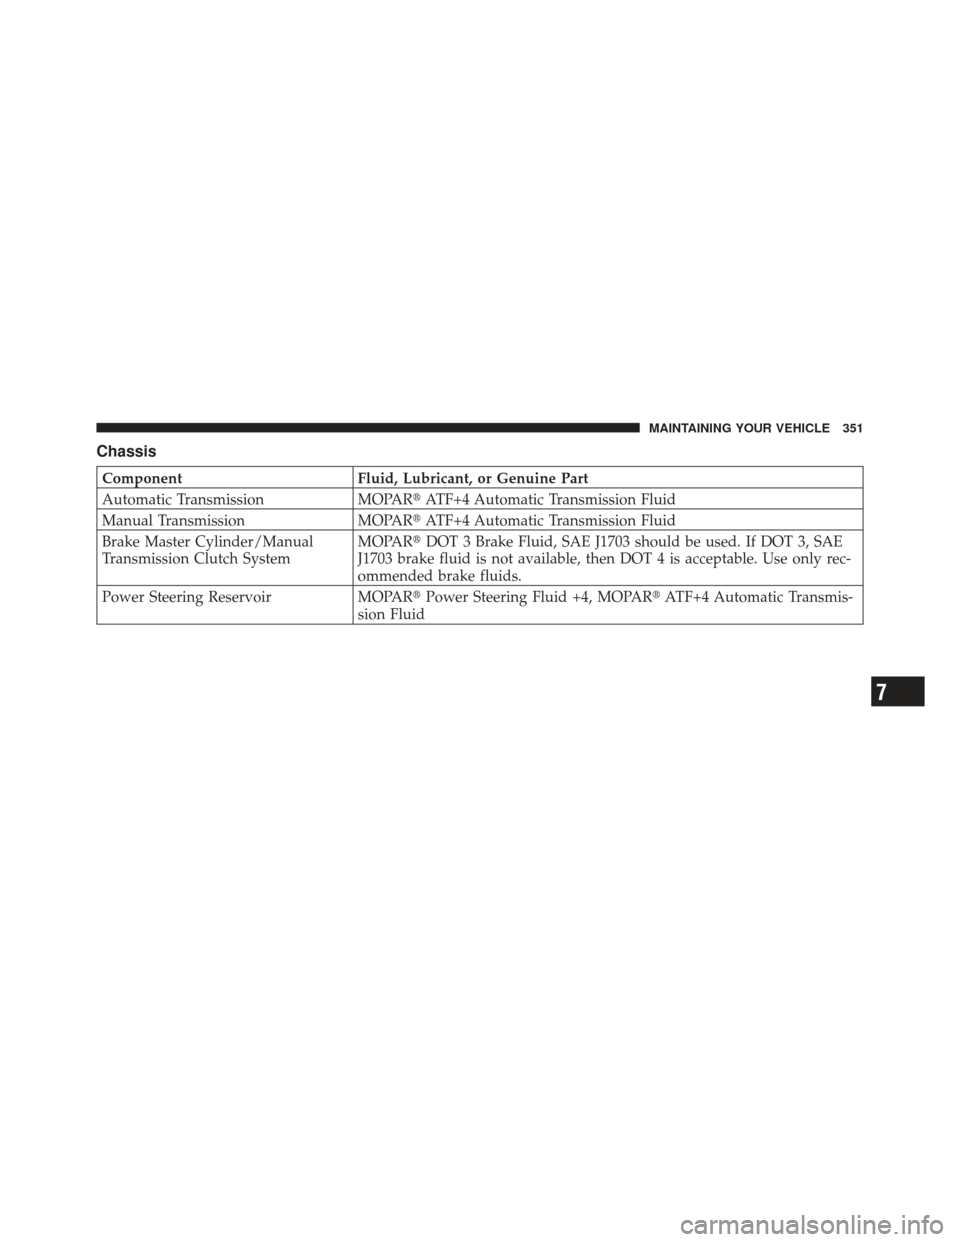
Chassis
ComponentFluid, Lubricant, or Genuine Part
Automatic Transmission MOPAR�ATF+4 Automatic Transmission Fluid
Manual Transmission MOPAR�ATF+4 Automatic Transmission Fluid
Brake Master Cylinder/Manual
Transmission Clutch System MOPAR�
DOT 3 Brake Fluid, SAE J1703 should be used. If DOT 3, SAE
J1703 brake fluid is not available, then DOT 4 is acceptable. Use only rec-
ommended brake fluids.
Power Steering Reservoir MOPAR�Power Steering Fluid +4, MOPAR� ATF+4 Automatic Transmis-
sion Fluid
7
MAINTAINING YOUR VEHICLE 351