Page 176 of 410

exist, this display shows the EVIC messages. Refer to
“Electronic Vehicle Information Center” in this section.
On vehicles equipped with Compass Mini-Trip Com-
puter (CMTC) the display provides the outside tempera-
ture, one of eight compass headings to indicate the
direction the vehicle is facing and the current radio
station. Refer to “Compass Mini-Trip Computer” in this
section.
COMPASS MINI-TRIP COMPUTER (CMTC) — IF
EQUIPPED
NOTE:The compass on your vehicle is self-calibrating,
eliminating the need to manually calibrate the compass.
The Compass Mini-Trip Computer features a driver-
interactive display (displays information on outside tem-
perature, compass direction, and trip information). The
display is located on the lower left part of the cluster
below the fuel and engine temperature gauge.
Compass Mini-Trip Computer Reset Button
CMTC Reset Button — Secondary Reset Button
Press the left Compass/Temperature RESET button to
scroll through sub-menus (i.e., Trip Functions: AVG Fuel
Economy, DTE Elapsed Time, and Units (US or Metric).
When the appropriate conditions exist, the following
messages will display in the window below the fuel and
engine temperature gauge:
E .................. Eight-point compass headings
are displayed (N, S, E, W, NE, NW, SE, SW)
14°F ............ T emperature (Fahrenheit or Celsius)
AV G .......... Average Fuel Economy (US or Metric)
DTE ....................... Distance to Empty
ET ............................ Elapsed Time
NOTE: Temperature and Average Fuel Economy can be
changed from U.S. or Metric. by pressing and holding the
(left) secondary pushbutton.
174 UNDERSTANDING YOUR INSTRUMENT PANEL
Page 182 of 410

•Tire Pressure Monitor (TPM)
•Personal Settings
To Reset the Display
Pressing and holding the EVIC button once will clear the
resettable function currently being displayed. Reset will
only occur if a resettable function is currently beingdisplayed. To reset all resettable functions, press and
release the EVIC button a second time within three
seconds of resetting the currently-displayed function
(Reset ALL will be displayed during this three-second
window).
Compass/Temperature/Audio
Press and release the EVIC button to display one of eight
compass headings to indicate the direction the vehicle is
facing, the outside temperature, and the current radio
station.
For additional information regarding the compass, refer
to “Personal Settings (Customer-Programmable Fea-
tures)” in this section.
Average Fuel Economy
Shows the average fuel economy since the last reset.
When the fuel economy is reset, the display will read
RESET, or show dashes for two seconds. Then, the
EVIC Button
180 UNDERSTANDING YOUR INSTRUMENT PANEL
Page 185 of 410

Remote Unlock All Doors is selected, all doors will
unlock at the first press of the RKE transmitter UNLOCK
button. Press and hold the EVIC button when in this
display until Driver’s Door 1st or All Doors appears, to
make your selection.
Sound Horn On Lock
When ON is selected, a short horn sound will occur when
the RKE transmitter LOCK button is pressed. This feature
may be selected with or without the Flash Lights On
Lock/Unlock feature. Press and hold the EVIC button
when in this display until ON or OFF appears, to make
your selection.
Flash Lights On Lock
When ON is selected, the front and rear turn signals will
flash when the doors are locked or unlocked using the
RKE transmitter. This feature may be selected with orwithout the Sound Horn On Lock feature activated. Press
and hold the EVIC button when in this display until ON
or OFF appears, to make your selection.
Delay Turning Headlights Off
When this feature is selected the driver can choose to
have the headlights remain on for 0, 30, 60, or 90 seconds
when exiting the vehicle. Press and hold the EVIC button
when in this display until 0, 30, 60, or 90 appears to make
your selection.
Delay Power Off to Accessories Until Exit
When this feature is selected, the power window
switches, radio, hands–free system, DVD video system,
power sunroof, and power outlets will remain active for
up to 60 minutes after the ignition switch has been turned
OFF. Opening a vehicle door will cancel this feature.
Press and hold the EVIC button when in this display until
OFF, 45 sec, 5 min, or 10 min appears, to make your
selection.
4
UNDERSTANDING YOUR INSTRUMENT PANEL 183
Page 189 of 410
5. Press and release the EVIC button to exit.
SETTING THE ANALOG CLOCK
To set the analog clock at the top center of the instrument
panel, press and hold the button until the setting is
correct. The clock will adjust slowly at first, and then
more quickly the longer the button is held.
SALES CODE RAQ – AM/FM/CD (6-DISC) RADIO
WITH OPTIONAL uconnect�studios (SATELLITE
RADIO), uconnect� phone, AND VIDEO
ENTERTAINMENT SYSTEMS (VES)™
CAPABILITIES
NOTE: The radio sales code is located on the lower right
side of your radio faceplate.
Setting The Analog ClockRAQ Radio
4
UNDERSTANDING YOUR INSTRUMENT PANEL 187
Page 190 of 410

Operating Instructions - Radio Mode
NOTE:The ignition switch must be in the ON or ACC
position to operate the radio.
Power Switch/Volume Control (Rotary)
Push the ON/VOL control to turn the radio ON. Push the
ON/VOL a second time to turn OFF the radio.
Electronic Volume Control
The electronic volume control turns continuously (360
degrees) in either direction without stopping. Turning the
volume control to the right increases the volume and to
the left decreases it.
When the audio system is turned on, the sound will be
set at the same volume level as last played.
For your convenience, the volume can be turned down,
but not up, when the audio system is off and the ignition
is ON.
MODE Button (Radio Mode)
Press the MODE button repeatedly to select between the
CD player, Satellite Radio, or Video Entertainment Sys-
tem (VES)™ (if equipped).
SEEK Button (Radio Mode)
Press and release the SEEK button to search for the next
listenable station in either AM/FM or Satellite (if
equipped) mode. Press the right side of the button to seek
up and the left side to seek down. The radio will remain
tuned to the new station until you make another selec-
tion. Holding the button will bypass stations without
stopping until you release it.
MUTE Button (Radio Mode)
Press the MUTE button to cancel the sound from the
speakers. �MUTE�will be displayed. Press the MUTE
button a second time and the sound from the speakers
188 UNDERSTANDING YOUR INSTRUMENT PANEL
Page 191 of 410

will return. Rotating the volume control, turning the
radio ON/OFF, or turning OFF the ignition will also
return the sound from the speakers
NOTE:In Hands Free Phone (if equipped) mode, the
MUTE button mutes the microphone.
SCAN Button (Radio Mode)
Pressing the SCAN button causes the tuner to search for
the next listenable station, in either AM, FM or Satellite (if
equipped) frequencies, pausing for 5 seconds at each
listenable station before continuing to the next. To stop
the search, press SCAN a second time.
MSG or INFO Button (Radio Mode)
Press the MSG or INFO button for an RBDS station (one
with call letters displayed). The radio will return a radio
text message broadcast from an FM station (FM mode
only).
TIME Button
Press the TIME button and the time of day will be
displayed for 5 seconds.
Clock Setting Procedure
1. Press and hold the TIME button until the hours blink.
2. Adjust the hours by turning the right side Tune /
Audio control.
3. After the hours are adjusted, press the right side Tune
/ Audio control to set the minutes. The minutes will
begin to blink.
4. Adjust the minutes using the right side Tune / Audio
control.
5. To exit, press any button/knob or wait 5 seconds.
4
UNDERSTANDING YOUR INSTRUMENT PANEL 189
Page 192 of 410

RW/FF (Radio Mode)
Pressing the Rewind/Fast Forward button causes the
tuner to search for the next frequency in the direction of
the arrows. This feature operates in either AM, FM or
Satellite (if equipped) frequencies.
TUNE Control (Radio Mode)
Turn the right side rotary TUNE control clockwise to
increase or counter-clockwise to decrease the channel
number.
AM/FM Button (Radio Mode)
Press the button to select AM or FM modes.
Setting the Tone, Balance, and Fade
Press the rotary TUNE control and “BASS” will display.
Turn the TUNE control to the right or left to increase or
decrease the Bass tones.Press the rotary TUNE control a second time and “MID”
will display. Turn the TUNE control to the right or left to
increase or decrease the Mid Range tones.
Press the rotary TUNE control a third time and
“TREBLE” will display. Turn the TUNE control to the
right or left to increase or decrease the Treble tones.
Press the rotary TUNE control a fourth time and “BAL-
ANCE” will display. Turn the TUNE control to the right
or left to adjust the sound level from the right or left side
speakers.
Press the rotary TUNE control a fifth time and “FADE”
will display. Turn the TUNE control to the left or right to
adjust the sound level between the front and rear speak-
ers.
Press the rotary TUNE control again to exit setting tone,
balance and fade.
190 UNDERSTANDING YOUR INSTRUMENT PANEL
Page 193 of 410

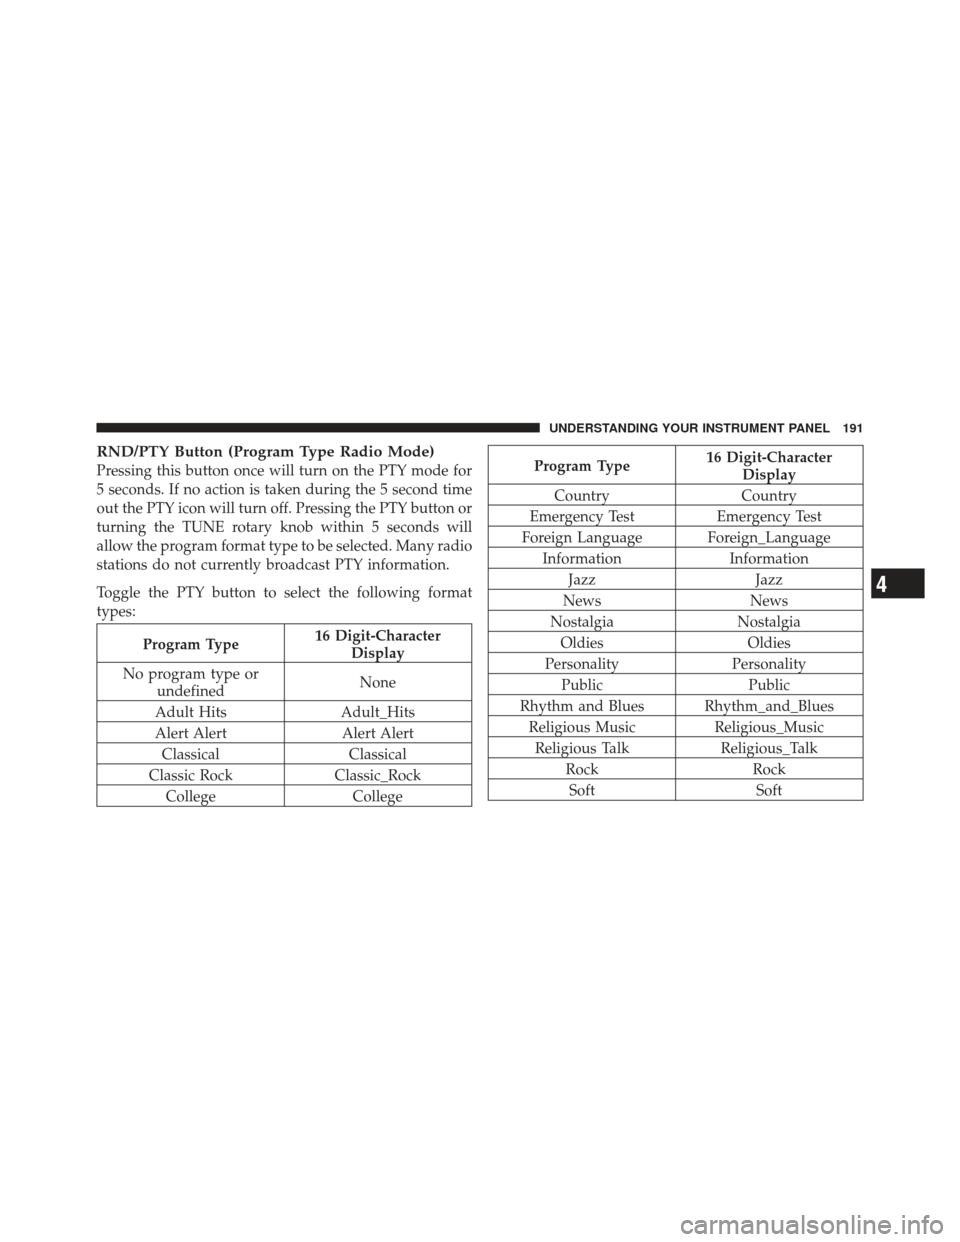
RND/PTY Button (Program Type Radio Mode)
Pressing this button once will turn on the PTY mode for
5 seconds. If no action is taken during the 5 second time
out the PTY icon will turn off. Pressing the PTY button or
turning the TUNE rotary knob within 5 seconds will
allow the program format type to be selected. Many radio
stations do not currently broadcast PTY information.
Toggle the PTY button to select the following format
types:
Program Type16 Digit-Character
Display
No program type or undefined None
Adult Hits Adult_Hits
Alert Alert Alert Alert Classical Classical
Classic Rock Classic_Rock
College College
Program Type16 Digit-Character
Display
Country Country
Emergency Test Emergency Test
Foreign Language Foreign_Language Information Information
Jazz Jazz
News News
Nostalgia Nostalgia
Oldies Oldies
Personality Personality
Public Public
Rhythm and Blues Rhythm_and_Blues Religious Music Religious_Music
Religious Talk Religious_Talk
Rock Rock
Soft Soft
4
UNDERSTANDING YOUR INSTRUMENT PANEL 191