Page 112 of 526
To restore the Voice Recognition system to factory default
settings, enter the Voice Training session via the above
procedure and follow the prompts.
Voice Recognition (VR)
•
For best performance, adjust the rearview mirror to
provide at least1�2in (1 cm) gap between the overhead
console (if equipped) and the mirror.
•Always wait for the beep before speaking.
•Speak normally, without pausing, just as you would
speak to a person sitting a few feet/meters away from
you.
•Make sure that no one other than you is speaking
during a voice recognition period.
•Performance is maximized under:
•low-to-medium blower setting,
•low-to-medium vehicle speed,
•low road noise,
•smooth road surface,
•fully closed windows,
•dry weather condition.
•Even though the system is designed for users speaking
in North American English, French, and Spanish ac-
cents, the system may not always work for some.
•When navigating through an automated system such
as voice mail, or when sending a page, at the end of
speaking the digit string, make sure to say�Send.�
•Storing names in the phonebook when the vehicle is
not in motion is recommended.
•It is not recommended to store similar sounding
names in the uconnect�phonebook.
110 UNDERSTANDING THE FEATURES OF YOUR VEHICLE
Page 132 of 526
WARNING!
•Be certain that the seatback is securely locked into
position. If the seatback is not securely locked into
position, the seat will not provide the proper
stability for child seats and/or passengers. An
improperly latched seat could cause serious injury.
•The cargo area in the rear of the vehicle (with the
rear seatbacks in the locked-up or folded down
position) should not be used as a play area by
children when the vehicle is in motion. They could
be seriously injured in an accident. Children
should be seated and using the proper restraint
system.
DRIVER MEMORY SEAT — IF EQUIPPED
This feature allows the driver to store up to two different
memory profiles for easy recall through a memory
switch. Each memory profile contains desired positionsettings for the driver seat, side mirrors, adjustable
pedals (if equipped), and power tilt and telescopic steer-
ing column (if equipped) and a set of desired radio
station presets. Your Remote Keyless Entry (RKE) trans-
mitter can also be programmed to recall the same posi-
tions when the unlock button is pressed.
NOTE:Only one RKE transmitter can be linked to each
of the memory positions.
The memory switch is located on the driver’s door trim
panel. The switch contains an (S) button to activate the
memory save function. It also contains a rocker switch
labeled with the number (1) and the number (2). The
rocker switch allows the driver to recall either of two
pre-programmed memory profiles by pressing the appro-
priate side of the switch.
130 UNDERSTANDING THE FEATURES OF YOUR VEHICLE
Page 133 of 526
Programming The Memory Feature
NOTE:Saving a new memory profile will erase an
existing profile from memory.
To create a new memory profile, perform the following:
1. Turn your ignition to the ON position.2. Adjust all memory profile settings to desired prefer-
ences (i.e., seat, side mirror, adjustable pedals [if
equipped], power tilt and telescopic steering column [if
equipped], and radio station presets).
3. Press and release the SET (S) button on the memory
switch.
4. Within five seconds, press and release the memory
button 1 or 2. The Electronic Vehicle Information Center
(EVIC) (if equipped) will display which memory position
has been set.
NOTE:
•Memory profiles can be set without the vehicle in
PARK, but the vehicle must be in PARK to recall a
memory profile.
•The Recall Memory with Remote Key Unlock feature
can be enabled through the EVIC (if equipped). Refer
Memory Switch
UNDERSTANDING THE FEATURES OF YOUR VEHICLE 131
3
Page 135 of 526
To recall the memory settings for driver one, press
MEMORY button number 1 on the driver’s door or the
UNLOCK button on the RKE transmitter linked to
memory position 1.
To recall the memory setting for driver two, press
MEMORY button number 2 on the driver’s door or the
UNLOCK button on the RKE transmitter linked to
memory position 2.
A recall can be cancelled by pressing any of the
MEMORY buttons (S, 1, or 2) on the driver’s door during
a recall. When a recall is cancelled, the driver seat, side
mirror, adjustable pedals (if equipped), and power tilt
and telescopic steering column (if equipped) stop mov-
ing. A delay of one second will occur before another recall
can be selected.Easy Entry/Exit Seat (Available with Memory Seat
Only)
This feature provides automatic driver seat positioning to
enhance driver mobility when entering and exiting the
vehicle.
The distance the driver seat moves depends on where
you have the driver seat positioned when you remove the
key from the ignition switch.
UNDERSTANDING THE FEATURES OF YOUR VEHICLE 133
3
Page 140 of 526
The Headlights On with Wipers feature can be turned on
or off through the Electronic Vehicle Information Center
(EVIC) (if equipped). Refer to ”Headlights On with
Wipers,” under “Personal Settings (Customer-
Programmable Features)” under “Electronic Vehicle In-
formation Center (EVIC)” in Section 4.
SmartBeams — If Equipped
The SmartBeam system provides increased forward light-
ing at night by automating high beam control through
the use of a digital camera mounted on the inside
rearview mirror. This camera detects vehicle specific light
and automatically switches from high beams to low
beams until the approaching vehicle is out of view.
To Activate
1. Select “Automatic High Beams — ON” through the
EVIC. Refer to “Automatic High Beams,” under “Per-
sonal Settings (Customer-Programmable Features)” un-
der “Electronic Vehicle Information Center (EVIC)” in
Section 4.
2. Rotate the headlight switch counterclockwise to the
AUTO (A) position.
3. Push the multifunction lever away from you to switch
the headlights to the high beam position. Refer to “Mul-
tifunction Lever” in this section.
NOTE:This system will not activate until the vehicle is
at or above 25 mph (40 km/h).
To Deactivate
Perform either of the following steps to deactivate the
SmartBeam system.
138 UNDERSTANDING THE FEATURES OF YOUR VEHICLE
Page 143 of 526
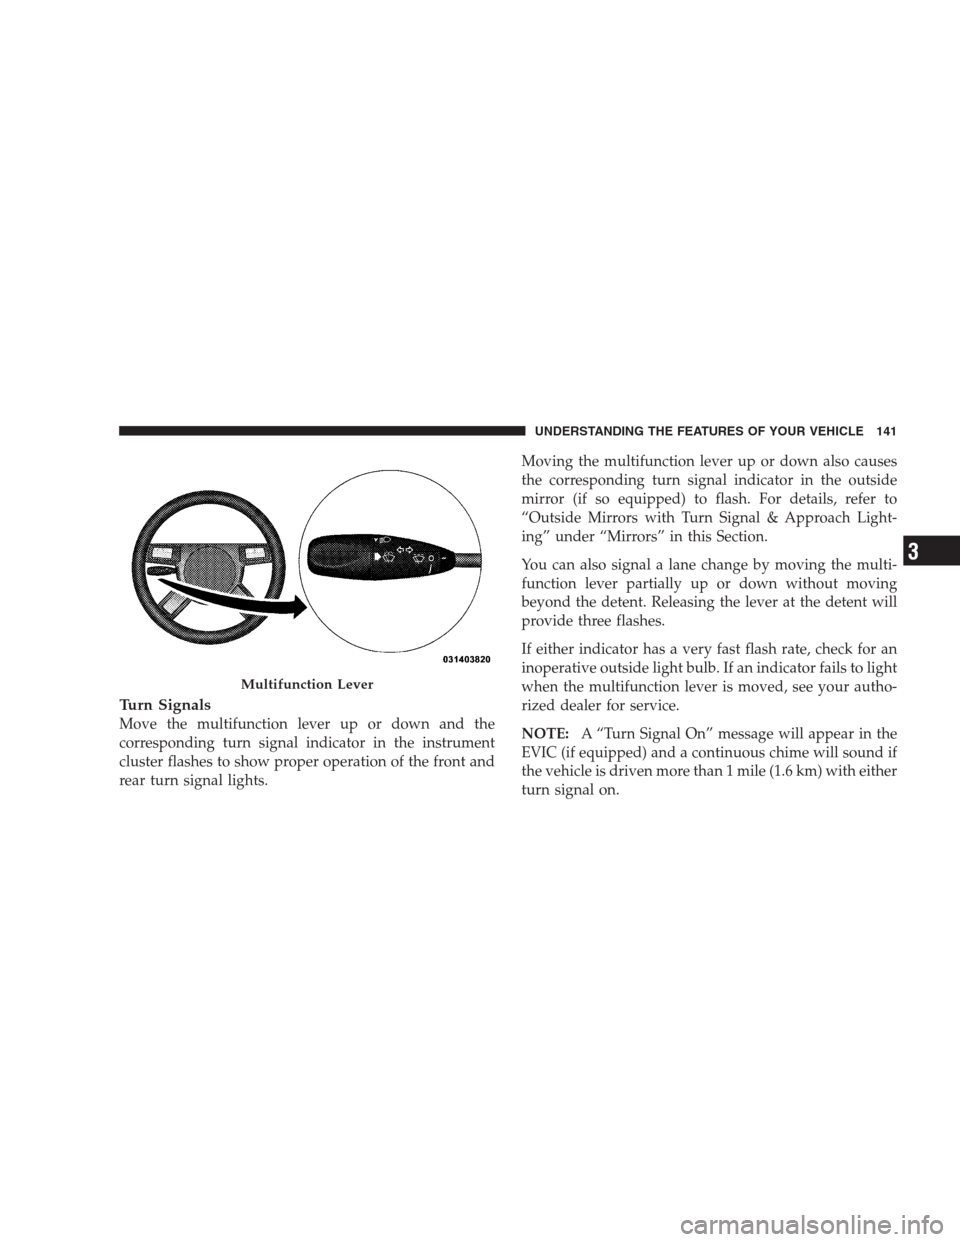
Turn Signals
Move the multifunction lever up or down and the
corresponding turn signal indicator in the instrument
cluster flashes to show proper operation of the front and
rear turn signal lights.Moving the multifunction lever up or down also causes
the corresponding turn signal indicator in the outside
mirror (if so equipped) to flash. For details, refer to
“Outside Mirrors with Turn Signal & Approach Light-
ing” under “Mirrors” in this Section.
You can also signal a lane change by moving the multi-
function lever partially up or down without moving
beyond the detent. Releasing the lever at the detent will
provide three flashes.
If either indicator has a very fast flash rate, check for an
inoperative outside light bulb. If an indicator fails to light
when the multifunction lever is moved, see your autho-
rized dealer for service.
NOTE:A “Turn Signal On” message will appear in the
EVIC (if equipped) and a continuous chime will sound if
the vehicle is driven more than 1 mile (1.6 km) with either
turn signal on.
Multifunction Lever
UNDERSTANDING THE FEATURES OF YOUR VEHICLE 141
3
Page 180 of 526
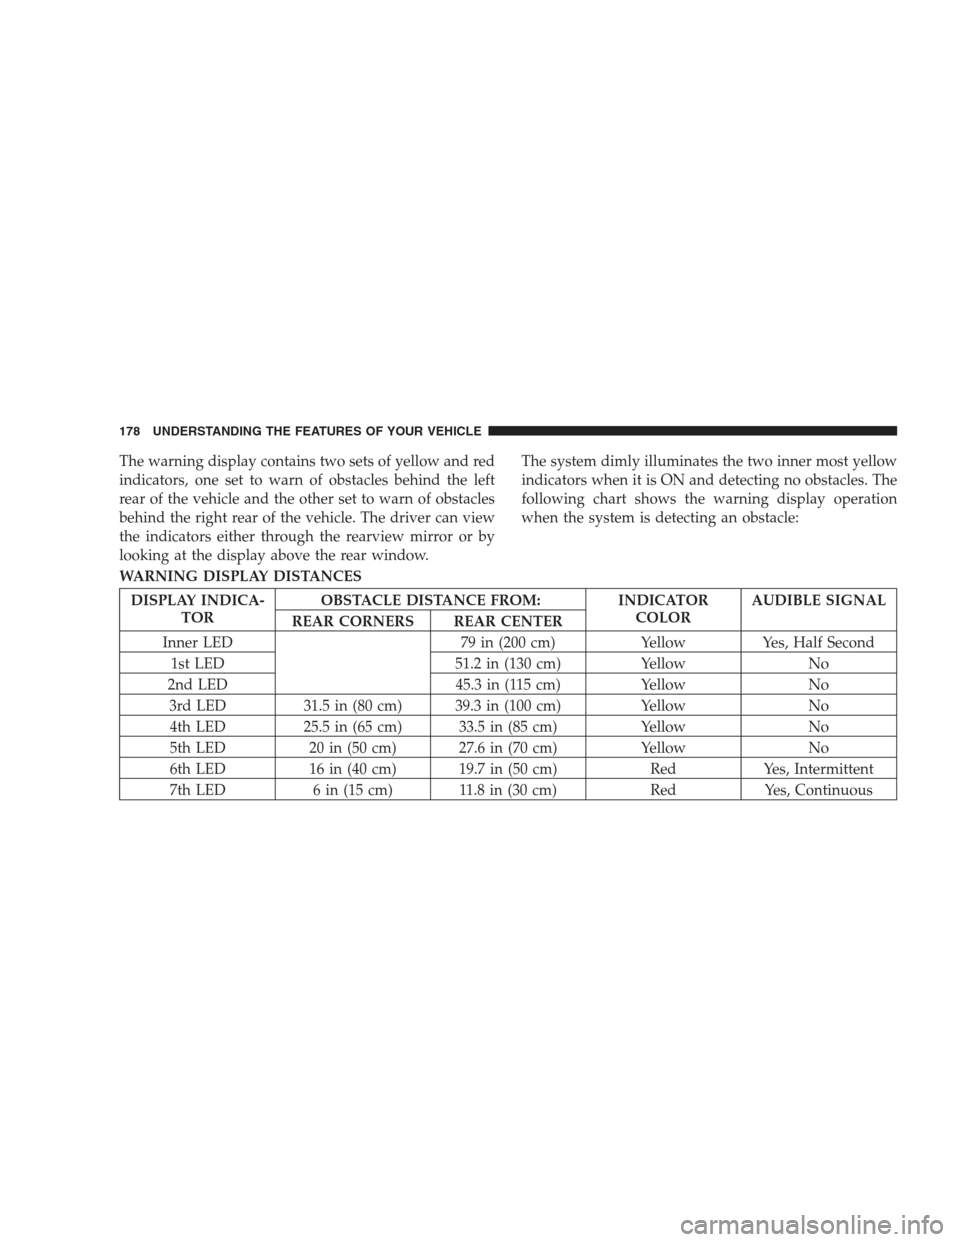
The warning display contains two sets of yellow and red
indicators, one set to warn of obstacles behind the left
rear of the vehicle and the other set to warn of obstacles
behind the right rear of the vehicle. The driver can view
the indicators either through the rearview mirror or by
looking at the display above the rear window.The system dimly illuminates the two inner most yellow
indicators when it is ON and detecting no obstacles. The
following chart shows the warning display operation
when the system is detecting an obstacle:
WARNING DISPLAY DISTANCES
DISPLAY INDICA-
TOROBSTACLE DISTANCE FROM: INDICATOR
COLORAUDIBLE SIGNAL
REAR CORNERS REAR CENTER
Inner LED 79 in (200 cm) Yellow Yes, Half Second
1st LED 51.2 in (130 cm) Yellow No
2nd LED 45.3 in (115 cm) Yellow No
3rd LED 31.5 in (80 cm) 39.3 in (100 cm) Yellow No
4th LED 25.5 in (65 cm) 33.5 in (85 cm) Yellow No
5th LED 20 in (50 cm) 27.6 in (70 cm) Yellow No
6th LED 16 in (40 cm) 19.7 in (50 cm) Red Yes, Intermittent
7th LED 6 in (15 cm) 11.8 in (30 cm) Red Yes, Continuous
178 UNDERSTANDING THE FEATURES OF YOUR VEHICLE
Page 200 of 526
WARNING! (Continued)
•To help protect against personal injury, passengers
should not be seated in the rear cargo area. The
rear cargo space is intended for load carrying
purposes only, not for passengers, who should sit
in seats and use seat belts.
CARGO AREA FEATURES
Trunk Mat — If Equipped
A reversible trunk mat covers the bottom of the cargo
area. The rubber side of the mat is used to protect the
interior of the trunk from mud, snow, and debris. It
provides a nonskid surface to keep cargo from sliding.
REAR WINDOW FEATURES
Rear Window Defroster
The electric rear window defroster button is lo-
cated on the climate control. Press this button toturn on the rear window defroster and the heated outside
rearview mirrors (if equipped). An indicator in the button
will illuminate when the rear window defroster is on. The
rear window defroster automatically turns off after ap-
proximately 10 minutes. For an additional five minutes of
operation, press the button a second time.
CAUTION!
•To avoid damaging the electrical conductors of the
rear window defroster, do not use scrapers, sharp
instruments, or abrasive window cleaners on the
interior surface of the window.
•Labels can be peeled off after soaking with warm
water.
198 UNDERSTANDING THE FEATURES OF YOUR VEHICLE