2009 CHEVROLET TRAVERSE spare wheel
[x] Cancel search: spare wheelPage 335 of 422
The grades are molded on the
sidewalls of most passenger car
tires. The Uniform Tire Quality
Grading (UTQG) system does
not apply to deep tread,
winter-type snow tires,
space-saver, or temporary use
spare tires, tires with nominal rim
diameters of 10 to 12 inches
(25 to 30 cm), or to some
limited-production tires.
While the tires available on
General Motors passenger cars
and light trucks may vary with
respect to these grades, they
must also conform to federal
safety requirements and
additional General Motors Tire
Performance Criteria (TPC)
standards.
Treadwear
The treadwear grade is a
comparative rating based
on the wear rate of the tire when
tested under controlled
conditions on a speci�ed
government test course.For example, a tire graded 150
would wear one and a half
(1.5) times as well on the
government course as a tire
graded 100. The relative
performance of tires depends
upon the actual conditions of
their use, however, and may
depart signi�cantly from the norm
due to variations in driving habits,
service practices, and differences
in road characteristics and
climate.
Traction – AA, A, B, C
The traction grades, from highest
to lowest, are AA, A, B, and C.
Those grades represent the
tire’s ability to stop on wet
pavement as measured under
controlled conditions on speci�ed
government test surfaces of
asphalt and concrete. A tire
marked C may have poor traction
performance.Temperature – A, B, C
The temperature grades
are A (the highest), B, and C,
representing the tire’s resistance
to the generation of heat and
its ability to dissipate heat
when tested under controlled
conditions on a speci�ed indoor
laboratory test wheel. Sustained
high temperature can cause
the material of the tire to
degenerate and reduce tire life,
and excessive temperature
can lead to sudden tire failure.
The grade C corresponds to
a level of performance which
all passenger car tires must
meet under the Federal Motor
Vehicle Safety Standard
No. 109. Grades B and A
represent higher levels of
performance on the laboratory
test wheel than the minimum
required by law. It should
be noted that the temperature
grade for this tire is established
for a tire that is properly
in�ated and not overloaded.
Service and Appearance Care 5-53
Page 338 of 422
If a Tire Goes Flat
It is unusual for a tire to blowout
while you are driving, especially if
you maintain the tires properly. See
Tires on page 5-36. If air goes out of
a tire, It is much more likely to leak
out slowly. But if you should ever
have a blowout, here are a few tips
about what to expect and what to do:
If a front tire fails, the �at tire will
create a drag that pulls the vehicle
toward that side. Take your foot off
the accelerator pedal and grip the
steering wheel �rmly. Steer to
maintain lane position, and then
gently brake to a stop well out of
the traffic lane.
A rear blowout, particularly on a
curve, acts much like a skid and may
require the same correction you
would use in a skid. In any rearblowout, remove your foot from the
accelerator pedal. Get the vehicle
under control by steering the way
you want the vehicle to go. It may be
very bumpy and noisy, but you can
still steer. Gently brake to a stop, well
off the road if possible.
If a tire goes �at, avoid further tire
and wheel damage by driving slowly
to a level place and stopping.
1. Turn on the hazard warning
�ashers. SeeHazard Warning
Flashers on page 3-5.
2. Park the vehicle. Set the parking
brake �rmly and put the shift
lever in P (Park).
3. Turn off the engine.
4. Inspect the �at tire.{CAUTION
Lifting a vehicle and getting under
it to do maintenance or repairs is
dangerous without the appropriate
safety equipment and training. If a
jack is provided with the vehicle, it
is designed only for changing a
�at tire. If it is used for anything
else, you or others could be badly
injured or killed if the vehicle slips
off the jack. If a jack is provided
with the vehicle, only use it for
changing a �at tire.
This vehicle may come with a jack
and spare tire or a tire sealant and
compressor kit. To use the jack and
spare tire, seeChanging a Flat Tire
on page 5-65. To use the tire sealant
and compressor kit, seeTire Sealant
and Compressor Kit on page 5-57.
5-56 Service and Appearance Care
Page 339 of 422
Tire Sealant and
Compressor Kit
{CAUTION
Idling a vehicle in an enclosed
area with poor ventilation is
dangerous. Engine exhaust may
enter the vehicle. Engine exhaust
contains Carbon Monoxide (CO)
which cannot be seen or smelled.
It can cause unconsciousness
and even death. Never run the
engine in an enclosed area that
has no fresh air ventilation. For
more information, seeEngine
Exhaust on page 2-30.
{CAUTION
Over-in�ating a tire could cause
the tire to rupture and you or
others could be injured. Be sure to
read and follow the tire sealant and
compressor kit instructions and
in�ate the tire to its recommended
pressure. Do not exceed the
recommended pressure.
{CAUTION
Storing the tire sealant and
compressor kit or other equipment
in the passenger compartment
of the vehicle could cause injury.
In a sudden stop or collision, loose
equipment could strike someone.
Store the tire sealant and
compressor kit in its original
location.If this vehicle has a tire sealant and
compressor kit, there may not be a
spare tire, tire changing equipment,
and on some vehicles there may not
be a place to store a tire.
The tire sealant and compressor
can be used to temporarily seal
punctures up to
1�4inch (6 mm) in the
tread area of the tire. It can also be
used to in�ate an under in�ated tire.
If the tire has been separated from
the wheel, has damaged sidewalls,
or has a large puncture, the tire
is too severely damaged for the tire
sealant and compressor kit to be
effective. SeeRoadside Assistance
Program on page 7-6.
Read and follow all of the tire
sealant and compressor kit
instructions.
Service and Appearance Care 5-57
Page 349 of 422
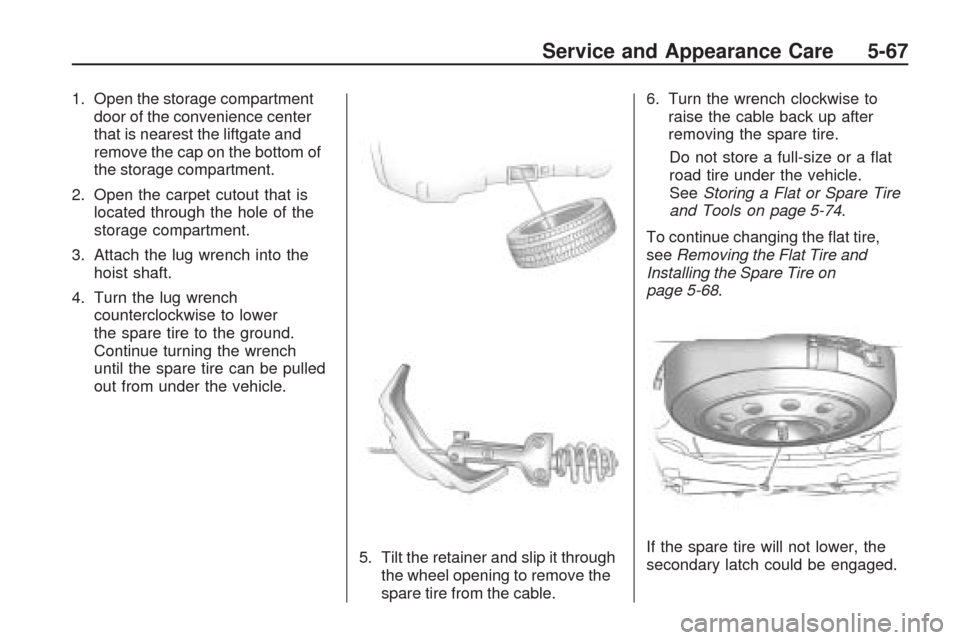
1. Open the storage compartment
door of the convenience center
that is nearest the liftgate and
remove the cap on the bottom of
the storage compartment.
2. Open the carpet cutout that is
located through the hole of the
storage compartment.
3. Attach the lug wrench into the
hoist shaft.
4. Turn the lug wrench
counterclockwise to lower
the spare tire to the ground.
Continue turning the wrench
until the spare tire can be pulled
out from under the vehicle.
5. Tilt the retainer and slip it through
the wheel opening to remove the
spare tire from the cable.6. Turn the wrench clockwise to
raise the cable back up after
removing the spare tire.
Do not store a full-size or a �at
road tire under the vehicle.
SeeStoring a Flat or Spare Tire
and Tools on page 5-74.
To continue changing the �at tire,
seeRemoving the Flat Tire and
Installing the Spare Tire on
page 5-68.
If the spare tire will not lower, the
secondary latch could be engaged.
Service and Appearance Care 5-67
Page 350 of 422
Do the following to check the cable:
1. Check under the vehicle to
see if the cable is visible.
2. If it is not visible, seeSecondary
Latch System on page 5-72.
If it is visible, �rst try to tighten the
cable by turning the lug wrench
clockwise until you hear two clicks
or feel it skip twice. You cannot
over-tighten the cable.
3. Loosen the cable by turning the
wrench counterclockwise three
or four turns.
4. If the spare tire has not lowered,
tighten the cable all the way and
then loosen it at least two times.
If the spare tire did lower to the
ground, continue with Step 5
under “Removing the Spare Tire
(Vehicles with the Rear
Convenience Center)” listed
previously.
5. If you still cannot lower the spare
tire to the ground, seeSecondary
Latch System on page 5-72.Removing the Flat Tire
and Installing the
Spare Tire
1. Do a safety check before
proceeding. SeeChanging a Flat
Tire on page 5-65for more
information.
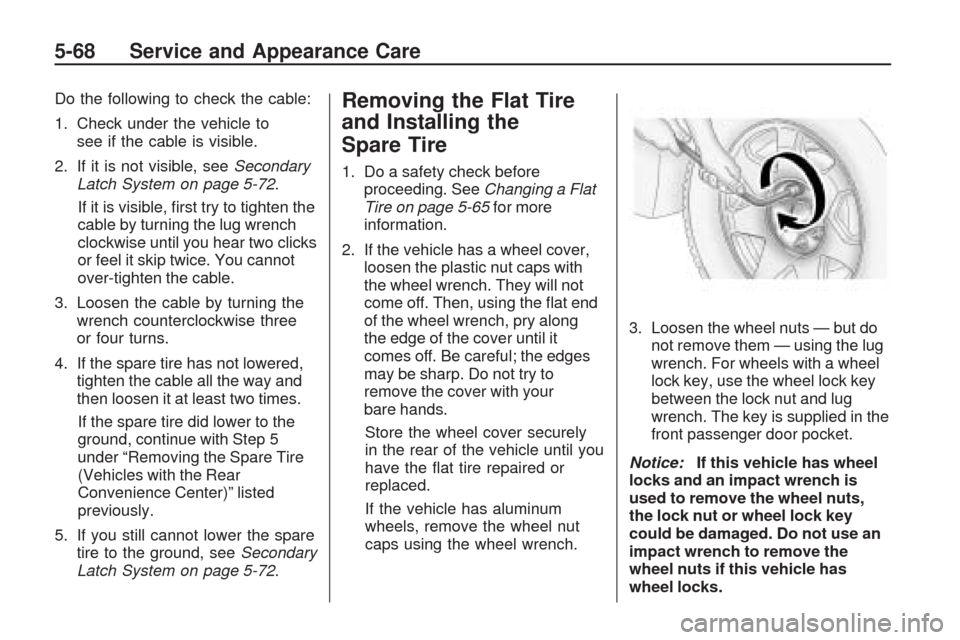
2. If the vehicle has a wheel cover,
loosen the plastic nut caps with
the wheel wrench. They will not
come off. Then, using the �at end
of the wheel wrench, pry along
the edge of the cover until it
comes off. Be careful; the edges
may be sharp. Do not try to
remove the cover with your
bare hands.
Store the wheel cover securely
in the rear of the vehicle until you
have the �at tire repaired or
replaced.
If the vehicle has aluminum
wheels, remove the wheel nut
caps using the wheel wrench.3. Loosen the wheel nuts — but do
not remove them — using the lug
wrench. For wheels with a wheel
lock key, use the wheel lock key
between the lock nut and lug
wrench. The key is supplied in the
front passenger door pocket.
Notice:If this vehicle has wheel
locks and an impact wrench is
used to remove the wheel nuts,
the lock nut or wheel lock key
could be damaged. Do not use an
impact wrench to remove the
wheel nuts if this vehicle has
wheel locks.
5-68 Service and Appearance Care
Page 351 of 422
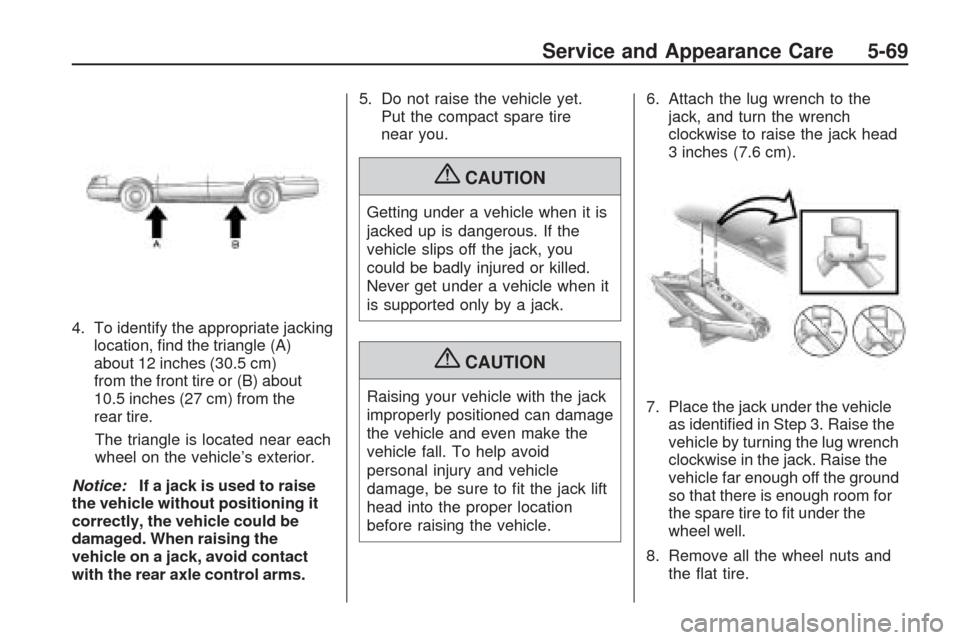
4. To identify the appropriate jacking
location, �nd the triangle (A)
about 12 inches (30.5 cm)
from the front tire or (B) about
10.5 inches (27 cm) from the
rear tire.
The triangle is located near each
wheel on the vehicle’s exterior.
Notice:If a jack is used to raise
the vehicle without positioning it
correctly, the vehicle could be
damaged. When raising the
vehicle on a jack, avoid contact
with the rear axle control arms.5. Do not raise the vehicle yet.
Put the compact spare tire
near you.
{CAUTION
Getting under a vehicle when it is
jacked up is dangerous. If the
vehicle slips off the jack, you
could be badly injured or killed.
Never get under a vehicle when it
is supported only by a jack.
{CAUTION
Raising your vehicle with the jack
improperly positioned can damage
the vehicle and even make the
vehicle fall. To help avoid
personal injury and vehicle
damage, be sure to �t the jack lift
head into the proper location
before raising the vehicle.6. Attach the lug wrench to the
jack, and turn the wrench
clockwise to raise the jack head
3 inches (7.6 cm).
7. Place the jack under the vehicle
as identi�ed in Step 3. Raise the
vehicle by turning the lug wrench
clockwise in the jack. Raise the
vehicle far enough off the ground
so that there is enough room for
the spare tire to �t under the
wheel well.
8. Remove all the wheel nuts and
the �at tire.
Service and Appearance Care 5-69
Page 352 of 422
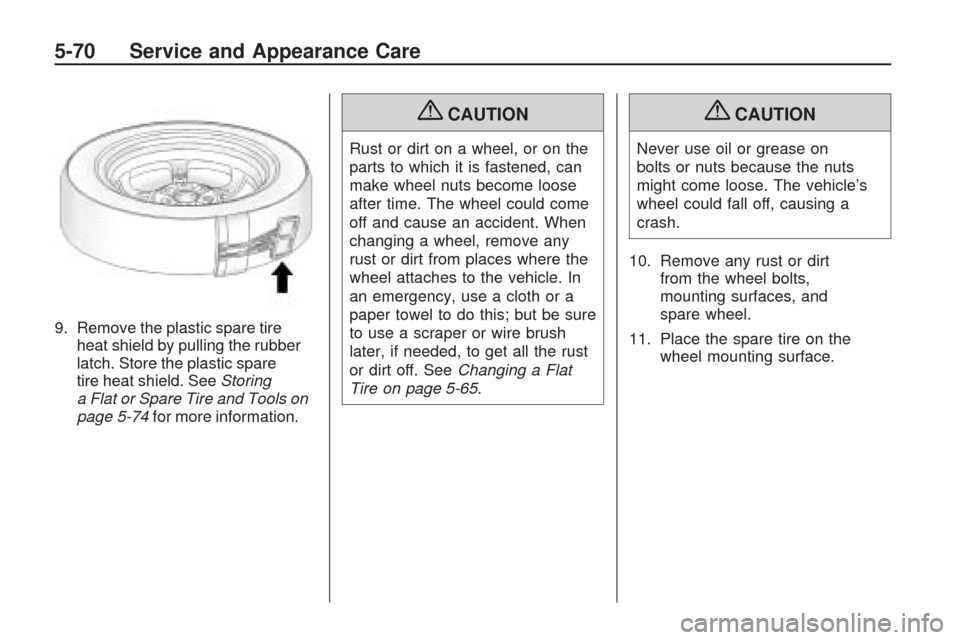
9. Remove the plastic spare tire
heat shield by pulling the rubber
latch. Store the plastic spare
tire heat shield. SeeStoring
a Flat or Spare Tire and Tools on
page 5-74for more information.
{CAUTION
Rust or dirt on a wheel, or on the
parts to which it is fastened, can
make wheel nuts become loose
after time. The wheel could come
off and cause an accident. When
changing a wheel, remove any
rust or dirt from places where the
wheel attaches to the vehicle. In
an emergency, use a cloth or a
paper towel to do this; but be sure
to use a scraper or wire brush
later, if needed, to get all the rust
or dirt off. SeeChanging a Flat
Tire on page 5-65.
{CAUTION
Never use oil or grease on
bolts or nuts because the nuts
might come loose. The vehicle’s
wheel could fall off, causing a
crash.
10. Remove any rust or dirt
from the wheel bolts,
mounting surfaces, and
spare wheel.
11. Place the spare tire on the
wheel mounting surface.
5-70 Service and Appearance Care
Page 353 of 422
12. Put the nuts on by hand by
turning the clockwise until
the wheel is held against the
mounting surface. Make sure
the rounded end is toward
the wheel.
13. Lower the vehicle by attaching
the lug wrench to the jack
and turning the wrench
counterclockwise. Lower
the jack completely.
{CAUTION
Wheel nuts that are improperly or
incorrectly tightened can cause
the wheels to become loose or
come off. The wheel nuts should
be tightened with a torque wrench
to the proper torque speci�cation
after replacing. Follow the torque
(Continued)
CAUTION (Continued)
speci�cation supplied by the
aftermarket manufacturer when
using accessory locking wheel
nuts. SeeCapacities and
Specifications on page 5-92for
original equipment wheel nut
torque speci�cations.
Notice:Improperly tightened
wheel nuts can lead to brake
pulsation and rotor damage.
To avoid expensive brake repairs,
evenly tighten the wheel nuts in
the proper sequence and to the
proper torque speci�cation. See
Capacities and Specifications on
page 5-92for the wheel nut torque
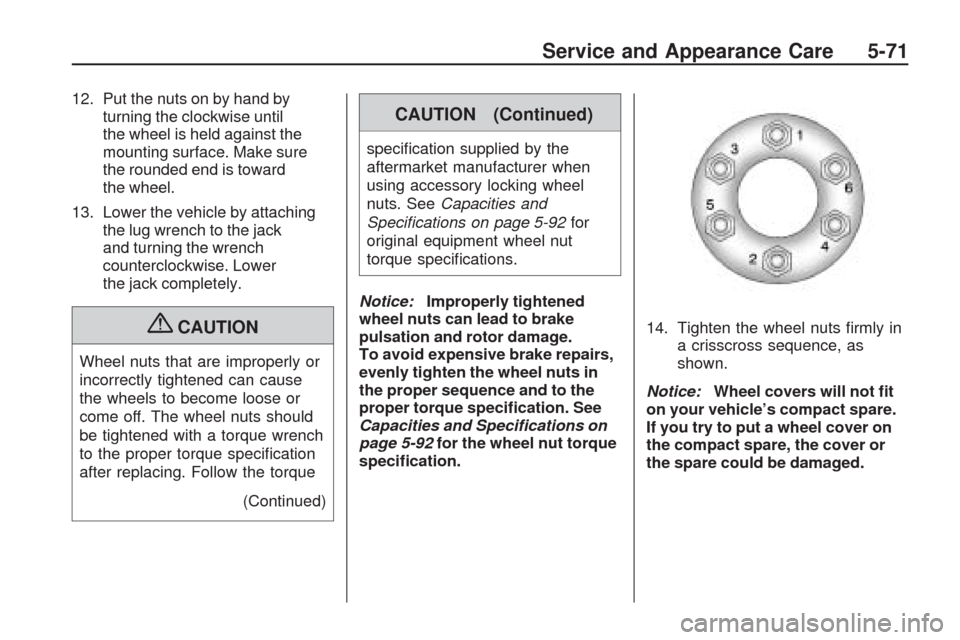
speci�cation.14. Tighten the wheel nuts �rmly in
a crisscross sequence, as
shown.
Notice:Wheel covers will not �t
on your vehicle’s compact spare.
If you try to put a wheel cover on
the compact spare, the cover or
the spare could be damaged.
Service and Appearance Care 5-71