2009 CHEVROLET TRAIL BLAZER wiring
[x] Cancel search: wiringPage 72 of 484

Servicing Your Airbag-Equipped
Vehicle
Airbags affect how the vehicle should be serviced.
There are parts of the airbag system in several places
around the vehicle. Your dealer/retailer and the
service manual have information about servicing the
vehicle and the airbag system. To purchase a service
manual, seeService Publications Ordering Information
on page 7-16.
{CAUTION:
For up to 10 seconds after the ignition is turned off
and the battery is disconnected, an airbag can still
in�ate during improper service. You can be injured
if you are close to an airbag when it in�ates. Avoid
yellow connectors. They are probably part of the
airbag system. Be sure to follow proper service
procedures, and make sure the person performing
work for you is quali�ed to do so.
Adding Equipment to Your
Airbag-Equipped Vehicle
Q:Is there anything I might add to or change
about the vehicle that could keep the airbags
from working properly?
A:Yes. If you add things that change your vehicle’s
frame, bumper system, height, front end or side
sheet metal, they may keep the airbag system from
working properly. Changing or moving any parts of
the front seats, safety belts, the airbag sensing and
diagnostic module, steering wheel, instrument panel,
roof-rail airbag modules, ceiling headliner or pillar
garnish trim, rearview mirror, front sensors, rollover
sensor module, or airbag wiring can affect the
operation of the airbag system.
In addition, your vehicle has a passenger sensing
system for the right front passenger’s position, which
includes sensors that are part of the passenger’s
seat. The passenger sensing system may not
operate properly if the original seat trim is replaced
with non-GM covers, upholstery or trim, or with GM
covers, upholstery or trim designed for a different
vehicle.
1-68
Page 73 of 484

Any object, such as an aftermarket seat heater or a
comfort enhancing pad or device, installed under or
on top of the seat fabric, could also interfere with the
operation of the passenger sensing system. This
could either prevent proper deployment of the
passenger airbag(s) or prevent the passenger
sensing system from properly turning off the
passenger airbag(s). SeePassenger Sensing
System on page 1-63.
If you have any questions about this, you should
contact Customer Assistance before you modify
your vehicle. The phone numbers and addresses
for Customer Assistance are in Step Two of
the Customer Satisfaction Procedure in this manual.
SeeCustomer Satisfaction Procedure on page 7-2.
If your vehicle has rollover roof-rail airbags, see
Different Size Tires and Wheels on page 5-77
for additional important information.Q:Because I have a disability, I have to get my
vehicle modi�ed. How can I �nd out whether
this will affect my airbag system?
A:If you have questions, call Customer Assistance.
The phone numbers and addresses for Customer
Assistance are in Step Two of the Customer
Satisfaction Procedure in this manual. See
Customer Satisfaction Procedure on page 7-2.
In addition, your dealer/retailer and the service manual
have information about the location of the airbag
sensors, sensing and diagnostic module and airbag
wiring.
1-69
Page 89 of 484

Liftgate/Liftglass
{CAUTION:
It can be dangerous to drive with the liftgate or
liftglass open because carbon monoxide (CO) gas
can come into your vehicle. You cannot see or
smell CO. It can cause unconsciousness and even
death. If you must drive with the liftgate open or if
electrical wiring or other cable connections must
pass through the seal between the body and the
liftgate or liftglass:
Make sure all other windows are shut.
Turn the fan on your climate control system to
its highest speed and select the control setting
that will force outside air into your vehicle.
See “Climate Control System” in the Index.
If you have air outlets on or under the
instrument panel, open them all the way.
SeeEngine Exhaust on page 2-38.
Liftgate Release
To unlock the liftgate, use the power door lock switch
or the remote keyless entry transmitter. SeeRemote
Keyless Entry (RKE) System Operation on page 2-5.
The liftglass will also unlock when the liftgate is
unlocked.
Press the button on the liftglass to open it. To open the
entire liftgate, lift the handle located in the center of
the liftgate. When the liftgate is opened, the liftglass
will lock after a short delay.
Emergency Release for Opening
Liftgate
1. Remove the trim plug, located on the inside of the
liftgate in the center, to expose the access hole in
the trim panel.
2. Use a tool to reach through the access hole in the
trim panel.
3. Pry the left release lever up to the unlock position.
Pry the right release lever up to unlatch the liftgate.
4. Reinstall the trim plug.
2-13
Page 141 of 484

Turn Signal/Multifunction Lever
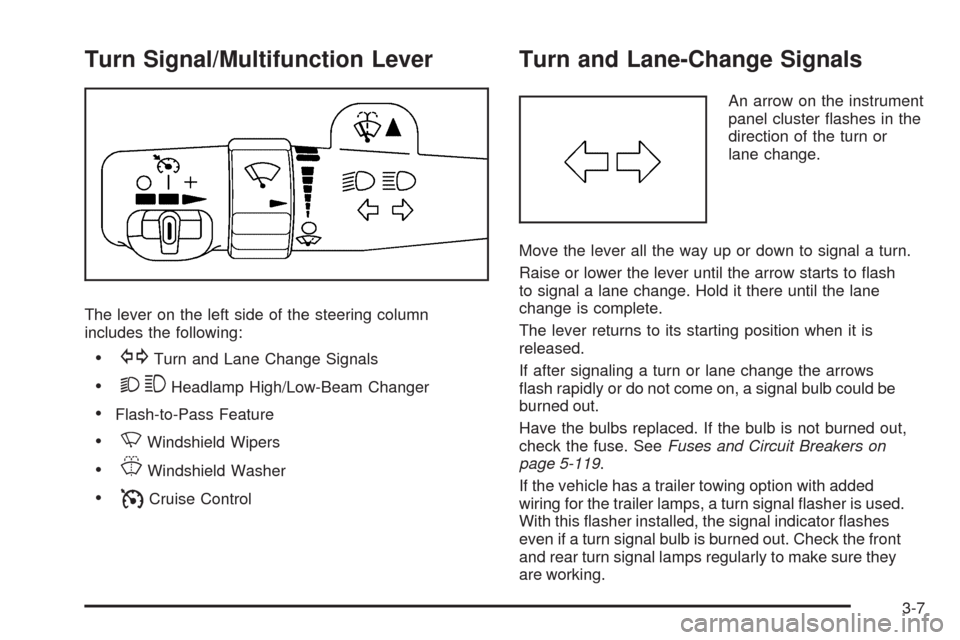
The lever on the left side of the steering column
includes the following:
GTurn and Lane Change Signals
23Headlamp High/Low-Beam Changer
Flash-to-Pass Feature
NWindshield Wipers
JWindshield Washer
ICruise Control
Turn and Lane-Change Signals
An arrow on the instrument
panel cluster �ashes in the
direction of the turn or
lane change.
Move the lever all the way up or down to signal a turn.
Raise or lower the lever until the arrow starts to �ash
to signal a lane change. Hold it there until the lane
change is complete.
The lever returns to its starting position when it is
released.
If after signaling a turn or lane change the arrows
�ash rapidly or do not come on, a signal bulb could be
burned out.
Have the bulbs replaced. If the bulb is not burned out,
check the fuse. SeeFuses and Circuit Breakers on
page 5-119.
If the vehicle has a trailer towing option with added
wiring for the trailer lamps, a turn signal �asher is used.
With this �asher installed, the signal indicator �ashes
even if a turn signal bulb is burned out. Check the front
and rear turn signal lamps regularly to make sure they
are working.
3-7
Page 166 of 484

Airbag Readiness Light
The system checks the airbag’s electrical system for
possible malfunctions. If the light stays on it indicates
there is an electrical problem. The system check includes
the airbag sensor, the pretensioners, the airbag modules,
the wiring and the crash sensing and diagnostic module.
For more information on the airbag system, seeAirbag
System on page 1-55.
The airbag readiness light
�ashes for a few seconds
when the engine is started.
If the light does not come
on then, have it �xed
immediately.{CAUTION:
If the airbag readiness light stays on after the
vehicle is started or comes on while driving,
it means the airbag system might not be working
properly. The airbags in the vehicle might not
in�ate in a crash, or they could even in�ate
without a crash. To help avoid injury, have
the vehicle serviced right away.
If there is a problem with the airbag system, an airbag
Driver Information Center (DIC) message can also come
on. SeeDIC Warnings and Messages on page 3-51
for more information.
3-32
Page 304 of 484

Leaving After Parking on a Hill
1. Apply and hold the brake pedal while you:
start the engine,
shift into a gear, and
release the parking brake.
2. Let up on the brake pedal.
3. Drive slowly until the trailer is clear of the chocks.
4. Stop and have someone pick up and store the
chocks.
Maintenance When Trailer Towing
The vehicle needs service more often when pulling a
trailer. See this manual’s Maintenance Schedule or Index
for more information. Things that are especially important
in trailer operation are automatic transmission �uid,
engine oil, axle lubricant, belts, cooling system and brake
system. It is a good idea to inspect these before and
during the trip.
Check periodically to see that all hitch nuts and bolts
are tight.
Trailer Wiring Harness
The vehicle may have a seven-wire trailer towing
harness. This harness may have a seven-pin
universal heavy-duty trailer connector (if equipped
with the trailering package) that is attached to a
bracket on the hitch platform or included with the
four-pin trailer towing harness. If the vehicle is not
equipped with the heavy-duty trailer connector, one
may be purchased from your dealer/retailer.
4-58
Page 305 of 484

The seven-wire harness contains the following trailer
circuits:
Yellow: Left Stop/Turn Signal
Dark Green: Right Stop/Turn Signal
Brown: Running Lamps
White: Ground
Light Green: Back-up Lamps
Dark Blue: Electric Brakes
Red: Battery Feed (The chassis wiring ring terminal
must be fastened to a stud on the underhood
electrical center before the trailer feed will become
active.)
If towing a light-duty trailer with a standard four-way
round pin connector, an adapter connector is available
from your dealer/retailer.
If charging a remote (non-vehicle) battery, turn on the
headlamps to boost the vehicle system voltage and
properly charge the battery.
The vehicle is also equipped with wiring for an electric
trailer brake controller. These wires are located inside the
vehicle on the driver side under the instrument panel.
These wires should be connected to an electric trailer
brake controller by your dealer/retailer or a quali�ed
service center.The vehicle may be equipped with a four-pin trailer
towing harness. This harness has a four-pin trailer
connector that contains the following trailer circuits:
Yellow: Left Stop/Turn Signal
Dark Green: Right Stop/Turn Signal
Brown: Running Lamps
White: Ground
This harness also contains the following trailer circuits
that are not connected to the four-pin trailer connector:
Light Green: Back-Up Lamps
Dark Blue: Electric Brakes
Red: Battery Feed
If the vehicle is a TrailBlazer SS, a trailer wiring harness
extension, and instructions for installing this extension,
were provided when the vehicle was delivered. This
extension will allow the vehicle’s trailer wiring harness to
be more easily accessible. There is a four-way connector
on the harness. A seven-way adapter plug is also
included if the trailer requires it.
4-59
Page 359 of 484

Taillamps and Turn Signal Lamps
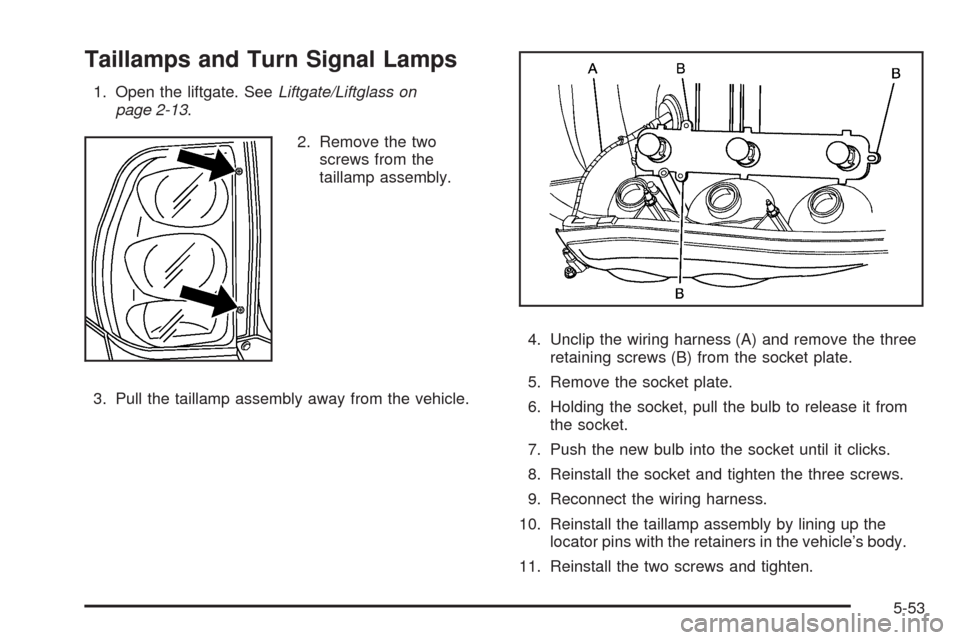
1. Open the liftgate. SeeLiftgate/Liftglass on
page 2-13.
2. Remove the two
screws from the
taillamp assembly.
3. Pull the taillamp assembly away from the vehicle.4. Unclip the wiring harness (A) and remove the three
retaining screws (B) from the socket plate.
5. Remove the socket plate.
6. Holding the socket, pull the bulb to release it from
the socket.
7. Push the new bulb into the socket until it clicks.
8. Reinstall the socket and tighten the three screws.
9. Reconnect the wiring harness.
10. Reinstall the taillamp assembly by lining up the
locator pins with the retainers in the vehicle’s body.
11. Reinstall the two screws and tighten.
5-53