Page 110 of 484
Parking Brake
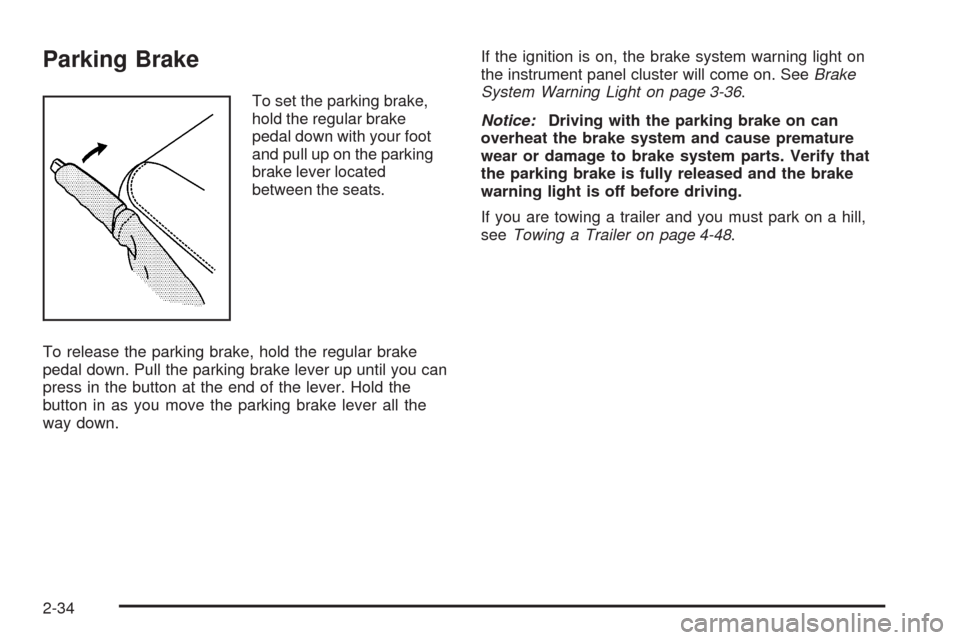
To set the parking brake,
hold the regular brake
pedal down with your foot
and pull up on the parking
brake lever located
between the seats.
To release the parking brake, hold the regular brake
pedal down. Pull the parking brake lever up until you can
press in the button at the end of the lever. Hold the
button in as you move the parking brake lever all the
way down.If the ignition is on, the brake system warning light on
the instrument panel cluster will come on. SeeBrake
System Warning Light on page 3-36.
Notice:Driving with the parking brake on can
overheat the brake system and cause premature
wear or damage to brake system parts. Verify that
the parking brake is fully released and the brake
warning light is off before driving.
If you are towing a trailer and you must park on a hill,
seeTowing a Trailer on page 4-48.
2-34
Page 111 of 484
Shifting Into Park
{CAUTION:
It can be dangerous to get out of the vehicle if the
shift lever is not fully in P (Park) with the parking
brake rmly set. The vehicle can roll. If you have
left the engine running, the vehicle can move
suddenly. You or others could be injured. To be
sure the vehicle will not move, even when you are
on fairly level ground, use the steps that follow.
With four-wheel drive, the vehicle will be free to
roll — even if the shift lever is in P (Park) — if your
transfer case is in Neutral. So, be sure the transfer
case is in a drive gear — not in Neutral. See
Four-Wheel Drive on page 2-30. Always put the
shift lever fully in P (Park) with the parking brake
rmly set. If you are pulling a trailer, seeTowing a
Trailer on page 4-48.To shift into P (Park):
1. Hold the brake pedal down with your foot and set
the parking brake.
2. Move the shift lever into P (Park) by pressing the
button on the side of the shift lever and pushing
the lever all the way toward the front of the vehicle.
3. Turn the ignition key to OFF/LOCK.
4. Remove the key and take it with you. You know the
vehicle is in P (Park) if the key can be removed
from the ignition.
2-35
Page 113 of 484

Shifting Out of Park
The vehicle has an electronic shift lock release system.
The shift lock release is designed to:
Prevent ignition key removal unless the shift lever
is in P (Park) with the shift lever button fully
released, and
Prevent movement of the shift lever out of P (Park),
unless the ignition is in ON/RUN and the regular
brake pedal is applied.
The shift lock release is always functional except in the
case of an uncharged or low voltage (less than 9 volt)
battery.
If the vehicle has an uncharged battery or a battery with
low voltage, try charging or jump starting the battery.
SeeJump Starting on page 5-43for more information.
To shift out of P (Park) use the following:
1. Apply the brake pedal.
2. Press the shift lever button.
3. Move the shift lever to the desired position.If you still are unable to shift out of P (Park):
1. Fully release the shift lever button.
2. Hold the brake pedal down and press the shift lever
button again.
3. Move the shift lever to the desired position.
If you still cannot move the shift lever from P (Park),
consult your dealer/retailer or a professional towing
service.
Parking Over Things That Burn
{CAUTION:
Things that can burn could touch hot exhaust
parts under the vehicle and ignite. Do not park
over papers, leaves, dry grass, or other things that
can burn.
2-37
Page 115 of 484
Running the Vehicle While Parked
It is better not to park with the engine running. But if you
ever have to, here are some things to know.
{CAUTION:
Idling a vehicle in an enclosed area with poor
ventilation is dangerous. Engine exhaust may
enter the vehicle. Engine exhaust contains Carbon
Monoxide (CO) which cannot be seen or smelled.
It can cause unconsciousness and even death.
Never run the engine in an enclosed area that
has no fresh air ventilation. For more information,
seeEngine Exhaust on page 2-38.
{CAUTION:
It can be dangerous to get out of the vehicle if the
automatic transmission shift lever is not fully in
P (Park) with the parking brake rmly set.
CAUTION: (Continued)
CAUTION: (Continued)
Thevehicle can roll. Do not leave the vehicle when
the engine is running unless you have to. If you
have left the engine running, the vehicle can move
suddenly. You or others could be injured. To be
sure the vehicle will not move, even when you are
on fairly level ground, always set the parking
brake and move the shift lever to P (Park).
{CAUTION:
If the vehicle has four-wheel drive, it will be free to
roll — even if the shift lever is in P (Park) — if the
transfer case is in N (Neutral). So be sure the
transfer case is in a drive gear — not in N (Neutral).
SeeFour-Wheel Drive on page 2-30.
Follow the proper steps to be sure the vehicle will not
move. SeeShifting Into Park on page 2-35.
If pulling a trailer, seeTowing a Trailer on page 4-48.
2-39
Page 117 of 484

Temperature Display
PressOor depending on the mirror, press TEMP to
turn the temperature display on or off.
To adjust between Fahrenheit and Celsius:
1. Press and hold
Oor depending on the mirror,
press TEMP until either a ashing F or C appears.
2. Press
Oor TEMP again to change the display to
the desired unit of measurement. After approximately
four seconds of inactivity, the new unit locks in and
the display returns.
If an abnormal temperature reading is displayed for
an extended period of time, please consult your
dealer/retailer. Under certain circumstances, a delay
in updating the temperature is normal.
Passenger Airbag Indicator
The vehicle may be equipped with a passenger airbag
indicator, on the mirror glass, just above the buttons.
If the vehicle has this feature, the mirror displays
the word ON, or an airbag symbol in Canada, when the
passenger airbag is enabled. For more information,
seePassenger Sensing System on page 1-63.
Cleaning the Mirror
Do not spray glass cleaner directly on the mirror. Use a
soft towel dampened with water.
2-41
Page 119 of 484
To adjust for compass variance:
1. Find your current location and variance zone
number on the following zone map.
2. Press and hold
Oor depending on the mirror,
press COMP until a Z and/or a zone number
displays. The compass is now in zone mode.3. Keep pressing
Ountil the desired zone number
displays. Release the button. After several seconds
of inactivity, the new zone number locks in and the
compass display returns.
4. Calibrate the compass as previously described.
Outside Manual Mirrors
Adjust the outside rearview mirrors to see a little of the
side of your vehicle, and the area beside your vehicle.
Manually fold the mirrors inward to prevent damage
when going through an automatic car wash. To fold, push
the mirror toward the vehicle. Push the mirror outward, to
return to its original position.
2-43
Page 120 of 484

Outside Power Mirrors
Vehicles with outside power mirrors have controls
located on the driver door.
To adjust the mirrors:
1. Turn the control knob left or right to select the
driver’s or passenger mirror.
2. Move the control knob to the left or right or up or
down to position the mirror to see a little of the
outside of the vehicle.
3. After adjusting the position of the mirrors, turn the
knob to the center off position so that the mirrors
do not move.
If the end of travel position in any direction of the mirror
is reached, it will enter a ratcheting mode. This action
is harmless. It is a warning that the mirror can go
no further. To stop this action, back the mirror up by
moving the knob in the opposite direction.
Manually fold the mirrors inward to prevent damage
when going through an automatic car wash. To
fold, push the mirrors toward the vehicle. To return the
mirrors to their original position, push outward.
Outside Convex Mirror
{CAUTION:
A convex mirror can make things (like other
vehicles) look farther away than they really are.
If you cut too sharply into the right lane, you could
hit a vehicle on the right. Check the inside mirror
or glance over your shoulder before changing
lanes.
The passenger side mirror is convex shaped. A convex
mirror’s surface is curved so more can be seen from
the driver seat.
Outside Heated Mirrors
<(Rear Window Defogger):Press to heat the
mirrors. See “Rear Window Defogger” underDual
Climate Control System on page 3-20orDual Automatic
Climate Control System on page 3-22for more
information.
2-44
Page 131 of 484

To slide the crossrails to where you want them, pull up
on the lever on each side of the crossrail. This
releases the crossrail and allows you to slide it. When
the crossrail is where you want it, press down on
the levers to lock it into place.
Notice:Loading cargo on the luggage carrier that
weighs more than 220 lbs (100 kg) or hangs over the
rear or sides of the vehicle may damage your
vehicle. Load cargo so that it rests on the slats as
far forward as possible and against the side
rails, making sure to fasten it securely.
Do not exceed the maximum vehicle capacity when
loading your vehicle. For more information on vehicle
capacity and loading, seeLoading the Vehicle on
page 4-33.
To prevent damage or loss of cargo as you are driving,
check now and then to make sure the luggage carrier
is locked and cargo is still securely fastened.
When the luggage carrier is not in use, place the
crossrails at the following positions for wind noise
reduction. Place one crossrail at the rear most point of
the vehicle and the other crossrail above the opening
of the rear door.Rear Floor Storage Cover
{CAUTION:
If any removable convenience item is not secured
properly, it can move around in a collision or
sudden stop. People in the vehicle could be
injured. Be sure to secure any such item properly.
The vehicle has a rear cargo area with a removable
storage cover.
To remove the rear oor storage cover, do the following:
1. Press the latch release and lift up the latch
handle.
2. Raise the cover slightly to unhook it.
3. Pull the cover towards the rear of the vehicle to
release it from the forward mounting slots.
To reinstall the rear oor storage cover, reverse the
previous steps. Make sure the cover is secure by
applying slight pressure to the latch until it clicks.
2-55