2009 CHEVROLET TAHOE rear view mirror
[x] Cancel search: rear view mirrorPage 1 of 574

Seats and Restraint System............................. 1-1
Head Restraints
......................................... 1-2
Front Seats
............................................... 1-3
Rear Seats
..............................................1-14
Safety Belts
.............................................1-32
Child Restraints
.......................................1-55
Airbag System
.........................................1-81
Restraint System Check
............................1-98
Features and Controls..................................... 2-1
Keys
........................................................ 2-3
Doors and Locks
......................................2-10
Windows
.................................................2-19
Theft-Deterrent Systems
............................2-22
Starting and Operating Your Vehicle
...........2-26
Mirrors
....................................................2-52
Object Detection Systems
..........................2-56
OnStar
®System
......................................2-68
Universal Home Remote System
................2-71
Storage Areas
.........................................2-78
Sunroof
..................................................2-81Instrument Panel............................................. 3-1
Instrument Panel Overview
.......................... 3-4
Climate Controls
......................................3-22
Warning Lights, Gages, and Indicators
........3-34
Driver Information Center (DIC)
..................3-51
Audio System(s)
.......................................3-82
Driving Your Vehicle....................................... 4-1
Your Driving, the Road, and the Vehicle
....... 4-2
Towing
...................................................4-43
Service and Appearance Care.......................... 5-1
Service
..................................................... 5-3
Fuel
......................................................... 5-5
Checking Things Under the Hood
...............5-12
Rear Axle
...............................................5-50
Four-Wheel Drive
.....................................5-52
Front Axle
...............................................5-53
Headlamp Aiming
.....................................5-54
Bulb Replacement
....................................5-57
Windshield Wiper Blade Replacement
.........5-60
Tires
......................................................5-62
2009 Chevrolet Tahoe, Suburban Owner ManualM
Page 107 of 574

Keys...............................................................2-3
Remote Keyless Entry (RKE) System................2-4
Remote Keyless Entry (RKE) System
Operation...................................................2-4
Remote Vehicle Start......................................2-7
Doors and Locks............................................2-10
Door Locks..................................................2-10
Power Door Locks........................................2-10
Delayed Locking...........................................2-11
Programmable Automatic Door Locks..............2-11
Rear Door Security Locks..............................2-11
Lockout Protection........................................2-12
Liftgate/Liftglass............................................2-13
Power Liftgate..............................................2-15
Power Assist Steps.......................................2-18
Windows........................................................2-19
Power Windows............................................2-20
Sun Visors...................................................2-21
Theft-Deterrent Systems..................................2-22
Content Theft-Deterrent.................................2-22
PASS-Key
®III+ Electronic Immobilizer.............2-24
PASS-Key®III+ Electronic Immobilizer
Operation.................................................2-24Starting and Operating Your Vehicle................2-26
New Vehicle Break-In....................................2-26
Ignition Positions..........................................2-26
Retained Accessory Power (RAP)...................2-28
Starting the Engine.......................................2-28
Adjustable Throttle and Brake Pedal................2-30
Engine Coolant Heater..................................2-30
Active Fuel Management™.............................2-31
Automatic Transmission Operation...................2-32
Tow/Haul Mode............................................2-38
Four-Wheel Drive..........................................2-40
Parking Brake..............................................2-45
Shifting Into Park..........................................2-47
Shifting Out of Park......................................2-49
Parking Over Things That Burn.......................2-49
Engine Exhaust............................................2-50
Running the Vehicle While Parked..................2-51
Mirrors...........................................................2-52
Manual Rearview Mirror.................................2-52
Automatic Dimming Rearview Mirror................2-52
Outside Manual Mirrors..................................2-52
Outside Towing Mirrors..................................2-53
Outside Power Mirrors...................................2-53
Outside Power Foldaway Mirrors.....................2-54
Section 2 Features and Controls
2-1
Page 158 of 574

Mirrors
Manual Rearview Mirror
Hold the inside rearview mirror in the center to move it
for a clearer view behind your vehicle. Adjust the
mirror to avoid glare from the headlamps behind you.
Push the tab forward for daytime use and pull it for
nighttime use.
Automatic Dimming Rearview Mirror
The vehicle has an automatic dimming inside rearview
mirror.
Vehicles with OnStar
®have three additional control
buttons for the OnStar®system. See your dealer/retailer
for more information about OnStar®and how to
subscribe to it. SeeOnStar®System on page 2-68for
more information about the services OnStar®provides.
O(On/Off):Press to turn the dimming feature on
or off.
The vehicle may also have a Rear Vision Camera
(RVC). SeeRear Vision Camera (RVC) on page 2-62
for more information.If the vehicle has RVC, the
O(On/Off) button for
turning the automatic dimming feature on or off will not
be available.
Automatic Dimming Mirror Operation
Automatic dimming reduces the glare from the
headlamps of the vehicle behind you. The dimming
feature comes on and the indicator light illuminates each
time the ignition is turned to start.
Cleaning the Mirror
Do not spray glass cleaner directly on the mirror. Use a
soft towel dampened with water.
Outside Manual Mirrors
Adjust the outside mirrors to see the side of the vehicle
and have a clear view of objects behind you.
Manually fold the mirrors inward to prevent damage
when going through an automatic car wash. To
fold, push the mirror toward the vehicle. Push the mirror
outward, to return to its original position.
Using hood-mounted air de�ectors and add-on convex
mirror attachments could decrease mirror performance.
2-52
Page 159 of 574

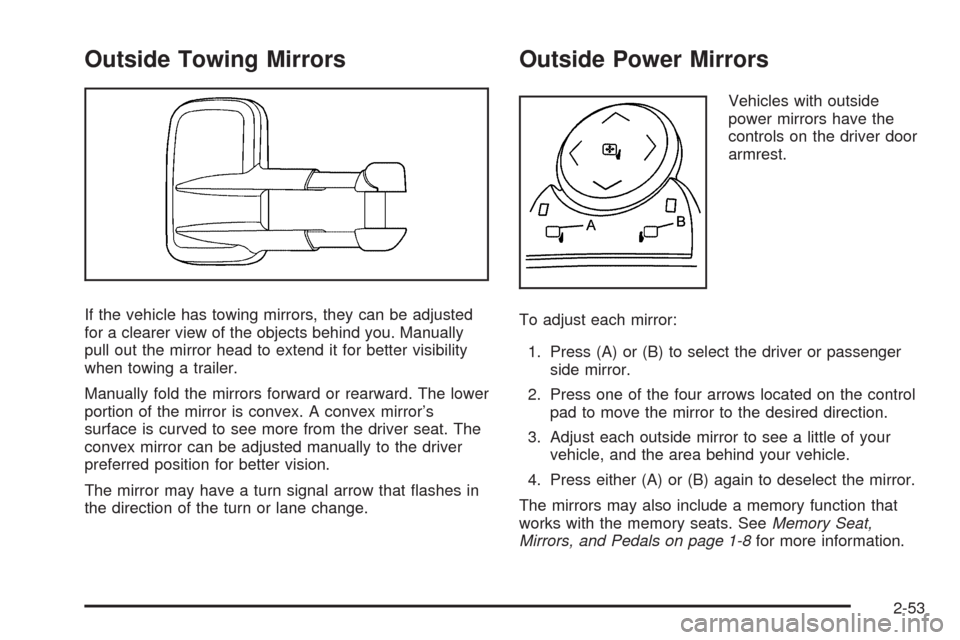
Outside Towing Mirrors
If the vehicle has towing mirrors, they can be adjusted
for a clearer view of the objects behind you. Manually
pull out the mirror head to extend it for better visibility
when towing a trailer.
Manually fold the mirrors forward or rearward. The lower
portion of the mirror is convex. A convex mirror’s
surface is curved to see more from the driver seat. The
convex mirror can be adjusted manually to the driver
preferred position for better vision.
The mirror may have a turn signal arrow that �ashes in
the direction of the turn or lane change.
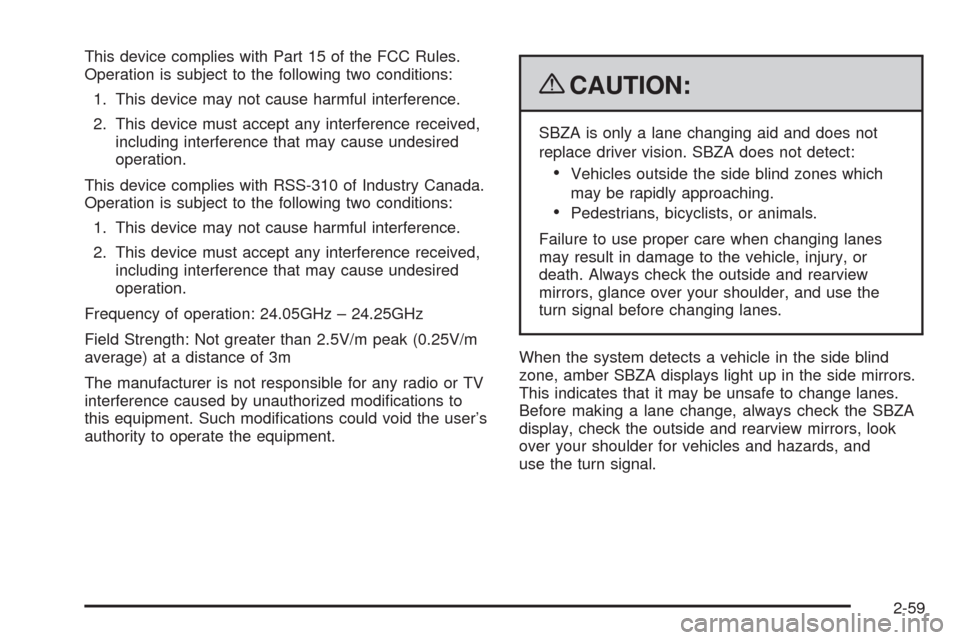
Outside Power Mirrors
Vehicles with outside
power mirrors have the
controls on the driver door
armrest.
To adjust each mirror:
1. Press (A) or (B) to select the driver or passenger
side mirror.
2. Press one of the four arrows located on the control
pad to move the mirror to the desired direction.
3. Adjust each outside mirror to see a little of your
vehicle, and the area behind your vehicle.
4. Press either (A) or (B) again to deselect the mirror.
The mirrors may also include a memory function that
works with the memory seats. SeeMemory Seat,
Mirrors, and Pedals on page 1-8for more information.
2-53
Page 161 of 574

Outside Automatic Dimming Mirror
Vehicles with this feature have a driver outside
mirror that adjusts for the glare of headlamps behind
you. SeeAutomatic Dimming Rearview Mirror on
page 2-52for more information.
Park Tilt Mirrors
Vehicles with the memory package have a passenger
and/or driver mirror that tilts to a preselected position
when the vehicle is in R (Reverse). This feature lets
the driver view the curb when parallel parking. The
mirror(s) return to the original position when the
vehicle is shifted out of R (Reverse), or the ignition
is turned off.
Turn this feature on or off through the Driver Information
Center (DIC). SeeDIC Vehicle Customization (With
DIC Buttons) on page 3-74for more information.
Outside Convex Mirror
{CAUTION:
A convex mirror can make things (like other
vehicles) look farther away than they really are. If
you cut too sharply into the right lane, you could
hit a vehicle on the right. Check the inside mirror
or glance over your shoulder before changing
lanes.
The passenger side mirror is convex shaped. A convex
mirror’s surface is curved so more can be seen from
the driver seat.
Outside Heated Mirrors
For vehicles with heated mirrors:
<(Rear Window Defogger):Press to heat the
mirrors.
See “Rear Window Defogger” underDual Automatic
Climate Control System on page 3-24orClimate Control
System on page 3-22for more information.
2-55
Page 165 of 574

This device complies with Part 15 of the FCC Rules.
Operation is subject to the following two conditions:
1. This device may not cause harmful interference.
2. This device must accept any interference received,
including interference that may cause undesired
operation.
This device complies with RSS-310 of Industry Canada.
Operation is subject to the following two conditions:
1. This device may not cause harmful interference.
2. This device must accept any interference received,
including interference that may cause undesired
operation.
Frequency of operation: 24.05GHz – 24.25GHz
Field Strength: Not greater than 2.5V/m peak (0.25V/m
average) at a distance of 3m
The manufacturer is not responsible for any radio or TV
interference caused by unauthorized modi�cations to
this equipment. Such modi�cations could void the user’s
authority to operate the equipment.
{CAUTION:
SBZA is only a lane changing aid and does not
replace driver vision. SBZA does not detect:
Vehicles outside the side blind zones which
may be rapidly approaching.
Pedestrians, bicyclists, or animals.
Failure to use proper care when changing lanes
may result in damage to the vehicle, injury, or
death. Always check the outside and rearview
mirrors, glance over your shoulder, and use the
turn signal before changing lanes.
When the system detects a vehicle in the side blind
zone, amber SBZA displays light up in the side mirrors.
This indicates that it may be unsafe to change lanes.
Before making a lane change, always check the SBZA
display, check the outside and rearview mirrors, look
over your shoulder for vehicles and hazards, and
use the turn signal.
2-59
Page 169 of 574

Vehicles Without Navigation System
The rear vision camera system is designed to help the
driver when backing up by displaying a view of the area
behind the vehicle. When the key is in the ON/RUN
position and the driver shifts the vehicle into R (Reverse),
the video image automatically appears on the inside rear
view mirror. Once the driver shifts out of R (Reverse), the
video image automatically disappears from the inside
rear view mirror.
Turning the Rear Vision Camera System
OfforOn
To turn off the rear vision camera system, press and
hold
z, located on the inside rearview mirror, until the
left indicator light turns off. The rear camera vision
display is now disabled.
To turn the rear vision camera system on again, press
and hold
zuntil the left indicator light illuminates.
The rear vision camera system display is now enabled
and the display will appear in the mirror normally.
Vehicles With Navigation System
The rear vision camera system is designed to help the
driver when backing up by displaying a view of the
area behind the vehicle. When the driver shifts
the vehicle into R (Reverse), the video image
automatically appears on the navigation screen. Once
the driver shifts out of R (Reverse), the navigation
screen will go back to the last screen that had been
displayed, after a delay.
Turning the Rear Vision Camera System
On or Off
To turn the rear vision camera system on or off:
1. Shift into P (Park).
2. Press the MENU button to enter the con�gure
menu options, then press the MENU hard key
to select Display or touch the Display screen button.
3. Select the Rear Camera Options screen button. The
Rear Camera Options screen will display.
2-63
Page 173 of 574

When the System Does Not Seem To
Work Properly
The rear vision camera system might not work properly
or display a clear image if:
The RVC is turned off. See “Turning the Rear
Camera System On or Off” earlier in this section.
It is dark.
The sun or the beam of headlights is shining
directly into the camera lens.
Ice, snow, mud, or anything else builds up on the
camera lens. Clean the lens, rinse it with water,
and wipe it with a soft cloth.
The back of the vehicle is in an accident, the
position and mounting angle of the camera
can change or the camera can be affected. Be sure
to have the camera and its position and mounting
angle checked at your dealer/retailer.
There are extreme temperature changes.The rear vision camera system display in the rearview
mirror may turn off or not appear as expected due to one
of the following conditions. If this occurs the left
indicator light on the mirror will �ash.
A slow �ash may indicate a loss of video signal, or
no video signal present during the reverse cycle.
A fast �ash may indicate that the display has been
on for the maximum allowable time during a
reverse cycle, or the display has reached an Over
Temperature limit.
The fast �ash conditions are used to protect the
video device from high temperature conditions. Once
conditions return to normal the device will reset
and the green indicator will stop �ashing.
During any of these fault conditions, the display will be
blank and the indicator will continue to �ash as long
as the vehicle is in R (Reverse) or until the conditions
return to normal.
Pressing and holding
zwhen the left indicator light is
�ashing will turn off the video display along with the
left indicator light.
2-67