2009 CHEVROLET MALIBU radio controls
[x] Cancel search: radio controlsPage 132 of 420
Engine Coolant Temperature Warning Light......3-36
Engine Coolant Temperature Gage..................3-37
Tire Pressure Light.......................................3-37
Malfunction Indicator Lamp.............................3-38
Oil Pressure Light.........................................3-41
Security Light...............................................3-41
Cruise Control Light......................................3-42
Highbeam On Light.......................................3-42
Fuel Gage...................................................3-42
Driver Information Center (DIC).......................3-43
DIC Operation and Displays...........................3-44
DIC Warnings and Messages.........................3-46
DIC Vehicle Personalization............................3-50Audio System(s).............................................3-56
Setting the Clock..........................................3-57
Radio(s)......................................................3-59
Using an MP3..............................................3-71
XM Radio Messages.....................................3-77
Bluetooth
®...................................................3-78
Theft-Deterrent Feature..................................3-89
Audio Steering Wheel Controls.......................3-89
Radio Reception...........................................3-91
Backglass Antenna.......................................3-92
XM™ Satellite Radio Antenna System.............3-92
Chime Level Adjustment................................3-92
Section 3 Instrument Panel
3-2
Page 145 of 420
Automatic Headlamp System
When it is dark enough outside, the automatic headlamp
system turns on the headlamps at the normal brightness
along with other lamps such as the taillamps, sidemarker,
parking lamps, and the instrument panel lights. The radio
lights will also be dim.
The vehicle has a light sensor on top of the instrument
panel that controls the automatic headlamp system.
Do not cover the sensor or the automatic headlamp
system will turn on when it is not needed.
There is a delay in the transition between the daytime
and nighttime operation of the DRL and the automatic
headlamp systems so that driving under bridges or
bright overhead street lights does not affect the system.
The DRL and automatic headlamp systems will only be
affected when the light sensor sees a change in lighting
lasting longer than this delay.
If vehicle is started in a dark garage, the automatic
headlamp system comes on immediately. Once the
vehicle leaves the garage, it takes about one minute for
the automatic headlamp system to change to DRL if it is
light outside. During that delay, the instrument panel
cluster may not be as bright as usual. Make sure the
instrument panel brightness control is in the full bright
position. SeeInstrument Panel Brightness on page 3-16.To idle the vehicle with the automatic headlamp system
off, turn the ignition on and set the exterior light switch to
the off/on position. For vehicles �rst sold in Canada, the
transmission must stay in P (Park) for this function.
The regular headlamps should be used when needed.
Fog Lamps
For vehicles with fog lamps, the button for this feature is
located on the instrument panel, to the left of the
steering wheel.
The ignition must be on for the fog lamps to work.
#:Press to turn the fog lamps on or off. An indicator
light comes on when the fog lamps are on.
The parking lamps automatically turn on and off when
the fog lamps are turned on and off.
The fog lamps turn off while the high-beam headlamps
are turned on.
Some localities have laws that require the headlamps to
be on along with the fog lamps.
3-15
Page 186 of 420
Audio System(s)
Determine which radio the vehicle has and read the
following pages to become familiar with its features.
{CAUTION:
Taking your eyes off the road for extended periods
could cause a crash resulting in injury or death to
you or others. Do not give extended attention to
entertainment tasks while driving.
This system provides access to many audio and non
audio listings.
To minimize taking your eyes off the road while driving,
do the following while the vehicle is parked:
Become familiar with the operation and controls of
the audio system.
Set up the tone, speaker adjustments, and preset
radio stations.
For more information, seeDefensive Driving on
page 4-2.Notice:Contact your dealer/retailer before adding
any equipment.
Adding audio or communication equipment could
interfere with the operation of the vehicle’s engine,
radio, or other systems, and could damage them.
Follow federal rules covering mobile radio and
telephone equipment.
Notice:The chime signals related to safety belts,
parking brake, and other functions of your vehicle
operate through the radio/entertainment system.
If that equipment is replaced or additional equipment
is added to your vehicle, the chimes may not
work. Make sure that replacement or additional
equipment is compatible with your vehicle before
installing it. SeeAccessories and Modifications
on page 5-3.
The vehicle has Retained Accessory Power (RAP). With
RAP, the audio system can be played even after the
ignition is turned off. SeeRetained Accessory Power
(RAP) on page 2-23for more information.
3-56
Page 192 of 420
Storing Radio Stations
Depending on which radio the vehicle has, radio
stations are stored as either favorites or presets.
Storing a Radio Station as a Favorite
Radio that have a FAV button store radio stations as
favorites.
Drivers are encouraged to set up radio station favorites
while the vehicle is in P (Park). Tune to favorite stations
using the softkeys, favorites button, and steering wheel
controls. SeeDefensive Driving on page 4-2.
FAV (Favorites):A maximum of 36 stations can be
stored as favorites using the six softkeys located below
the radio station frequency tabs and by using the radio
favorites page button (FAV button). Press FAV to go
through up to six pages of favorites, each having six
favorite stations available per page. Each page of
favorites can contain any combination of AM, FM, or XM
stations. The current balance/fade and tone settings are
also stored with the favorite stations.To store a station as a favorite:
1. Tune to the desired radio station and set the
balance/fade and tone settings to the desired levels.
2. Press FAV to display the page where to store the
station.
3. Press and hold one of the six softkeys until a beep
sounds.
4. Repeat the steps for each radio station to be stored
as a favorite.
To setup the number of favorites pages:
1. Press MENU to display the radio setup menu.
2. Press the softkey located below the FAV 1-6 tab.
3. Select the desired number of favorites pages
by pressing the softkey located below the displayed
page numbers.
4. Press FAV, or let the menu time out, to return to
the original main radio screen showing the radio
station frequency tabs and to begin programming
favorites.
3-62
Page 194 of 420
Setting the Tone
(Bass/Midrange/Treble)
BASS/MID/TREB (Bass, Midrange, or Treble):The
radio may display some or all tones such as BASS, MID,
and TREB.
To adjust the tone settings on the Radio with CD (Base):
Press
funtil the tone control labels display, then turnf
to change the setting.
To adjust the tone settings on the Radio with CD (MP3)
and USB Port, Radio with CD (MP3), or Radio with
Six-Disc CD (MP3):
1. Press
funtil the tone control tabs display.
2. Press the softkey below the desired tab to be
adjusted.
3. To increase the level of the bass, midrange, or
treble:
Press¨SEEK, or\FWD.
Turnfclockwise.4. To decrease the level of the bass, midrange, or
treble:
Press©SEEK, orsREV.
Turnfcounterclockwise.
The radio may be capable of adjusting bass, midrange,
or treble to the middle position by pressing the
softkey below the BASS, MID, or TREB tab for more
than two seconds. The radio beeps once and the level
adjusts to the middle position.
The radio may also be capable of adjusting all tone and
speaker controls to the middle position by pressing
ffor
more than two seconds until the radio beeps once.
If a station’s frequency is weak, or has static, decrease
the treble.
EQ (Equalization):Press this button to select preset
equalization settings.
To return to the manual mode, press EQ until Manual
displays or start to manually adjust the bass, midrange,
or treble by pressing
f.
3-64
Page 195 of 420
Adjusting the Speakers (Balance/Fade)
Depending on which radio the vehicle has, the
Balance/Fade can be adjusted using
for`.
To adjust balance or fade using
f:
1. Press
funtil the speaker control tabs display.
2. Press the softkey under the desired tab, or continue
pressing
fto highlight the desired tab.
3. Turn
fto adjust the highlighted setting. The
highlighted setting can also be adjusted by pressing
either SEEK arrow.
On some radios,
\FWD andsREV can also
be used to adjust the highlighted level.
To adjust balance or fade using
`:
1. Press
`until the speaker control labels display.
2. Continue pressing
`until the desired speaker
control label displays.
3. Turn
fto adjust the setting. The setting can
also be adjusted by pressing either SEEK arrow,
\FWD, orsREV.The radio may be capable of adjusting balance or fade to
the middle position by pressing the softkey below the BAL
or FADE tab for more than two seconds. The radio beeps
once and the level adjusts to the middle position.
The radio may also be capable of adjusting all tone and
speaker controls to the middle position by pressing
ffor
more than two seconds until the radio beeps once.
Finding a Category (CAT) Station
(XM Satellite Radio Service Only)
CAT (Category):The radio may have the CAT button
feature.
To select and �nd a desired category:
1. Press BAND until the XM frequency displays.
2. Press CAT to display the category tabs on the radio
display. Continue pressing the CAT button until the
desired category name displays.
3. Press either of the two softkeys below the desired
category tab to immediately tune to the �rst XM
station associated with that category.
3-65
Page 219 of 420
This device complies with Part 15 of the FCC Rules.
Operation is subject to the following two conditions:
1. This device may not cause harmful interference.
2. This device must accept any interference received,
including interference that may cause undesired
operation.
This device complies with RSS-210 of Industry Canada.
Operation is subject to the following two conditions:
1. This device may not cause interference.
2. This device must accept any interference received,
including interference that may cause undesired
operation of the device.
Changes or modi�cations to this system by other than
an authorized service facility could void authorization to
use this equipment.
Theft-Deterrent Feature
THEFTLOCK®is designed to discourage theft of the
vehicle’s radio by learning a portion of the Vehicle
Identi�cation Number (VIN). The radio does not operate
if it is stolen or moved to a different vehicle.
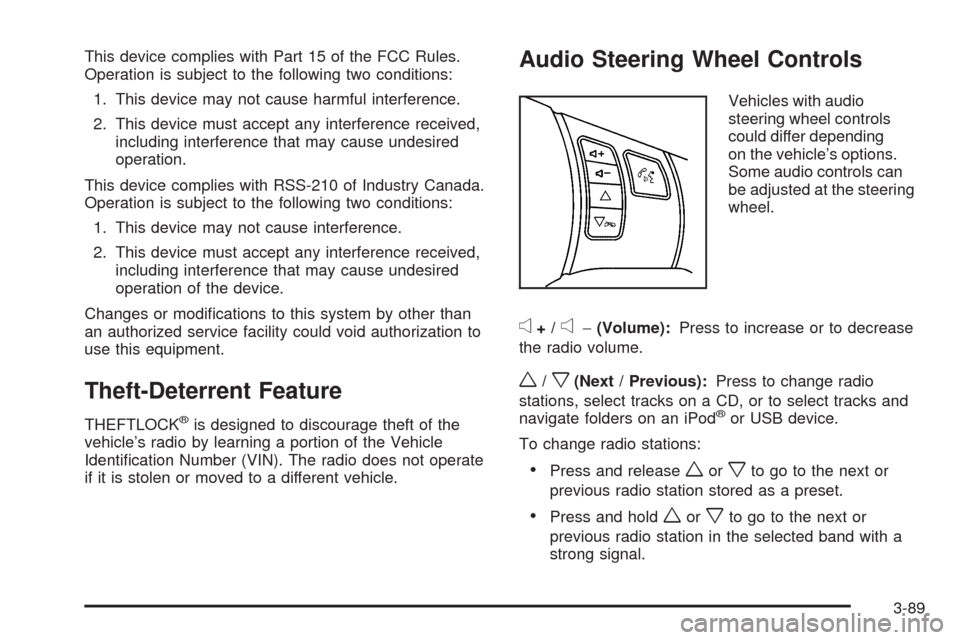
Audio Steering Wheel Controls
Vehicles with audio
steering wheel controls
could differ depending
on the vehicle’s options.
Some audio controls can
be adjusted at the steering
wheel.
e+/e−(Volume):Press to increase or to decrease
the radio volume.
w/x(Next / Previous):Press to change radio
stations, select tracks on a CD, or to select tracks and
navigate folders on an iPod
®or USB device.
To change radio stations:
Press and releaseworxto go to the next or
previous radio station stored as a preset.
Press and holdworxto go to the next or
previous radio station in the selected band with a
strong signal.
3-89
Page 365 of 420

Fuses Usage
9 Not Used
10 Sunroof Controls
11 Not Used
12 Not Used
13 Audio Ampli�er
14 Heated Seat Controls
15 Not Used
16Remote Keyless Entry (RKE)
System, XM™ Satellite
Radio, UGDO
17 Back-up Lamps
18 Not Used
19 Not Used
20 Auxiliary Power Outlets
21 Not Used
22 Trunk Release
23 Rear Defog
24 Heated Mirrors
25 Fuel PumpRelays Usage
26 Rear Window Defogger
27 Park Lamps
28 Not Used
29 Not Used
30 Not Used
31 Not Used
32 Not Used
33 Back-up Lamps
34 Not Used
35 Not Used
36 Trunk Release
37 Fuel Pump
38 (Diode) Cargo Lamp
5-107