2009 CHEVROLET IMPALA instrument panel
[x] Cancel search: instrument panelPage 76 of 406

Adding Equipment to Your
Airbag-Equipped Vehicle
Q:Is there anything I might add to or change
about the vehicle that could keep the airbags
from working properly?
A:Yes. If you add things that change the vehicle’s
frame, bumper system, height, front end or side
sheet metal, they may keep the airbag system from
working properly. Changing or moving any parts
of the front seats, safety belts, the airbag sensing
and diagnostic module, steering wheel, instrument
panel, roof-rail airbag modules, ceiling headliner
or pillar garnish trim, front sensors, side impact
sensors, or airbag wiring can affect the operation of
the airbag system.
In addition, the vehicle has a passenger sensing
system for the right front passenger position, which
includes sensors that are part of the passenger’s
seat. The passenger sensing system may not
operate properly if the original seat trim is replaced
with non-GM covers, upholstery or trim, or with
GM covers, upholstery or trim designed for a
different vehicle. Any object, such as an aftermarket
seat heater or a comfort enhancing pad or device,
installed under or on top of the seat fabric,could also interfere with the operation of the
passenger sensing system. This could either
prevent proper deployment of the passenger
airbag(s) or prevent the passenger sensing system
from properly turning off the passenger airbag(s).
SeePassenger Sensing System on page 1-65.
If you have any questions, call Customer
Assistance. The phone numbers and addresses for
Customer Assistance are in Step Two of the
Customer Satisfaction Procedure in this manual.
SeeCustomer Satisfaction Procedure on page 7-2.
Q:Because I have a disability, I have to get
my vehicle modi�ed. How can I �nd out whether
this will affect my airbag system?
A:If you have questions, call Customer Assistance.
The phone numbers and addresses for Customer
Assistance are in Step Two of the Customer
Satisfaction Procedure in this manual. See
Customer Satisfaction Procedure on page 7-2.
In addition, your dealer/retailer and the service manual
have information about the location of the airbag
sensors, sensing and diagnostic module and airbag
wiring.
1-72
Page 90 of 406

To open a rear door when the security lock is on, do the
following:
1. Unlock the door using the Remote Keyless Entry
(RKE) transmitter, if the vehicle has one, the
power door lock switch, or by lifting the rear door
manual lock.
2. Open the door from the outside.
To cancel the rear door security lock:
1. Unlock the door and open it from the outside.
2. Insert the key into the security lock slot and turn it
so the slot is in the vertical position.
3. Do the same for the other rear door.
Lockout Protection
This feature helps prevent you from locking the doors
while the key is in the ignition. Always remember to take
your key with you when exiting the vehicle.
If the lock switch is pressed on the door that is open
and the key is in the ignition, all of the doors will
lock and then the open door will unlock. A chime sounds
continuously until the driver door is closed.
Trunk
{CAUTION:
Exhaust gases can enter the vehicle if it is driven
with the liftgate, trunk/hatch open, or with any
objects that pass through the seal between the
body and the trunk/hatch or liftgate. Engine
exhaust contains Carbon Monoxide (CO) which
cannot be seen or smelled. It can cause
unconsciousness and even death.
If the vehicle must be driven with the liftgate, or
trunk/hatch open:
Close all of the windows.
Fully open the air outlets on or under the
instrument panel.
Adjust the Climate Control system to a setting
that brings in only outside air and set the fan
speed to the highest setting. See Climate
Control System in the Index.
If the vehicle is equipped with a power liftgate,
disable the power liftgate function.
For more information about carbon monoxide, see
Engine Exhaust on page 2-30.
2-12
Page 91 of 406

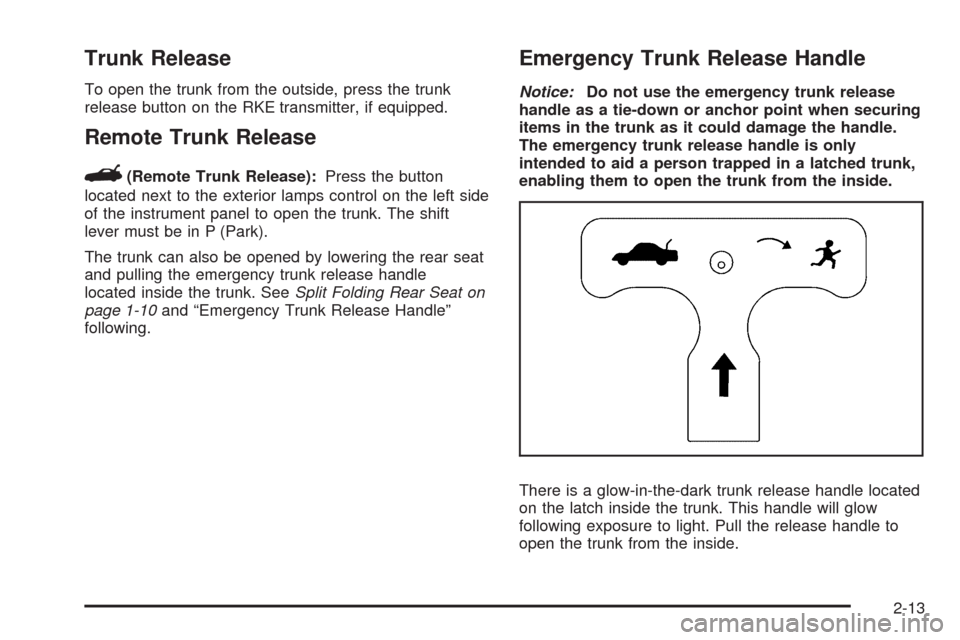
Trunk Release
To open the trunk from the outside, press the trunk
release button on the RKE transmitter, if equipped.
Remote Trunk Release
G
(Remote Trunk Release):Press the button
located next to the exterior lamps control on the left side
of the instrument panel to open the trunk. The shift
lever must be in P (Park).
The trunk can also be opened by lowering the rear seat
and pulling the emergency trunk release handle
located inside the trunk. SeeSplit Folding Rear Seat on
page 1-10and “Emergency Trunk Release Handle”
following.
Emergency Trunk Release Handle
Notice:Do not use the emergency trunk release
handle as a tie-down or anchor point when securing
items in the trunk as it could damage the handle.
The emergency trunk release handle is only
intended to aid a person trapped in a latched trunk,
enabling them to open the trunk from the inside.
There is a glow-in-the-dark trunk release handle located
on the latch inside the trunk. This handle will glow
following exposure to light. Pull the release handle to
open the trunk from the inside.
2-13
Page 96 of 406

This device complies with RSS-210 of Industry Canada.
Operation is subject to the following two conditions:
1. This device may not cause interference.
2. This device must accept any interference received,
including interference that may cause undesired
operation of the device.
Changes or modi�cations to this system by other than
an authorized service facility could void authorization to
use this equipment.
PASS-Key III+ uses a radio frequency transponder in
the key that matches a decoder in the vehicle.
PASS-Key®III+ Electronic
Immobilizer Operation
Your vehicle has PASS-Key®III+ (Personalized
Automotive Security System) theft-deterrent system.
PASS-Key
®III+ is a passive theft-deterrent system.
The system is automatically armed when the key
is removed from the ignition.
The system is automatically disarmed when the key is
turned to ON/RUN, ACC/ACCESSORY or START
from the LOCK/OFF position.
You do not have to manually arm or disarm the system.The security light will come on if there is a problem with
arming or disarming the theft-deterrent system.
When the PASS-Key
®III+ system senses that someone
is using the wrong key, it prevents the vehicle from
starting. Anyone using a trial-and-error method to start
the vehicle will be discouraged because of the high
number of electrical key codes.
If the engine does not start and the security light on the
instrument panel cluster comes on when trying to
start the vehicle, there may be a problem with your
theft-deterrent system. Turn the ignition off and try again.
If the engine still does not start, and the key appears
to be undamaged, try another ignition key. At this time,
you may also want to check the fuse, seeFuses
and Circuit Breakers on page 5-97. If the engine still
does not start with the other key, your vehicle needs
service. If your vehicle does start, the �rst key may be
faulty. See your dealer/retailer who can service the
PASS-Key
®III+ to have a new key made. In an
emergency, contact Roadside Assistance.
It is possible for the PASS-Key
®III+ decoder to learn
the transponder value of a new or replacement key. Up
to 10 keys may be programmed for the vehicle. The
following procedure is for programming additional keys
only. If all the currently programmed keys are lost or
do not operate, you must see your dealer/retailer
or a locksmith who can service PASS-Key
®III+ to have
keys made and programmed to the system.
2-18
Page 98 of 406

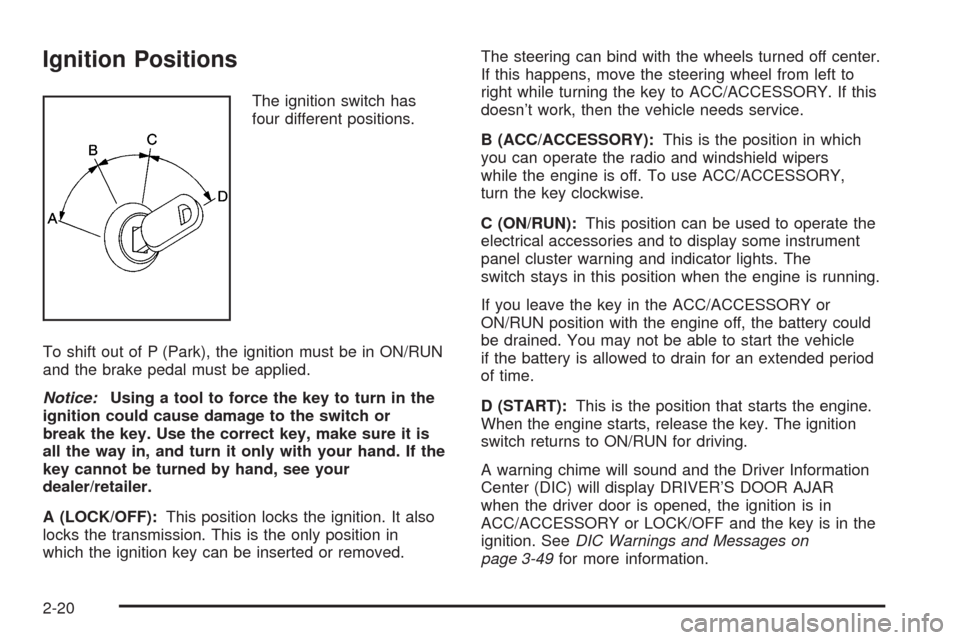
Ignition Positions
The ignition switch has
four different positions.
To shift out of P (Park), the ignition must be in ON/RUN
and the brake pedal must be applied.
Notice:Using a tool to force the key to turn in the
ignition could cause damage to the switch or
break the key. Use the correct key, make sure it is
all the way in, and turn it only with your hand. If the
key cannot be turned by hand, see your
dealer/retailer.
A (LOCK/OFF):This position locks the ignition. It also
locks the transmission. This is the only position in
which the ignition key can be inserted or removed.The steering can bind with the wheels turned off center.
If this happens, move the steering wheel from left to
right while turning the key to ACC/ACCESSORY. If this
doesn’t work, then the vehicle needs service.
B (ACC/ACCESSORY):This is the position in which
you can operate the radio and windshield wipers
while the engine is off. To use ACC/ACCESSORY,
turn the key clockwise.
C (ON/RUN):This position can be used to operate the
electrical accessories and to display some instrument
panel cluster warning and indicator lights. The
switch stays in this position when the engine is running.
If you leave the key in the ACC/ACCESSORY or
ON/RUN position with the engine off, the battery could
be drained. You may not be able to start the vehicle
if the battery is allowed to drain for an extended period
of time.
D (START):This is the position that starts the engine.
When the engine starts, release the key. The ignition
switch returns to ON/RUN for driving.
A warning chime will sound and the Driver Information
Center (DIC) will display DRIVER’S DOOR AJAR
when the driver door is opened, the ignition is in
ACC/ACCESSORY or LOCK/OFF and the key is in the
ignition. SeeDIC Warnings and Messages on
page 3-49for more information.
2-20
Page 102 of 406

Automatic Transmission Operation
The automatic transmission has a shift lever on the
steering column or on the console between the seats.
There is a display, located on the instrument panel
cluster that will indicate the gear the vehicle is in.
Maximum engine speed is limited on automatic
transmission vehicles while in P (Park) or N (Neutral) to
protect driveline components from improper operation.
There are several different positions for the shift lever.
P (Park):This position locks the front wheels. It is
the best position to use when the engine is started
because the vehicle cannot move easily.{CAUTION:
It can be dangerous to get out of the vehicle if the
shift lever is not fully in P (Park) with the parking
brake �rmly set. The vehicle can roll. If you have
left the engine running, the vehicle can move
suddenly. You or others could be injured. To be
sure the vehicle will not move, even when you are
on fairly level ground, use the steps that follow. If
you are pulling a trailer, seeTowing a Trailer on
page 4-28.
Make sure the shift lever is fully in P (Park) before
starting the engine. The vehicle has an automatic
transmission shift lock control system. You must fully
apply the brakes �rst, then press the shift lever
button before you can shift from P (Park) while the
ignition is in ON/RUN. If you cannot shift out of P (Park),
ease pressure on the shift lever and push the shift
lever all the way into P (Park) as you maintain brake
application. Then press the shift lever button and move
the shift lever into another gear. SeeShifting Out of
Park on page 2-29.
2-24
Page 105 of 406

A warning chime will sound and a brake warning light
located on the instrument panel cluster will come
on, if the parking brake is set, the ignition is on and the
vehicle speed is greater than 5 mph (8 km/h).
Notice:Driving with the parking brake on can
overheat the brake system and cause premature
wear or damage to brake system parts. Make sure
that the parking brake is fully released and the brake
warning light is off before driving.
If you are towing a trailer and parking on any hill, see
Towing a Trailer on page 4-28.
Shifting Into Park
{CAUTION:
It can be dangerous to get out of the vehicle if the
shift lever is not fully in P (Park) with the parking
brake �rmly set. The vehicle can roll. If you have
left the engine running, the vehicle can move
suddenly. You or others could be injured. To be
sure the vehicle will not move, even when you are
on fairly level ground, use the steps that follow. If
you are pulling a trailer, seeTowing a Trailer on
page 4-28.
Steering Column Shift Lever
If the vehicle has a steering column shift lever, use this
procedure to shift the vehicle into P (Park):
1. Hold the brake pedal down.
2. Move the shift lever into P (Park) by pulling the
shift lever toward you and moving it up as far as
it will go.
3. With your foot still holding the brake pedal down,
set the parking brake. SeeParking Brake on
page 2-26for more information.
4. Turn the ignition key to LOCK/OFF.
5. Remove the key and take it with you. If you can
leave the vehicle with the ignition key in your
hand, the vehicle is in P (Park).
2-27
Page 123 of 406

Instrument Panel Overview...............................3-4
Hazard Warning Flashers................................3-6
Horn .............................................................3-6
Tilt Wheel.....................................................3-6
Turn Signal/Multifunction Lever.........................3-7
Turn and Lane-Change Signals........................3-7
Headlamp High/Low-Beam Changer..................3-8
Flash-to-Pass.................................................3-8
Windshield Wipers..........................................3-8
Windshield Washer.........................................3-9
Cruise Control................................................3-9
Exterior Lamps.............................................3-12
Daytime Running Lamps (DRL)/Automatic
Headlamp System......................................3-14
Fog Lamps ..................................................3-14
Instrument Panel Brightness...........................3-15
Courtesy Lamps...........................................3-15
Dome Lamp .................................................3-15
Entry Lighting...............................................3-15
Delayed Entry Lighting...................................3-16
Delayed Exit Lighting.....................................3-16
Parade Dimming...........................................3-16
Reading Lamps............................................3-17
Mirror Reading Lamps...................................3-17
Electric Power Management...........................3-17Battery Run-Down Protection..........................3-18
Accessory Power Outlet(s).............................3-18
Ashtray(s) and Cigarette Lighter......................3-19
Climate Controls............................................3-20
Climate Control System.................................3-20
Outlet Adjustment.........................................3-23
Passenger Compartment Air Filter...................3-23
Warning Lights, Gages, and Indicators............3-24
Instrument Panel Cluster................................3-25
Speedometer and Odometer...........................3-26
Tachometer
.................................................3-26
Safety Belt Reminders...................................3-27
Airbag Readiness Light..................................3-28
Passenger Airbag Status Indicator...................3-29
Charging System Light..................................3-30
Brake System Warning Light..........................3-30
Antilock Brake System (ABS) Warning Light.....3-31
Traction Control System (TCS) Warning
Light........................................................3-32
Electronic Stability Control Indicator Light.........3-33
Engine Coolant Temperature Warning Light......3-34
Engine Coolant Temperature Gage..................3-34
Tire Pressure Light.......................................3-35
Malfunction Indicator Lamp.............................3-36
Section 3 Instrument Panel
3-1