Page 284 of 440
Engine Compartment Overview
If the vehicle has a diesel engine, see the maintenance schedule section in the DURAMAX®Diesel manual.
When the hood is lifted:
6-14
Page 290 of 440
Engine Air Cleaner/Filter
If your vehicle has the DURAMAX Diesel engine, see
the DURAMAX Diesel manual for more information.
The engine air cleaner/filter is located near the center
of the engine compartment. SeeEngine Compartment
Overview on page 6-14for more information on location.
When to Inspect the Engine Air
Cleaner/Filter
Inspect the air cleaner/filter at the MaintenanceII
intervals and replace it at the first oil change after each
50,000 mile (80 000 km) interval. SeeScheduled
Maintenance on page 7-3for more information. If you are
driving in dusty/dirty conditions, inspect the filter at each
engine oil change.
How to Inspect the Engine Air
Cleaner/Filter
To inspect the air cleaner/filter, remove the filter from the
vehicle and lightly shake the filter to release loose dust
and dirt. If the filter remains caked with dirt, a new filter is
required. Never use compressed air to clean the filter.
6-20
Page 291 of 440

To inspect or replace the engine air cleaner/filter, do the
following:
1. Unhook the retainer clips and remove the cover.
2. Lift the filter out of the engine air cleaner/filter
housing. Care should be taken to dislodge as
little dirt as possible.
3. Clean the engine air cleaner/filter housing.
4. Inspect or replace the engine air cleaner/filter.
Make sure that the filter fits properly into the
housing.
5. Reinstall the cover and fasten the retaining clips.
{WARNING:
Operating the engine with the air cleaner/filter off
can cause you or others to be burned. The air
cleaner not only cleans the air; it helps to stop
flames if the engine backfires. If it is not there and
the engine backfires, you could be burned. Do not
drive with it off, and be careful working on the
engine with the air cleaner/filter off.Notice:If the air cleaner/�lter is off, a back�re
can cause a damaging engine �re. And, dirt
can easily get into the engine, which will damage it.
Always have the air cleaner/�lter in place when
you are driving.
Automatic Transmission Fluid
(4-Speed Transmission)
If your vehicle has the DURAMAX Diesel engine, see
the DURAMAX Diesel manual for more information.
When to Check and Change Automatic
Transmission Fluid
A good time to check your automatic transmission fluid
level is when the engine oil is changed.
Change the fluid and filter at the intervals listed in
Scheduled Maintenance on page 7-3, and be sure to
use the transmission fluid listed inRecommended Fluids
and Lubricants on page 7-12.
6-21
Page 294 of 440

How to Add Automatic Transmission
Fluid
Refer to the Maintenance Schedule to determine what
kind of transmission fluid to use. SeeRecommended
Fluids and Lubricants on page 7-12.
Using a funnel, add fluid down the transmission dipstick
tube only after checking the transmission fluid while it is
hot. A cold check is used only as a reference. If the fluid
level is low, add only enough of the proper fluid to bring
the level up to the HOT area for a hot check. It does not
take much fluid, generally less than one pint (0.5 L).
Do not overfill.
Notice:Use of the incorrect automatic transmission
�uid may damage the vehicle, and the damages may
not be covered by the vehicle’s warranty. Always
use the automatic transmission �uid listed in
Recommended Fluids and Lubricants on page 7-12.
•After adding fluid, recheck the fluid level as described
under “How to Check Automatic Transmission Fluid,”
earlier in this section.
•When the correct fluid level is obtained, push the
dipstick back in all the way; then flip the handle down
to lock the dipstick in place.
Automatic Transmission Fluid
(6-Speed Transmission)
When to Check and Change Automatic
Transmission Fluid
It is usually not necessary to check the transmission fluid
level. The only reason for fluid loss is a transmission
leak or overheating the transmission. If a small leak is
suspected, use the following procedures to check the
fluid level. However, if there is a large leak, then it may be
necessary to have the vehicle towed to a dealer/retailer
service department and have it repaired before driving
the vehicle further.
Change the fluid and filter at the intervals listed in
Scheduled Maintenance on page 7-3, and be sure
to use the transmission fluid listed inRecommended
Fluids and Lubricants on page 7-12.
6-24
Page 297 of 440

How to Add Automatic Transmission
Fluid
Refer to the Maintenance Schedule to determine what
kind of transmission fluid to use. SeeRecommended
Fluids and Lubricants on page 7-12.
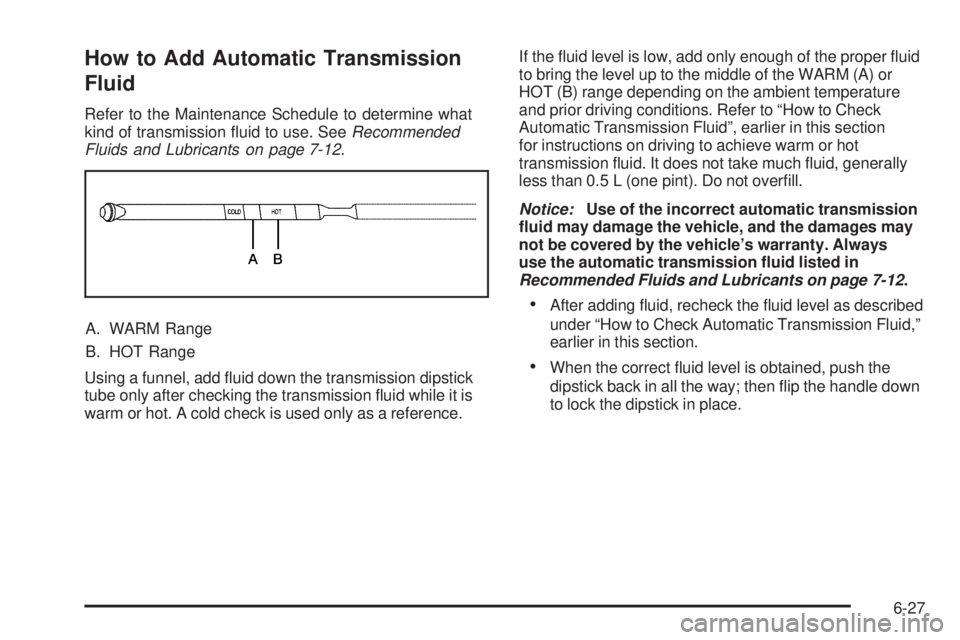
A. WARM Range
B. HOT Range
Using a funnel, add fluid down the transmission dipstick
tube only after checking the transmission fluid while it is
warm or hot. A cold check is used only as a reference.If the fluid level is low, add only enough of the proper fluid
to bring the level up to the middle of the WARM (A) or
HOT (B) range depending on the ambient temperature
and prior driving conditions. Refer to “How to Check
Automatic Transmission Fluid”, earlier in this section
for instructions on driving to achieve warm or hot
transmission fluid. It does not take much fluid, generally
less than 0.5 L (one pint). Do not overfill.
Notice:Use of the incorrect automatic transmission
�uid may damage the vehicle, and the damages may
not be covered by the vehicle’s warranty. Always
use the automatic transmission �uid listed in
Recommended Fluids and Lubricants on page 7-12.
•After adding fluid, recheck the fluid level as described
under “How to Check Automatic Transmission Fluid,”
earlier in this section.
•When the correct fluid level is obtained, push the
dipstick back in all the way; then flip the handle down
to lock the dipstick in place.
6-27
Page 310 of 440

Brakes
Brake Fluid
The brake master cylinder
reservoir is filled with
DOT 3 brake fluid. See
Engine Compartment
Overview on page 6-14for
the location of the reservoir.
There are only two reasons why the brake fluid level in
the reservoir might go down:
•The brake fluid level goes down because of normal
brake lining wear. When new linings are installed,
the fluid level goes back up.
•A fluid leak in the brake hydraulic system can also
cause a low fluid level. Have the brake hydraulic
system fixed, since a leak means that sooner
or later the brakes will not work well.Do not top off the brake fluid. Adding fluid does not
correct a leak. If fluid is added when the linings are worn,
there will be too much fluid when new brake linings are
installed. Add or remove brake fluid, as necessary, only
when work is done on the brake hydraulic system.
{WARNING:
If too much brake fluid is added, it can spill on
the engine and/or fuel operated heater parts, if
equipped. If the vehicle has a diesel engine and a
fuel operated heater, see “Fuel Operated Heater
(FOH)” in the diesel engine supplement. The fluid
will burn if the engine is hot enough. You or others
could be burned, and the vehicle could be
damaged. Add brake fluid only when work is done
on the brake hydraulic system. See “Checking
Brake Fluid” in this section.
Refer to the Maintenance Schedule to determine when
to check the brake fluid. SeeScheduled Maintenance
on page 7-3.
6-40
Page 319 of 440

To disconnect the jumper cables from both vehicles, do
the following:
1. Disconnect the black negative (−) cable from the
vehicle that had the dead battery.
2. Disconnect the black negative (−) cable from the
vehicle with the good battery.
3. Disconnect the red positive (+) cable from the
vehicle with the good battery.
4. Disconnect the red positive (+) cable from the other
vehicle.
5. Return the remote positive (+) terminal cover to its
original position.
All-Wheel Drive
Lubricant checks in this section also apply to these
vehicles. However, there are two additional systems
that need lubrication.
Transfer Case
When to Check Lubricant
Refer to the Maintenance Schedule to determine
how often to check the lubricant. SeeScheduled
Maintenance on page 7-3.
How to Check Lubricant
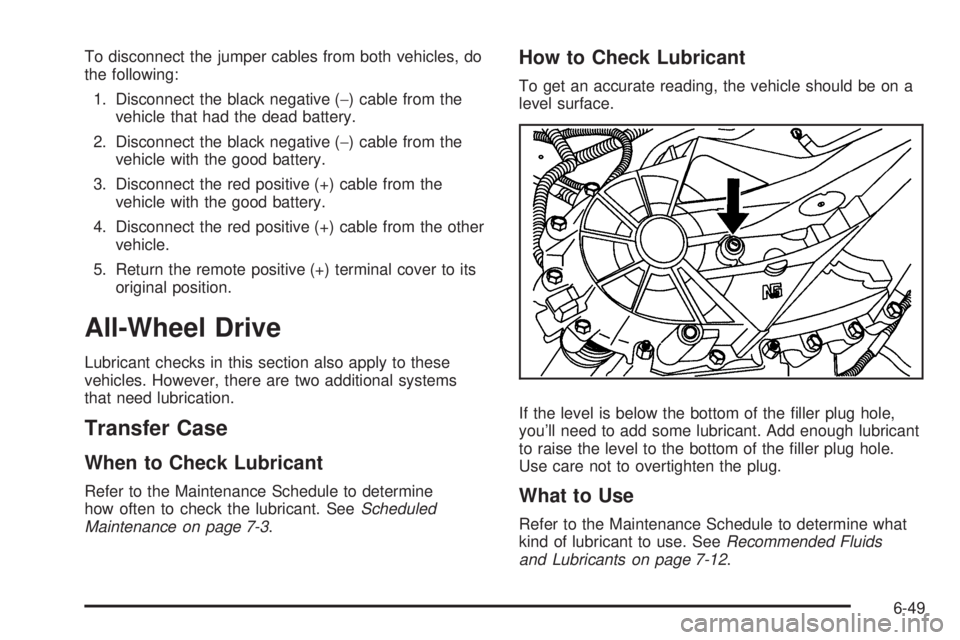
To get an accurate reading, the vehicle should be on a
level surface.
If the level is below the bottom of the filler plug hole,
you’ll need to add some lubricant. Add enough lubricant
to raise the level to the bottom of the filler plug hole.
Use care not to overtighten the plug.
What to Use
Refer to the Maintenance Schedule to determine what
kind of lubricant to use. SeeRecommended Fluids
and Lubricants on page 7-12.
6-49
Page 320 of 440
Rear Axle
When to Check Lubricant
Refer to the Maintenance Schedule to determine
how often to check the lubricant. SeeScheduled
Maintenance on page 7-3.
How to Check Lubricant
To get an accurate reading, the vehicle should be on a
level surface.If you have the 1500 Series, the proper level is from
5/8 inch (15 mm) to 1 5/8 inch (40 mm) below the bottom
of the filler plug hole. The proper level for the 2500 and
3500 Series is from 0 to 1/4 (6 mm) below the bottom of
the filler plug hole. Add only enough fluid to reach the
proper level.
What to Use
Refer to the Maintenance Schedule to determine what
kind of lubricant to use. SeeRecommended Fluids
and Lubricants on page 7-12.
Front Axle
When to Check and Change Lubricant
Refer to the Maintenance Schedule to determine how
often to check the lubricant and when to change it.
SeeScheduled Maintenance on page 7-3.
How to Check Lubricant
To get an accurate reading, the vehicle should be on a
level surface.
6-50