Page 28 of 408

Lap-Shoulder Belt
All seating positions in the vehicle have a lap-shoulder
belt. If you are using a rear seating position with a
detachable safety belt and the safety belt is not
attached, seeRear Seat Operation on page 1-6for
instruction on reconnecting the safety belt to the
mini-buckle.
The following instructions explain how to wear a
lap-shoulder belt properly.
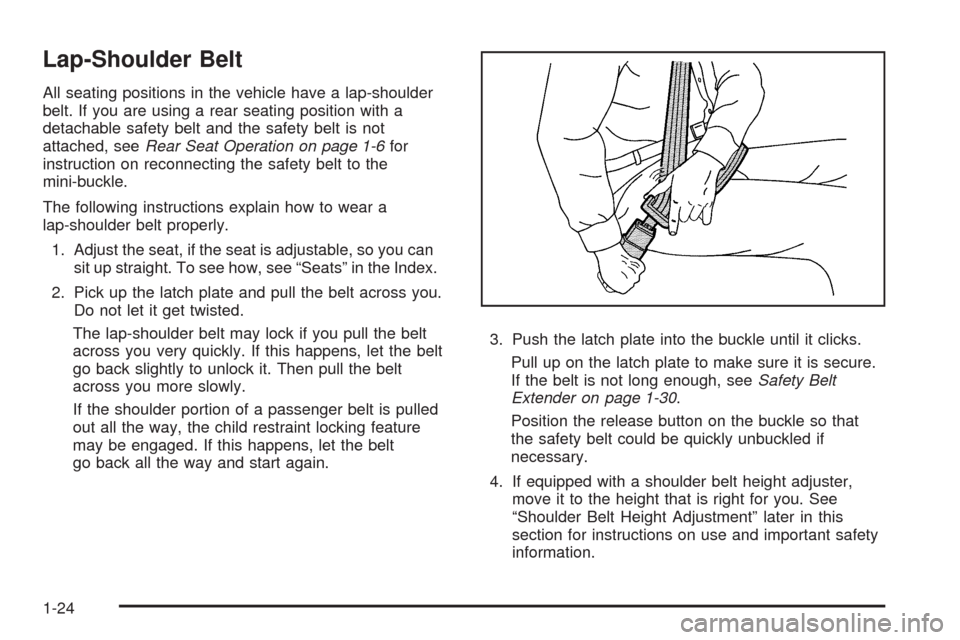
1. Adjust the seat, if the seat is adjustable, so you can
sit up straight. To see how, see “Seats” in the Index.
2. Pick up the latch plate and pull the belt across you.
Do not let it get twisted.
The lap-shoulder belt may lock if you pull the belt
across you very quickly. If this happens, let the belt
go back slightly to unlock it. Then pull the belt
across you more slowly.
If the shoulder portion of a passenger belt is pulled
out all the way, the child restraint locking feature
may be engaged. If this happens, let the belt
go back all the way and start again.3. Push the latch plate into the buckle until it clicks.
Pull up on the latch plate to make sure it is secure.
If the belt is not long enough, seeSafety Belt
Extender on page 1-30.
Position the release button on the buckle so that
the safety belt could be quickly unbuckled if
necessary.
4. If equipped with a shoulder belt height adjuster,
move it to the height that is right for you. See
“Shoulder Belt Height Adjustment” later in this
section for instructions on use and important safety
information.
1-24
Page 31 of 408
Rear Safety Belt Comfort Guides
Rear shoulder belt comfort guides may provide added
safety belt comfort for older children who have outgrown
booster seats and for some adults. When installed on
a shoulder belt, the comfort guide positions the shoulder
belt away from the neck and head.
There is one guide for each outboard passenger
position in the rear seats. Here is how to install a
comfort guide to the safety belt:
1. Locate the guide in a pocket on the side of the
seatback.2. Place the guide over the belt, and insert the two
edges of the belt into the slots of the guide.
1-27
Page 34 of 408
Safety Belt Extender
If the safety belt will fasten around you, you should
use it.
But if a safety belt is not long enough, your dealer/retailer
will order you an extender. When you go in to order it,
take the heaviest coat you will wear, so the extender will
be long enough for you. To help avoid personal injury, do
not let someone else use it, and use it only for the seat it
is made to fit. The extender has been designed for adults.
Never use it for securing child seats. To wear it, attach it
to the regular safety belt. For more information, see the
instruction sheet that comes with the extender.
Child Restraints
Older Children
Older children who have outgrown booster seats should
wear the vehicle’s safety belts.
1-30
Page 42 of 408
A booster seat (C-D) is a child restraint designed to
improve the fit of the vehicle’s safety belt system.
A booster seat can also help a child to see out the
window.
Securing an Add-On Child Restraint in
the Vehicle
{CAUTION:
A child can be seriously injured or killed in a crash
if the child restraint is not properly secured in the
vehicle. Secure the child restraint properly in the
vehicle using the vehicle’s safety belt or LATCH
system, following the instructions that came with
that child restraint and the instructions in this
manual.
To help reduce the chance of injury, the child restraint
must be secured in the vehicle. Child restraint systems
must be secured in vehicle seats by lap belts or the
lap belt portion of a lap-shoulder belt, or by the LATCH
system. SeeLower Anchors and Tethers for Children
(LATCH) on page 1-41for more information. A child can
be endangered in a crash if the child restraint is not
properly secured in the vehicle.
1-38
Page 48 of 408

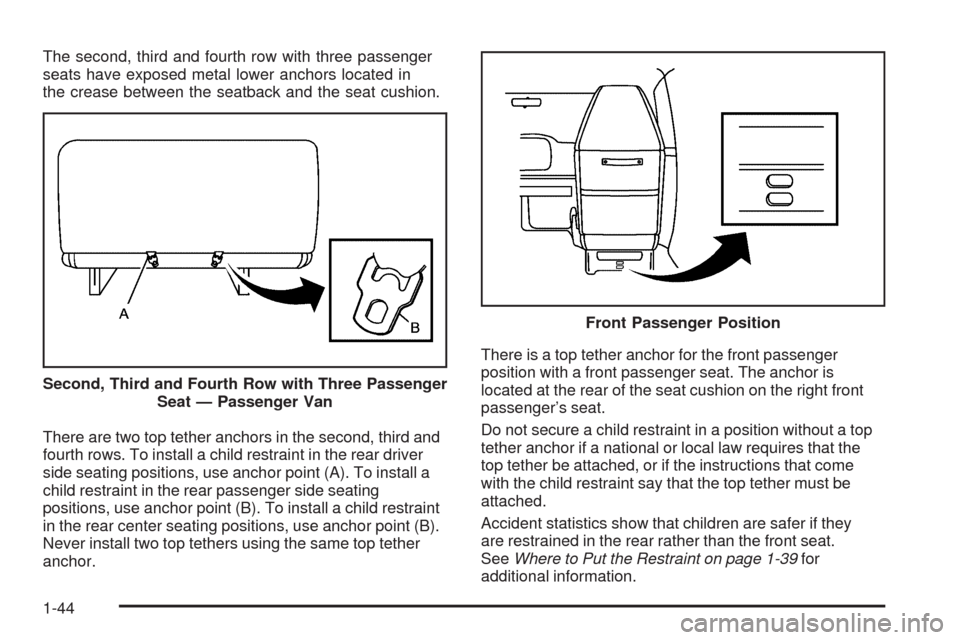
The second, third and fourth row with three passenger
seats have exposed metal lower anchors located in
the crease between the seatback and the seat cushion.
There are two top tether anchors in the second, third and
fourth rows. To install a child restraint in the rear driver
side seating positions, use anchor point (A). To install a
child restraint in the rear passenger side seating
positions, use anchor point (B). To install a child restraint
in the rear center seating positions, use anchor point (B).
Never install two top tethers using the same top tether
anchor.There is a top tether anchor for the front passenger
position with a front passenger seat. The anchor is
located at the rear of the seat cushion on the right front
passenger’s seat.
Do not secure a child restraint in a position without a top
tether anchor if a national or local law requires that the
top tether be attached, or if the instructions that come
with the child restraint say that the top tether must be
attached.
Accident statistics show that children are safer if they
are restrained in the rear rather than the front seat.
SeeWhere to Put the Restraint on page 1-39for
additional information. Second, Third and Fourth Row with Three Passenger
Seat — Passenger Van
Front Passenger Position
1-44
Page 50 of 408

{CAUTION:
Children can be seriously injured or strangled if a
shoulder belt is wrapped around their neck and
the safety belt continues to tighten. Buckle any
unused safety belts behind the child restraint so
children cannot reach them. Pull the shoulder belt
all the way out of the retractor to set the lock, if
your vehicle has one, after the child restraint has
been installed.
Notice:Do not let the LATCH attachments rub
against the vehicle’s safety belts. This may damage
these parts. If necessary, move buckled safety
belts to avoid rubbing the LATCH attachments.
Do not fold the empty rear seat with a safety belt
buckled. This could damage the safety belt or
the seat. Unbuckle and return the safety belt to its
stowed position.
1. Attach and tighten the lower attachments to the
lower anchors. If the child restraint does not have
lower attachments or the desired seating position
does not have lower anchors, secure the childrestraint with the top tether and the safety belts.
Refer to your child restraint manufacturer
instructions and the instructions in this manual.
1.1. Find the lower anchors for the desired
seating position.
1.2. Put the child restraint on the seat.
1.3. Attach and tighten the lower attachments on
the child restraint to the lower anchors.
2. If the child restraint manufacturer recommends that
the top tether be attached, attach and tighten the
top tether to the top tether anchor, if equipped.
Refer to the child restraint instructions and
the following steps:
2.1. Find the top tether anchor.
2.2. For the second, third and fourth row with three
passenger seats only, in the rear driver side
seating positions, use anchor point (A). For
the rear passenger side seating positions,
use anchor point (B). For the center seating
positions, use anchor point (B). Never install
two top tethers using the same top tether
anchor.
1-46
Page 80 of 408

Servicing Your Airbag-Equipped
Vehicle
Airbags affect how the vehicle should be serviced.
There are parts of the airbag system in several places
around the vehicle. Your dealer/retailer and the
service manual have information about servicing the
vehicle and the airbag system. To purchase a service
manual, seeService Publications Ordering Information
on page 7-16.
{CAUTION:
For up to 10 seconds after the ignition is turned off
and the battery is disconnected, an airbag can still
inflate during improper service. You can be injured
if you are close to an airbag when it inflates. Avoid
yellow connectors. They are probably part of the
airbag system. Be sure to follow proper service
procedures, and make sure the person performing
work for you is qualified to do so.
Adding Equipment to Your
Airbag-Equipped Vehicle
Q:Is there anything I might add to or change
about the vehicle that could keep the airbags
from working properly?
A:Yes. If you add things that change the vehicle’s
frame, bumper system, height, front end or side
sheet metal, they may keep the airbag system from
working properly. Changing or moving any parts
of the front seats, safety belts, the airbag sensing
and diagnostic module, steering wheel, instrument
panel, roof-rail airbag modules, ceiling headliner
or pillar garnish trim, front sensors, or airbag wiring
can affect the operation of the airbag system.
1-76
Page 139 of 408

Outlet Adjustment
Use the outlets located near the center and on the sides
of the instrument panel to change the direction of airflow.
Operation Tips
•Clear away any ice, snow or leaves from the air
inlets at the base of the windshield that may
block the flow of air into your vehicle.
•Use of non-GM approved hood deflectors may
adversely affect the performance of the system.
•Keep the path under the front seats clear of objects
to help circulate the air inside of your vehicle more
effectively.
Rear Heating System
For vehicles with a rear heating system, it lets you
adjust the amount of air flowing into the rear of the
vehicle, from the front-seating area. This feature works
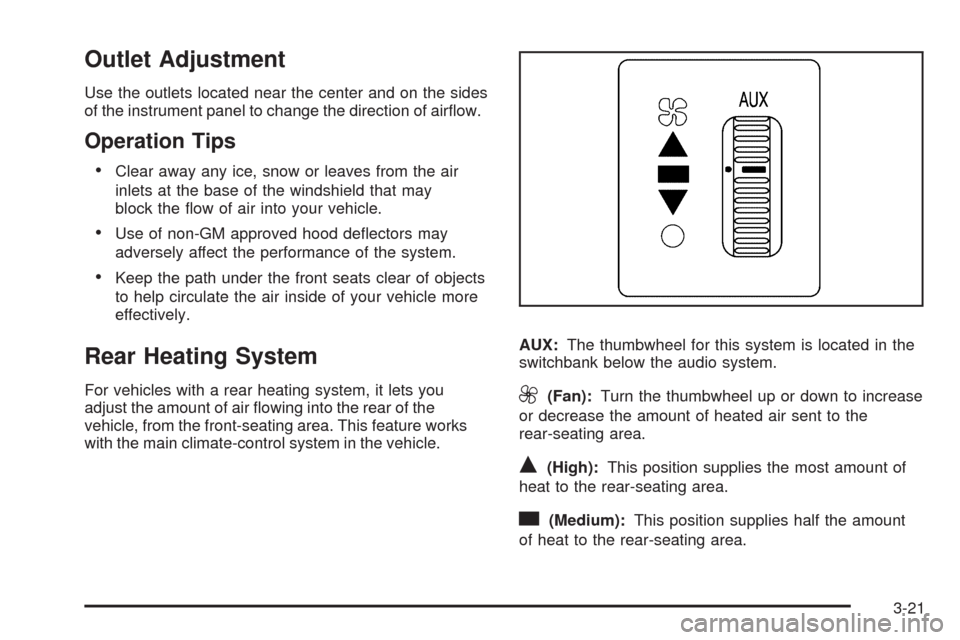
with the main climate-control system in the vehicle.AUX:The thumbwheel for this system is located in the
switchbank below the audio system.9(Fan):Turn the thumbwheel up or down to increase
or decrease the amount of heated air sent to the
rear-seating area.
Q(High):This position supplies the most amount of
heat to the rear-seating area.
c(Medium):This position supplies half the amount
of heat to the rear-seating area.
3-21