Page 292 of 408
Bulb Replacement
For the proper type of replacement bulbs, see
Replacement Bulbs on page 5-52.
For any bulb changing procedure not listed in this
section, contact your dealer/retailer.
Halogen Bulbs
{CAUTION:
Halogen bulbs have pressurized gas inside and
can burst if you drop or scratch the bulb. You or
others could be injured. Be sure to read and follow
the instructions on the bulb package.
Headlamps
To remove the headlamp assembly from the vehicle and
access the bulbs:
1. Open the hood. SeeHood Release on page 5-13
for more information.
2. Remove the two bolts from the headlamp assembly.
3. Remove the two pins on the top of the headlamp
assembly. To remove the pins, turn the outer pin
clockwise and pull it straight up. To remove the inner
pin, turn it counterclockwise and pull it straight up.
5-48
Page 293 of 408
4. Lift the inboard side of the headlamp to release the
inboard tab from the radiator support.
5. Lift the outboard side of the headlamp to release
the outboard tab from the radiator support.
6. Lower the headlamp to allow the vertical adjustor to
clear the tie bar.
7. Turn the headlamp forward and upward to remove
it from the grille.
8. Turn the bulb connector counterclockwise and pull it
out of the housing.
9. Without removing the headlamp assembly itself,
remove the bulb socket from the back of the
headlamp on the driver’s side.
10. Turn the bulb counterclockwise one quarter turn to
remove it from the socket.
11. On the passenger’s side, turn the bulb clockwise
one turn.12. Install the new bulb into the socket then reinstall it
into the headlamp assembly.
13. Reverse the steps to reinstall the headlamp
assembly.
5-49
Page 294 of 408
Front Turn Signal, Sidemarker and
Parking Lamps
To replace the front turn signal, sidemarker and/or
parking lamp bulb(s):
1. Use a small tool to unlatch the outboard clip on
the lamp.
2. Pull the lamp forward to completely unlatch the clip.
Move the lamp to the outboard side to loosen
the tabs.3. Remove the lamp from the grille.
4. Squeeze the tab on the side of the bulb socket
while turning it counterclockwise.
5. Remove the bulb socket from the back of the lamp
assembly.
6. Replace the bulb.
7. Turn the bulb socket clockwise to reinstall it in the
lamp assembly.
5-50
Page 295 of 408
Center High-Mounted
Stoplamp (CHMSL)
The Center High-Mounted Stoplamp (CHMSL) is located
above the rear doors at the center of the vehicle.
To replace a bulb:
1. Remove the two screws from the CHMSL assembly.
2. Remove the CHMSL assembly.
3. Turn the bulb counterclockwise one quarter turn to
remove it from the socket.
4. Turn the bulb clockwise one quarter turn to install it
in the socket.
5. Reinstall the CHMSL assembly and two screws.
Do not block or damage the CHMSL when items
are loaded on the roof of the vehicle.
Taillamps
To replace one of these bulbs:
1. Remove the two
inboard nuts from the
inside of the taillamp
assembly.
2. Pull the taillamp assembly straight back to clear the
studs.
3. Slide the taillamp assembly slightly upward to
release the lower clip.
4. Remove the three nuts on the taillamp assembly.
5. Remove the taillamp assembly from the vehicle.
5-51
Page 296 of 408
6. Remove the bulb socket by squeezing the
tab on the side of the socket while turning it
counterclockwise.
7. Turn the bulb counterclockwise to remove it.
8. Turn the bulb clockwise to install it in the socket.
9. Reinstall the bulb socket by squeezing the tab while
turning it clockwise.
10. Reinstall the taillamp assembly and three nuts on
the vehicle.
11. Slide the taillamp slightly downward to reengage
the lower clip.12. Push the taillamp straight forward to reengage
the studs.
13. Reinstall the two inboard nuts from the inside of the
taillamp assembly.
Replacement Bulbs
Exterior Lamp Bulb Number
Back-up, Rear Parking,
Stoplamp, and Turn Signal Lamp3157
Center High Mounted
Stop Lamp (CHMSL)912
Front Parking and Turn
Signal Lamp3157KX
Front Sidemarker Lamp 194
Headlamps
Composite High-Beam
Headlamp9005
Composite Low-Beam
Headlamp9006GS
Sealed Beam Headlamp H6054
For replacement bulbs not listed here, contact your
dealer/retailer.
5-52
Page 297 of 408

Windshield Wiper Blade
Replacement
Windshield wiper blades should be inspected for wear
and cracking. SeeScheduled Maintenance on page 6-4
for more information on wiper blade inspection.
Replacement blades come in different types and are
removed in different ways. To remove the type with a
release clip, do the following:
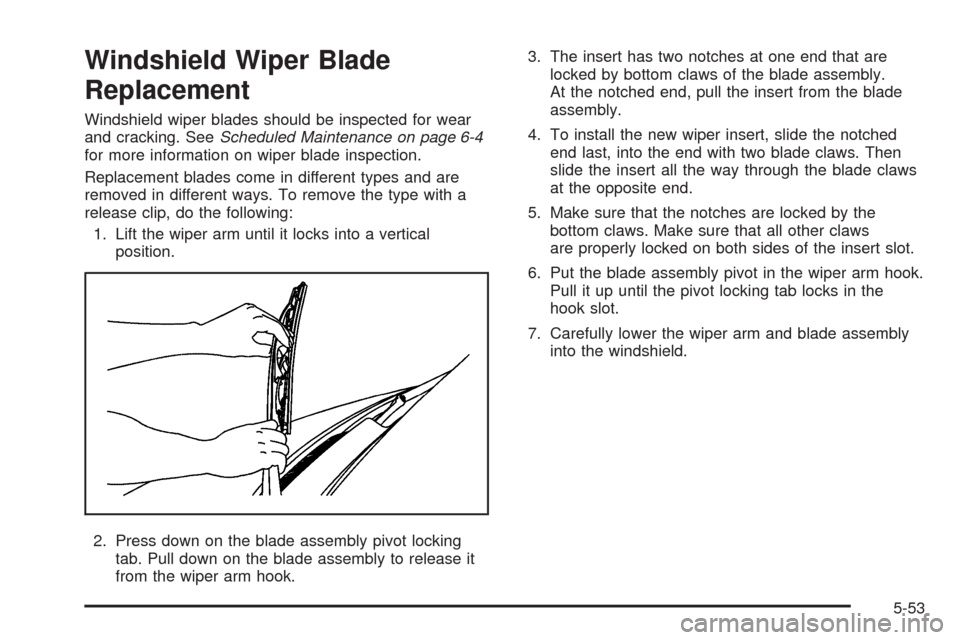
1. Lift the wiper arm until it locks into a vertical
position.
2. Press down on the blade assembly pivot locking
tab. Pull down on the blade assembly to release it
from the wiper arm hook.3. The insert has two notches at one end that are
locked by bottom claws of the blade assembly.
At the notched end, pull the insert from the blade
assembly.
4. To install the new wiper insert, slide the notched
end last, into the end with two blade claws. Then
slide the insert all the way through the blade claws
at the opposite end.
5. Make sure that the notches are locked by the
bottom claws. Make sure that all other claws
are properly locked on both sides of the insert slot.
6. Put the blade assembly pivot in the wiper arm hook.
Pull it up until the pivot locking tab locks in the
hook slot.
7. Carefully lower the wiper arm and blade assembly
into the windshield.
5-53
Page 312 of 408

The TPMS sensor matching process is outlined below:
1. Set the parking brake.
2. Turn the ignition switch to ON/RUN with the
engine off.
3. Press the Remote Keyless Entry (RKE) transmitter’s
LOCK and UNLOCK buttons at the same time
for approximately five seconds. The horn sounds
twice to signal the receiver is in relearn mode and
TIRE LEARNING ACTIVE message displays on the
DIC screen.
If your vehicle does not have RKE, press the Driver
Information Center (DIC) vehicle information button
until the PRESS
VTO RELEARN TIRE POSITIONS
message displays. The horn sounds twice to signal
the receiver is in relearn mode and TIRE LEARNING
ACTIVE message displays on the DIC screen.
If your vehicle does not have RKE or DIC buttons,
press the trip odometer reset stem located on
the instrument panel cluster until the PRESS
VTO
RELEARN TIRE POSITIONS message displays.
The horn sounds twice to signal the receiver
is in relearn mode and TIRE LEARNING ACTIVE
message displays on the DIC screen.
4. Start with the driver side front tire.5. Remove the valve cap from the valve cap stem.
Activate the TPMS sensor by increasing or
decreasing the tire’s air pressure for five seconds, or
until a horn chirp sounds. The horn chirp, which may
take up to 30 seconds to sound, confirms that the
sensor identification code has been matched to this
tire and wheel position.
6. Proceed to the passenger side front tire, and repeat
the procedure in Step 5.
7. Proceed to the passenger side rear tire, and repeat
the procedure in Step 5.
8. Proceed to the driver side rear tire, and repeat the
procedure in Step 5. The horn sounds two times to
indicate the sensor identification code has been
matched to the driver side rear tire, and that
the TPMS sensor matching process is no longer
active. The TIRE LEARNING ACTIVE message
on the DIC display screen goes off.
9. Turn the ignition switch to LOCK/OFF.
10. Set all four tires to the recommended air pressure
level as indicated on the Tire and Loading
Information label.
11. Put the valve caps back on the valve stems.
5-68
Page 317 of 408

If you must replace your vehicle’s tires with those that
do not have a TPC Spec number, make sure they
are the same size, load range, speed rating, and
construction type (radial and bias-belted tires) as
your vehicle’s original tires.
Vehicles that have a tire pressure monitoring system
could give an inaccurate low-pressure warning if
non-TPC Spec rated tires are installed on your vehicle.
Non-TPC Spec rated tires may give a low-pressure
warning that is higher or lower than the proper warning
level you would get with TPC Spec rated tires.
SeeTire Pressure Monitor System on page 5-64.
Your vehicle’s original equipment tires are listed on the
Tire and Loading Information label. SeeLoading the
Vehicle on page 4-19, for more information about
the Tire and Loading Information label and its location
on your vehicle.Different Size Tires and Wheels
If you add wheels or tires that are a different size than
your original equipment wheels and tires, this could affect
the way your vehicle performs, including its braking, ride
and handling characteristics, stability, and resistance
to rollover. Additionally, if your vehicle has electronic
systems such as anti-lock brakes, rollover airbags,
traction control, and electronic stability control, the
performance of these systems can be affected.
{CAUTION:
If you add different sized wheels, your vehicle may
not provide an acceptable level of performance and
safety if tires not recommended for those wheels
are selected. You may increase the chance that you
will crash and suffer serious injury. Only use GM
specific wheel and tire systems developed for your
vehicle, and have them properly installed by a GM
certified technician.
SeeBuying New Tires on page 5-72andAccessories
and Modifications on page 5-3for additional information.
5-73