2009 CHEVROLET EQUINOX lights
[x] Cancel search: lightsPage 1 of 442

Seats and Restraint System............................. 1-1
Front Seats
............................................... 1-2
Rear Seats
..............................................1-10
Safety Belts
.............................................1-12
Child Restraints
.......................................1-32
Airbag System
.........................................1-58
Restraint System Check
............................1-74
Features and Controls..................................... 2-1
Keys
........................................................ 2-3
Doors and Locks
......................................2-10
Windows
.................................................2-14
Theft-Deterrent Systems
............................2-16
Starting and Operating Your Vehicle
...........2-19
Mirrors
....................................................2-36
OnStar
®System
......................................2-37
Storage Areas
.........................................2-41
Sunroof
..................................................2-47
Instrument Panel............................................. 3-1
Instrument Panel Overview
.......................... 3-4
Climate Controls
......................................3-18
Warning Lights, Gages, and Indicators
........3-23
Driver Information Center (DIC)
..................3-42
Audio System(s)
.......................................3-64Driving Your Vehicle....................................... 4-1
Your Driving, the Road, and the Vehicle
....... 4-2
Towing
...................................................4-26
Service and Appearance Care.......................... 5-1
Service
..................................................... 5-3
Fuel
......................................................... 5-5
Checking Things Under the Hood
...............5-10
All-Wheel Drive
........................................5-42
Headlamp Aiming
.....................................5-44
Bulb Replacement
....................................5-45
Windshield Wiper Blade Replacement
.........5-51
Tires
......................................................5-52
Appearance Care
.....................................5-88
Vehicle Identi�cation
.................................5-96
Electrical System
......................................5-97
Capacities and Speci�cations
...................5-104
Maintenance Schedule..................................... 6-1
Maintenance Schedule
................................ 6-2
Customer Assistance Information.................... 7-1
Customer Assistance and Information
........... 7-2
Reporting Safety Defects
...........................7-14
Vehicle Data Recording and Privacy
...........7-16
Index................................................................ 1
2009 Chevrolet Equinox Owner ManualM
Page 8 of 442
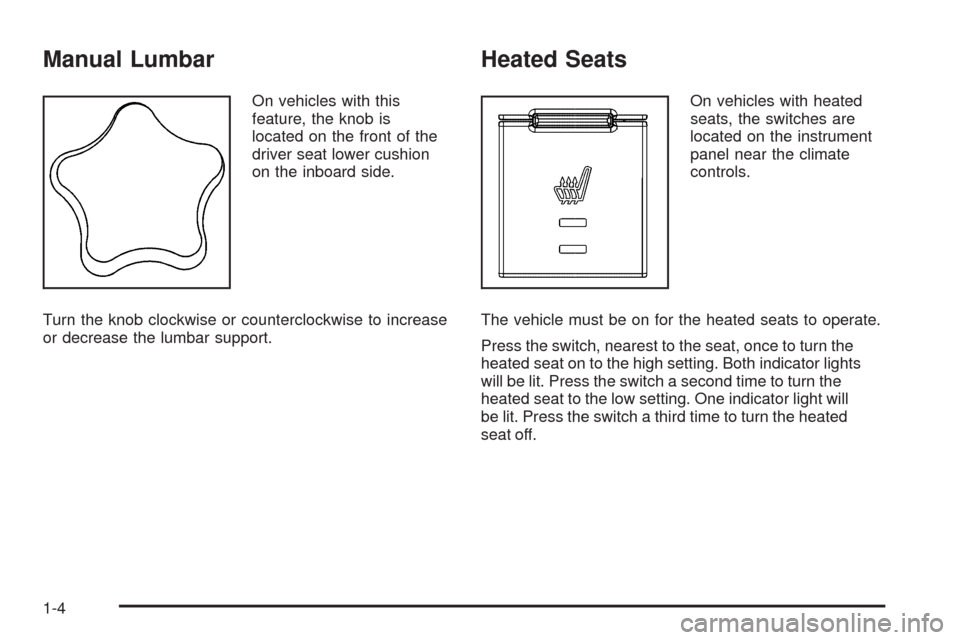
Manual Lumbar
On vehicles with this
feature, the knob is
located on the front of the
driver seat lower cushion
on the inboard side.
Turn the knob clockwise or counterclockwise to increase
or decrease the lumbar support.
Heated Seats
On vehicles with heated
seats, the switches are
located on the instrument
panel near the climate
controls.
The vehicle must be on for the heated seats to operate.
Press the switch, nearest to the seat, once to turn the
heated seat on to the high setting. Both indicator lights
will be lit. Press the switch a second time to turn the
heated seat to the low setting. One indicator light will
be lit. Press the switch a third time to turn the heated
seat off.
1-4
Page 87 of 442
Remote Vehicle Start
Your vehicle may have the remote start feature. This
feature allows you to start the engine from outside
the vehicle. See “REMOTE START” underDIC Vehicle
Personalization on page 3-57for instructions on how
to enable and disable this feature.
During a remote start, the climate control system will
turn on at the fan, temperature, and mode settings the
vehicle was set to when the vehicle was last turned
off. The rear window defogger will also turn on.
If your vehicle has heated seats, they may turn on during
colder outside temperatures and will shut off when the
key is turned to ON/RUN. You may not notice an increase
in seat surface temperature until the seat is occupied for
a short period of time.
Laws in some local communities may restrict the use of
remote starters. For example, some laws may require a
person using remote start to have the vehicle in view
when doing so. Check local regulations for any
requirements on remote starting of vehicles.
If your vehicle is low on fuel, do not use the remote
start feature. The vehicle may run out of fuel.If your vehicle has the remote start feature, the RKE
transmitter functions will have an increased range
of operation. However, the range may be less while
the vehicle is running.
There are other conditions which can affect the
performance of the transmitter, seeRemote Keyless
Entry (RKE) System on page 2-4for additional
information.
/(Remote Vehicle Start):This button will be on the
RKE transmitter if you have remote start.
To start the engine using the remote start feature:
1. Aim the RKE transmitter, that has a remote vehicle
start button, at the vehicle.
2. Press and release the transmitter’s lock button,
then immediately press and hold the remote
vehicle start button. Hold the remote start button
until the vehicle’s turn signal lamps �ash, or
for at least four seconds if the vehicle’s lights are
not visible. The vehicle’s doors will be locked.
Pressing the remote start button again after the
vehicle has started will turn off the ignition.
When the vehicle’s engine starts, the parking lamps
will turn on and remain on while the engine is
running.
2-7
Page 101 of 442
ACC (ACC/ACCESSORY):This is the position in
which you can operate some electrical accessories.
R(ON/RUN):This position can be used to operate
the electrical accessories and to display some
instrument panel cluster warning and indicator
lights. The switch stays in this position when the
engine is running. If you leave the key in the
ACC/ACCESSORY or ON/RUN position with the
engine off, the battery could be drained. You may not
be able to start the vehicle if the battery is allowed
to drain for an extended period of time.
/(START):This is the position that starts the engine.
When the engine starts, release the key. The ignition
switch returns to ON/RUN for driving.
Retained Accessory Power (RAP)
These vehicle accessories can be used for up to
10 minutes after the engine is turned off:
Audio System
Power Windows
Sunroof (if equipped)
Power to these accessories will continue to operate for
up to 10 minutes or until the driver door is opened.
All these features will work when the key is in ON/RUN
or ACC/ACCESSORY.
Starting the Engine
Move the shift lever to P (Park) or N (Neutral).
The engine will not start in any other position.
To restart the engine when the vehicle is already
moving, use N (Neutral) only.
Notice:Do not try to shift to P (Park) if the
vehicle is moving. If you do, you could damage
the transmission. Shift to P (Park) only when the
vehicle is stopped.
2-21
Page 129 of 442
Instrument Panel Overview...............................3-4
Hazard Warning Flashers................................3-6
Horn .............................................................3-6
Tilt Wheel.....................................................3-6
Turn Signal/Multifunction Lever.........................3-7
Turn and Lane-Change Signals........................3-7
Headlamp High/Low-Beam Changer..................3-8
Flash-to-Pass.................................................3-8
Windshield Wipers..........................................3-8
Windshield Washer.........................................3-9
Rear Window Wiper/Washer.............................3-9
Cruise Control..............................................3-10
Headlamps..................................................3-13
Headlamps on Reminder................................3-13
Daytime Running Lamps (DRL).......................3-13
Automatic Headlamp System..........................3-14
Fog Lamps ..................................................3-14
Instrument Panel Brightness...........................3-14
Dome Lamp .................................................3-15
Entry Lighting...............................................3-15
Map Lamps .................................................3-15
Cargo Lamp.................................................3-15
Electric Power Management...........................3-16
Battery Run-Down Protection..........................3-16
Accessory Power Outlet(s).............................3-17
Ashtray(s) and Cigarette Lighter......................3-17Climate Controls............................................3-18
Climate Control System.................................3-18
Outlet Adjustment.........................................3-21
Passenger Compartment Air Filter...................3-22
Warning Lights, Gages, and Indicators............3-23
Instrument Panel Cluster................................3-24
Speedometer and Odometer...........................3-25
Trip Odometer..............................................3-25
Tachometer.................................................3-25
Safety Belt Reminders...................................3-26
Airbag Readiness Light..................................3-27
Passenger Airbag Status Indicator...................3-28
Charging System Light..................................3-29
Brake System Warning Light..........................3-29
Antilock Brake System (ABS) Warning Light.....3-30
Traction Control System (TCS) Warning Light......3-31
Engine Coolant Temperature Warning Light......3-31
Engine Coolant Temperature Gage..................3-32
Tire Pressure Light.......................................3-32
Malfunction Indicator Lamp.............................3-33
Oil Pressure Light.........................................3-36
Change Engine Oil Light................................3-36
Security Light...............................................3-37
Fog Lamp Light............................................3-37
Cruise Control Light......................................3-37
Reduced Engine Power Light.........................3-38
Section 3 Instrument Panel
3-1
Page 141 of 442

Headlamps
The exterior lamp control is located on the turn
signal/multifunction lever.
O(Exterior Lamp Control):Turn the control with this
symbol on it to operate the exterior lamps.
The exterior lamp control has the following positions:
AUTO (Off/Automatic Headlamps):Automatic
mode turns the exterior lamps on and off depending
upon how much light is available outside of the vehicle.
;(Parking Lamps):Turns on the parking lamps
together with the following:
Sidemarker Lamps
Taillamps
License Plate Lamps
Instrument Panel Lights
53(Headlamps):Turns on the headlamps, together
with the previously listed lamps and lights.
Headlamps on Reminder
If you open the driver’s door with the ignition off and the
lamps on, you will hear a warning chime.
Daytime Running Lamps (DRL)
Daytime Running Lamps (DRL) can make it easier for
others to see the front of your vehicle during the day.
Fully functional Daytime Running Lamps (DRL) are
required on all vehicles �rst sold in Canada.
The DRL system will make the low-beam headlamps
come on at a reduced brightness in daylight when
the following conditions are met:
The ignition is on.
The exterior lamp band is in the automatic position.
The transmission is not in P (Park).
The light sensor determines it is daytime.
The parking brake is released.
When the DRL are on, the low-beam headlamps will be
on at a reduced brightness. The taillamps, sidemarker,
instrument panel lights and other lamps will not be on.
When the exterior lamp band is turned to the headlamp
position, the low-beam headlamps come on. The other
lamps that come on with the headlamps will also
come on.
When the headlamps are turned off, the regular lamps
will go off, and the low-beam headlamps come on
to the reduced brightness.
3-13
Page 142 of 442

To idle your vehicle with the DRL off, move the shift
lever to P (Park). The DRL will stay off until the
shift lever is moved out of the P (Park) position.
The regular headlamp system should be turned on
when needed.
Automatic Headlamp System
When it is dark enough outside and the exterior lamps
control is in the automatic position, the headlamps
come on automatically. SeeHeadlamps on page 3-13.
The vehicle has a light sensor located on top of the
instrument panel. Make sure it is not covered, or
the headlamps will be on when they are not needed.
The system may also turn on the headlamps when
driving through a parking garage or tunnel.
Fog Lamps
For vehicles with fog lamps, the button is located on the
instrument panel above the radio.
Use the fog lamps for better visibility in foggy or misty
conditions.
The parking lamps or low-beam headlamps must be on
to use the fog lamps.
#:Press to turn the fog lamps on or off.The fog lamp button is lit when the lamps are on.
The fog lamps will go off whenever the high-beam
headlamps are turned on. When the high-beam
headlamps are turned off, the fog lamps will come
on again.
Some localities have laws that require the headlamps to
be on along with the fog lamps.
Instrument Panel Brightness
This feature controls the brightness of the instrument
panel lights.
The control for this feature
is located on the instrument
panel to the left of the
steering column.
Turn the control up to brighten the lights or down to
dim them.
3-14
Page 151 of 442
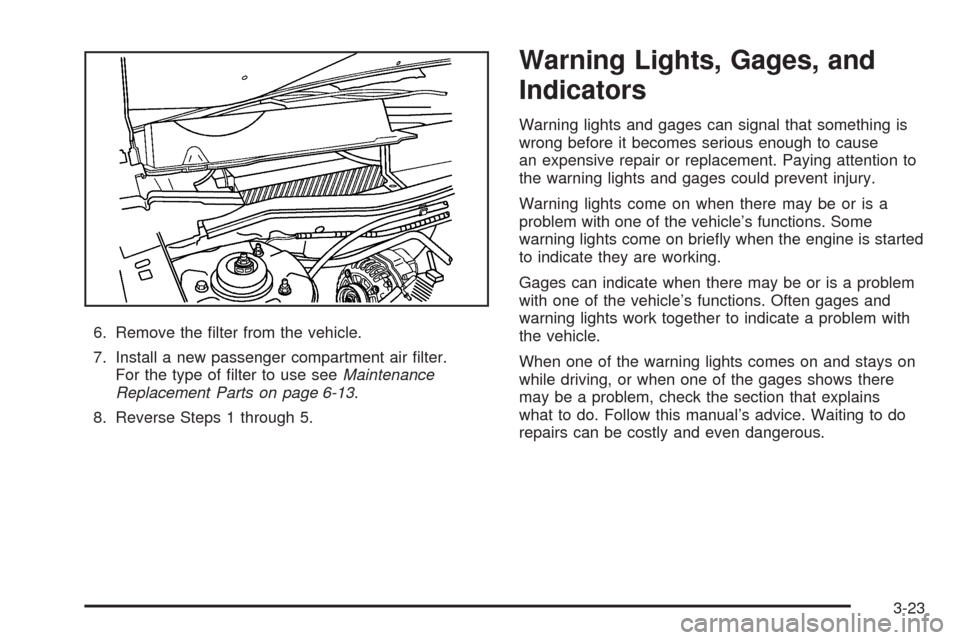
6. Remove the �lter from the vehicle.
7. Install a new passenger compartment air �lter.
For the type of �lter to use seeMaintenance
Replacement Parts on page 6-13.
8. Reverse Steps 1 through 5.
Warning Lights, Gages, and
Indicators
Warning lights and gages can signal that something is
wrong before it becomes serious enough to cause
an expensive repair or replacement. Paying attention to
the warning lights and gages could prevent injury.
Warning lights come on when there may be or is a
problem with one of the vehicle’s functions. Some
warning lights come on brie�y when the engine is started
to indicate they are working.
Gages can indicate when there may be or is a problem
with one of the vehicle’s functions. Often gages and
warning lights work together to indicate a problem with
the vehicle.
When one of the warning lights comes on and stays on
while driving, or when one of the gages shows there
may be a problem, check the section that explains
what to do. Follow this manual’s advice. Waiting to do
repairs can be costly and even dangerous.
3-23