2009 CHEVROLET EQUINOX bulb
[x] Cancel search: bulbPage 1 of 442

Seats and Restraint System............................. 1-1
Front Seats
............................................... 1-2
Rear Seats
..............................................1-10
Safety Belts
.............................................1-12
Child Restraints
.......................................1-32
Airbag System
.........................................1-58
Restraint System Check
............................1-74
Features and Controls..................................... 2-1
Keys
........................................................ 2-3
Doors and Locks
......................................2-10
Windows
.................................................2-14
Theft-Deterrent Systems
............................2-16
Starting and Operating Your Vehicle
...........2-19
Mirrors
....................................................2-36
OnStar
®System
......................................2-37
Storage Areas
.........................................2-41
Sunroof
..................................................2-47
Instrument Panel............................................. 3-1
Instrument Panel Overview
.......................... 3-4
Climate Controls
......................................3-18
Warning Lights, Gages, and Indicators
........3-23
Driver Information Center (DIC)
..................3-42
Audio System(s)
.......................................3-64Driving Your Vehicle....................................... 4-1
Your Driving, the Road, and the Vehicle
....... 4-2
Towing
...................................................4-26
Service and Appearance Care.......................... 5-1
Service
..................................................... 5-3
Fuel
......................................................... 5-5
Checking Things Under the Hood
...............5-10
All-Wheel Drive
........................................5-42
Headlamp Aiming
.....................................5-44
Bulb Replacement
....................................5-45
Windshield Wiper Blade Replacement
.........5-51
Tires
......................................................5-52
Appearance Care
.....................................5-88
Vehicle Identi�cation
.................................5-96
Electrical System
......................................5-97
Capacities and Speci�cations
...................5-104
Maintenance Schedule..................................... 6-1
Maintenance Schedule
................................ 6-2
Customer Assistance Information.................... 7-1
Customer Assistance and Information
........... 7-2
Reporting Safety Defects
...........................7-14
Vehicle Data Recording and Privacy
...........7-16
Index................................................................ 1
2009 Chevrolet Equinox Owner ManualM
Page 135 of 442
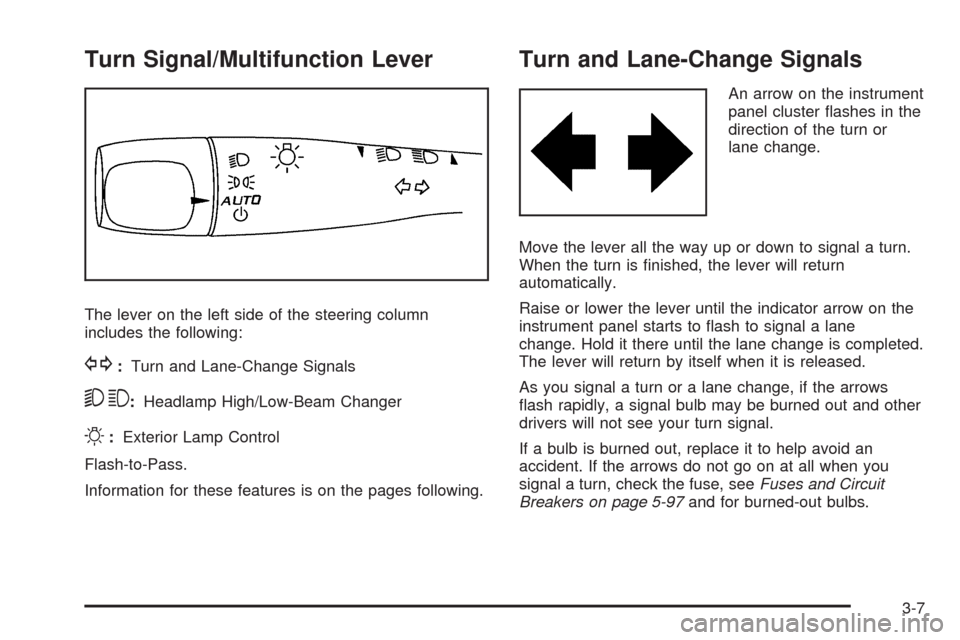
Turn Signal/Multifunction Lever
The lever on the left side of the steering column
includes the following:
G:Turn and Lane-Change Signals
53:Headlamp High/Low-Beam Changer
O:Exterior Lamp Control
Flash-to-Pass.
Information for these features is on the pages following.
Turn and Lane-Change Signals
An arrow on the instrument
panel cluster �ashes in the
direction of the turn or
lane change.
Move the lever all the way up or down to signal a turn.
When the turn is �nished, the lever will return
automatically.
Raise or lower the lever until the indicator arrow on the
instrument panel starts to �ash to signal a lane
change. Hold it there until the lane change is completed.
The lever will return by itself when it is released.
As you signal a turn or a lane change, if the arrows
�ash rapidly, a signal bulb may be burned out and other
drivers will not see your turn signal.
If a bulb is burned out, replace it to help avoid an
accident. If the arrows do not go on at all when you
signal a turn, check the fuse, seeFuses and Circuit
Breakers on page 5-97and for burned-out bulbs.
3-7
Page 284 of 442
Following Distance
Stay at least twice as far behind the vehicle ahead as
you would when driving the vehicle without a trailer.
This can help to avoid situations that require heavy
braking and sudden turns.
Passing
More passing distance is needed when towing a trailer.
Because the rig is longer, it is necessary to go much
farther beyond the passed vehicle before returning to
the lane.
Backing Up
Hold the bottom of the steering wheel with one hand.
Then, to move the trailer to the left, move that hand
to the left. To move the trailer to the right, move your
hand to the right. Always back up slowly and, if possible,
have someone guide you.
Making Turns
Notice:Making very sharp turns while trailering
could cause the trailer to come in contact with the
vehicle. The vehicle could be damaged. Avoid
making very sharp turns while trailering.
When turning with a trailer, make wider turns than
normal. Do this so the trailer will not strike soft shoulders,
curbs, road signs, trees or other objects. Avoid jerky or
sudden maneuvers. Signal well in advance.
Turn Signals When Towing a Trailer
The arrows on the instrument panel �ash whenever
signaling a turn or lane change. Properly hooked up, the
trailer lamps also �ash, telling other drivers the vehicle
is turning, changing lanes or stopping.
When towing a trailer, the arrows on the instrument panel
�ash for turns even if the bulbs on the trailer are burned
out. For this reason you may think other drivers are
seeing the signal when they are not. It is important to
check occasionally to be sure the trailer bulbs are still
working.
4-38
Page 287 of 442
Service............................................................5-3
Accessories and Modi�cations..........................5-3
California Proposition 65 Warning.....................5-4
California Perchlorate Materials Requirements......5-4
Doing Your Own Service Work.........................5-4
Adding Equipment to the Outside of the
Vehicle......................................................5-5
Fuel................................................................5-5
Gasoline Octane............................................5-5
Gasoline Speci�cations....................................5-6
California Fuel...............................................5-6
Additives.......................................................5-6
Fuels in Foreign Countries...............................5-7
Filling the Tank..............................................5-8
Filling a Portable Fuel Container.....................5-10
Checking Things Under the Hood....................5-10
Hood Release..............................................5-11
Engine Compartment Overview.......................5-12
Engine Oil...................................................5-15
Engine Oil Life System..................................5-18
Engine Air Cleaner/Filter................................5-20
Automatic Transmission Fluid.........................5-22
Cooling System............................................5-22
Engine Coolant.............................................5-23
Engine Overheating.......................................5-28Overheated Engine Protection
Operating Mode........................................5-30
Power Steering Fluid.....................................5-31
Windshield Washer Fluid................................5-32
Brakes........................................................5-33
Battery........................................................5-36
Jump Starting...............................................5-37
All-Wheel Drive..............................................5-42
Headlamp Aiming...........................................5-44
Bulb Replacement..........................................5-45
Halogen Bulbs..............................................5-45
Headlamps, Front Turn Signal, Sidemarker,
and Parking Lamps....................................5-45
Taillamps, Turn Signal, Stoplamps and
Back-up Lamps.........................................5-48
License Plate Lamp......................................5-50
Replacement Bulbs.......................................5-50
Windshield Wiper Blade Replacement..............5-51
Tires..............................................................5-52
Tire Sidewall Labeling...................................5-53
Tire Terminology and De�nitions.....................5-56
In�ation - Tire Pressure.................................5-59
High-Speed Operation...................................5-60
Tire Pressure Monitor System.........................5-61
Section 5 Service and Appearance Care
5-1
Page 331 of 442
Bulb Replacement
For the proper type of replacement bulbs, see
Replacement Bulbs on page 5-50.
For any bulb changing procedure not listed in this
section, contact your dealer/retailer.
Halogen Bulbs
{CAUTION:
Halogen bulbs have pressurized gas inside and
can burst if you drop or scratch the bulb. You or
others could be injured. Be sure to read and follow
the instructions on the bulb package.
Headlamps, Front Turn Signal,
Sidemarker, and Parking Lamps
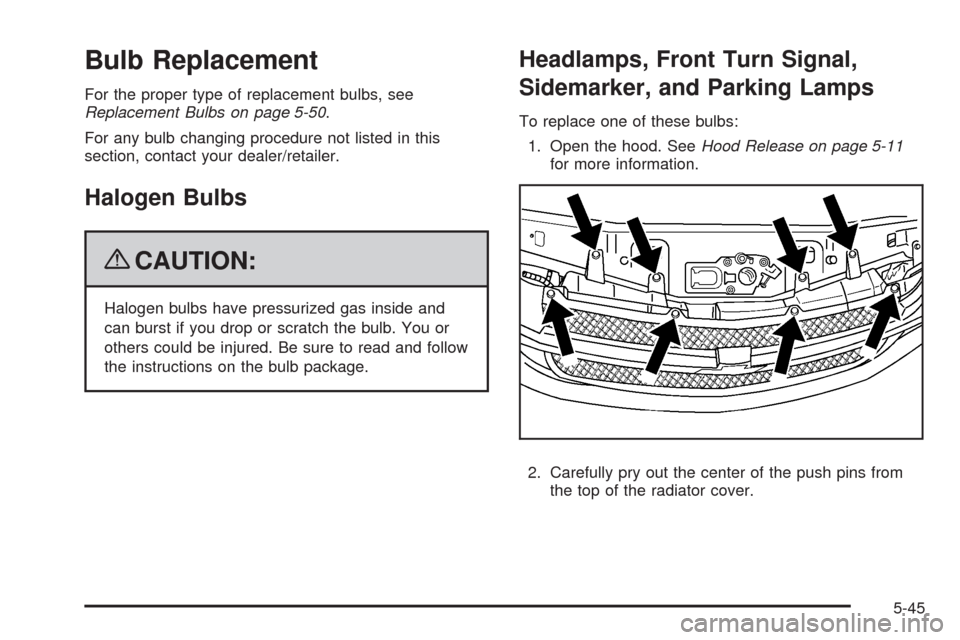
To replace one of these bulbs:
1. Open the hood. SeeHood Release on page 5-11
for more information.
2. Carefully pry out the center of the push pins from
the top of the radiator cover.
5-45
Page 333 of 442
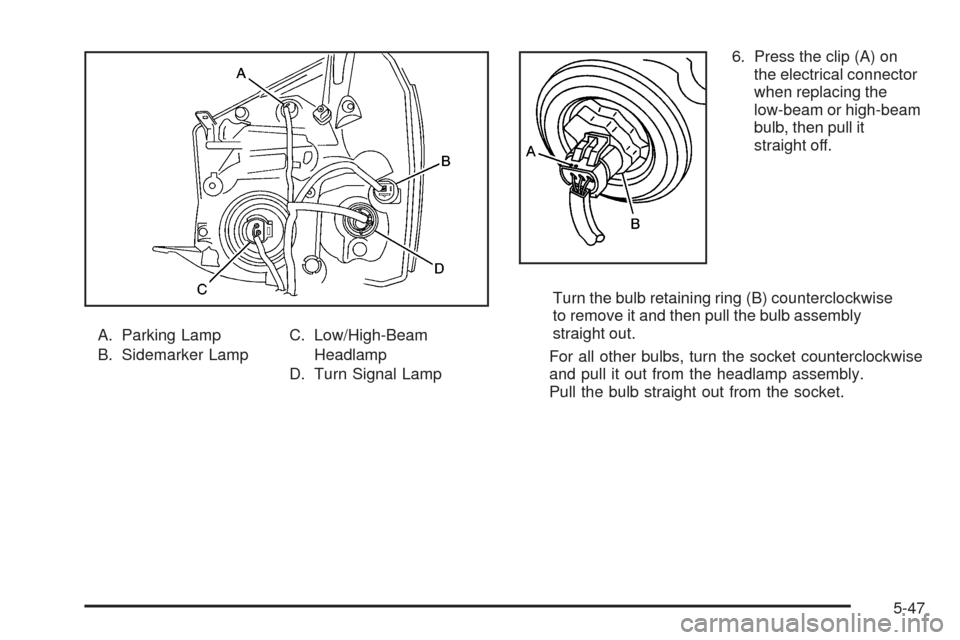
A. Parking Lamp
B. Sidemarker LampC. Low/High-Beam
Headlamp
D. Turn Signal Lamp6. Press the clip (A) on
the electrical connector
when replacing the
low-beam or high-beam
bulb, then pull it
straight off.
Turn the bulb retaining ring (B) counterclockwise
to remove it and then pull the bulb assembly
straight out.
For all other bulbs, turn the socket counterclockwise
and pull it out from the headlamp assembly.
Pull the bulb straight out from the socket.
5-47
Page 334 of 442
7. Push the new bulb into the socket and reinstall the
socket into the headlamp assembly by turning it
clockwise.
For the low-beam or high-beam bulb, install the new
bulb being sure to align the notches in the bulb
with the notches in the headlamp assembly.
8. Place the retaining ring over the bulb/socket and
turn it clockwise to tighten it and secure the
bulb/socket.
9. Connect the electrical connector.
10. Reverse Steps 1 through 5 to reinstall the headlamp
assembly.Taillamps, Turn Signal, Stoplamps
and Back-up Lamps
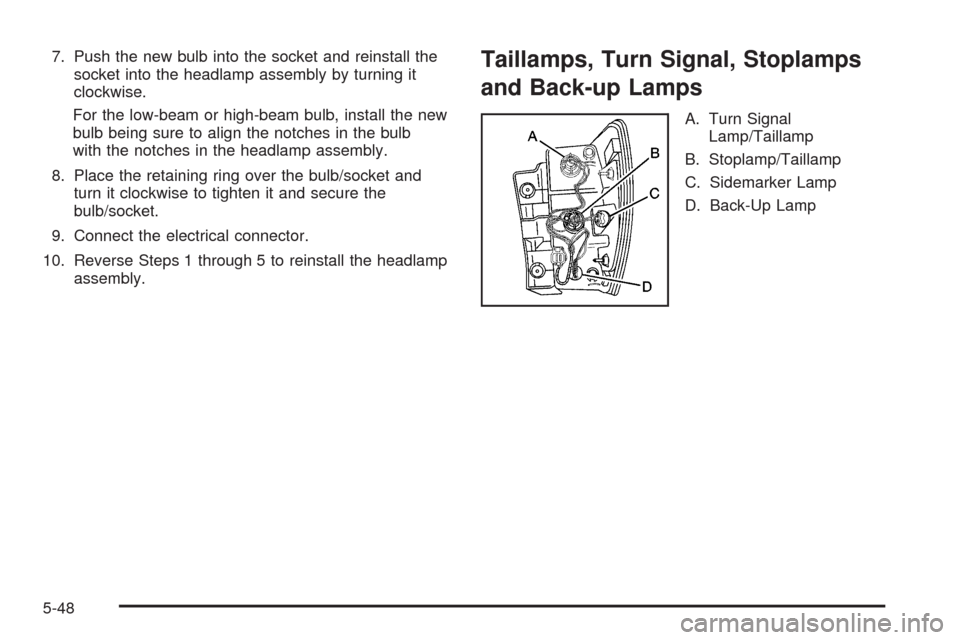
A. Turn Signal
Lamp/Taillamp
B. Stoplamp/Taillamp
C. Sidemarker Lamp
D. Back-Up Lamp
5-48
Page 335 of 442
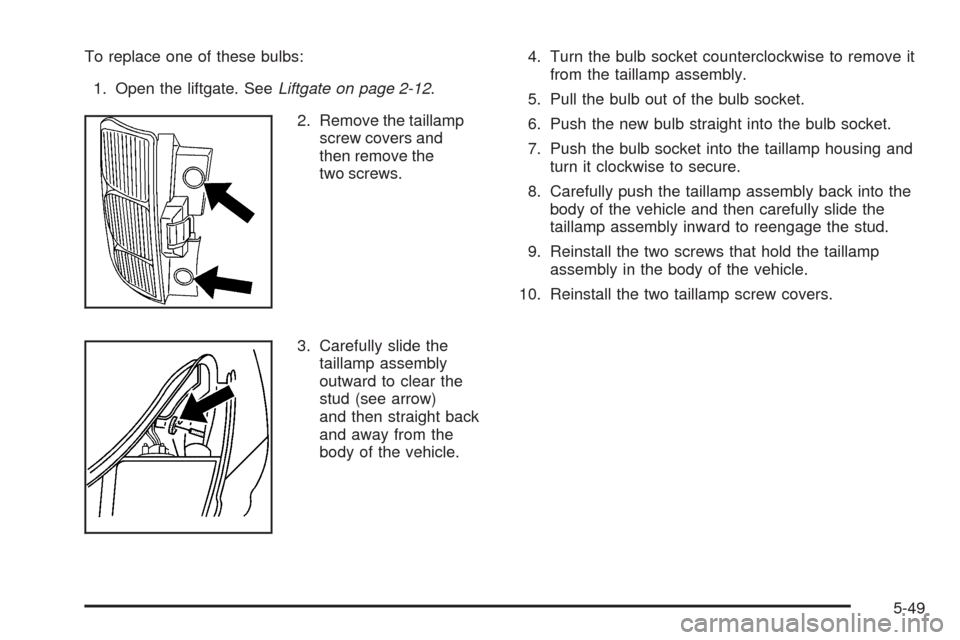
To replace one of these bulbs:
1. Open the liftgate. SeeLiftgate on page 2-12.
2. Remove the taillamp
screw covers and
then remove the
two screws.
3. Carefully slide the
taillamp assembly
outward to clear the
stud (see arrow)
and then straight back
and away from the
body of the vehicle.4. Turn the bulb socket counterclockwise to remove it
from the taillamp assembly.
5. Pull the bulb out of the bulb socket.
6. Push the new bulb straight into the bulb socket.
7. Push the bulb socket into the taillamp housing and
turn it clockwise to secure.
8. Carefully push the taillamp assembly back into the
body of the vehicle and then carefully slide the
taillamp assembly inward to reengage the stud.
9. Reinstall the two screws that hold the taillamp
assembly in the body of the vehicle.
10. Reinstall the two taillamp screw covers.
5-49