2009 CHEVROLET CORVETTE mirror
[x] Cancel search: mirrorPage 143 of 434
Telescopic Steering Column
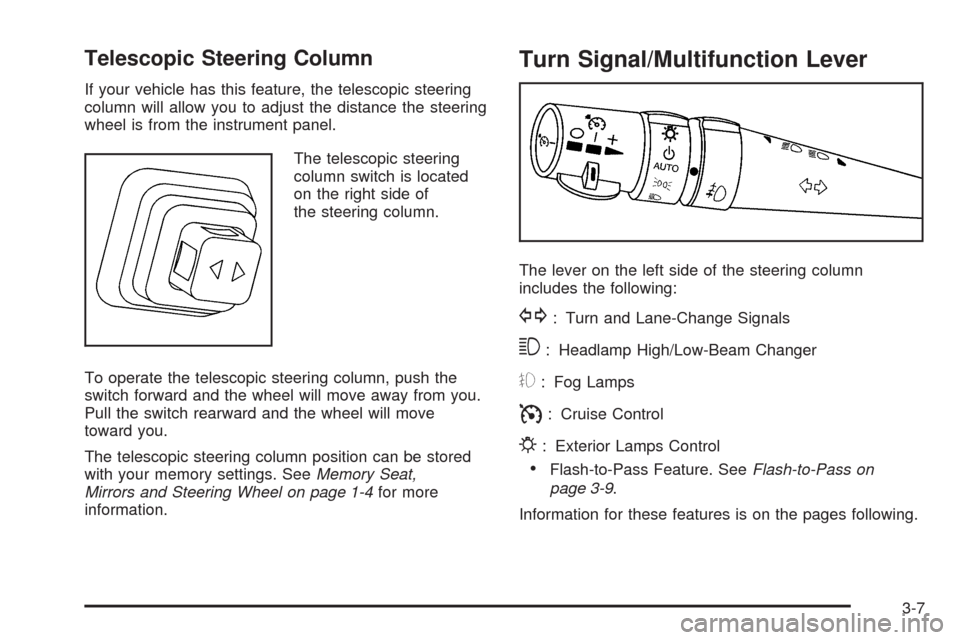
If your vehicle has this feature, the telescopic steering
column will allow you to adjust the distance the steering
wheel is from the instrument panel.
The telescopic steering
column switch is located
on the right side of
the steering column.
To operate the telescopic steering column, push the
switch forward and the wheel will move away from you.
Pull the switch rearward and the wheel will move
toward you.
The telescopic steering column position can be stored
with your memory settings. SeeMemory Seat,
Mirrors and Steering Wheel on page 1-4for more
information.
Turn Signal/Multifunction Lever
The lever on the left side of the steering column
includes the following:
G: Turn and Lane-Change Signals
3: Headlamp High/Low-Beam Changer
#: Fog Lamps
I: Cruise Control
P: Exterior Lamps Control
Flash-to-Pass Feature. SeeFlash-to-Pass on
page 3-9.
Information for these features is on the pages following.
3-7
Page 154 of 434

Instrument Panel Brightness
The knob for this feature is
located on the left side of
the instrument panel.
Push the knob in to turn on the interior lights.
Turn and hold the knob clockwise to brighten the lights
or counterclockwise to dim them. During the day,
this knob will adjust the instrument panel brightness
and at night will adjust all interior lighting.
Be sure not to have this knob turned all the way down
with the lamps on during the day. Your Driver
Information Center (DIC) may not be visible.
Courtesy Lamps
When any door or the hatch/trunk lid is opened, the
interior lamps will go on unless it is bright outside.
You can also turn the courtesy lamps on and off
by pressing the instrument panel brightness knob.
Entry/Exit Lighting
With entry lighting, the interior lamps will come on when
entering the vehicle. The interior lamps will come on
for about 20 seconds when the engine is off.
You can turn exit and entry lighting off by quickly turning
the courtesy lamps on and off.
Reading Lamps
The inside rearview mirror includes two reading lamps.
The lamps will go on when a door is opened.
When the doors are closed, press each lamp switch
to turn them on individually.
Battery Run-Down Protection
This vehicle has a feature to help prevent the battery
from being drained in case any of the following
lamps are left on; the underhood lamp, if your vehicle
has this feature, vanity mirror lamps, cargo lamps,
reading lamps, console or glove box lamps. If any of
these lamps are left on, they will automatically time-out
after about 10 minutes. To reset it, all of the above
lamps must be turned off or the ignition key on.
3-18
Page 165 of 434
Rear Window Defogger
The rear window defogger uses a warming grid to
remove fog or frost from the rear window.
The rear window defogger only works when the
engine is running.
=(Rear Window Defogger):Press to turn the
rear window defogger on or off. Be sure to clear as
much snow from the rear window as possible.
An indicator light comes on to show that the rear
window defogger is on.
The rear window defogger turns off about 10 minutes
after the button is pressed when traveling less than
30 mph (48 km/h). If turned on again, the defogger only
runs for about �ve minutes before turning off. The
defogger can also be turned off by turning off the engine.
The vehicle has heated outside rearview mirrors.
The mirrors will heat to help clear fog or frost from the
surface of the mirrors when the rear window defogger
button is pressed.
For vehicles with a power convertible top, the rear
window defogger and heated mirrors are automatically
disabled when the power convertible top is moving
or down.Notice:Do not use anything sharp on the inside of
the rear window. If you do, you could cut or
damage the warming grid, and the repairs would not
be covered by the vehicle warranty. Do not attach
a temporary vehicle license, tape, a decal or
anything similar to the defogger grid.Outlet Adjustment
Use the tab located on the air outlets to change the
direction of the air�ow.
Operation Tips
Clear away any ice, snow or leaves from the air
inlets at the base of the windshield that may
block the �ow of air into your vehicle.
Use of non-GM approved hood de�ectors may
adversely affect the performance of the system.
Keep the area around the base of the instrument
panel console and air path under the seats clear
of objects to help circulate the air inside of
your vehicle more effectively.
3-29
Page 172 of 434
Passenger Airbag Status Indicator
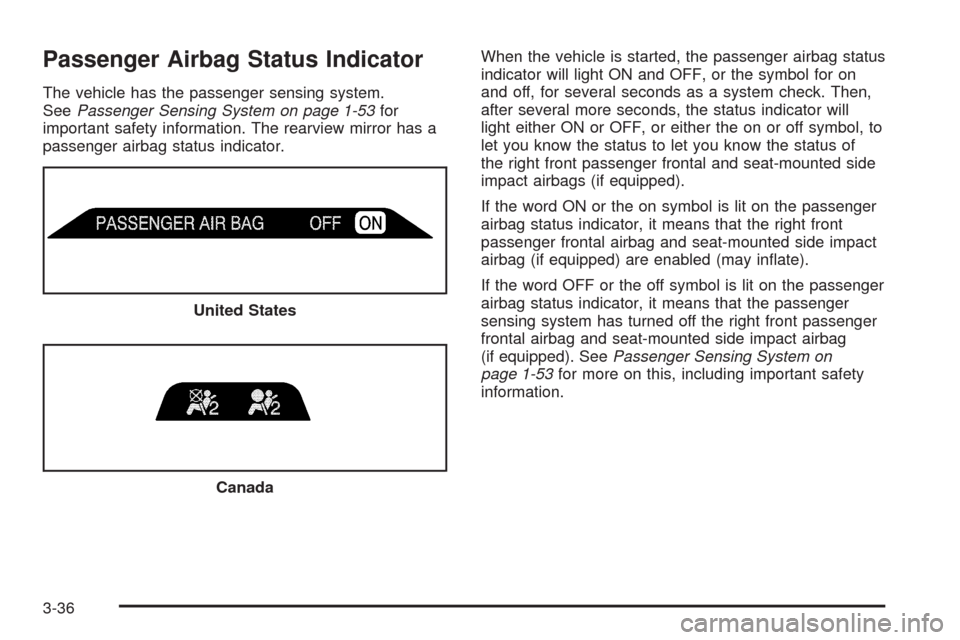
The vehicle has the passenger sensing system.
SeePassenger Sensing System on page 1-53for
important safety information. The rearview mirror has a
passenger airbag status indicator.When the vehicle is started, the passenger airbag status
indicator will light ON and OFF, or the symbol for on
and off, for several seconds as a system check. Then,
after several more seconds, the status indicator will
light either ON or OFF, or either the on or off symbol, to
let you know the status to let you know the status of
the right front passenger frontal and seat-mounted side
impact airbags (if equipped).
If the word ON or the on symbol is lit on the passenger
airbag status indicator, it means that the right front
passenger frontal airbag and seat-mounted side impact
airbag (if equipped) are enabled (may in�ate).
If the word OFF or the off symbol is lit on the passenger
airbag status indicator, it means that the passenger
sensing system has turned off the right front passenger
frontal airbag and seat-mounted side impact airbag
(if equipped). SeePassenger Sensing System on
page 1-53for more on this, including important safety
information. United States
Canada
3-36
Page 201 of 434
The traction control system (TCS) warning light on the
instrument panel cluster will also turn on and a
sound will be heard.
When this message is displayed, the computer
controlled systems will not assist the driver in controlling
the vehicle. Have the system repaired by your
dealer/retailer as soon as possible. Adjust your driving
accordingly. SeeTraction Control System (TCS) on
page 4-6for more information.
To acknowledge the message, press the RESET button.
SERVICE TRANSMISSION
This message displays when there is a problem with the
transmission. See your dealer/retailer for service.
SERVICE VEHICLE SOON
This message displays and a sound will be heard when
there may be an electrical or another system problem
with the vehicle. Have your vehicle checked by your
dealer/retailer if this message keeps appearing.
SET PARK BRAKE FOR SEAT RECALL
If the vehicle has a manual transmission, this message
displays if you try to recall the memory positions
when the ignition is on and the parking brake is not set.If the vehicle is on, you must set the parking brake in
order for the memory positions to recall. SeeMemory
Seat, Mirrors and Steering Wheel on page 1-4for more
information.
SET PARK BRAKE TO MOVE TOP
If the vehicle has a manual transmission, this message
displays and a sound will be heard if you try to
operate the power convertible top without �rst setting
the parking brake. Set the parking brake before trying to
operate the power convertible top. SeeConvertible
Top (Manual) on page 2-59orConvertible Top (Power)
on page 2-66for more information.
SHIFT TO PARK
If the vehicle has an automatic transmission, this
message displays if the vehicle is not in P (Park) when
the engine is being turned off. The vehicle will be in
ACCESSORY Once the shift lever is moved to P (Park),
the vehicle will turn off.
The vehicle will remain in ACCESSORY, without the
20 minute time-out period, until the shift lever is moved
to P (Park) or until the driver presses the pushbutton
to restart the vehicle. SeeIgnition Positions on
page 2-22for more information.
3-65
Page 207 of 434
DIC Vehicle Personalization
Many features on your vehicle can be personalized.
This means that the operation of these features can be
set to operate differently depending on who is driving
the vehicle. See “Personal Options” later in this section
for the features that you can personalize.
The personalization settings for other features are
automatically updated and saved as the driver adjusts
them. These include the following settings and presets:
The radio presets, tone, volume, fade,
balance, equalization (EQ) settings and
source (radio or CD)
The last climate control setting
The Head-Up Display (HUD) position and
dimming level, if your vehicle has this feature
The instrument panel cluster dimming level
and last selected DIC display
Separate personalization settings are saved for
two different drivers. One of the keyless access
transmitters is assigned to driver 1. The other is
assigned to driver 2. The back of the keyless access
transmitters are labelled 1 or 2 to correspond to
each driver.The current driver’s preferences are recalled when
one of the following occurs:
The lock or unlock button on the keyless access
transmitter, labelled 1 or 2, is pressed.
The appropriate memory button, 1 or 2, located on
the driver’s door is pressed. SeeMemory Seat,
Mirrors and Steering Wheel on page 1-4for more
information.
A valid keyless access transmitter is detected upon
opening the driver’s door.
If more than one valid keyless access transmitter is
detected upon opening the driver’s door, the driver
preferences for the lowest driver number will be recalled.
If a keyless access transmitter that is not labelled 1 or 2
is used, the personalization system will not recognize
the transmitter. The Driver Information Center (DIC) will
not display a current driver number and the features
that are normally programmed through the DIC will be
set to the default states. Also, if the OPTION button
is pressed, the DIC does not display the menus used to
set personalizations, but instead displays OPTIONS
UNAVAILABLE for a few seconds.
3-71
Page 208 of 434
Entering the Personal Options Menu
To enter the personal options menu, use the
following steps:
1. If you have an automatic transmission vehicle,
turn the vehicle on with the shift lever in P (Park).
If you have a manual transmission vehicle, turn the
vehicle on with the parking brake set.
To avoid excessive drain on the battery, it is
recommended that the headlamps are turned off.
2. Press the OPTION button and you will enter the
PERSONAL OPTIONS menu.
The DIC will display the current driver
number (1 or 2) for a few seconds and then will
display instructions on which buttons to use
for setting the personalizations. The RESET button
is used to select a setting for a particular feature.
The OPTION button is used to move to the
next feature.
3. Press the OPTION button while the instruction
screen is displayed to enter the �rst personalization
menu item.
4. Once you have cycled through all of the personal
options, pressing the OPTION button a �nal time
exits the personal options menu. In addition,
if no button is pressed within 45 seconds, the DIC
will exit the personal options menu.
Personal Options
The following options are available for programming:
Display Units:This option allows you to choose
the measurement units.
Press the OPTION button until DISPLAY UNITS
appears on the display, then press the RESET button to
scroll through the following modes:
ENGLISH (default)
METRIC
If you choose ENGLISH, all information will be displayed
in English units.
If you choose METRIC, all information will be displayed
in metric units.
When the mode you want is selected, press the
OPTION button to set your choice and advance to the
next personal option.
Auto Memory Recall (Automatic Transmission only):
If your automatic transmission vehicle has the memory
package, you may have this option. This option allows
the driver’s seat, the telescopic steering column, if
your vehicle has this feature, and the outside rearview
mirrors to automatically move to the current driver’s
set position when the engine starts.
3-72
Page 209 of 434
Press the OPTION button until AUTO MEMORY
RECALL appears on the display, then press the
RESET button to scroll through the following modes:
YES
NO (default)
If you choose YES, the driver’s seat, the outside
rearview mirrors and the telescopic steering column,
if your vehicle has this feature, positions are recalled
when you turn the ignition on.
If you choose NO, this option will turn off.
When the mode you want is selected, press the
OPTION button to set your choice and advance to the
next personal option.
Auto Exit Recall:If your vehicle has the memory
package, you may have this option. This option allows
the driver’s seat and telescopic steering column, if
your vehicle has this feature, to automatically move to
the current driver’s exit position when one of the
following occurs:
The vehicle is turned off or in Retained Accessory
Power (RAP) or accessory mode and the driver’s
door is opened.
The vehicle is turned off or in RAP and the unlock
button on the keyless access transmitter is pressed.In order for the Auto Exit Recall feature to work on an
automatic transmission vehicle, the vehicle must be
in P (Park). On a manual transmission vehicle, the
parking brake must be set.
Press the OPTION button until AUTO EXIT RECALL
appears on the display, then press the RESET button to
scroll through the following modes:
YES
NO (default)
If you choose YES, when you turn the ignition off and
open the driver’s door or press the unlock button on the
keyless access transmitter, the seat and the telescopic
steering wheel, if your vehicle has this feature, will return
to their stored exit positions for an easy exit or an
easy entrance when returning to the vehicle.
The seat and steering wheel will only return to the
stored driving position if you press the appropriate
memory button or activate the auto memory recall
feature.
If you choose NO, this option will turn off.
When the mode you want is selected, press the
OPTION button to set your choice and advance to
the next personal option.
3-73