Page 1308 of 1903
Downloaded from www.Manualslib.com manuals search engine ON-VEHICLE SERVICE
Front Steering Knuckle
Description
The steering knuckle is a single casting with legs machined for attachment to the front strut assembly on the top and
steering linkage on the trailing leading end. The steering knuckle also has two machined, drilled legs on the end
casting to support and align the front disc brake caliper adapter.
Operation
The steering knuckle supports the hub and bearing. The front suspension steering knuckle is not a repairable com-
ponent of the front suspension. It must be replaced if damaged in any way. If it is determined that the steering
knuckle is bent when servicing the vehicle, no attempt should be made to straighten the steering knuckle.
Removal & Installation
NOTE :
The following special tools are required to perform the repair procedure:
•CH-10002 - Ball Joint Separator
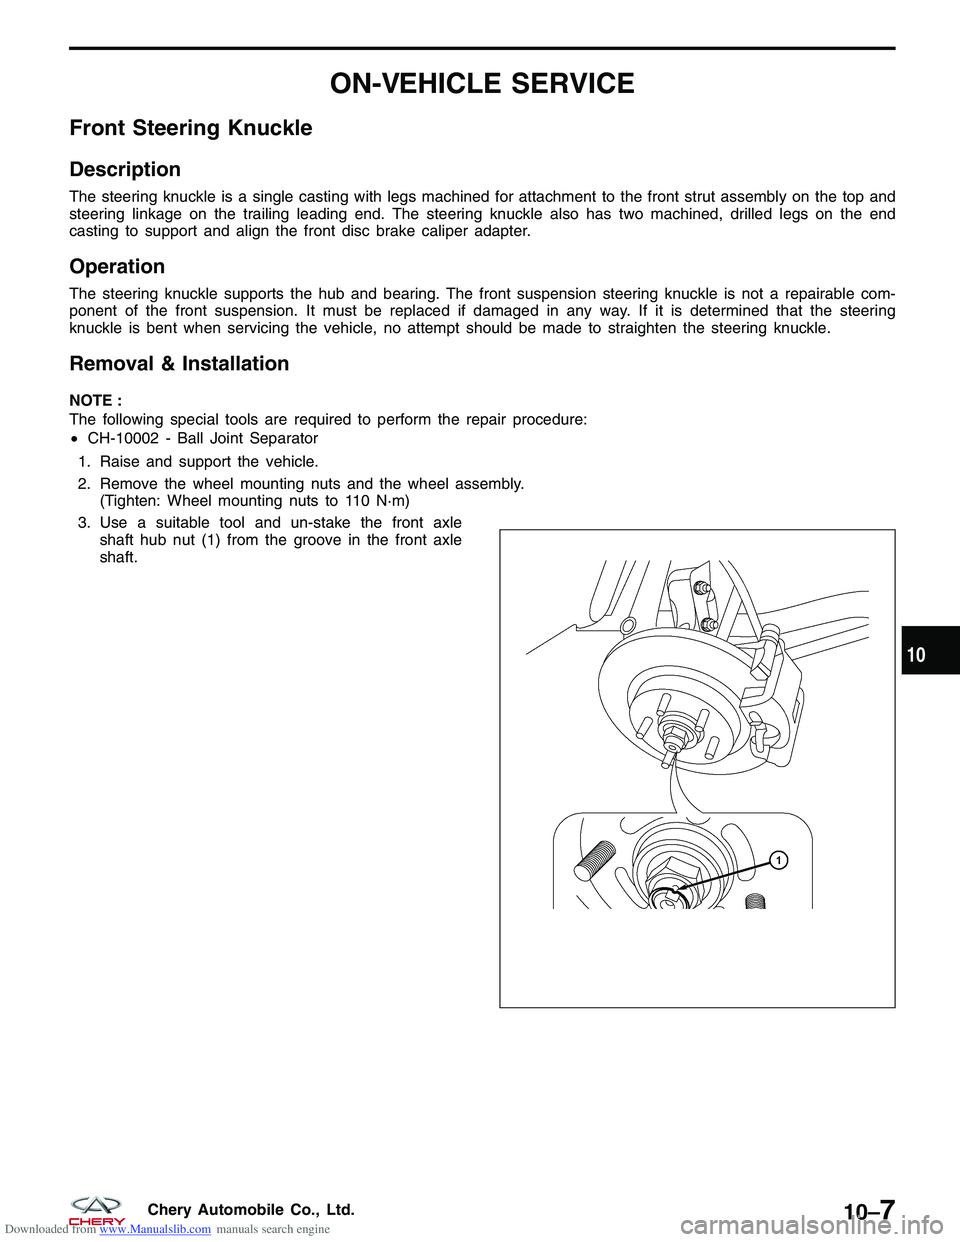
1. Raise and support the vehicle.
2. Remove the wheel mounting nuts and the wheel assembly. (Tighten: Wheel mounting nuts to 110 N·m)
3. Use a suitable tool and un-stake the front axle shaft hub nut (1) from the groove in the front axle
shaft.
??????
10
10–7Chery Automobile Co., Ltd.
Page 1310 of 1903
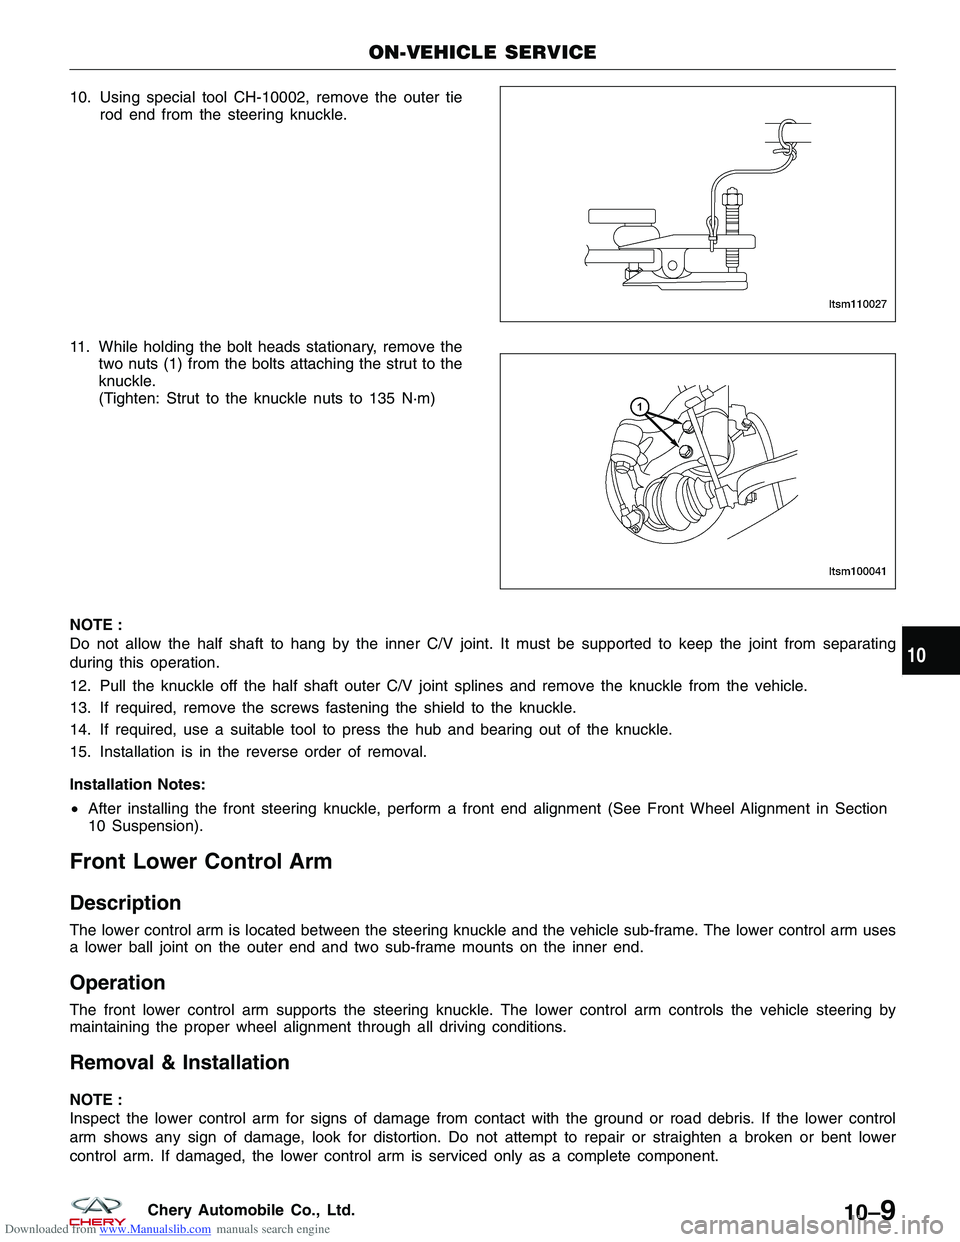
Downloaded from www.Manualslib.com manuals search engine 10. Using special tool CH-10002, remove the outer tierod end from the steering knuckle.
11. While holding the bolt heads stationary, remove the two nuts (1) from the bolts attaching the strut to the
knuckle.
(Tighten: Strut to the knuckle nuts to 135 N·m)
NOTE :
Do not allow the half shaft to hang by the inner C/V joint. It must be supported to keep the joint from separating
during this operation.
12. Pull the knuckle off the half shaft outer C/V joint splines and remove the knuckle from the vehicle.
13. If required, remove the screws fastening the shield to the knuckle.
14. If required, use a suitable tool to press the hub and bearing out of the knuckle.
15. Installation is in the reverse order of removal.
Installation Notes:
• After installing the front steering knuckle, perform a front end alignment (See Front Wheel Alignment in Section
10 Suspension).
Front Lower Control Arm
Description
The lower control arm is located between the steering knuckle and the vehicle sub-frame. The lower control arm uses
a lower ball joint on the outer end and two sub-frame mounts on the inner end.
Operation
The front lower control arm supports the steering knuckle. The lower control arm controls the vehicle steering by
maintaining the proper wheel alignment through all driving conditions.
Removal & Installation
NOTE :
Inspect the lower control arm for signs of damage from contact with the ground or road debris. If the lower control
arm shows any sign of damage, look for distortion. Do not attempt to repair or straighten a broken or bent lower
control arm. If damaged, the lower control arm is serviced only as a complete component.
ON-VEHICLE SERVICE
LTSM110027
LTSM100041
10
10–9Chery Automobile Co., Ltd.
Page 1314 of 1903
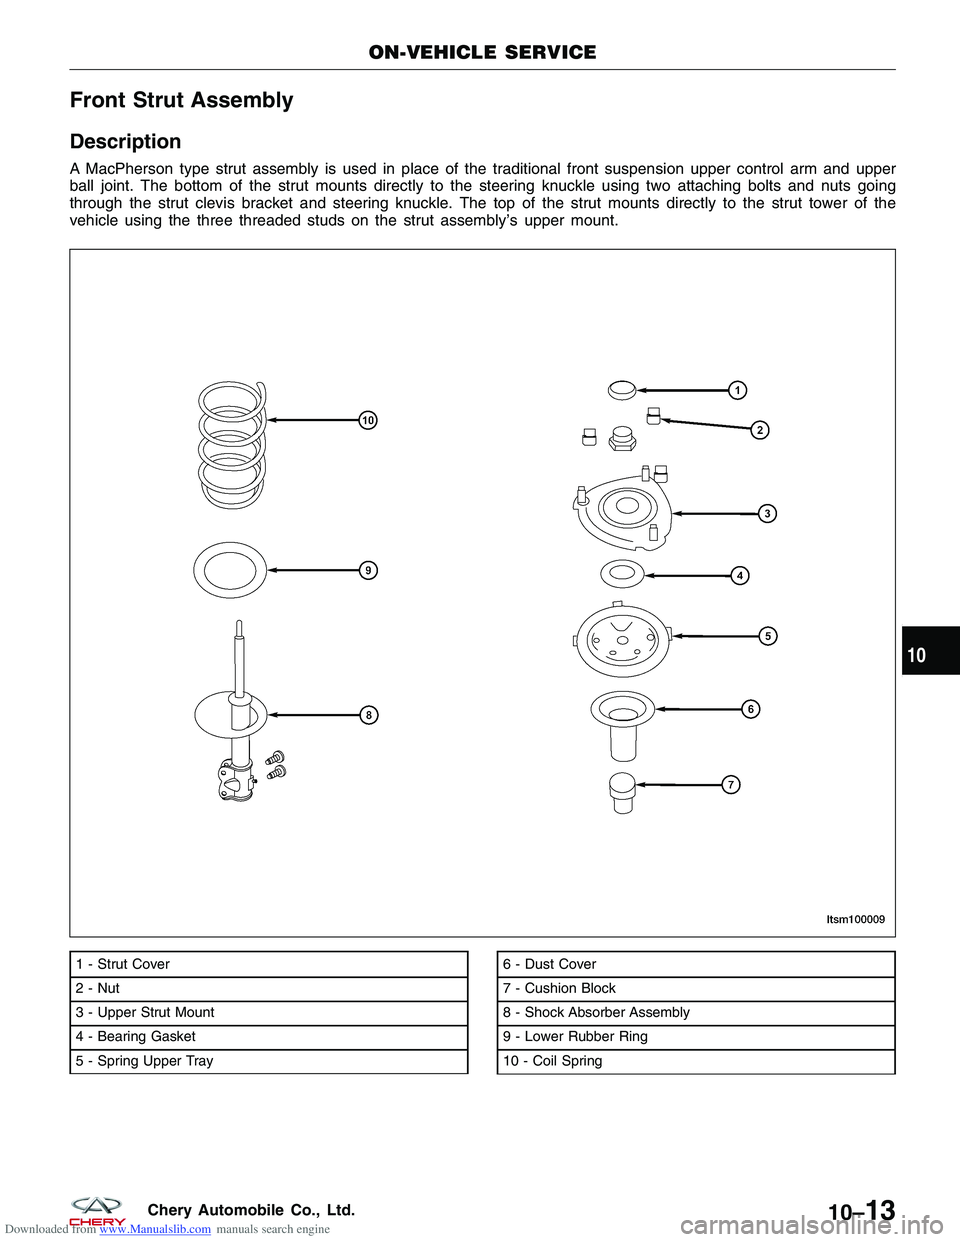
Downloaded from www.Manualslib.com manuals search engine Front Strut Assembly
Description
A MacPherson type strut assembly is used in place of the traditional front suspension upper control arm and upper
ball joint. The bottom of the strut mounts directly to the steering knuckle using two attaching bolts and nuts going
through the strut clevis bracket and steering knuckle. The top of the strut mounts directly to the strut tower of the
vehicle using the three threaded studs on the strut assembly’s upper mount.
1 - Strut Cover
2 - Nut
3 - Upper Strut Mount
4 - Bearing Gasket
5 - Spring Upper Tray6 - Dust Cover
7 - Cushion Block
8 - Shock Absorber Assembly
9 - Lower Rubber Ring
10 - Coil Spring
ON-VEHICLE SERVICE
LTSM100009
10
10–13Chery Automobile Co., Ltd.
Page 1315 of 1903
Downloaded from www.Manualslib.com manuals search engine Operation
The strut assembly cushions the ride of the vehicle, controlling vibration, jounce and rebound of the suspension. The
coil spring controls ride quality and maintains proper ride height. The spring isolators isolate the coil spring at the top
and bottom from coming into metal-to-metal contact with the upper mounting seat and the strut. The strut dampens
jounce and rebound motions of the coil spring and suspension.
Diagnosis & Testing
Before removing the front strut, perform the following to test the front strut functionality:
•Adjust the tire pressure to all tires to proper specifications.
• Push and shake the front of the vehicle three or four times with identical force every time
• During the pushing and recoiling, the resistance and recoil times of the vehicle should be equal.
• If the strut (shock absorber) functions properly, the vehicle will recoil several times and then stop recoiling after
the pushing force is removed.
Removal & Installation
1. Raise and support the vehicle.
2. Remove the wheel mounting nuts and the wheel assembly.
(Tighten: Wheel mounting nuts to 110 N·m)
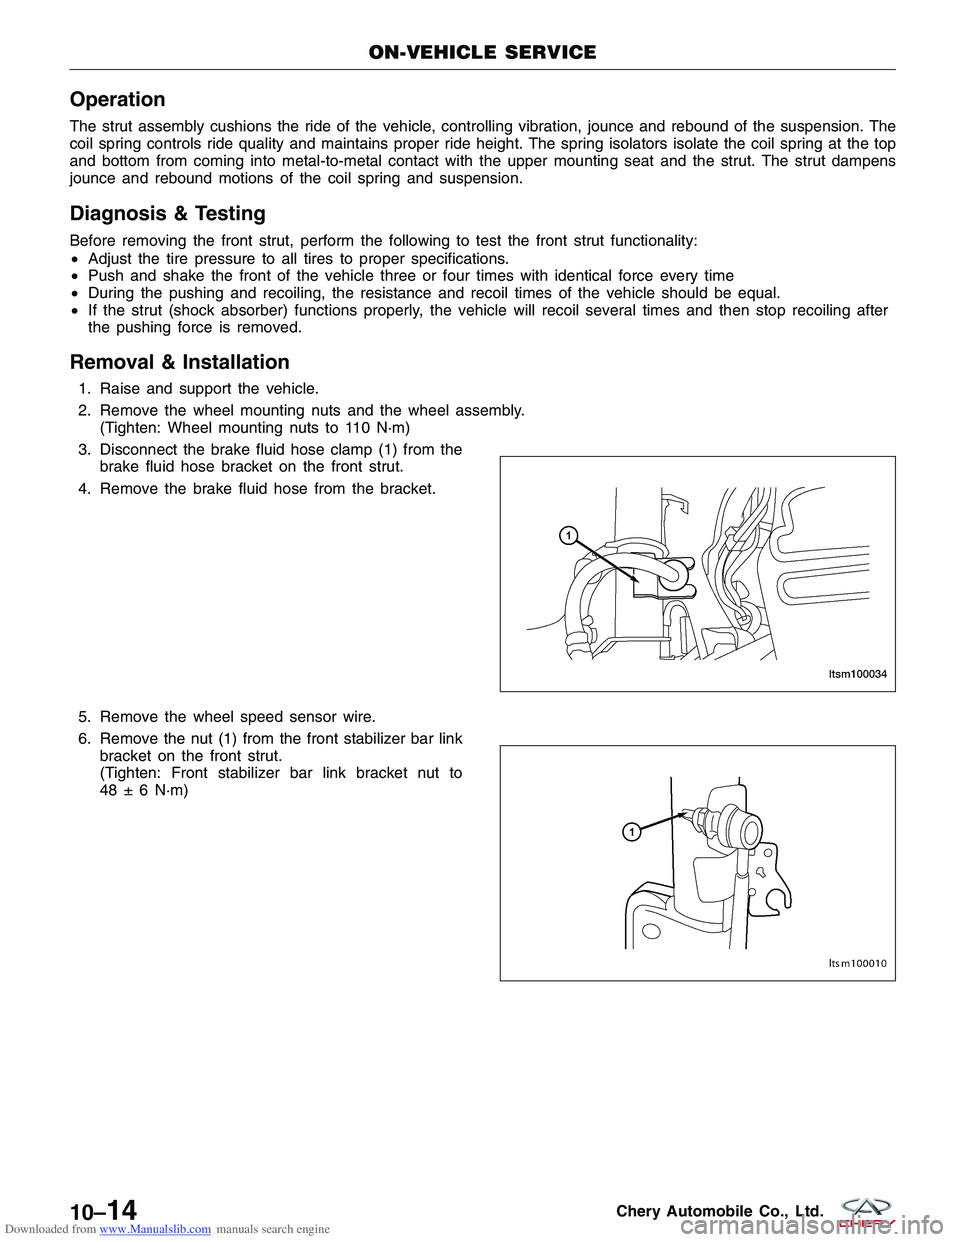
3. Disconnect the brake fluid hose clamp (1) from the brake fluid hose bracket on the front strut.
4. Remove the brake fluid hose from the bracket.
5. Remove the wheel speed sensor wire.
6. Remove the nut (1) from the front stabilizer bar link bracket on the front strut.
(Tighten: Front stabilizer bar link bracket nut to
48 ± 6 N·m)
ON-VEHICLE SERVICE
LTSM100034
LTSM100010
10–14Chery Automobile Co., Ltd.
Page 1317 of 1903
Downloaded from www.Manualslib.com manuals search engine Front Coil Spring
Description
A coil-over front strut assembly supports each front coil spring. The top of the strut assembly mounts to the strut
tower.
Operation
Coil springs are designed to store energy and subsequently release it and to absorb shock and maintain a force
between contacting surfaces. Coil springs are rated for specific vehicle applications.
NOTE :
Each component is serviced by removing the strut assembly from the vehicle and disassembling it. Coil springs are
rated separately for each corner or side of the vehicle depending on optional equipment and type of vehicle service.
If a coil spring requires replacement, be sure that it is replaced with a spring meeting the correct load rating for the
vehicle and its specific options.
Removal & Installation
CAUTION:
At no time when servicing a vehicle can a sheet metal screw, bolt or other metal fastener be
installed into the strut tower to take the place of an original plastic clamp. Also, do not drill holes
into the front strut tower for the installation of any metal fasteners into the strut tower area indi-
cated.
1. Raise and support the vehicle.
2. Remove the front strut assembly (See Front Strut Removal & Installation in Section 10 Suspension).
WARNING!
Do not remove the strut rod nut before the coil spring is properly compressed. The coil spring is held under
pressure. The coil spring must be compressed, removing spring tension from the upper mount and bearing,
before the strut rod nut is removed.
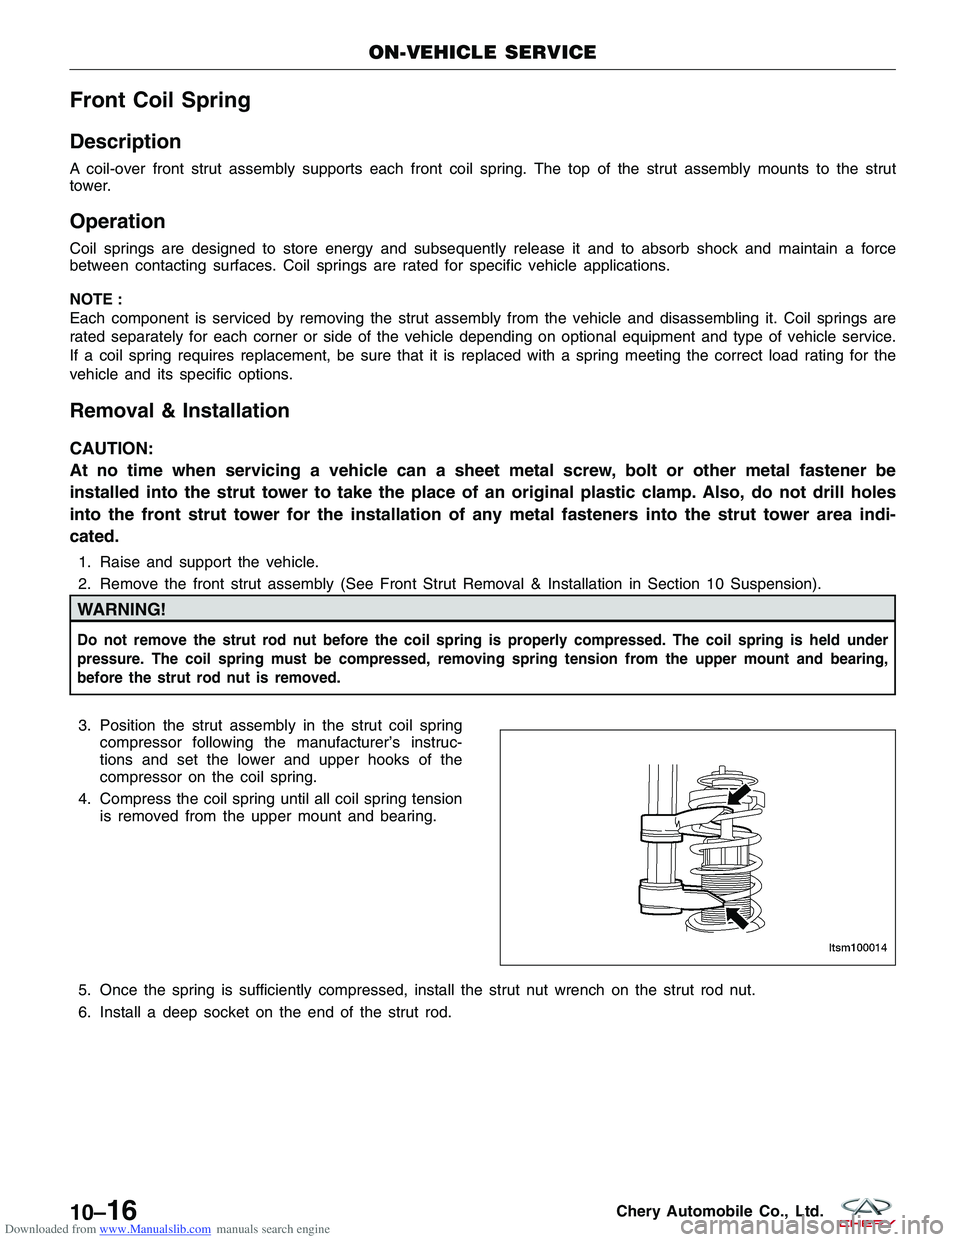
3. Position the strut assembly in the strut coil springcompressor following the manufacturer’s instruc-
tions and set the lower and upper hooks of the
compressor on the coil spring.
4. Compress the coil spring until all coil spring tension is removed from the upper mount and bearing.
5. Once the spring is sufficiently compressed, install the strut nut wrench on the strut rod nut.
6. Install a deep socket on the end of the strut rod.
ON-VEHICLE SERVICE
LTSM100014
10–16Chery Automobile Co., Ltd.
Page 1319 of 1903
Downloaded from www.Manualslib.com manuals search engine 6. Remove the nut (1) between the control arm andthe steering knuckle.
(Tighten: Control arm to steering knuckle nut to
120 ± 10 N·m)
7. Remove the wheel speed sensor mounting bolt (1). (Tighten: Wheel speed sensor mounting bolt to 10
± 1 N·m)
8. Remove the wheel speed sensor and set it aside.
9. Remove the left and right front stabilizer bar links (See Front Stabilizer Bar Link Removal & Installation in Sec- tion 10 Suspension).
10. Remove the nut (1) attaching the outer tie rod ends to the steering knuckle on each side of the steering
rack.
(Tighten: Outer tie rod end nut to 35 N·m)
11. Remove the exhaust pipe assembly mounting bolts (1).
(Tighten: Exhaust pipe assembly mounting bolts to
25 ± 3 N·m)
ON-VEHICLE SERVICE
LTSM100006
LTSM100045
LTSM110034 VISM110016
10–18Chery Automobile Co., Ltd.
Page 1322 of 1903
Downloaded from www.Manualslib.com manuals search engine UNIT REPAIR
Front Strut
Disassemble
NOTE :
The strut assembly must be removed from the vehicle for it to be disassembled and assembled. For the disassembly
and assembly of the strut assembly, use a strut spring compressor, or the equivalent, to compress the coil spring.
Follow the manufacturer’s instructions closely.1. Remove the front strut assembly (See Front Strut Removal & Installation in Section 10 Suspension).
2. If both struts are being serviced at the same time, mark both the coil springs and strut assemblies according to which side of the vehicle the strut is being removed from.
WARNING!
Do not remove the strut rod nut before the coil spring is properly compressed. The coil spring is held under
pressure. The coil spring must be compressed, removing spring tension from the upper mount and bearing,
before the strut rod nut is removed.
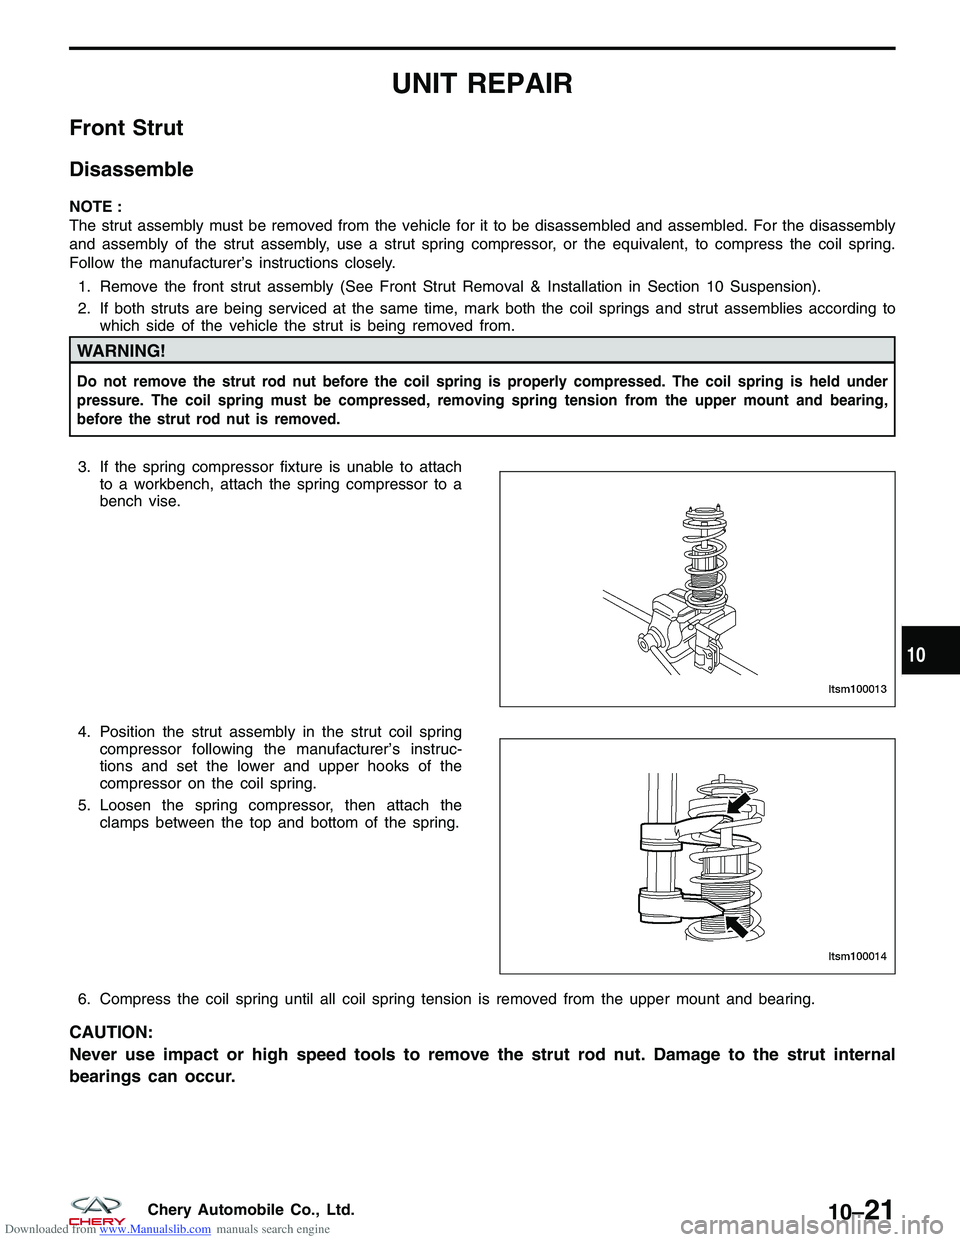
3. If the spring compressor fixture is unable to attachto a workbench, attach the spring compressor to a
bench vise.
4. Position the strut assembly in the strut coil spring compressor following the manufacturer’s instruc-
tions and set the lower and upper hooks of the
compressor on the coil spring.
5. Loosen the spring compressor, then attach the clamps between the top and bottom of the spring.
6. Compress the coil spring until all coil spring tension is removed from the upper mount and bearing.
CAUTION:
Never use impact or high speed tools to remove the strut rod nut. Damage to the strut internal
bearings can occur.
LTSM100013
LTSM100014
10
10–21Chery Automobile Co., Ltd.
Page 1326 of 1903
Downloaded from www.Manualslib.com manuals search engine REAR SUSPENSION
GENERAL INFORMATION10-26
Description 10-26
Operation 10-27
Specifications 10-28
DIAGNOSIS & TESTING10-29
Vehicle Inspection 10-29
Vibration At High Speed 10-29
ON-VEHICLE SERVICE10-30
Rear Lower Control Arm 10-30
Removal & Installation 10-30
Rear Upper Control Arm 10-31
Removal & Installation 10-31 Rear Stabilizer Bar Link
10-32
Removal & Installation 10-32
Rear Shock Absorber 10-32
Description 10-32
Operation 10-32
Removal & Installation 10-32
Rear Shock Absorber Inspection 10-33
Rear Coil Spring 10-33
Description 10-33
Operation 10-34
Removal & Installation 10-34
Rear Trailing Arm Assembly 10-35
Removal & Installation 10-35
10
10–25Chery Automobile Co., Ltd.