Page 928 of 1903

Downloaded from www.Manualslib.com manuals search engine ON-VEHICLE SERVICE
Cooling System Draining and Filling
Cooling System Draining Procedure
WARNING!
Never remove the pressure relief cap, under any conditions, while the engine is operating or hot. Failure to fol-
low these instructions could result in personal injury or damage to the cooling system or engine. To avoid hav-
ing scalding hot coolant or steam blow out of the cooling system, use extreme care when removing the pressure
relief cap. Wait until the engine has cooled, then wrap a thick cloth around the pressure relief cap and turn it
slowly one turn (counterclockwise). Step back while the pressure is released from the cooling system. When you
are certain all the pressure has been released, using a cloth turn and remove the pressure relief cap. Failure to
follow these instructions may result in serious personal injury.
Perform the following procedure when draining the cooling system.1. Do not remove the pressure cap first.
2. With the engine cold, remove the pressure cap.
3. Raise and support the vehicle and locate the radiator drain plug.
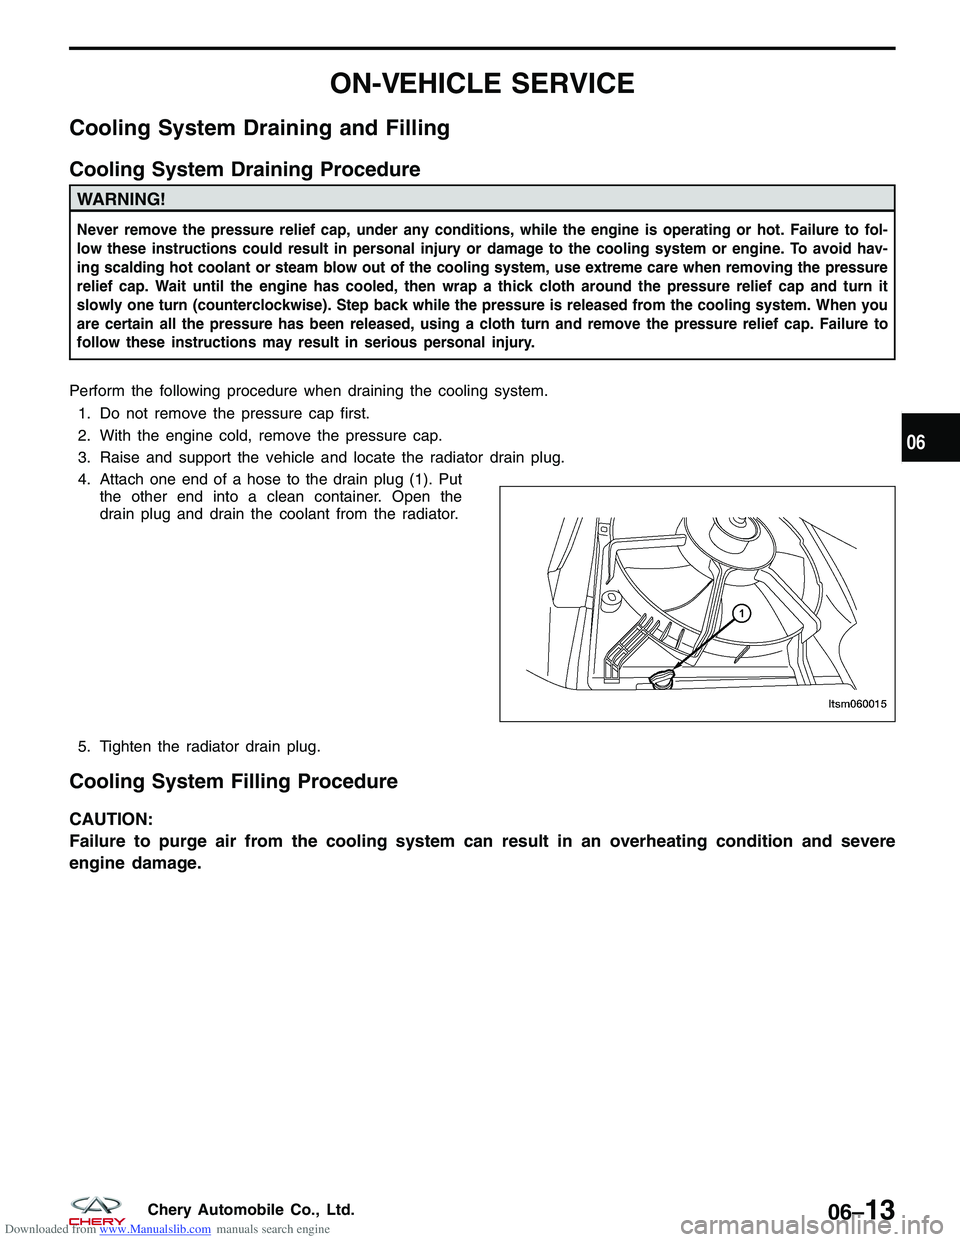
4. Attach one end of a hose to the drain plug (1). Put the other end into a clean container. Open the
drain plug and drain the coolant from the radiator.
5. Tighten the radiator drain plug.
Cooling System Filling Procedure
CAUTION:
Failure to purge air from the cooling system can result in an overheating condition and severe
engine damage.
LTSM060015
06
06–13Chery Automobile Co., Ltd.
Page 1636 of 1903

Downloaded from www.Manualslib.com manuals search engine INSTRUMENT CLUSTER
Description
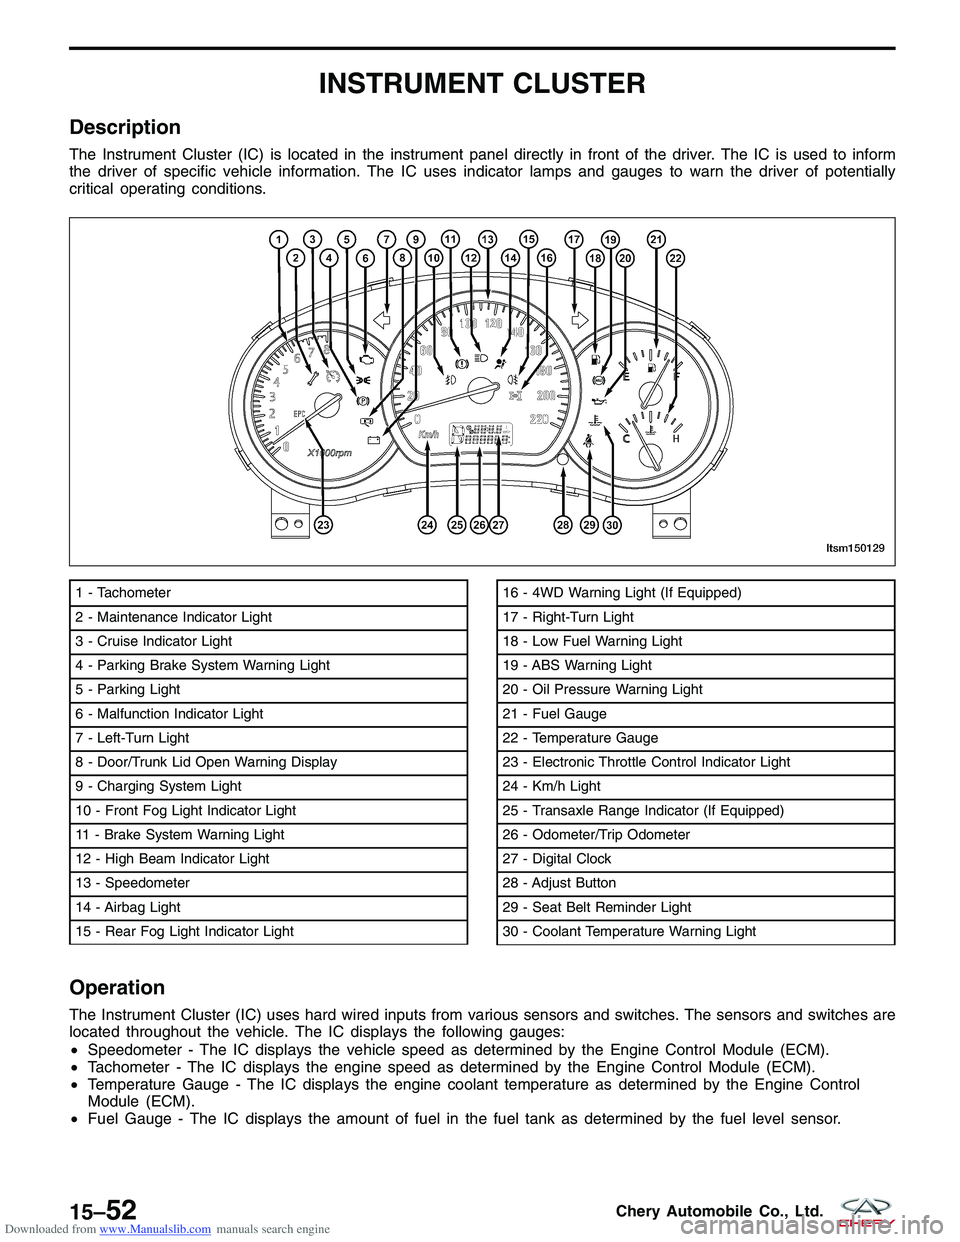
The Instrument Cluster (IC) is located in the instrument panel directly in front of the driver. The IC is used to inform
the driver of specific vehicle information. The IC uses indicator lamps and gauges to warn the driver of potentially
critical operating conditions.
Operation
The Instrument Cluster (IC) uses hard wired inputs from various sensors and switches. The sensors and switches are
located throughout the vehicle. The IC displays the following gauges:
•Speedometer - The IC displays the vehicle speed as determined by the Engine Control Module (ECM).
• Tachometer - The IC displays the engine speed as determined by the Engine Control Module (ECM).
• Temperature Gauge - The IC displays the engine coolant temperature as determined by the Engine Control
Module (ECM).
• Fuel Gauge - The IC displays the amount of fuel in the fuel tank as determined by the fuel level sensor.
1 - Tachometer
2 - Maintenance Indicator Light
3 - Cruise Indicator Light
4 - Parking Brake System Warning Light
5 - Parking Light
6 - Malfunction Indicator Light
7 - Left-Turn Light
8 - Door/Trunk Lid Open Warning Display
9 - Charging System Light
10 - Front Fog Light Indicator Light
11 - Brake System Warning Light
12 - High Beam Indicator Light
13 - Speedometer
14 - Airbag Light
15 - Rear Fog Light Indicator Light16 - 4WD Warning Light (If Equipped)
17 - Right-Turn Light
18 - Low Fuel Warning Light
19 - ABS Warning Light
20 - Oil Pressure Warning Light
21 - Fuel Gauge
22 - Temperature Gauge
23 - Electronic Throttle Control Indicator Light
24 - Km/h Light
25 - Transaxle Range Indicator (If Equipped)
26 - Odometer/Trip Odometer
27 - Digital Clock
28 - Adjust Button
29 - Seat Belt Reminder Light
30 - Coolant Temperature Warning Light
LTSM150129
15–52Chery Automobile Co., Ltd.
Page 1648 of 1903

Downloaded from www.Manualslib.com manuals search engine DIAGNOSIS & TESTING
Clearing Service Monitor Lamp
Perform the following to clear the service monitor lamp:1. Turn the ignition switch off.
2. Press down and hold the Mode switch.
3. Turn the ignition switch on.
4. Release the Mode switch.
5. Press the Mode switch and the Clock switch simultaneously within 30 seconds and hold less than 2 seconds to clear the mileage maintenance identification.
Diagnostic Help
1. The X-431 scan tool connects to the Data Link Connector (DLC) and communicates with the vehicle electronicmodules through the class two serial data circuit.
2. Confirm that the malfunction is current and carry-out the diagnostic tests and repair procedures.
3. If the DTC cannot be deleted, it is a current fault.
4. Use a digital multimeter to perform voltage readings on electronic systems.
5. Refer to any Technical Bulletins that issued.
6. Visually inspect the related electrical wiring harness.
7. Inspect and clean all Instrument Cluster (IC) grounds that are related to the DTC.
8. If numerous trouble codes were set, use the electrical schematic and look for any common ground circuits or voltage supply circuits that may apply to the DTC.
Intermittent DTC Troubleshooting
If the failure is intermittent, perform the following:
•Check for loose connectors.
• Look for any chafed, pierced, pinched, or partially broken wires.
• Monitor the scan tool data relative to this circuit.
• Wiggle the related electrical wiring harness and connectors while looking for an interrupted signal on the
affected circuit.
• If possible, try to duplicate the conditions under which the DTC set.
• Look for the data to change or for the DTC to reset during the wiggle test.
• Look for broken, bent, pushed out or corroded terminals.
• Inspect the sensor and mounting area for any condition that would result in an incorrect signal, such as dam-
age or foreign material.
• A data recorder, and/or oscilloscope should be used to help diagnose intermittent conditions.
Ground Inspection
Ground connections are very important to the proper operation of electrical and electronic circuits. Ground connec-
tions are often exposed to moisture, dirt and other corrosive elements. The corrosion (rust) can become an unwanted
resistance. This added resistance can alter the way a circuit works.
Electronically controlled circuits are very sensitive to proper grounding. A loose or corroded ground can drastically
affect an electronically controlled circuit. A poor or corroded ground can effect the circuit. Perform the following when
inspecting a ground connection:
1. Remove the ground bolt or screw.
2. Inspect all mating surface for tarnish, dirt, rust, etc.
3. Clean as required to assure good contact.
4. Reinstall bolt or screw securely.
5. Inspect for �add-on�accessories which may be interfering with the ground circuit.
6. If several wires are crimped into one ground eyelet terminal, check for proper crimps. Make sure all of the wires are clean, securely fastened and providing a good ground path. If multiple wires are crimped to one eyelet, make
sure no excess wire insulation has been crimped creating a bad ground.
15–64Chery Automobile Co., Ltd.
Page 1687 of 1903
Downloaded from www.Manualslib.com manuals search engine Power Window Motor Inspection
1. Using the following table, apply battery voltage to the specified connector terminals.
2. Verify that the motor operates smoothly when voltage is applied in each direction.
3. If the test results are not as specified, replace the motor.
MEASURING CONDITIONOPERATIONAL
DIRECTION INSPECTION DIAGRAM
Battery positive (+) to terminal – 1
Battery negative (-) to terminal – 2 Clockwise rotation
Battery positive (+) to
terminal – 2
Battery negative (-) to terminal – 1 Counterclockwise rotation
POWER WINDOW
15
15–103Chery Automobile Co., Ltd.