2009 CADILLAC XLR key
[x] Cancel search: keyPage 255 of 462

Setting the Search Area
To determine or change the system’s search area:
1. Press the ROUTE key.
2. Touch the Enter Destination screen button.
3. Touch Change under
the Search Area
heading. The system
displays a map
with each region
represented.
4. Select the desired region by touching the appropriate
screen button to the left of the U.S. map. The name
of the states or the country included in the selected
region displays at the bottom of the screen and the
region is highlighted.
5. Touch Enter to set the region as the search area.
6. Touch Return to go back to the previous screen.
4-41
Page 256 of 462

Map Adjustments
The system allows the adjustment of the scale of view
on the map. The map scrolls automatically based on the
direction being traveled.
Map Scales
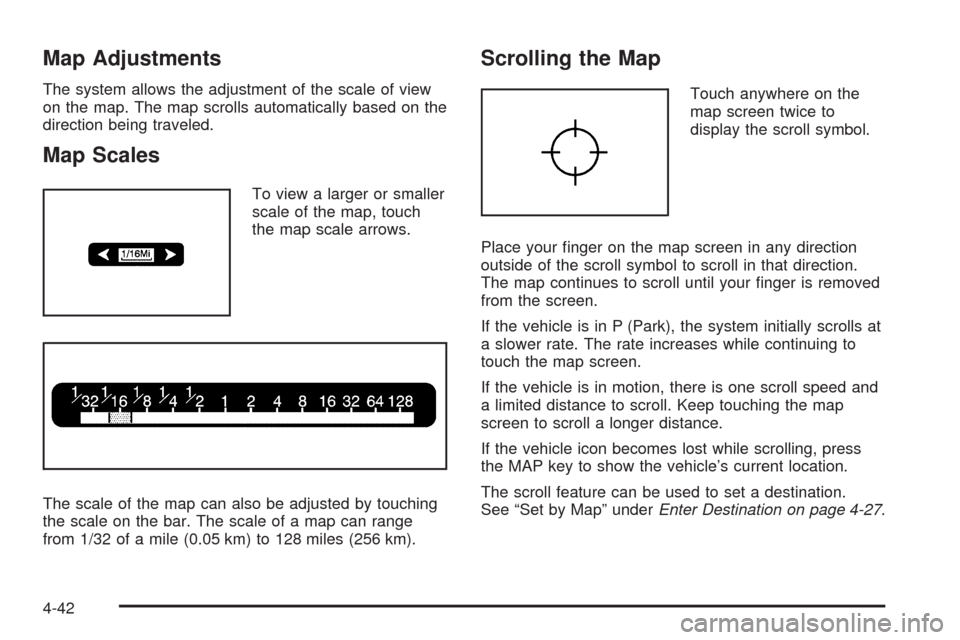
To view a larger or smaller
scale of the map, touch
the map scale arrows.
The scale of the map can also be adjusted by touching
the scale on the bar. The scale of a map can range
from 1/32 of a mile (0.05 km) to 128 miles (256 km).
Scrolling the Map
Touch anywhere on the
map screen twice to
display the scroll symbol.
Place your �nger on the map screen in any direction
outside of the scroll symbol to scroll in that direction.
The map continues to scroll until your �nger is removed
from the screen.
If the vehicle is in P (Park), the system initially scrolls at
a slower rate. The rate increases while continuing to
touch the map screen.
If the vehicle is in motion, there is one scroll speed and
a limited distance to scroll. Keep touching the map
screen to scroll a longer distance.
If the vehicle icon becomes lost while scrolling, press
the MAP key to show the vehicle’s current location.
The scroll feature can be used to set a destination.
See “Set by Map” underEnter Destination on page 4-27.
4-42
Page 261 of 462

Turn List:This option allows viewing of a step-by-step
listing of upcoming street names, the distance that you
will travel on the road, and turns needed to make during
the planned route.
After touching Turn List, the system may take some time
to create the list. The length of time varies depending
on the length of the route and the planning methods
selected.The turn list reads from bottom to top. The bottom street
name is the street you are currently on. The system
automatically updates this screen as each turn is made.
Touch the scroll up and down arrows, providing scroll is
available. Touching the down arrow gives the current
location. Touching the up arrow gives upcoming streets.
At times, there may not be names available for entrance
or exit ramps.
To avoid a turn, touch AVOID next to the turn to be
avoided. Use REDUCE or ENLARGE to edit the avoided
point. Touch Reroute or press the MAP key to calculate
the new route.
Touch Return to view the current position and to turn
the turn list screen off.
Touch REROUTE or press the MAP key to calculate a
new route.
Auto Reroute
When the destination is set and you travel off of the
planned route, the system automatically begins to
reroute. The new route highlights on the screen.
4-47
Page 262 of 462

Traveling Across Regions
If driving across several states, the selected region
might have to be changed to represent the destination.
There are two ways to plan a destination when
traveling across regions.
The following method is suggested and provides the
most route guidance and map display functions:
1. Change the selected search area region as you get
closer to the destination. See “Setting the Search
Area” underMaps on page 4-38.
2. Enter the destination and route settings. SeeEnter
Destination on page 4-27for more information.
If not using the �rst method, keep the currently
selected search area region and enter the destination.
This method allows a destination selection from the
easy planning route method or from the All Points of
Interest (POI) categories with the “All Search Areas”
comment for US Only. For example, Tourist is a category
that features this comment. SeeEnter Destination on
page 4-27for more information.If traveling in or to Canada and the regional border is
crossed, the only map scale views available are 4 mi,
8 mi, 31 mi, and 128 mi (8 km, 16 km, 64 km and
256 km). Change the selected search area region when
you get closer to the destination. See “Setting the Search
Area” underMaps on page 4-38for more information.
Keyless Access System
When the engine is started, Driver 1 or Driver 2 displays
on the screen. A message will not appear on the
screen if the driver is unknown. The number on the back
of the transmitter corresponds to driver 1 or driver 2.
The navigation system can store memory points for
drivers 1 and 2 individually. SeeKeyless Access System
Operation on page 2-5for more information.
OnStar®System
When using the OnStar®system, the audio system
mutes and the navigation voice prompts become
disabled during the call. The volume of the OnStar call
can be adjusted by using the steering wheel volume
controls. SeeOnStar
®System on page 2-42for
more information.
4-48
Page 267 of 462

Main Audio Menu
e
/z(Audio/Adjust):Press this key to view the main
audio screen.
Preset Selection:The audio system’s presets can be
programmed to recall the home settings by touching
HOME. The presets used when traveling can also be
recalled to another area by touching AWAY. See “Preset
Station Menu” later in this section for more information on
how to store preset stations.
The Home and Away feature is not available for the XM™
Satellite Radio source, if equipped.Display Presets on the Map:With this feature on,
the audio system presets for the current audio source
displays on the left of the map screen. Touch ON to turn
this feature on. This feature can also be turned off.
With this feature on, the preset radio stations can be
recalled from the map screen. Preset stations from
the map screen cannot be stored. This must be done
from the audio screen. See “Preset Station Menu” later
in this section for more information on storing presets.
Noise Compensation Technology:The system
is equipped with Bose
®AudioPilot®noise compensation
technology. AudioPilot continuously adjusts the audio
system equalization to compensate for the background
noise, so the music sounds the same, even as the
background noise levels change.
To use AudioPilot
®, press the ON screen button.
To turn it off, press the OFF screen button.
This feature is most effective at lower volume settings
where background noise can affect how well the music
being played through the vehicle’s audio system is heard.
At higher volume settings, where the music is much
louder than the background noise, there may be little or
no adjustments by AudioPilot
®.
For more information on AudioPilot
®, visit
bose.com/audiopilot.
4-53
Page 270 of 462

DAY:This setting leaves the screen in day mode.
Day mode is best suited for daylight conditions.
NIGHT:This setting leaves the screen in night mode.
Night mode is best suited for nighttime conditions.
SCREEN OFF:Touch SCREEN OFF to turn off the
screen. Press any hard key to turn the screen back on.
SET:Touch SET to save the choices and exit the
CLOCK ADJUST menu.
Language
The vehicle has been set for the English language.
Change the language, through the Driver Information
Center (DIC). SeeDriver Information Center (DIC)
on page 3-57for more information.
If the language is changed from English, a majority of the
voice guidance prompts and screen text changes to the
selected language. Remember, the menu screens will not
match word-for-word as they appear in this manual.
Playing the Radio
PWR-VOL (Power-Volume):Press to turn the audio
and navigation systems on and off. Turn the knob
to increase or decrease the volume to the audio system.
«TUNE/SEEKª:Press the up or down arrow to
go to the next or previous station and stay there.BAND:Press this key to switch between AM, FM1,
FM2, XM1, XM 2, or WX, if equipped. While on a map
screen and this key is pressed, the screen will not
change but the audio source will.
Finding a Station
Press the BAND key to switch between AM, FM1, FM2,
XM1, XM2, or WX, if equipped. Touch the desired audio
source to select it.FM1 audio source shown, other sources similar
4-56
Page 272 of 462

Sound Menu
Touch SOUND at the bottom of the main audio screen,
source menu, or DSP menu to change the tone, DSP, if
equipped, fade, and balance for all sources. The audio
system has a separate setting for these features for each
source preset. However, the audio system keeps one
fade and one balance setting for all audio sources.
To adjust sound settings:
1. Touch the plus (+) or minus (−) signs to adjust
treble, mid-range, and bass.
2. Touch the L for left or R for right to adjust the
balance of the speakers.3. Touch the F for front or R for rear to adjust the
fade of the speakers.
4. Touch DSP to adjust the DSP, if equipped.
See “Adjusting the Speakers” later in this section for
more information.
After adjustments are made, touch any source screen
button. This takes you back to the preset station menu.
Whenever that screen button is touched, the previously
stored information that was entered for each preset
station is recalled.
To adjust the tone for each preset:
1. Press the BAND key.
2. Touch AM, FM1, FM2, XM1, XM2, or WX, if
equipped, to access the desired preset screen.
3. Touch SOUND.
4. Touch the plus (+) or minus (−) signs to adjust
treble, mid-range, and bass.
5. Touch Return to exit. This takes you to the preset
station menu.
6. Touch and hold one of the six preset screen buttons
for more than two seconds until a beep is heard.
Whenever that preset is touched for less than
two seconds, the station and previously stored
information that was entered for each preset station
is recalled.
7. Repeat the steps for additional presets.
4-58
Page 279 of 462

No CAT Info:No category information is available.
The system is working properly.
CAT Not Found:There are no channels available for
the selected category. The system is working properly.
No Information:No text or informational messages
are available. The system is working properly.
XM Theftlocked:The XM™ receiver may have
previously been in another vehicle. For security
purposes, XM™ receivers cannot be swapped between
vehicles. If this message is received after having
your vehicle serviced, check with your dealer/retailer.
XM Radio ID:If tuned to channel 0, this message
will alternate with the XM™ Radio eight digit radio ID
label. This label is needed to activate the service.
Unknown:If this message is received when tuned to
channel 0, there may be a receiver fault. Consult
with your dealer/retailer.
Check XM Receiver:If this message does not clear
within a short period of time, the receiver may have
a fault. Consult with your dealer/retailer.
XM Not Available:If this message does not clear
within a short period of time, the receiver could have a
fault. Consult with your dealer/retailer.Six-Disc CD Changer
With the compact disc changer, up to six normal size
discs can be played continuously.
When the radio is turned on, the changer begins
checking for discs. This continues for up to one and a
half minutes, depending on the number of discs loaded.
Noise might be heard, but this is normal. The CD
changer is initializing.
Press the CD hard key to access the six-disc CD
changer screen. You can also use the system’s DVD
player for single CD play once the map DVD is removed.
SeeCD/DVD Player on page 4-68for more information.
If no CD is loaded in the CD/DVD Player and the CD
hard key is pressed, the message “No CD Loaded”
displays.
4-65