Page 414 of 514

{CAUTION:
Idling a vehicle in an enclosed area with poor
ventilation is dangerous. Engine exhaust may
enter the vehicle. Engine exhaust contains Carbon
Monoxide (CO) which cannot be seen or smelled.
It can cause unconsciousness and even death.
Never run the engine in an enclosed area that has
no fresh air ventilation. For more information, see
Engine Exhaust on page 2-36.
{CAUTION:
Over-inating a tire could cause the tire to rupture
and you or others could be injured. Be sure to
read and follow the tire sealant and compressor kit
instructions and inate the tire to its recommended
pressure. Do not exceed the recommended
pressure.
{CAUTION:
Storing the tire sealant and compressor kit or
other equipment in the passenger compartment of
the vehicle could cause injury. In a sudden stop or
collision, loose equipment could strike someone.
Store the tire sealant and compressor kit in its
original location.
If this vehicle has a tire sealant and compressor kit,
there may not be a spare tire, tire changing equipment,
and on some vehicles there may not be a place to
store a tire.
The tire sealant and compressor can be used to
temporarily seal punctures up to
14inch (6 mm) in the
tread area of the tire. It can also be used to inate
an under inated tire.
If the tire has been separated from the wheel, has
damaged sidewalls, or has a large puncture, the tire is
too severely damaged for the tire sealant and
compressor kit to be effective. SeeRoadside Service on
page 7-7.
5-88
Page 423 of 514

{CAUTION:
Idling a vehicle in an enclosed area with poor
ventilation is dangerous. Engine exhaust may
enter the vehicle. Engine exhaust contains Carbon
Monoxide (CO) which cannot be seen or smelled.
It can cause unconsciousness and even death.
Never run the engine in an enclosed area that has
no fresh air ventilation. For more information, see
Engine Exhaust on page 2-36.
{CAUTION:
Over-inating a tire could cause the tire to rupture
and you or others could be injured. Be sure to
read and follow the tire sealant and compressor kit
instructions and inate the tire to its recommended
pressure. Do not exceed the recommended
pressure.
{CAUTION:
Storing the tire sealant and compressor kit or
other equipment in the passenger compartment of
the vehicle could cause injury. In a sudden stop or
collision, loose equipment could strike someone.
Store the tire sealant and compressor kit in its
original location.
If this vehicle has a tire sealant and compressor kit,
there may not be a spare tire, tire changing equipment,
and on some vehicles there may not be a place to
store a tire.
The tire sealant and compressor can be used to
temporarily seal punctures up to
14inch (6 mm) in the
tread area of the tire. It can also be used to inate
an under inated tire.
If the tire has been separated from the wheel, has
damaged sidewalls, or has a large puncture, the tire is
too severely damaged for the tire sealant and
compressor kit to be effective. SeeRoadside Service on
page 7-7.
Read and follow all of the tire sealant and compressor
kit instructions.
5-97
Page 430 of 514

Tire Sealant and Compressor Kit
Storage
The tire sealant and compressor kit is located in
the trunk.
1. Open the trunk. SeeTrunk on page 2-15.
2. Remove the retainer that holds the tire sealant and
compressor kit in place.
3. Remove the tire sealant and compressor kit from
the foam container.
To store the tire sealant and compressor kit, reverse
the steps.
Changing a Flat Tire
If you have an STS-V model, there is no spare tire and
no tire changing equipment. The vehicle is equipped
with run-at tires. SeeRun-Flat Tires (STS-V) on
page 5-62for more information. If you have an STS
model, the vehicle may be equipped with a tire inator
kit. SeeTire Sealant and Compressor Kit on page 5-87
for more information. If the vehicle is not equipped
with a tire inator kit, follow the directions for changing
a at tire in this section.
If a tire goes at, avoid further tire and wheel damage
by driving slowly to a level place. Turn on the hazard
warning ashers. SeeHazard Warning Flashers
on page 3-6.
5-104
Page 432 of 514
Removing the Spare Tire and Tools
The equipment you will need is located in the trunk.
To access to the compact spare tire and jacking
equipment:
1. Open the trunk. SeeTrunk on page 2-15for more
information.
2. Remove the compact spare tire cover.
3. Pull the stow rod (A) to remove it.
4. Turn the nut (B) holding the jack package container
counterclockwise and remove it. Then remove the
jack and wheel wrench.
5. Remove the compact spare tire. SeeCompact
Spare Tire on page 5-114for more information
about the compact spare tire.
5-106
Page 433 of 514
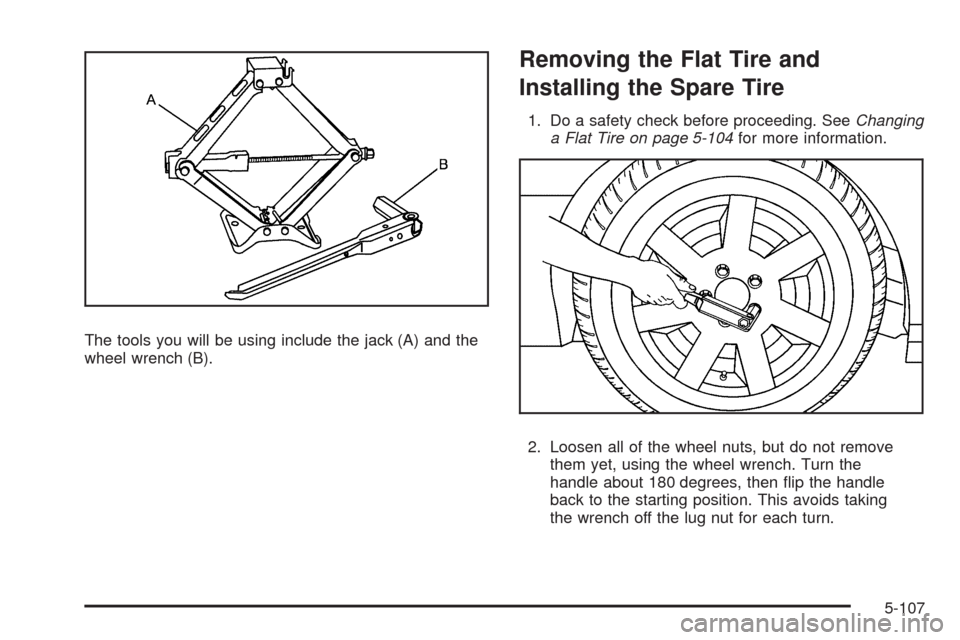
The tools you will be using include the jack (A) and the
wheel wrench (B).
Removing the Flat Tire and
Installing the Spare Tire
1. Do a safety check before proceeding. SeeChanging
a Flat Tire on page 5-104for more information.
2. Loosen all of the wheel nuts, but do not remove
them yet, using the wheel wrench. Turn the
handle about 180 degrees, then ip the handle
back to the starting position. This avoids taking
the wrench off the lug nut for each turn.
5-107
Page 435 of 514

{CAUTION:
Lifting a vehicle and getting under it to do
maintenance or repairs is dangerous without the
appropriate safety equipment and training. If a jack
is provided with the vehicle, it is designed only for
changing a at tire. If it is used for anything else,
you or others could be badly injured or killed if the
vehicle slips off the jack. If a jack is provided with
the vehicle, only use it for changing a at tire.
Notice:If you position the jack under the rocker
molding and attempt to raise the vehicle, you could
break the molding and/or cause other damage to your
vehicle. Always position the jack so that when the
jack head is raised, it will t rmly in the notch
located inboard from the rocker molding.
5. Turn the wheel wrench counterclockwise to lower
the jack lift head until the jack ts under the vehicle.6. Raise the jack by turning the wheel wrench
clockwise until the slots in the jack head t into
the metal ange located behind the triangle on
the plastic molding as shown.
7. Put the compact spare tire near you.
5-109
Page 436 of 514
8. Raise the vehicle by turning the wheel wrench
clockwise. Raise the vehicle far enough off the
ground for the compact spare tire to t under
the vehicle.9. Remove all the wheel
nuts and the at tire.
{CAUTION:
Rust or dirt on a wheel, or on the parts to which
it is fastened, can make wheel nuts become loose
after time. The wheel could come off and cause an
accident. When changing a wheel, remove any rust
or dirt from places where the wheel attaches to the
vehicle. In an emergency, use a cloth or a paper
towel to do this; but be sure to use a scraper or wire
brush later, if needed, to get all the rust or dirt off.
SeeChanging a Flat Tire on page 5-104.
5-110
Page 437 of 514
{CAUTION:
Never use oil or grease on bolts or nuts because
the nuts might come loose. The vehicle’s wheel
could fall off, causing a crash.
10. Remove any rust or dirt
from the wheel bolts,
mounting surfaces,
and spare wheel.
11. Install the spare tire.12. Put the wheel nuts back on with the rounded end of
the nuts toward the wheel.
13. Tighten each wheel nut by turning it clockwise with
your hand until the wheel is held against the hub.
14. Lower the vehicle by turning the wheel wrench
counterclockwise. Lower the jack completely.
5-111