2009 CADILLAC CTS radio controls
[x] Cancel search: radio controlsPage 150 of 490

Malfunction Indicator Lamp.............................3-43
Oil Pressure Light.........................................3-46
Engine Oil Pressure Gage.............................3-47
Security Light...............................................3-48
Fog Lamp Light............................................3-48
Lights On Reminder......................................3-48
Cruise Control Light......................................3-48
Highbeam On Light.......................................3-49
Fuel Gage...................................................3-49
Boost Gage.................................................3-50
Driver Information Center (DIC).......................3-50
DIC Operation and Displays...........................3-51
DIC Compass..............................................3-56DIC Warnings and Messages.........................3-58
DIC Vehicle Customization.............................3-72
Audio System(s).............................................3-85
Radio(s)......................................................3-86
Using an MP3............................................3-108
XM Radio Messages...................................3-112
Navigation/Radio System..............................3-113
Bluetooth
®.................................................3-113
Theft-Deterrent Feature................................3-126
Audio Steering Wheel Controls......................3-126
Radio Reception.........................................3-127
Backglass Antenna......................................3-128
XM™ Satellite Radio Antenna System..............3-128
Section 3 Instrument Panel
3-2
Page 153 of 490

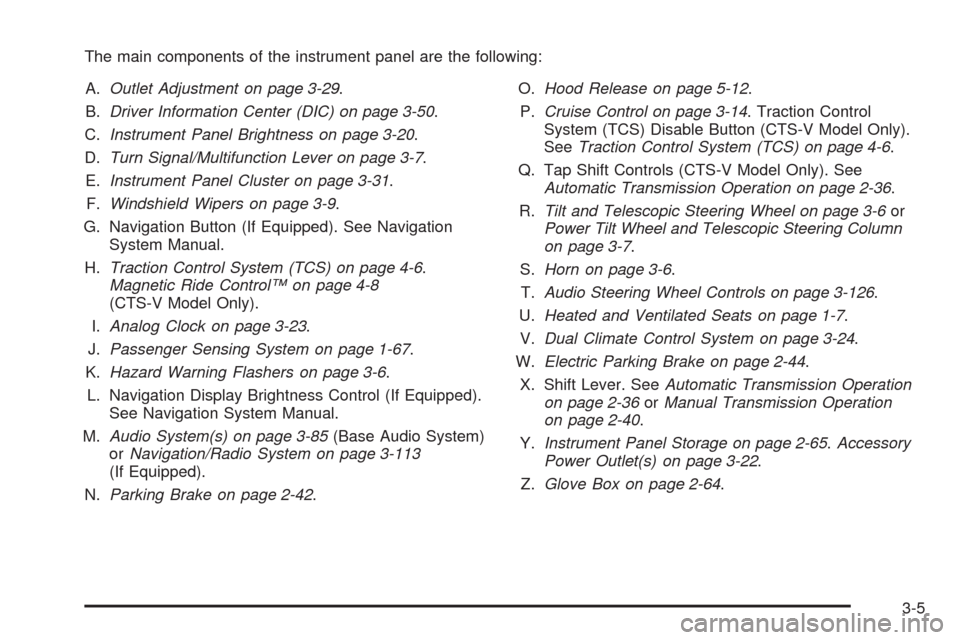
The main components of the instrument panel are the following:
A.Outlet Adjustment on page 3-29.
B.Driver Information Center (DIC) on page 3-50.
C.Instrument Panel Brightness on page 3-20.
D.Turn Signal/Multifunction Lever on page 3-7.
E.Instrument Panel Cluster on page 3-31.
F.Windshield Wipers on page 3-9.
G. Navigation Button (If Equipped). See Navigation
System Manual.
H.Traction Control System (TCS) on page 4-6.
Magnetic Ride Control™ on page 4-8
(CTS-V Model Only).
I.Analog Clock on page 3-23.
J.Passenger Sensing System on page 1-67.
K.Hazard Warning Flashers on page 3-6.
L. Navigation Display Brightness Control (If Equipped).
See Navigation System Manual.
M.Audio System(s) on page 3-85(Base Audio System)
orNavigation/Radio System on page 3-113
(If Equipped).
N.Parking Brake on page 2-42.O.Hood Release on page 5-12.
P.Cruise Control on page 3-14. Traction Control
System (TCS) Disable Button (CTS-V Model Only).
SeeTraction Control System (TCS) on page 4-6.
Q. Tap Shift Controls (CTS-V Model Only). See
Automatic Transmission Operation on page 2-36.
R.Tilt and Telescopic Steering Wheel on page 3-6or
Power Tilt Wheel and Telescopic Steering Column
on page 3-7.
S.Horn on page 3-6.
T.Audio Steering Wheel Controls on page 3-126.
U.Heated and Ventilated Seats on page 1-7.
V.Dual Climate Control System on page 3-24.
W.Electric Parking Brake on page 2-44.
X. Shift Lever. SeeAutomatic Transmission Operation
on page 2-36orManual Transmission Operation
on page 2-40.
Y.Instrument Panel Storage on page 2-65.Accessory
Power Outlet(s) on page 3-22.
Z.Glove Box on page 2-64.
3-5
Page 233 of 490

Audio System(s)
Determine which radio the vehicle has and read the
following pages to become familiar with its features.
{CAUTION:
Taking your eyes off the road for extended periods
could cause a crash resulting in injury or death to
you or others. Do not give extended attention to
entertainment tasks while driving.
This system provides access to many audio and non
audio listings.To minimize taking your eyes off the road while driving,
do the following while the vehicle is parked:
Become familiar with the operation and controls of
the audio system.
Set up the tone, speaker adjustments, and preset
radio stations.
For more information, seeDefensive Driving on page 4-2.
Notice:Contact your dealer/retailer before adding
any equipment.
Adding audio or communication equipment could
interfere with the operation of the vehicle’s engine,
radio, or other systems, and could damage them.
Follow federal rules covering mobile radio and
telephone equipment.
The vehicle has Retained Accessory Power (RAP).
With RAP, the audio system can be played even after
the ignition is turned off. SeeRetained Accessory
Power (RAP) on page 2-33for more information.
3-85
Page 237 of 490

Turn the MENU/SELECT knob clockwise or
counterclockwise to scroll through the list. Press this
knob to select the desired item. The selected item
displays a speaker symbol to indicate it is the current
active source.
Finding a XM™ Station
m
:Press to switch to XM mode. Turn the TUNE/TONE
knob to select from a list of available XM stations.
Turn the TUNE/TONE knob until the desired station is
highlighted. Press the TUNE/TONE knob to select
the highlighted station. The highlighted station will
also automatically be selected if the TUNE/TONE is
released and no longer turned.
Storing a Radio Station as a Favorite
Drivers are encouraged to set up their radio station
favorites while the vehicle is stopped. Tune to favorite
stations using the presets, favorites button, and
steering wheel controls, if the vehicle has this feature.
SeeDefensive Driving on page 4-2.
FAV (Favorites):A maximum of 36 stations can be
programmed as favorites using the six pushbuttons
positioned below the radio station frequency labels on
the display and by using the radio favorites page button
(FAV button). Press the FAV button to go through up
to six pages of favorites, each having six favorite
stations available per page. Each page of favorites can
contain any combination of AM, FM, or XM stations.To store a station as a favorite, perform the
following steps:
1. Tune to the desired radio station.
2. Press the FAV button to display the page where the
station is to be stored.
3. Press and hold one of the six pushbuttons until a
beep sounds. When that pushbutton is pressed and
released, the radio recalls the station that was set.
4. Repeat the steps for each pushbutton radio station
to be stored as a favorite.
The number of favorites pages can be setup using the
CONFIG button. To setup the number of favorites
pages, perform the following steps:
1. Press the CONFIG button to display the radio
setup menu.
2. Press the pushbutton located below the FAV label.
3. Select the desired number of favorites pages by
pressing the pushbutton located below the
displayed page numbers.
4. Press the FAV button, or let the menu time out, to
return to the original main radio screen showing the
radio station frequency labels and to begin the
process of programming favorites for the chosen
number of pages.
3-89
Page 254 of 490

Using the Auxiliary Input Jack
The radio system has an auxiliary input jack. It is in the
center console bin. This is not an audio output; do
not plug the headphone set into the front auxiliary
input jack. An external audio device such as an iPod,
laptop computer, MP3 player, etc. can be connected to
the auxiliary input jack for use as another source for
audio listening.
Set up any auxiliary device while the vehicle is stopped.
SeeDefensive Driving on page 4-2for more information
on driver distraction.
To use a portable audio player, connect a 3.5 mm
(1/8 inch) cable to the radio’s front auxiliary input jack.
The radio automatically detects the device and “Aux
Input Device” displays. The device begins playing over
the vehicle speakers. If an auxiliary device has
already been connected, press the radio’s AUX or
CD/AUX button.
VOL/
O(Volume/Power):Turn clockwise or
counterclockwise to increase or decrease the volume of
the portable player. Use the portable device to make
additional volume adjustments.
FM/AM:Press to listen to the radio when a portable
audio device is playing. The portable audio device
continues playing, until it is stopped.CD or CD/AUX (CD/Auxiliary):Press to play a CD
when a portable audio device is playing. Press again to
start playing audio from the connected portable audio
player. If a portable audio player is not connected,
“No Aux Device” displays.
Using the Radio Controls to Connect
and Control an iPod
An iPod can be controlled by using the radio buttons
and knobs and display the song information on the
radio’s display. To connect and control the iPod using
the radio controls, the vehicle must have a USB port. If it
does, it is located in the center console bin. You will
also need a special iPod connection cable that can be
purchased with the vehicle or may be available after,
from your dealer/retailer. See your dealer/retailer
for more information.
This feature supports the following iPod models:
Fifth generation or later iPod
First or Second generation or later iPod Nano*
* For proper operation, make sure the iPod has the
latest �rmware from Apple
®. The iPod �rmware
can be updated using the latest iTunes application.
See apple.com/itunes.
3-106
Page 261 of 490

Navigation/Radio System
For vehicles with a navigation radio system, see the
separate Navigation System manual.
Bluetooth®
Vehicles with a Bluetooth system can use a Bluetooth
capable cell phone with a Hands Free Pro�le to make
and receive phone calls. The system can be used
while the ignition is in ON/RUN or ACC/ACCESSORY
position. The range of the Bluetooth system can be up
to 30 ft. (9.1 m). Not all phones support all functions,
and not all phones are guaranteed to work with
the in-vehicle Bluetooth system. See gm.com/bluetooth
for more information on compatible phones.
Voice Recognition
The Bluetooth system uses voice recognition to interpret
voice commands to dial phone numbers and name tags.
Noise:Keep interior noise levels to a minimum.
The system may not recognize voice commands if there
is too much background noise.
When to Speak:A short tone sounds after the system
responds indicating when it is waiting for a voice
command. Wait until the tone and then speak.
How to Speak:Speak clearly in a calm and natural voice.
Audio System
When using the in-vehicle Bluetooth system, sound
comes through the vehicle’s front audio system speakers
and over-rides the audio system. Use the audio
system volume knob, during a call, to change the
volume level. The adjusted volume level remains in
memory for later calls. To prevent missed calls, a
minimum volume level is used if the volume is turned
down too low.
Bluetooth Controls
Use the buttons located on the steering wheel to
operate the in-vehicle Bluetooth system. SeeAudio
Steering Wheel Controls on page 3-126for more
information.
bg(Push To Talk):Press to answer incoming calls,
to con�rm system information, and to start speech
recognition.
cª(Phone On Hook):Press to end a call, reject a
call, or to cancel an operation.
3-113
Page 274 of 490

Theft-Deterrent Feature
THEFTLOCK®is designed to discourage theft of the
vehicle’s radio by learning a portion of the Vehicle
Identi�cation Number (VIN). The radio does not operate
if it is stolen or moved to a different vehicle.
Audio Steering Wheel Controls
Vehicles with audio steering wheel controls could differ
depending on the vehicle’s options. Some audio controls
can be adjusted at the steering wheel. They include the
following:
SRCE (Source):Press to switch between the radio AM,
FM, XM, CD, HDD, auxiliary input jack, USB and iPod.
y/cz(Previous/Next):Press to go to the
previous or next radio station stored as a favorite,
or the previous or next track of a CD.
Press to interact with the Bluetooth
®system.
SeeBluetooth®on page 3-113for more information.
+
e−e(Volume):Press to increase or to decrease
the volume.
Left-Side Steering
Wheel Controls for CTS
(CTS-V Similar)
Right-Side Steering
Wheel Controls for
CTS and CTS-V
3-126
Page 478 of 490

Audio System.................................................3-85
Audio Steering Wheel Controls....................3-126
Backglass Antenna.....................................3-128
Navigation/Radio System,
see Navigation Manual............................3-113
Radio Reception........................................3-127
Theft-Deterrent Feature...............................3-126
XM™ Satellite Radio Antenna System...........3-128
Audio System(s).............................................3-86
Automatic Transmission
Fluid..........................................................5-29
Operation...................................................2-36
B
Backglass Antenna........................................3-128
Battery..........................................................5-45
Electric Power Management..........................3-21
Exterior Lighting Battery Saver......................3-20
Run-Down Protection...................................3-22
Bluetooth
®....................................................3-113
Boost Gage...................................................3-50
Brake
Electric Parking...........................................2-44
Emergencies................................................ 4-5
Brake Fluid....................................................5-42
Brakes..........................................................5-42
System Warning Light..................................3-39
Braking........................................................... 4-4Braking in Emergencies..................................... 4-5
Break-In, New Vehicle.....................................2-30
Bulb Replacement...........................................5-57
Front Turn Signal and Fog Lamps..................5-58
Halogen Bulbs............................................5-57
Headlamp Aiming........................................5-53
High Intensity Discharge (HID) Lighting...........5-57
License Plate Lamps....................................5-59
Replacement Bulbs......................................5-59
Buying New Tires...........................................5-78
C
Calibration.....................................................3-56
California Fuel.................................................. 5-7
California Perchlorate Materials Requirements....... 5-4
California Proposition 65 Warning....................... 5-4
Canadian Owners............................................... iii
Capacities and Speci�cations..........................5-127
Carbon Monoxide...........................2-19, 2-50, 4-17
Care of
Safety Belts..............................................5-109
CD, MP3 .....................................................3-108
Center Console Storage Area...........................2-65
Chains, Tire...................................................5-84
Charging System Light....................................3-38
Check
Engine Lamp..............................................3-43
Checking Things Under the Hood......................5-12
2