Page 9 of 20

9
ENTERTAINMENT
Audio Systems
Setting the Time
Press and hold the H button on the
sound system faceplate until the correct
hour appears on the display. Press
and hold M until the correct minute
appears. The ignition does not need to
be turned on.
Radio Controls
(Power):Press to turn the system on
or off.
(Volume):Turn to increase/decrease
volume.
BAND:Press to switch between AM,
FM1/FM2 and XM1/XM2 (if equipped).
DISP (Display): Press to switch the dis-
play between the radio station frequency
and the time. With the ignition off, press
to display the time.
While in XM mode (if equipped), press
to display the artist, song title, category
and channel.
INFO (Information) (if equipped): While
in XM mode (if equipped), press to dis-
play a current radio station message
and other information, if available.
SCV (Speed Compensated Volume):
Press to select Off, Min, Med or Max
radio volume compensation as vehicle
speed increases.
(Tune/Balance/Fade):Turn to
select radio stations.
To set Bass/Treble, push and release
until BAS or TRE appears. Turn to
increase or decrease. To adjust to the
middle position, press and hold until it
beeps.
To adjust Balance, push and release
until BAL appears. Turn the knob to
move the sound toward the right or left.
To adjust Fade, push until FAD appears.
Turn the knob to move the sound toward
the front or rear.
To adjust all controls to the middle posi-
tion, push/hold the speaker knob when
no tone or speaker control is displayed.
ALL CEN appears and the unit beeps.
(Seek):Press and release the
left/right Seek arrow to go to the previ-
ous or next station and stay there.
To scan, press and hold either arrow for
more than two seconds. SCAN appears
on the display and a beep sounds. The
radio finds a station, plays a few sec-
onds and advances to the next. Press
either arrow or a pushbutton to stop
scanning.
To scan preset stations, press and hold
either arrow for more than four seconds.
PSCAN appears and two beeps sound.
Press either arrow or a pushbutton to
stop scanning presets.
Page 10 of 20
.
2. Tune to the desired station.
3. Press EQ to select equaliz")
Getting to Know Your LaCrosse10
Setting Preset Stations
1. With the radio on, press BAND to
select AM/FM1/FM2 or XM1/XM2
(if equipped).
2. Tune to the desired station.
3. Press EQ to select equalization.
4. Press and hold a numbered push-
button until a beep sounds.
Repeat for each pushbutton of each
band (up to 30 possible stations).
CD Controls
With the ignition on, insert a CD, label
side up, partway into the slot. The player
will pull it in and begin playing. To insert
with ignition off, first press eject or DISP.
1 (Reverse):Press to go to the
start of the current track if more than
eight seconds have played. Hold or
press more than once to move back-
ward through the CD tracks.
2 (Fast Forward):Press to go to
the next track. Hold or press more than
once to forward through the upcoming
CD tracks.
4RDM (Random):Press to hear tracks
in random order. Press again to disable
random play.
(Seek):Press the left arrow to go
to the start of the current track or the
previous track. Press the right arrow to
go to the start of the next track. Press
the arrows for more than two seconds to
search previous or next tracks. Release
to stop searching and play the track.
DISP (Display):Press to display the
current CD track and the elapsed time
the current track has played.BAND:Press to switch to the radio
when a CD is playing. The CD remains
inside the player.
(CD):Press to play a CD when the
radio is playing.
EQ (if equipped): Press to select cus-
tomized equalization settings for C&W,
Jazz, Talk, Pop, Rock and Classical
music. To return to manual mode,
press and release the Tone knob until
MANUAL is displayed.
(Eject):Press to eject a CD, with
the ignition off or on, or the radio off.
Load CDs with the ignition off by press-
ing this button first.
MP3-Capable Uplevel Radio
(if equipped)
Play MP3 files on CD-R CDs. To play,
with the ignition on, insert the disc
partway into the slot, label side up.
The player will pull it in. READING
appears on the display and the disc
plays. Smaller, 3-inch (8-cm) single CDs
may be used with an adapter ring.
3 (Repeat):Press to hear a track
again. RPT is displayed. Press again to
disable repeat play.
5 (Previous Folder):Press to go to
the first track in the previous folder.
Pressing while in Folder Random mode
takes you to the previous folder and
plays random tracks there.
6 (Next Folder):Press to go to the
first track in the next folder. Pressing
while in Folder Random mode takes you
to the next folder and plays random
tracks there.
Page 11 of 20

To load multiple CDs in the six-disc
CD player:
1. Turn the ignition on. Press and hold
the Load button for two seconds. The
player beeps and the light to the righ")
11
Six-Disc CD Player (if equipped)
To load multiple CDs in the six-disc
CD player:
1. Turn the ignition on. Press and hold
the Load button for two seconds. The
player beeps and the light to the right
of the slot will flash. MULTI LOAD #
is displayed.
2. When the light stops flashing and
turns green, INSERT CD # is
displayed. Insert a disc partway,
label side up.
3. The indicator light will begin blinking
and turn green. Another disc may be
loaded.
4. When loading two to five CDs, press
the Load button again after loading
the final CD.
For every CD loaded, a number appears
on the radio display. To play a specific
disc, press CD and the number of the
CD you want to hear. A small bar
appears under the CD number that is
playing, and the track number appears.
Note:CDs with any affixed labels may
jam in the CD player. Label a CD using
a permanent marker. If more than one
CD is inserted into the slot at a time,
or if scratched or damaged CDs are
played, the CD player could be dam-
aged. When using the CD player, use
only CDs in good condition without
labels; load one CD at a time; and keep
the CD player and the loading slot free
of foreign materials, liquids or debris.
Finding an XM Category Station
(if equipped)
Category (CAT) stations are available on
XM1 or XM2 bands only. To find a CAT
station:
1. Press the CAT button to activate
Program Type (PTY) Select mode.
2. A category is displayed.
3. Rotate the Tune knob. When the
preferred category appears, press the
Seek button to go to the first category
station (pressing Seek for more than
two seconds will activate Category
Scan).
4. To go to another station, press the
CAT button. The previously stored
category will be displayed.
5. Press the up or down Seek button.
6. Press the CAT button to exit PTY
Select mode.
See Section 3 of your Owner Manual.
Bluetooth®System
The in-vehicle Bluetooth system allows
users with a Bluetooth-enabled cell
phone to make and receive hands-free
phone calls using the vehicle’s audio
system, microphone and controls. The
Bluetooth-enabled cell phone must be
paired with the in-vehicle Bluetooth sys-
tem before it can be used in the vehicle.
Not all phones will support all functions.
Visit www.buick.com/bluetoothfor
more information.
See Section 3 of your Owner Manual.
Page 12 of 20

transmitter. The remote")
Getting to Know Your LaCrosse12
CONVENIENCE
Remote Vehicle Start
This feature allows you to start the
engine from outside the vehicle by
using the Remote Keyless Entry (RKE)
transmitter. The remote start capability
must be turned on using the Driver
Information Center.
Audio Steering Wheel Controls
Audio Steering Wheel Controls
The following audio controls are located
on the steering wheel:
+ – (Volume): Pull up on the plus or
minus button to increase or decrease
the volume.
(Next/Previous/End): Press the
up or down arrow to go to the
next or previous radio station stored as
a favorite or, when a CD is playing, to
the next or previous track. Press the
(End) button to end an OnStar or
Bluetooth call.
SRCE (Source):Press this button to
switch between AM, FM, XM (if equip-
ped), CD and the auxiliary input jack.
(Seek):Press this button to go to
the next radio station on the same band
or, when a CD is playing, to the next
track.
(Mute/Push to Talk/Voice
Recognition): Press this button to
mute the vehicle speakers. Press and
hold the button for more than two sec-
onds to interact with the OnStar or
Bluetooth system.
See Section 3 of your Owner Manual.
Based on outside temperature, the vehi-
cle’s automatic climate control system
will default to a heating or cooling mode.
Starting the Vehicle
1. Aim the RKE transmitter at the
vehicle.
2. Press and release the (Lock)
button on the transmitter.
3. Immediately press and hold the
(Remote Start) button for about four
seconds. When the vehicle starts, the
parking lamps will light and remain
on while the engine is running. The
engine will continue running for
10 minutes.
4. Repeat these steps for a 10-minute
time extension. Only two consecutive
remote starts are allowed.
After a remote start, the ignition must
be turned to the On position before
driving.
Canceling a Remote Start
To turn off the engine instead of driving
after a remote start:
• Press and hold the (Remote Start)
button until the parking lamps turn off.
• Press and release the Hazard
Warning Flashers button. Press it
again to turn off the flashers.
• Turn the key in the ignition switch to
the On position and then off.
See Section 2 of your Owner Manual.
Note:The Remote Vehicle Start feature
will not operate if the key is in the igni-
tion, a door or the hood is open, or the
Check Engine light is illuminated on the
instrument panel cluster.
Page 13 of 20
: To turn the headlamps off
when the lights are on, turn the contr")
Exterior Lamps and Automatic
Headlamp System
You will find the exterior lamps knob on
the left side of the instrument panel.
(On/Off): To turn the headlamps off
when the lights are on, turn the control
to the position. The momentary
switch design springs back to AUTO
when released.
AUTO:Activates the automatic head-
lamp system, illuminating all exterior
lamps and the instrument panel/radio
lights when needed.
(Parking Lamps):The parking lamp
position illuminates tail/side marker/
license plate lamps and instrument
panel/radio lights.
(Headlamps):The headlamps posi-
tion manually activates the headlamps,
exterior tail/marker lamps and instru-
ment panel/radio lights.
(Fog Lamps):To activate the fog
lamps, press the center of the rotary
control marked .
To switch headlamps from low to high
beam, push the multifunction lever away
from you. Pull it back and release for
low-beam operation.
See Section 3 of your Owner Manual.
Daytime Running Lamps
The Daytime Running Lamps (DRLs)
illuminate the low-beam headlamps at a
lower intensity in daylight to make the
front of the vehicle more visible to
others. The DRLs do not illuminate the
taillamps or side marker lamps.
See Section 3 of your Owner Manual.
Interior Lamps
The interior lamps control is located next to
the exterior lamps control on the left side
of the instrument panel. It can be set to:
(Off):This position disables the
interior lamps entirely, whether or not a
door is open.
(Door):This position turns on the
interior lamps when a door is opened
and when the ignition key is removed.
(On):This position turns on the
interior lamps continuously.
Instrument Panel Brightness:When
you push the center of the interior lamps
knob, a spring-loaded stem will pop out.
Turn it right or left to adjust intensity.
Reading Lamps:Press the reading light
lens to turn on/off.
See Section 3 of your Owner Manual.
13
Page 14 of 20
: Press this button to turn
the cruise control system on or off.
– SET (Set): Press this button to")
The cruise control buttons, located on
the steering wheel, include the following
functions:
(On/Off): Press this button to turn
the cruise control system on or off.
– SET (Set): Press this button to set
a speed, or to decrease the set speed
when the system is active. When the
cruise control is set, the cruise light
will illuminate on the instrument panel
cluster.
+ RES (Resume/Accelerate): Press
this button to resume a set speed, or to
increase the set
speed when the
system is active.
(Cancel):
Press this button
to cancel the set
speed. The set
speed will remain
in memory.
Applying the
brakes will also
cancel the set
speed.
See Section 3 of your
Owner Manual.
Getting to Know Your LaCrosse14
Cruise Control
The windshield wipers/washer controls
are located on the multifunction lever on
the left side of the steering wheel.
(Mist):For a single wipe, twist the
band on the multifunction stalk down to
this position and release.
(Off):Twist the band to this position
to turn off the wipers.
(Delay):Twist the band up to set the
delay time (the top of the band equals a
shorter delay).
(Low):Twist the band up to this
position for low-speed wipers.
(High):Twist the band up to this
position for high-speed wipers.
(Washer):To spray washer fluid,
turn the paddle at the top of the multi-
function lever forward and release.
There will be a slight delay before the
wipers are activated. This is normal and
allows the washer to clean the entire
windshield.
See Section 3 of your Owner Manual.
Windshield Wipers/Washer
Page 15 of 20
 Lid Pull-Down Handle
A convenient handle is located in the
top-inside edge of the deck lid. Use the
handle to easily pull down the deck lid
when closing it.
Vehicle Enhancements
Trunk Ac")
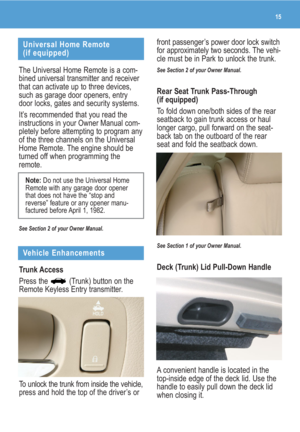
Deck (Trunk) Lid Pull-Down Handle
A convenient handle is located in the
top-inside edge of the deck lid. Use the
handle to easily pull down the deck lid
when closing it.
Vehicle Enhancements
Trunk Access
Press the (Trunk) button on the
Remote Keyless Entry transmitter.
To unlock the trunk from inside the vehicle,
press and hold the top of the driver’s or
Universal Home Remote
(if equipped)
The Universal Home Remote is a com-
bined universal transmitter and receiver
that can activate up to three devices,
such as garage door openers, entry
door locks, gates and security systems.
It’s recommended that you read the
instructions in your Owner Manual com-
pletely before attempting to program any
of the three channels on the Universal
Home Remote. The engine should be
turned off when programming the
remote.
See Section 2 of your Owner Manual.
Note: Do not use the Universal Home
Remote with any garage door opener
that does not have the “stop and
reverse” feature or any opener manu-
factured before April 1, 1982.
front passenger’s power door lock switch
for approximately two seconds. The vehi-
cle must be in Park to unlock the trunk.
See Section 2 of your Owner Manual.
Rear Seat Trunk Pass-Through
(if equipped)
To fold down one/both sides of the rear
seatback to gain trunk access or haul
longer cargo, pull forward on the seat-
back tab on the outboard of the rear
seat and fold the seatback down.
See Section 1 of your Owner Manual.
15
Page 16 of 20

Getting to Know Your LaCrosse16
On six-passenger models, a cupholder
is located inside the armrest/center stor-
age console. Turn the bottom of the
armrest/console outward to access the
cupholder.
The rear seat armrest also has a
cupholder.
See Section 2 of your Owner Manual.
Sun Visors
Swing down the visors and slide them
along the rod to cover different areas of
the front window, or move them to cover
the side windows.
See Section 2 of your Owner Manual.
OnStar®and Owner Manual Shelf
A shelf is located at the top of the
glove box to store the OnStar Owner’s
Guide and your Owner Manual.
See Section 2 of your Owner Manual.
Deck (Trunk) Lid Tie-Down
Use the deck lid tie-down to secure the
deck lid when carrying oversize cargo
that prevents the deck lid from closing
completely. Observe all applicable safety
precautions.
See Section 2 of your Owner Manual.
Cupholders
On five-passenger models, the center
console has a cupholder in its front sec-
tion. A two-position arm adjusts to hold
the cup securely.