2009 BUICK ENCLAVE buttons
[x] Cancel search: buttonsPage 2 of 24

DRIVER INFORMATION
Getting to Know Your Enclave2
Instrument Panel
See Section 3 of your Owner Manual.
ABACDE
IJNUSKLMOPQRT
F
The main features of the instrument panel
include:
A. Air Outlets
B. Turn Signal/Windshield
Wipers/Multifunction Lever
C. Instrument Panel Cluster
D. Driver Information Center Buttons
E. Audio System/Navigation System
(if equipped)
F. Hazard Warning Flashers Button
G. Passenger Airbag Status Indicator
H. Glove Box
I. Exterior Lamps Control
J. Instrument Panel Brightness ControlK. Heated Wiper Fluid Button
L. Hood Release
M. Tilt and Telescopic Steering Wheel
Lever
N. Cruise Controls
O. Horn
P. Audio Steering Wheel Controls
Q. Climate Controls
R. Heated Seat Buttons (if equipped)
S. Shift Lever
T. Rear Wiper Control/Traction Control/
Tow/Haul Mode (if equipped)/Power
Liftgate Buttons
U. Accessory Power Outlet
HG
Page 4 of 24

Getting to Know Your Enclave4
Driver Information Center
Your vehicle’s Driver Information Center
(DIC) provides vehicle information, vehi-
cle feature customization, and vehicle
warning messages. The DIC messages
will be shown on the instrument panel
cluster display.
To access DIC features, press the
following buttons located below the radio
on the instrument panel:
(Set/Reset):Press this button to
set or reset DIC information while it is
displayed or to acknowledge a warning
message.
(Customization): Press this
button to scroll through the following
customization settings:
• Display Language
• Auto Door Lock
• Auto Door Unlock
• Remote Door Lock
• Remote Door Unlock
• Delay Door Lock
• Exit Lighting
• Approach Lighting
• Chime Volume
• Park Tilt Mirrors (if equipped)
• Easy Exit Seat (if equipped)
• Memory Seat Recall (if equipped)
• Remote Start On/Off (if equipped)
• Reset to Factory Settings
To customize features:
1. With the vehicle in Park, turn on the
ignition.
2. Press the (Customization) button
to enter the Feature Settings menu.
3. Press the button to scroll through
the available customization features.
4. With the desired feature displayed,
press the (Set/Reset) button to
access the settings.
5. Press the button to scroll through
the available settings.
6. With the desired setting displayed,
press the button to select it.
7. Press the button to scroll to the
next available customization feature.
8. To exit the Feature Settings menu,
press the button until FEATURE
SETTINGS EXIT is displayed, and
then press the button; or press
the button or the button.
(Vehicle Information):Press this
button to display the following vehicle
information:
• Oil Life
• Park Assist On/Off (if equipped)
• Units
• Tire Pressure
• Tire Pressure System Programming
• Remote Keyless Entry Programming
Page 10 of 24

Getting to Know Your Enclave10
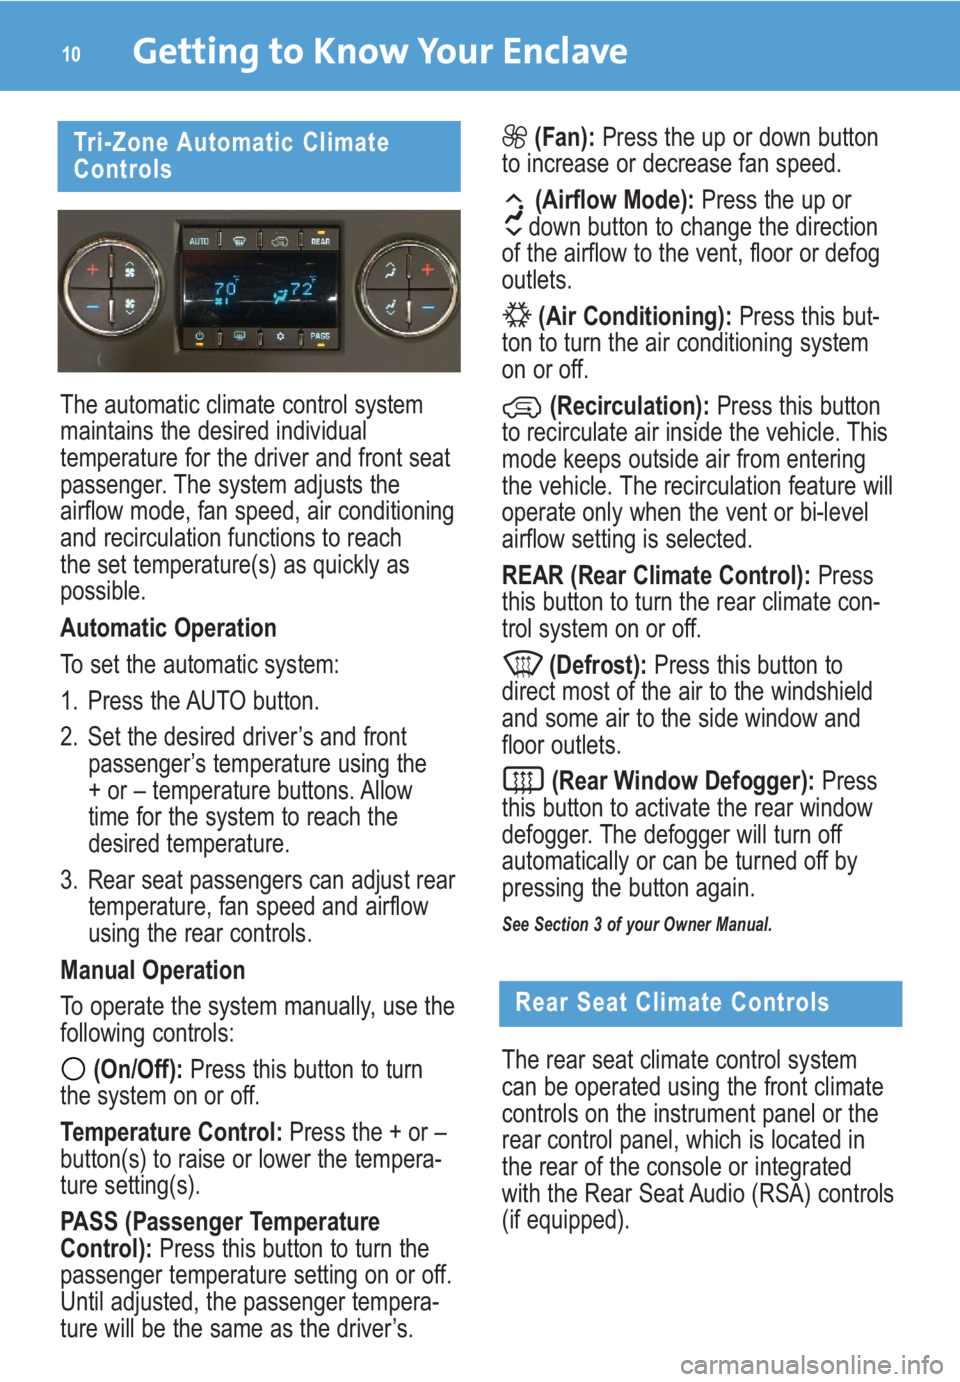
The automatic climate control system
maintains the desired individual
temperature for the driver and front seat
passenger. The system adjusts the
airflow mode, fan speed, air conditioning
and recirculation functions to reach
the set temperature(s) as quickly as
possible.
Automatic Operation
To set the automatic system:
1. Press the AUTO button.
2. Set the desired driver’s and front
passenger’s temperature using the
+ or – temperature buttons. Allow
time for the system to reach the
desired temperature.
3. Rear seat passengers can adjust rear
temperature, fan speed and airflow
using the rear controls.
Manual Operation
To operate the system manually, use the
following controls:
(On/Off):Press this button to turn
the system on or off.
Temperature Control: Press the + or –
button(s) to raise or lower the tempera-
ture setting(s).
PASS (Passenger Temperature
Control):Press this button to turn the
passenger temperature setting on or off.
Until adjusted, the passenger tempera-
ture will be the same as the driver’s.
(Fan): Press the up or down button
to increase or decrease fan speed.
(Airflow Mode):Press the up or
down button to change the direction
of the airflow to the vent, floor or defog
outlets.
(Air Conditioning): Press this but-
ton to turn the air conditioning system
on or off.
(Recirculation):Press this button
to recirculate air inside the vehicle. This
mode keeps outside air from entering
the vehicle. The recirculation feature will
operate only when the vent or bi-level
airflow setting is selected.
REAR (Rear Climate Control):Press
this button to turn the rear climate con-
trol system on or off.
(Defrost):Press this button to
direct most of the air to the windshield
and some air to the side window and
floor outlets.
(Rear Window Defogger):Press
this button to activate the rear window
defogger. The defogger will turn off
automatically or can be turned off by
pressing the button again.
See Section 3 of your Owner Manual.
Tri-Zone Automatic Climate
Controls
The rear seat climate control system
can be operated using the front climate
controls on the instrument panel or the
rear control panel, which is located in
the rear of the console or integrated
with the Rear Seat Audio (RSA) controls
(if equipped).
Rear Seat Climate Controls
Page 11 of 24

11
To turn the rear system on or off, press
the REAR button on the front control
panel. The settings in the rear will be
the same as in the front until they are
changed by rear occupants using the
rear controls.
Rear Control Panel
To operate the system, use the following
rear controls:
(Fan):Turn this knob to adjust fan
speed or to turn off the system.
Temperature Control:Turn this knob
to adjust the temperature setting.
(Airflow Mode):Turn this knob
to adjust the direction of the airflow
between the floor and headliner outlets.
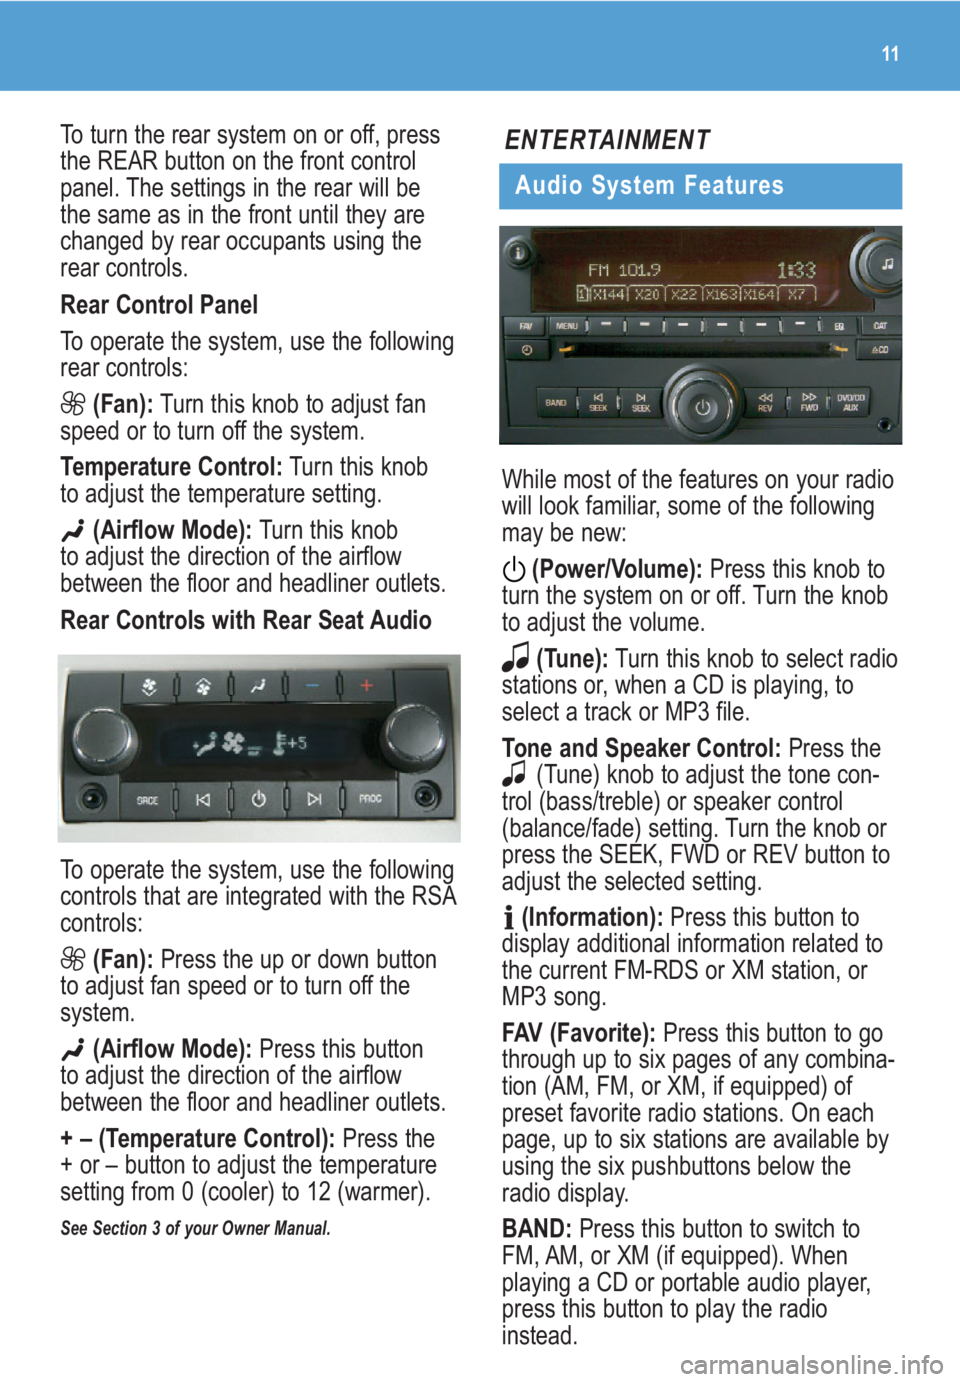
Rear Controls with Rear Seat Audio
To operate the system, use the following
controls that are integrated with the RSA
controls:
(Fan): Press the up or down button
to adjust fan speed or to turn off the
system.
(Airflow Mode): Press this button
to adjust the direction of the airflow
between the floor and headliner outlets.
+ – (Temperature Control):Press the
+ or – button to adjust the temperature
setting from 0 (cooler) to 12 (warmer).
See Section 3 of your Owner Manual.
ENTERTAINMENT
Audio System Features
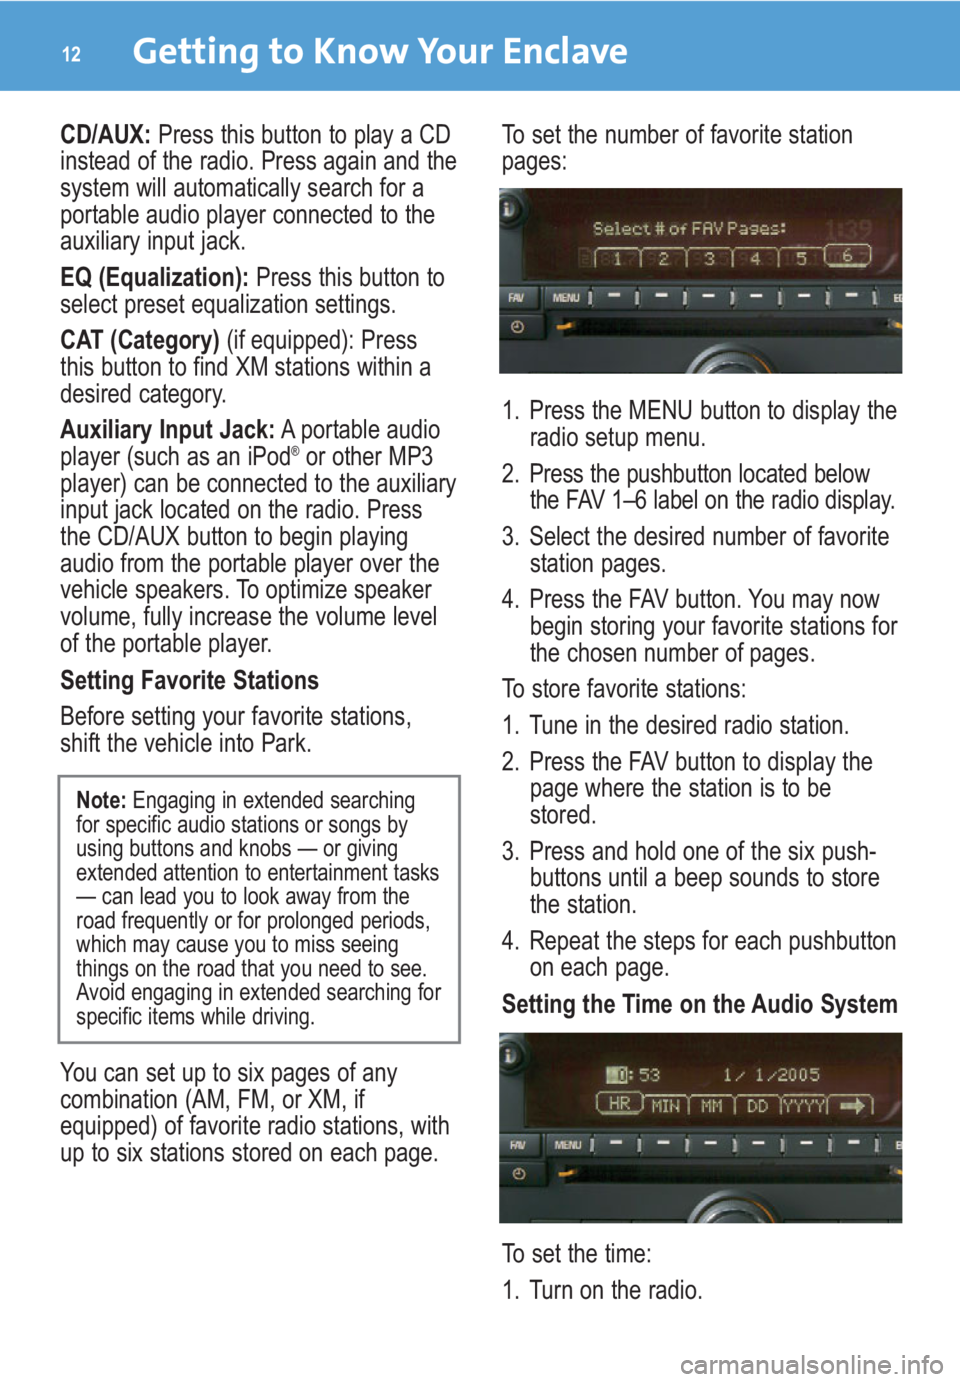
While most of the features on your radio
will look familiar, some of the following
may be new:
(Power/Volume):Press this knob to
turn the system on or off. Turn the knob
to adjust the volume.
(Tune):Turn this knob to select radio
stations or, when a CD is playing, to
select a track or MP3 file.
Tone and Speaker Control:Press the
(Tune) knob to adjust the tone con-
trol (bass/treble) or speaker control
(balance/fade) setting. Turn the knob or
press the SEEK, FWD or REV button to
adjust the selected setting.
(Information):Press this button to
display additional information related to
the current FM-RDS or XM station, or
MP3 song.
FAV (Favorite):Press this button to go
through up to six pages of any combina-
tion (AM, FM, or XM, if equipped) of
preset favorite radio stations. On each
page, up to six stations are available by
using the six pushbuttons below the
radio display.
BAND: Press this button to switch to
FM, AM, or XM (if equipped). When
playing a CD or portable audio player,
press this button to play the radio
instead.
Page 12 of 24

Getting to Know Your Enclave12
CD/AUX: Press this button to play a CD
instead of the radio. Press again and the
system will automatically search for a
portable audio player connected to the
auxiliary input jack.
EQ (Equalization):Press this button to
select preset equalization settings.
CAT (Category)(if equipped): Press
this button to find XM stations within a
desired category.
Auxiliary Input Jack:A portable audio
player (such as an iPod
®or other MP3
player) can be connected to the auxiliary
input jack located on the radio. Press
the CD/AUX button to begin playing
audio from the portable player over the
vehicle speakers. To optimize speaker
volume, fully increase the volume level
of the portable player.
Setting Favorite Stations
Before setting your favorite stations,
shift the vehicle into Park.
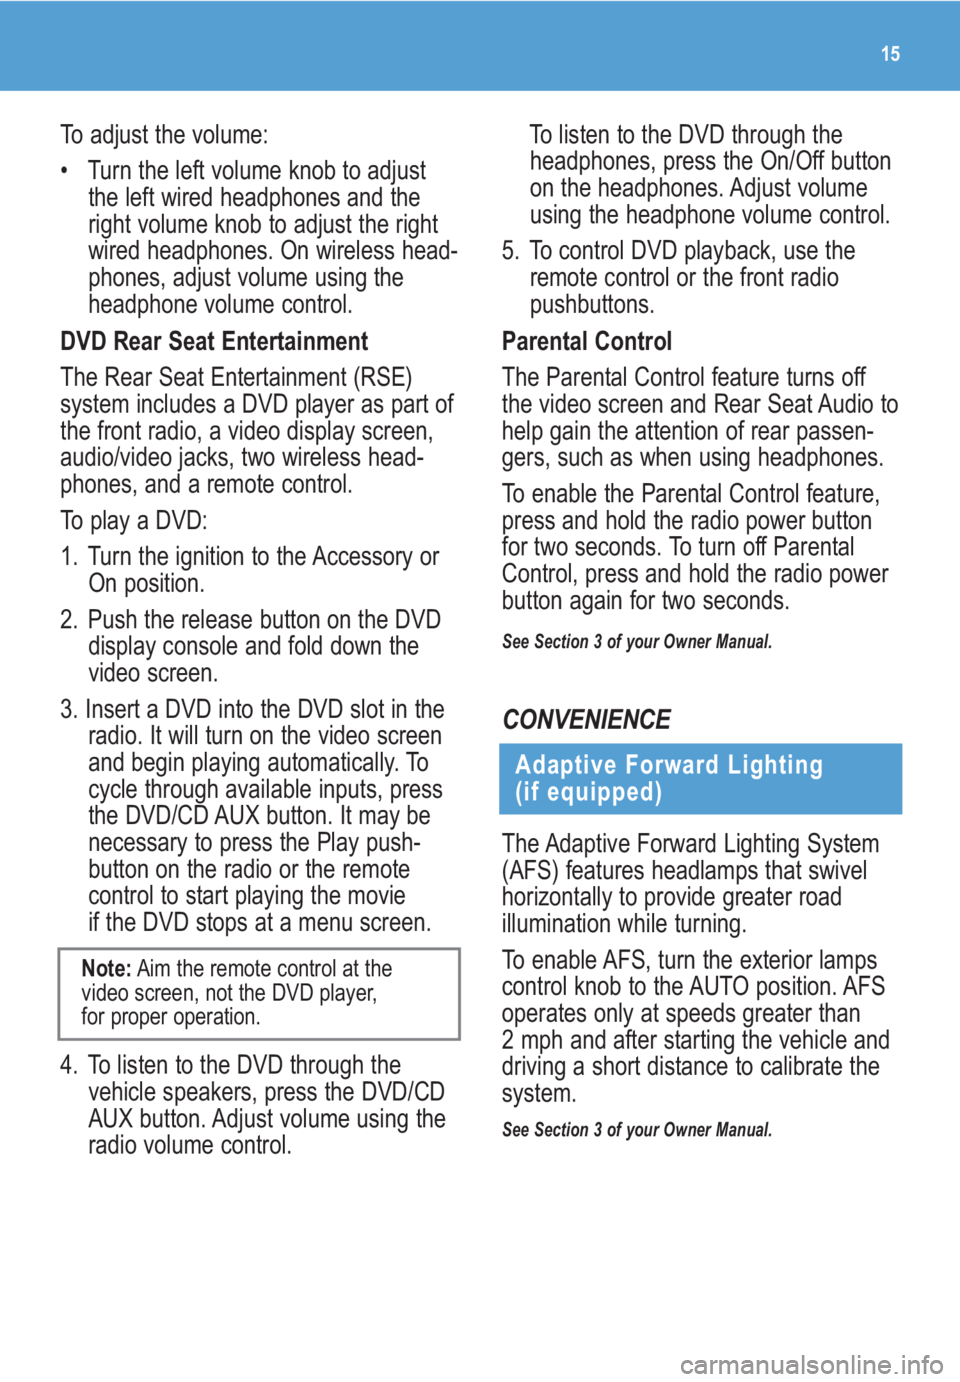
You can set up to six pages of any
combination (AM, FM, or XM, if
equipped) of favorite radio stations, with
up to six stations stored on each page.To set the number of favorite station
pages:
1. Press the MENU button to display the
radio setup menu.
2. Press the pushbutton located below
the FAV 1–6 label on the radio display.
3. Select the desired number of favorite
station pages.
4. Press the FAV button. You may now
begin storing your favorite stations for
the chosen number of pages.
To store favorite stations:
1. Tune in the desired radio station.
2. Press the FAV button to display the
page where the station is to be
stored.
3. Press and hold one of the six push-
buttons until a beep sounds to store
the station.
4. Repeat the steps for each pushbutton
on each page.
Setting the Time on the Audio System
To set the time:
1. Turn on the radio.
Note:Engaging in extended searching
for specific audio stations or songs by
using buttons and knobs — or giving
extended attention to entertainment tasks
— can lead you to look away from the
road frequently or for prolonged periods,
which may cause you to miss seeing
things on the road that you need to see.
Avoid engaging in extended searching for
specific items while driving.
Page 15 of 24

15
To adjust the volume:
• Turn the left volume knob to adjust
the left wired headphones and the
right volume knob to adjust the right
wired headphones. On wireless head-
phones, adjust volume using the
headphone volume control.
DVD Rear Seat Entertainment
The Rear Seat Entertainment (RSE)
system includes a DVD player as part of
the front radio, a video display screen,
audio/video jacks, two wireless head-
phones, and a remote control.
To play a DVD:
1. Turn the ignition to the Accessory or
On position.
2. Push the release button on the DVD
display console and fold down the
video screen.
3. Insert a DVD into the DVD slot in the
radio. It will turn on the video screen
and begin playing automatically. To
cycle through available inputs, press
the DVD/CD AUX button. It may be
necessary to press the Play push-
button on the radio or the remote
control to start playing the movie
if the DVD stops at a menu screen.
4. To listen to the DVD through the
vehicle speakers, press the DVD/CD
AUX button. Adjust volume using the
radio volume control.
Note:Aim the remote control at the
video screen, not the DVD player,
for proper operation.
To listen to the DVD through the
headphones, press the On/Off button
on the headphones. Adjust volume
using the headphone volume control.
5. To control DVD playback, use the
remote control or the front radio
pushbuttons.
Parental Control
The Parental Control feature turns off
the video screen and Rear Seat Audio to
help gain the attention of rear passen-
gers, such as when using headphones.
To enable the Parental Control feature,
press and hold the radio power button
for two seconds. To turn off Parental
Control, press and hold the radio power
button again for two seconds.
See Section 3 of your Owner Manual.
CONVENIENCE
Adaptive Forward Lighting
(if equipped)
The Adaptive Forward Lighting System
(AFS) features headlamps that swivel
horizontally to provide greater road
illumination while turning.
To enable AFS, turn the exterior lamps
control knob to the AUTO position. AFS
operates only at speeds greater than
2 mph and after starting the vehicle and
driving a short distance to calibrate the
system.
See Section 3 of your Owner Manual.
Page 18 of 24

There are several ways to open and
close the power liftgate:
• Press and hold the (Power
Liftgate) button on the Remote
Keyless Entry transmitter until the lift-
gate starts moving. Press it again to
reverse operation.
The following power foldaway mirror
controls are located on the driver’s door:
(Mirror Selector):Press the left side
of this switch (A) to select the driver’s
side mirror or the right side of this switch
to select the passenger’s side mirror.
Press either side of the switch twice to
lock out the control pad to prevent un-
intentional adjustment.
(Mirror Adjustment):Press the
four-way control pad (B) to adjust the
selected mirror.
(Foldaway Mirrors)(if equipped):
Press the right side of this switch (C) to
fold the mirrors, and press the left side
of this switch to unfold the mirrors.
See Section 2 of your Owner Manual.
Getting to Know Your Enclave18
Cruise Control
The cruise
control
buttons are
located on
the steering
wheel. They
include the
following
functions:
(On/Off):
Press this
button to
enable the
cruise control
system.
SET– (Set):Press this button to set a
speed. If the system is active, press and
release this button to decrease speed
1 mph, or press and hold the button to
decrease speed more than 1 mph.
When the cruise control is set, the
(Cruise Control) symbol will illuminate in
the instrument panel cluster.
RES+ (Resume):Press this button to
resume a set speed. If the system is
active, press and release this button to
increase speed 1 mph, or press and
hold the button to increase speed more
than 1 mph.
(Cancel):Press this button to can-
cel the cruise control but retain the set
speed in memory.
See Section 3 of your Owner Manual.
Outside Power Foldaway Mirrors
(if equipped)
Power Liftgate
B
A
C