2009 BMW Z4 SDRIVE35I turn signal
[x] Cancel search: turn signalPage 13 of 248

At a glance
11Reference
Controls
Driving tips
Communications
Navigation
Entertainment
Mobility
8Instrument cluster 12
9 Buttons
* on the steering wheel
12 Ignition lock 50
14 Horn, the entire surface
15 Adjusting the steering wheel 4617
Buttons
* on the steering wheel
18 Releasing the hood 197
7
Turn signals 59
High beams, headlamp flasher 90
Roadside parking lamps
*90
Computer 65
Settings and information about the
vehicle 68
Instrument lighting 90
Changing radio station
Selecting music track
Scrolling through phone book and
lists with stored phone numbers
Next entertainment source
Recirculated-air mode 97
10 Windshield wipers 60
Rain sensor
*60
11 Switching the ignition on/off and
starting/stopping the engine
50
13 Steering wheel heating
*47
16 Cruise control
*61
Telephone*:
> Press: accepting and ending a
call, starting to dial
* selected
phone number. Redialing if no
phone number is selected
> Press longer: redialing
Volume
Activating/deactivating voice acti-
vation system
*23
19 Opening the luggage
compartment lid
33
Page 14 of 248
Cockpit
12
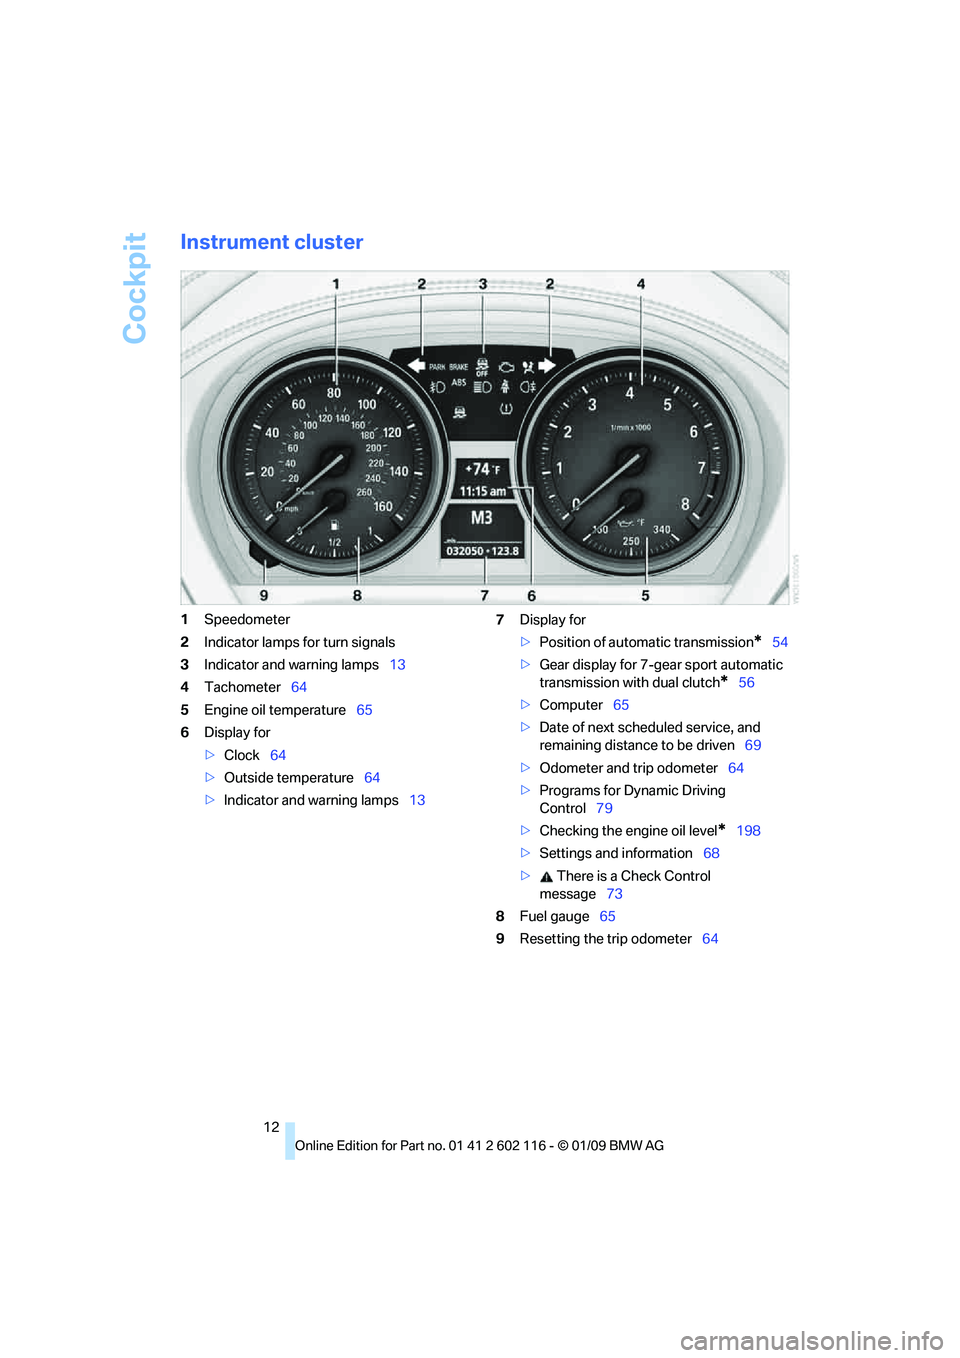
Instrument cluster
1Speedometer
2 Indicator lamps for turn signals
3 Indicator and warning lamps 13
4 Tachometer 64
5 Engine oil temperature 65
6 Display for
>Clock 64
> Outside temperature 64
> Indicator and warning lamps 137
Display for
>Position of automatic transmission
*54
> Gear display for 7-gear sport automatic
transmission with dual clutch
*56
> Computer 65
> Date of next scheduled service, and
remaining distance to be driven 69
> Odometer and trip odometer 64
> Programs for Dynamic Driving
Control 79
> Checking the engine oil level
*198
> Settings and information 68
> There is a Check Control
message 73
8 Fuel gauge 65
9 Resetting the trip odometer 64
Page 30 of 248
Opening and closing
28
Opening and closing
Remote control
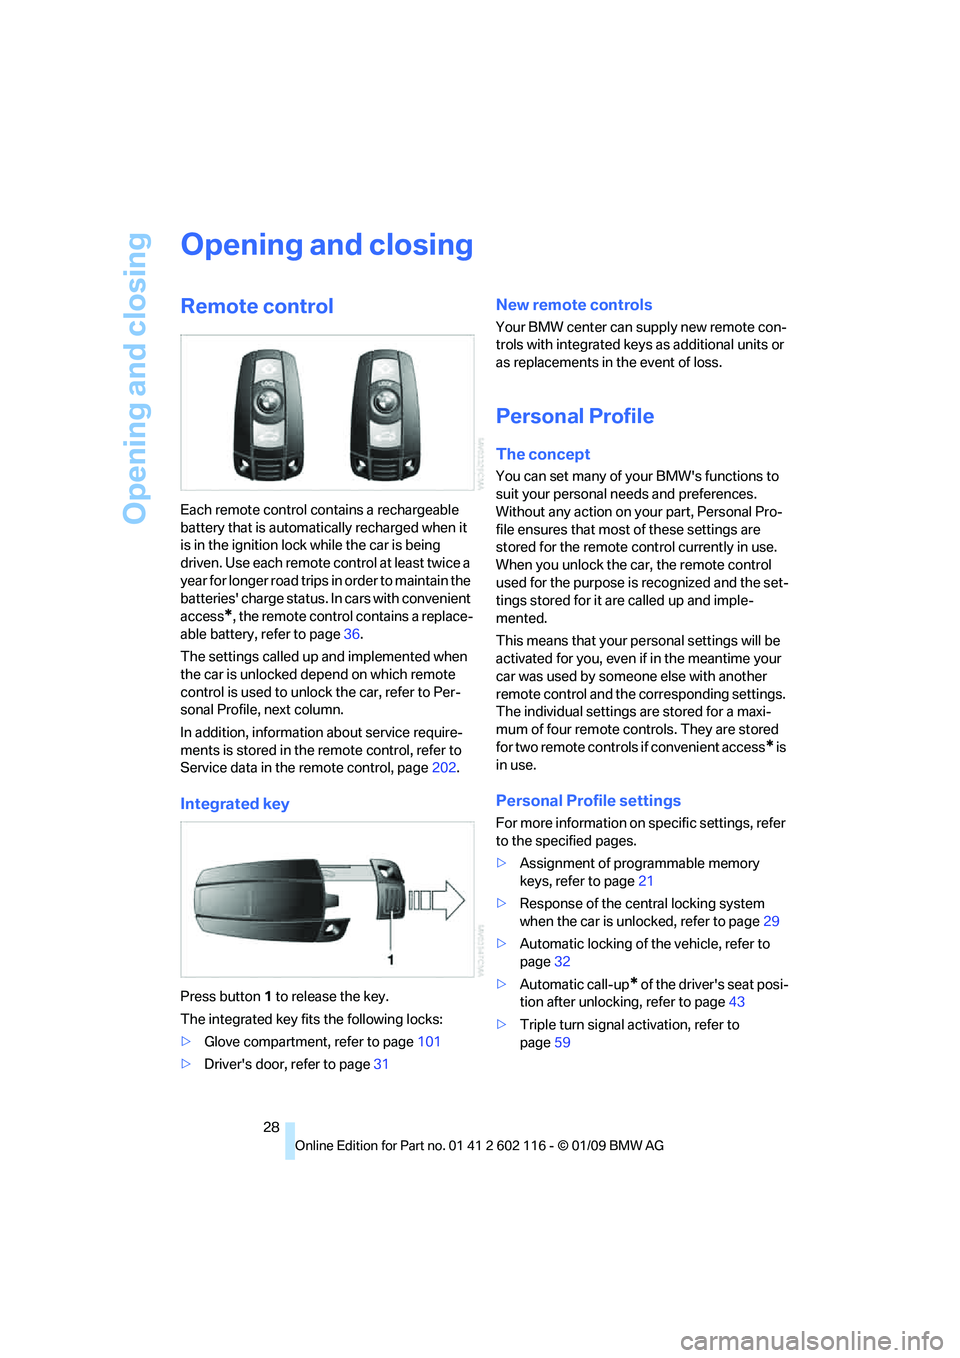
Each remote control contains a rechargeable
battery that is automatically recharged when it
is in the ignition lock while the car is being
driven. Use each remote control at least twice a
year for longer road trips in order to maintain the
batteries' charge status. In cars with convenient
access
*, the remote control contains a replace-
able battery, refer to page 36.
The settings called up and implemented when
the car is unlocked depend on which remote
control is used to unlock the car, refer to Per-
sonal Profile, next column.
In addition, informatio n about service require-
ments is stored in the re mote control, refer to
Service data in the remote control, page 202.
Integrated key
Press button 1 to release the key.
The integrated key fits the following locks:
> Glove compartment, refer to page 101
> Driver's door, refer to page 31
New remote controls
Your BMW center can supply new remote con-
trols with integrated keys as additional units or
as replacements in the event of loss.
Personal Profile
The concept
You can set many of yo ur BMW's functions to
suit your personal needs and preferences.
Without any action on your part, Personal Pro-
file ensures that most of these settings are
stored for the remote control currently in use.
When you unlock the ca r, the remote control
used for the purpose is recognized and the set-
tings stored for it are called up and imple-
mented.
This means that your pe rsonal settings will be
activated for you, even if in the meantime your
car was used by someone else with another
remote control and the corresponding settings.
The individual settings are stored for a maxi-
mum of four remote cont rols. They are stored
for two remote controls if convenient access
* is
in use.
Personal Profile settings
For more information on specific settings, refer
to the specified pages.
> Assignment of programmable memory
keys, refer to page 21
> Response of the central locking system
when the car is unlocked, refer to page 29
> Automatic locking of the vehicle, refer to
page 32
> Automatic call-up
* of the driver's seat posi-
tion after unlocking, refer to page 43
> Triple turn signal activation, refer to
page 59
Page 61 of 248

Controls
59Reference
At a glance
Driving tips
Communications
Navigation
Entertainment
Mobility
5.Turn the Allen wrench as far as it will go,
arrow 2. The transmission lock is released.
Do not turn the Allen wrench in the
opposite direction as this may dam-
age the mechanism.<
6. Draw the Allen wrench out of the opening.
After parking the vehicle, lock the trans-
mission lock again. Otherwise, there is a
danger of the vehicle rolling. <
Locking
1.Press the button, see arrow.
The transmission lock is locked again.
2. Clip the sleeve of the selector lever back in
place.
3. Set the parking brake.
Jump-starting and towing, refer to page 214.
Turn signals/
headlamp flasher
1High beams
2 Headlamp flasher
3 Turn signals
Using turn signals
Press the lever beyond the resistance point.
To turn off manually, press the lever to the
resistance point.
Unusually rapid flashi ng of the indicator
lamp indicates that a turn signal indicator
has failed. <
Indicating a turn briefly
Press the lever as far as the resistance point for
as long as you wish to indicate a turn.
Triple turn signal activation
Press the lever as far as the resistance point.
The turn signals flash once.
You can set whether it should flash once or
three times when activated.
iDrive, for operating pr inciple refer to page16.
1. Press the button.
2. "Settings"
3. "Lighting"
4. "Triple turn signal"
The setting is stored for the remote control cur-
rently in use.
Page 78 of 248

Everything under control
76
Volume of the warning signals*
You can raise or lower the volume of the warn-
ing signals, e.g. the 'fasten safety belts'
reminder, relative to the entertainment sound
output. The warning signals have a fixed mini-
mum and maximum volume that cannot be
dropped below or exceeded.
1."Settings"
2. "Tone"
3. "Volume settings"
>"Speed volume": speed-dependent vol-
ume control
> "PDC": volume of the PDC signal tone
relative to the entertainment sound
output
> "Gong": volume of the signal tone, e. g.
for the 'fasten safety belts' reminder, rel-
ative to the entertainment sound output
Brightness of Control Display
The brightness is automa tically adapted to the
ambient lighting conditio ns. However, you can
change the basic setting while the low beams
are switched on.
iDrive, for operating pr inciple refer to page16.
1. "Settings"
2. "Control display" 3.
"Brightness"
4. Turn the controller until the desired setting
is selected.
5. Press the controller.
The setting is stored fo r the remote control cur-
rently in use. In bright conditions, for example,
the brightness control may not be clearly
visible.
Page 87 of 248
Controls
85Reference
At a glance
Driving tips
Communications
Navigation
Entertainment
Mobility
The TPMS malfunction indicator is combined
with the low tire pressure telltale. When the sys-
tem detects a malfunction, the telltale will flash
for approximately one minute and then remain
continuously lit. This sequence will continue
upon subsequent vehicle startups as long as
the malfunction exists. When the malfunction
indicator is illuminated, the system may not be
able to detect or signal low tire pressure as
intended. TPMS malfunctions may occur for a
variety of reasons, including the installation of
replacement or alternate tires or wheels on the
vehicle that prevent the TPMS from functioning
properly. Always check the TPMS malfunction
telltale after replacing one or more tires or
wheels on your vehicle to ensure that the
replacement or alternate tires and wheels allow
the TPMS to continue to function properly.
Servotronic*
The concept
The Servotronic varies the steering force
required to turn the wh eels depending on the
speed at which you are driving. When you are
driving at low speeds, power steering provides
more support, i. e. little effort is needed to turn
the wheels. Power steering support lessens as
your speed increases.
The system works automatically.
Malfunction
Malfunctions are displayed via Check Control
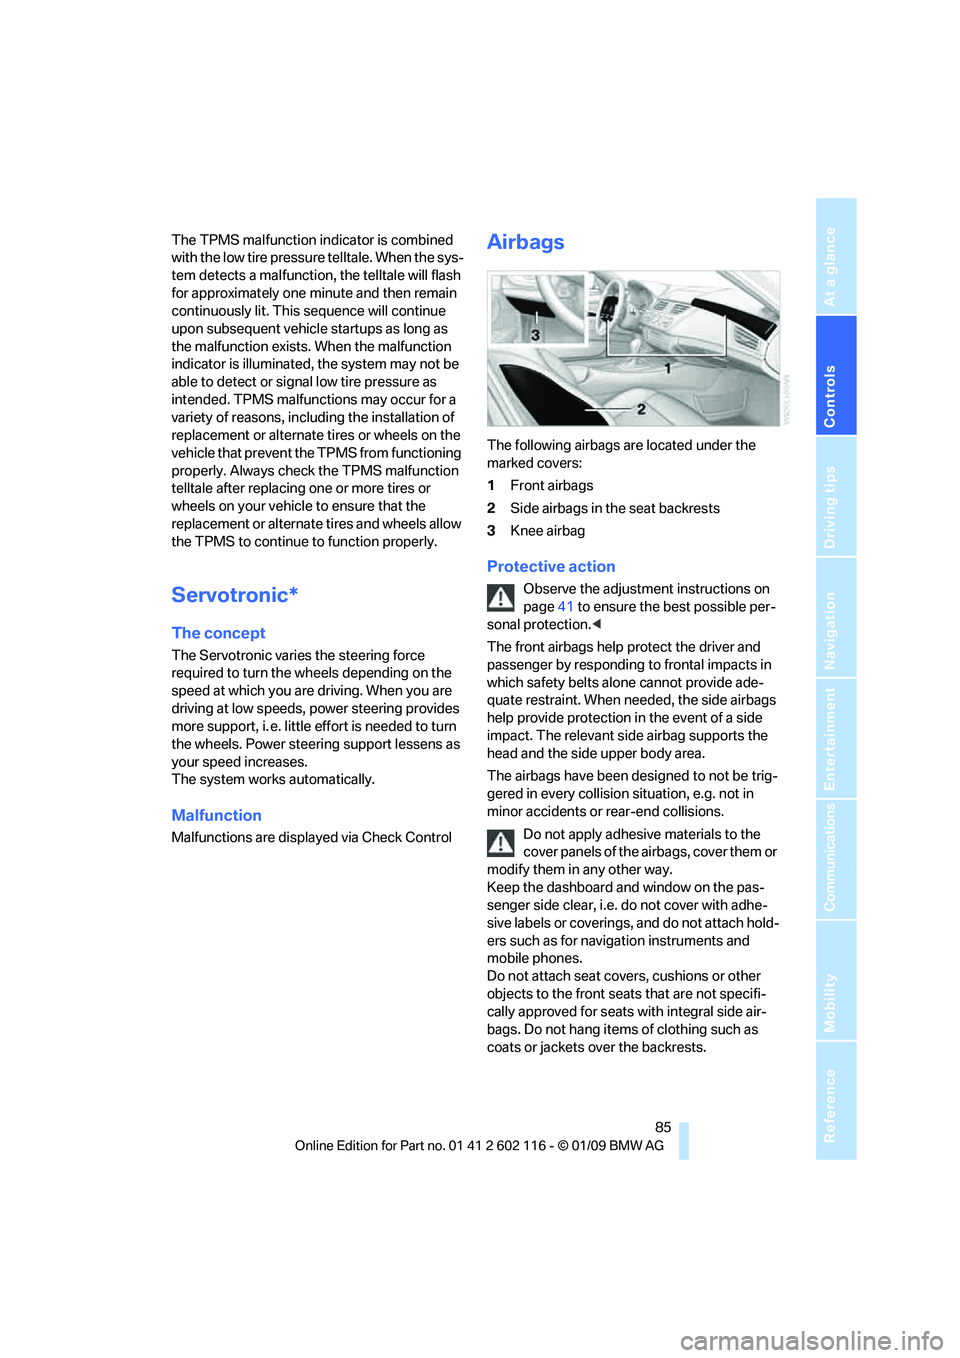
Airbags
The following airbags are located under the
marked covers:
1 Front airbags
2 Side airbags in the seat backrests
3 Knee airbag
Protective action
Observe the adjustment instructions on
page 41 to ensure the best possible per-
sonal protection. <
The front airbags help protect the driver and
passenger by responding to frontal impacts in
which safety belts alone cannot provide ade-
quate restraint. When needed, the side airbags
help provide protection in the event of a side
impact. The relevant side airbag supports the
head and the side upper body area.
The airbags have been designed to not be trig-
gered in every collision situation, e.g. not in
minor accidents or rear-end collisions.
Do not apply adhesive materials to the
cover panels of the airbags, cover them or
modify them in any other way.
Keep the dashboard and window on the pas-
senger side clear, i.e. do not cover with adhe-
sive labels or coverings, and do not attach hold-
ers such as for navigation instruments and
mobile phones.
Do not attach seat cove rs, cushions or other
objects to the front seats that are not specifi-
cally approved for seats with integral side air-
bags. Do not hang items of clothing such as
coats or jackets over the backrests.
Page 141 of 248
Navigation
Entertainment
Driving tips
139Reference
At a glance
Controls
Communications
Mobility
Treble, bass, balance, fader
>"Balance": left/right volume distribution
> "Fader": front/rear volume distribution
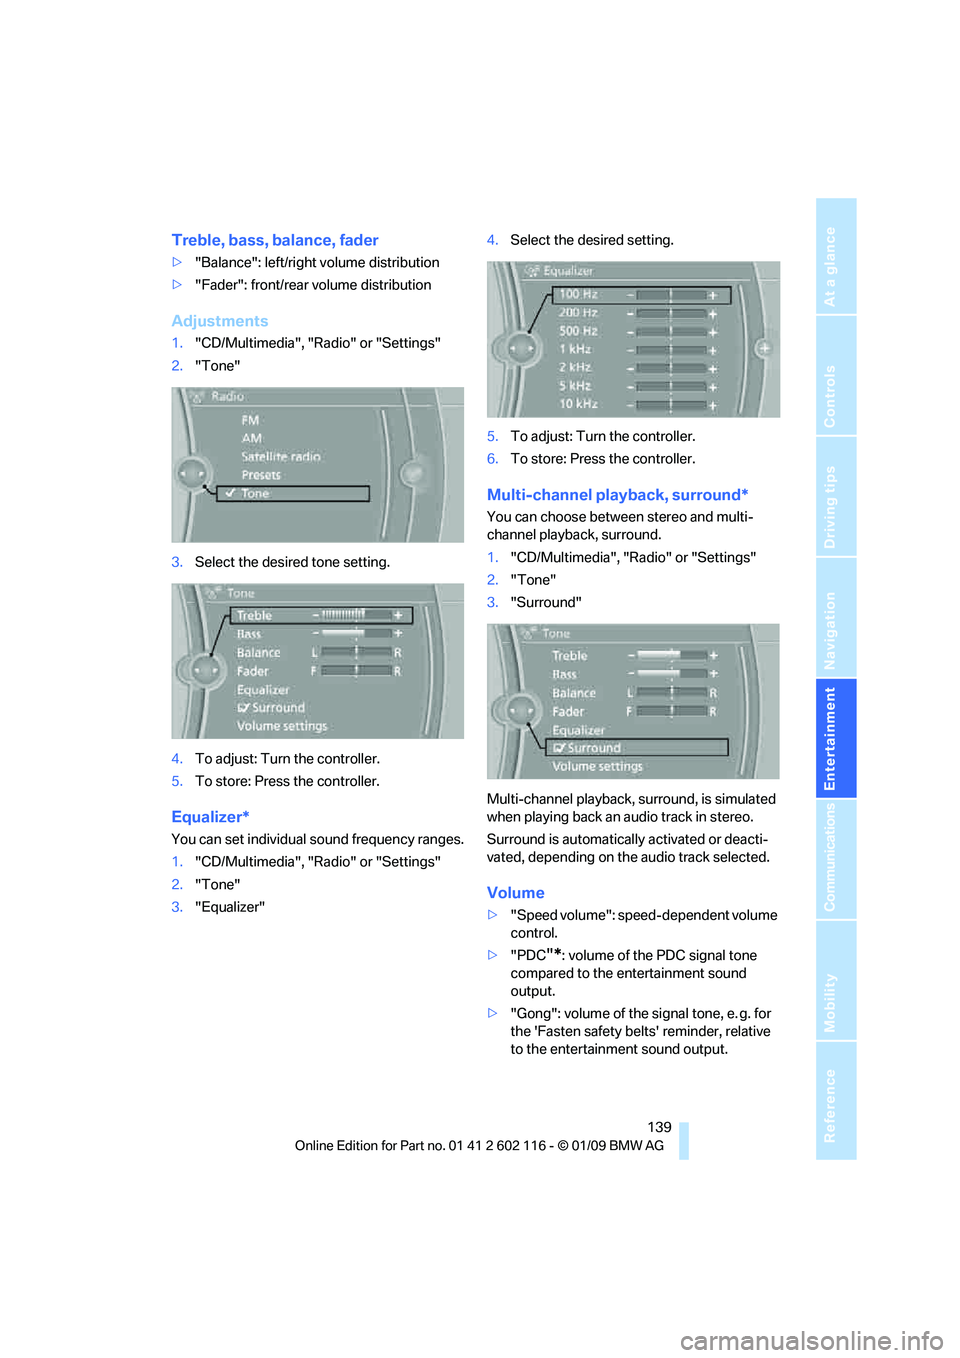
Adjustments
1."CD/Multimedia", "Radio" or "Settings"
2. "Tone"
3. Select the desired tone setting.
4. To adjust: Turn the controller.
5. To store: Press the controller.
Equalizer*
You can set individual sound frequency ranges.
1."CD/Multimedia", "Radio" or "Settings"
2. "Tone"
3. "Equalizer" 4.
Select the desired setting.
5. To adjust: Turn the controller.
6. To store: Press the controller.
Multi-channel playback, surround*
You can choose between stereo and multi-
channel playback, surround.
1."CD/Multimedia", "Radio" or "Settings"
2. "Tone"
3. "Surround"
Multi-channel playback, surround, is simulated
when playing back an audio track in stereo.
Surround is automatically activated or deacti-
vated, depending on the audio track selected.
Volume
> "Speed volume": speed-dependent volume
control.
> "PDC
"*: volume of the PDC signal tone
compared to the entertainment sound
output.
> "Gong": volume of the signal tone, e. g. for
the 'Fasten safety belts' reminder, relative
to the entertainment sound output.
Page 211 of 248
Mobility
209Reference
At a glance
Controls
Driving tips
Communications
Navigation
Entertainment
Xenon lamps
Have any work on the xenon lamp system,
including bulb replacements, performed
only by a BMW center or a workshop that works
according to BMW repair procedures with cor-
respondingly trained pers onnel. Otherwise, if
such work is carried out improperly, the high
voltage in the system presents the danger of
fatal injuries. <
Parking lamps and roadside parking
lamps, daytime running lamps
H8 bulb, 35 watts
1.Switch off the lamps and take the remote
control out of the ignition lock.
2. Turn the upper access cover to the left and
remove it, see arrow.
3. Turn the bulb by approx. 90°, see arrow 1,
and pull it out, see arrow 2.
4. Disconnect the plug, change the bulb and
reconnect the plug.
5. Insert the bulb and turn it until it stops.
6. Screw on the access co ver tightly by turn-
ing it to the right.
Be careful when attaching the access
cover; otherwise it may leak, causing
damage to the headlamp system. <
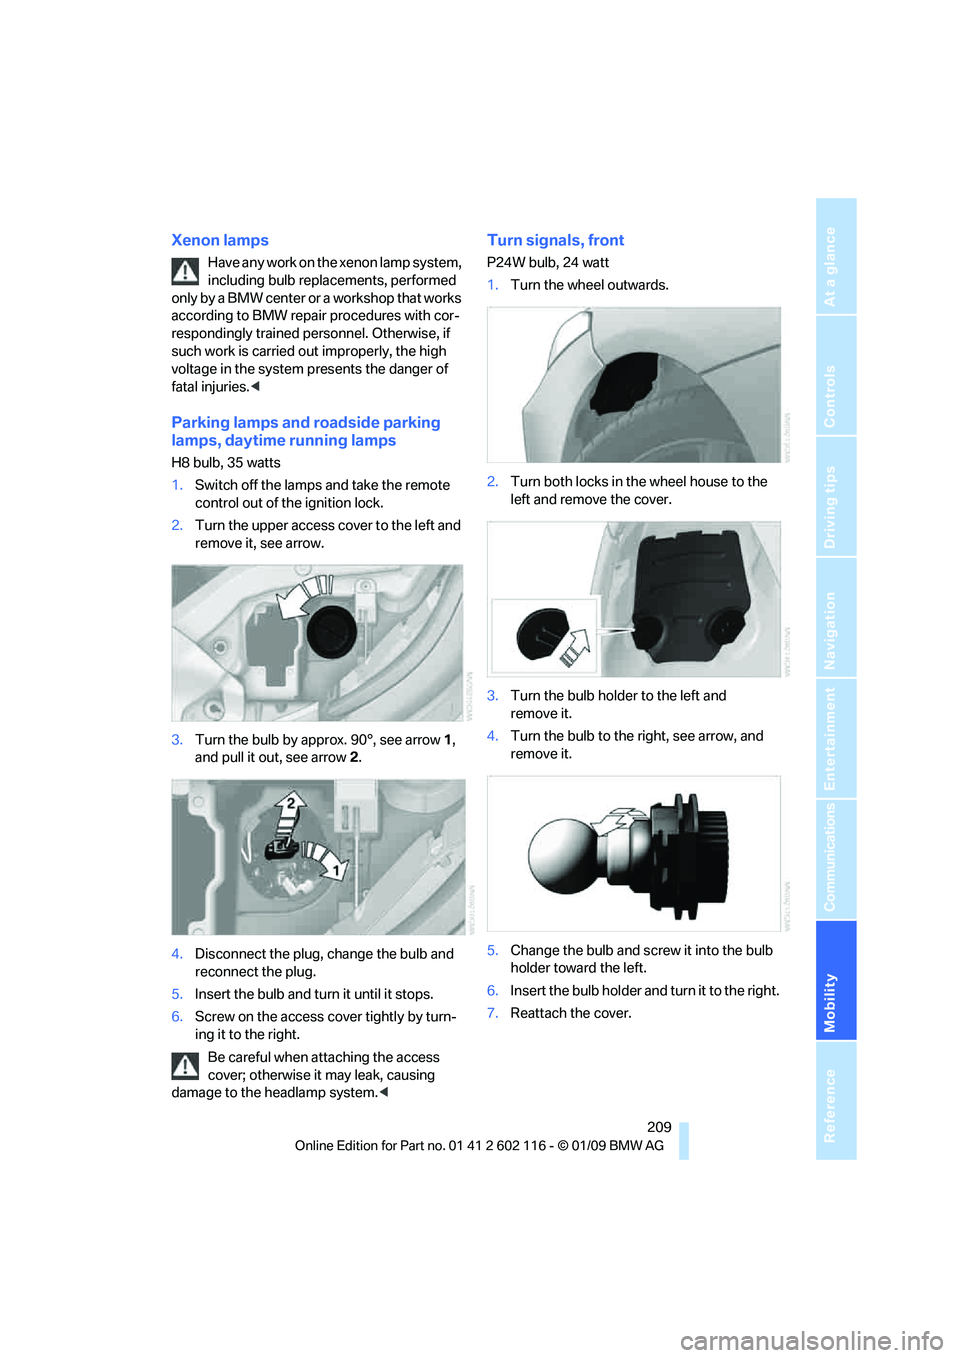
Turn signals, front
P24W bulb, 24 watt
1.Turn the wheel outwards.
2. Turn both locks in the wheel house to the
left and remove the cover.
3. Turn the bulb holder to the left and
remove it.
4. Turn the bulb to the right, see arrow, and
remove it.
5. Change the bulb and screw it into the bulb
holder toward the left.
6. Insert the bulb holder and turn it to the right.
7. Reattach the cover.