2009 BMW Z4 SDRIVE35I lock
[x] Cancel search: lockPage 13 of 248

At a glance
11Reference
Controls
Driving tips
Communications
Navigation
Entertainment
Mobility
8Instrument cluster 12
9 Buttons
* on the steering wheel
12 Ignition lock 50
14 Horn, the entire surface
15 Adjusting the steering wheel 4617
Buttons
* on the steering wheel
18 Releasing the hood 197
7
Turn signals 59
High beams, headlamp flasher 90
Roadside parking lamps
*90
Computer 65
Settings and information about the
vehicle 68
Instrument lighting 90
Changing radio station
Selecting music track
Scrolling through phone book and
lists with stored phone numbers
Next entertainment source
Recirculated-air mode 97
10 Windshield wipers 60
Rain sensor
*60
11 Switching the ignition on/off and
starting/stopping the engine
50
13 Steering wheel heating
*47
16 Cruise control
*61
Telephone*:
> Press: accepting and ending a
call, starting to dial
* selected
phone number. Redialing if no
phone number is selected
> Press longer: redialing
Volume
Activating/deactivating voice acti-
vation system
*23
19 Opening the luggage
compartment lid
33
Page 14 of 248
Cockpit
12
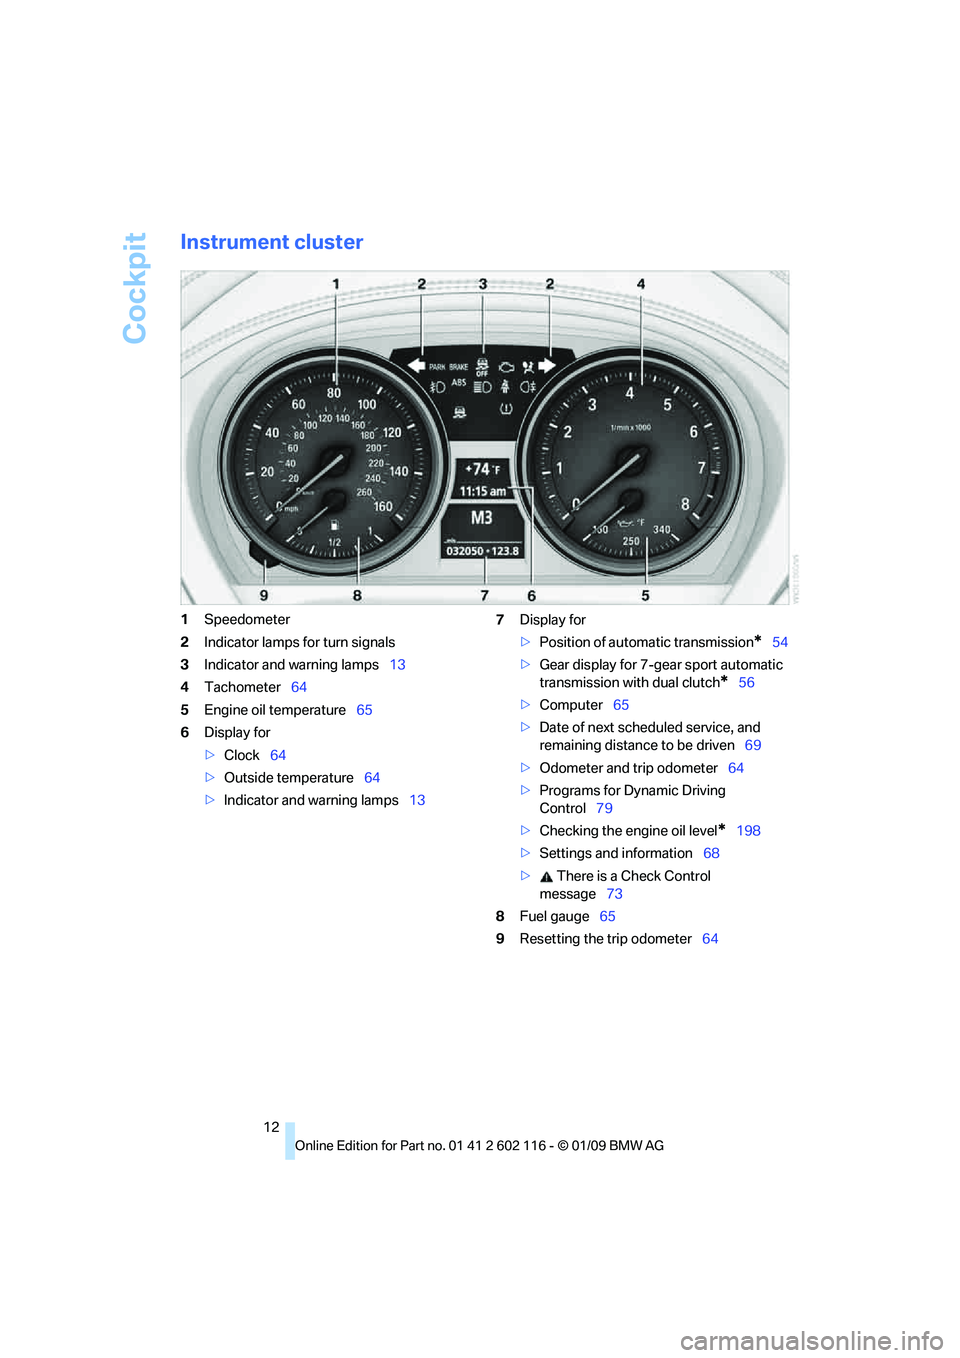
Instrument cluster
1Speedometer
2 Indicator lamps for turn signals
3 Indicator and warning lamps 13
4 Tachometer 64
5 Engine oil temperature 65
6 Display for
>Clock 64
> Outside temperature 64
> Indicator and warning lamps 137
Display for
>Position of automatic transmission
*54
> Gear display for 7-gear sport automatic
transmission with dual clutch
*56
> Computer 65
> Date of next scheduled service, and
remaining distance to be driven 69
> Odometer and trip odometer 64
> Programs for Dynamic Driving
Control 79
> Checking the engine oil level
*198
> Settings and information 68
> There is a Check Control
message 73
8 Fuel gauge 65
9 Resetting the trip odometer 64
Page 17 of 248

At a glance
15Reference
Controls
Driving tips
Communications
Navigation
Entertainment
Mobility
1SOS: initiating an Emergency
Request call
*213
2 Reading lamp 91
3 Interior lamps 90
4 Reading lamp 91
5 Passenger airbag status lamp
*86
6 Control Display 16
7 Hazard warning flashers
8 Central locking system 32
9 Automatic climate control
10 Hard drive for
>Audio CD 138
> Navigation DVD for Business navigation
system
*118
11 Programmable memory keys 21
12 Changing
>Radio station 141
> Track 146 14
Parking brake 52
15 Buttons on the controller 16
For selecting the menus directly
16 Controller 16
Can be turned, pressed, or moved horizon-
tally in four directions
17 Buttons for the Dynamic Driving
Control 79
18 Switching audio sources on/off and adjust-
ing volume 138
19 Ejecting of
>Audio CD 138
> Navigation DVD for Business navigation
system
*118
Air distribution
95
Automatic air distribution and
flow rate 96
Cooling function 96
Recirculated-air mode, automatic
recirculated-air control 97
Maximum cooling 96
Air flow, residual heat
utilization 96
Defrosting windows 97
Rear window defroster 97
13 Heated seats
*43
Park Distance Control PDC*77
Close the retractable hardtop 37
Open the retractable hardtop 37
Page 21 of 248
At a glance
19Reference
Controls
Driving tips
Communications
Navigation
Entertainment
Mobility
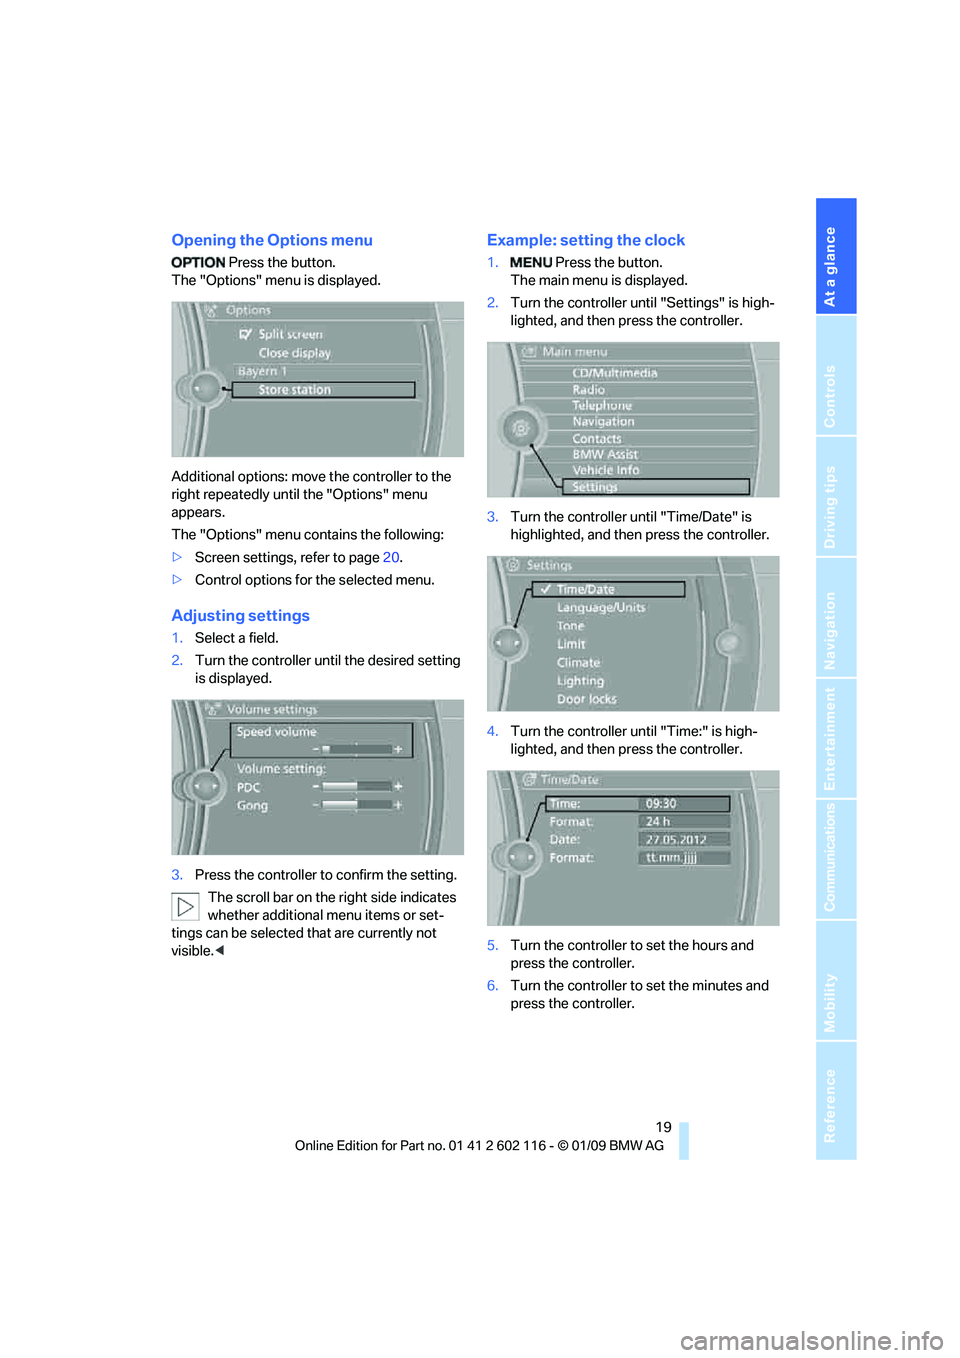
Opening the Options menu
Press the button.
The "Options" menu is displayed.
Additional options: move the controller to the
right repeatedly until the "Options" menu
appears.
The "Options" menu contains the following:
> Screen settings, refer to page 20.
> Control options for the selected menu.
Adjusting settings
1.Select a field.
2. Turn the controller unt il the desired setting
is displayed.
3. Press the controller to confirm the setting.
The scroll bar on the right side indicates
whether additional menu items or set-
tings can be selected that are currently not
visible. <
Example: setting the clock
1. Press the button.
The main menu is displayed.
2. Turn the controller unt il "Settings" is high-
lighted, and then press the controller.
3. Turn the controller un til "Time/Date" is
highlighted, and then press the controller.
4. Turn the controller until "Time:" is high-
lighted, and then press the controller.
5. Turn the controller to set the hours and
press the controller.
6. Turn the controller to set the minutes and
press the controller.
Page 30 of 248
Opening and closing
28
Opening and closing
Remote control
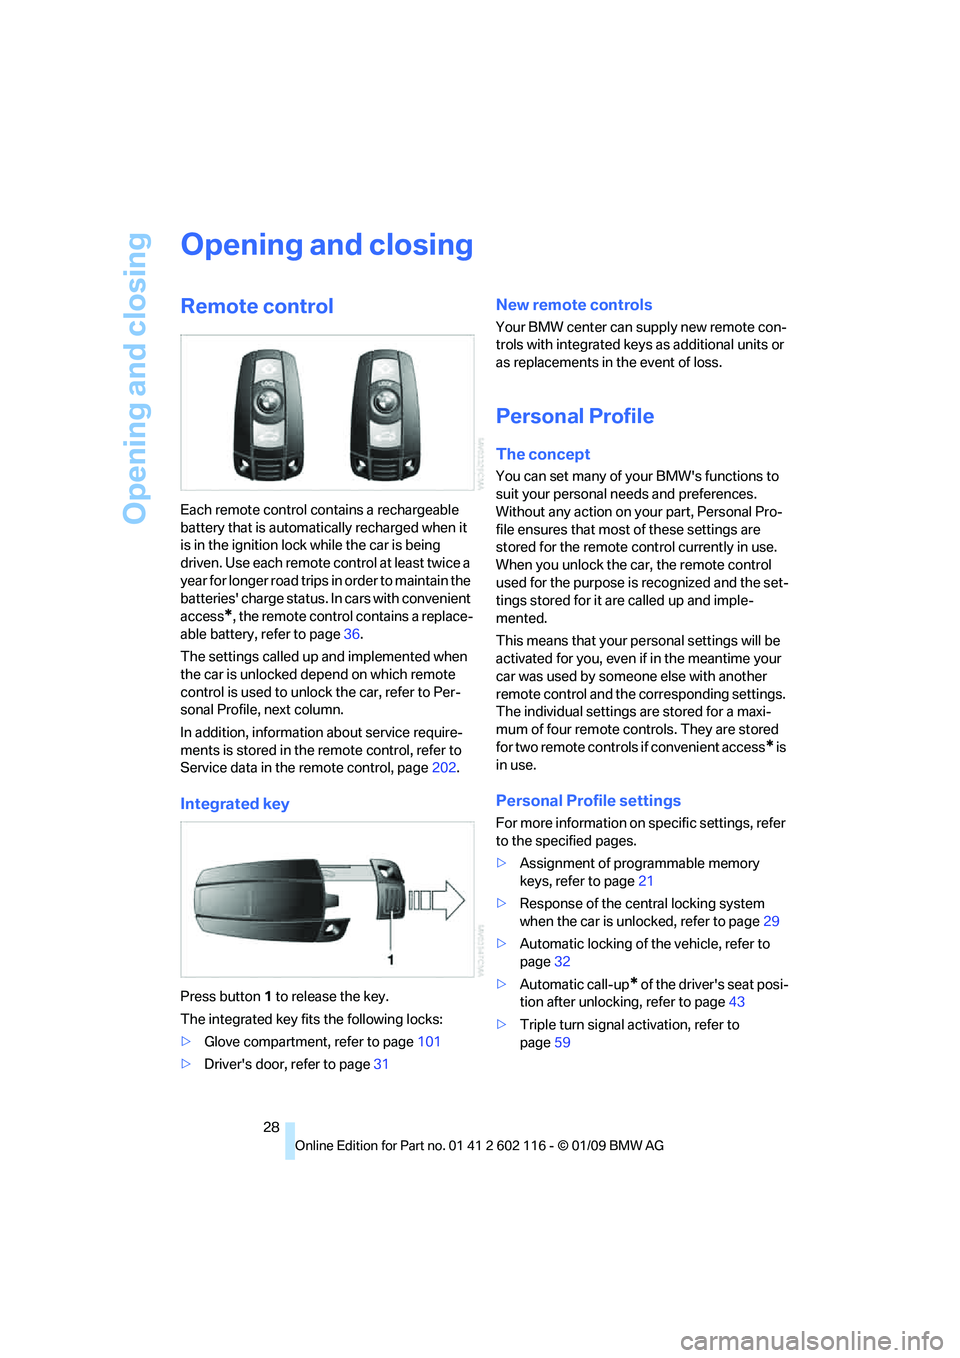
Each remote control contains a rechargeable
battery that is automatically recharged when it
is in the ignition lock while the car is being
driven. Use each remote control at least twice a
year for longer road trips in order to maintain the
batteries' charge status. In cars with convenient
access
*, the remote control contains a replace-
able battery, refer to page 36.
The settings called up and implemented when
the car is unlocked depend on which remote
control is used to unlock the car, refer to Per-
sonal Profile, next column.
In addition, informatio n about service require-
ments is stored in the re mote control, refer to
Service data in the remote control, page 202.
Integrated key
Press button 1 to release the key.
The integrated key fits the following locks:
> Glove compartment, refer to page 101
> Driver's door, refer to page 31
New remote controls
Your BMW center can supply new remote con-
trols with integrated keys as additional units or
as replacements in the event of loss.
Personal Profile
The concept
You can set many of yo ur BMW's functions to
suit your personal needs and preferences.
Without any action on your part, Personal Pro-
file ensures that most of these settings are
stored for the remote control currently in use.
When you unlock the ca r, the remote control
used for the purpose is recognized and the set-
tings stored for it are called up and imple-
mented.
This means that your pe rsonal settings will be
activated for you, even if in the meantime your
car was used by someone else with another
remote control and the corresponding settings.
The individual settings are stored for a maxi-
mum of four remote cont rols. They are stored
for two remote controls if convenient access
* is
in use.
Personal Profile settings
For more information on specific settings, refer
to the specified pages.
> Assignment of programmable memory
keys, refer to page 21
> Response of the central locking system
when the car is unlocked, refer to page 29
> Automatic locking of the vehicle, refer to
page 32
> Automatic call-up
* of the driver's seat posi-
tion after unlocking, refer to page 43
> Triple turn signal activation, refer to
page 59
Page 31 of 248

Controls
29Reference
At a glance
Driving tips
Communications
Navigation
Entertainment
Mobility
>Settings for the display on the Control Dis-
play and in the instrument cluster:
>12h/24h format of the clock, refer to
page 71
> Date format, refer to page 72
> Brightness of Control Display, refer to
page 76
> Language on the Control Display, refer
to page 75
> Units of measure for fuel consumption,
distance covered/remaining distances,
and temperature, refer to page 68
> Show visual warning for Park Distance Con-
trol PDC
*, refer to page 77
> Light settings:
>Welcome lamps, refer to page 88
> Pathway lighting, refer to page 89
> Daytime running lamps, refer to page 89
> Automatic climate control: activating/deac-
tivating AUTO program, cooling function
and automatic recirculated-air control, set-
ting temperature, air fl ow rate and distribu-
tion, refer to page 95 ff
> Entertainment:
>Audio volume, refer to page 138
> Tone control, refer to page 138
> Volume, refer to page 139
Central locking system
The concept
The central locking system functions when the
driver's door is closed.
The system simultaneously engages and
releases the locks on the following:
>Doors
> Luggage compartment lid
> Fuel filler door
> Center armrest
*
Operating from outside
>Via the remote control
> Using the door lock
> In cars with convenient access
*, via the
handles on the driver's and passenger's
doors
In addition, if the remo te control is used, the
welcome lamps, interior lamps and the door's
courtesy lamps
* are switched on or off. The
alarm system
* is also armed or disarmed.
For further details of the alarm system,
refer to
page 33.
Operating from inside
By means of the button for central locking, refer
to page 32.
In the event of a sufficiently severe accident, the
central locking system un locks automatically. In
addition, the hazard warning flashers and inte-
rior lamps come on.
Opening and closing:
Using the remote control
Persons or animals in a parked vehicle
could lock the doors from the inside. You
should therefore take the remote control with
you when you leave the ve hicle so that the latter
can be opened from outside. <
To operate the retractable hardtop with
the remote control, the doors and lug-
gage compartment lid must be closed and the
cargo bay partition must be folded down and
engaged on both sides. Refer also to page38.<
Unlocking
Press the button.
The interior lamps, the courtesy lamps
* and the
welcome lamps come on.
Setting unlocking characteristics
You can set whether only the driver's door or
the entire vehicle is to be unlocked when the
button is pressed for the first time.
Page 32 of 248
Opening and closing
30
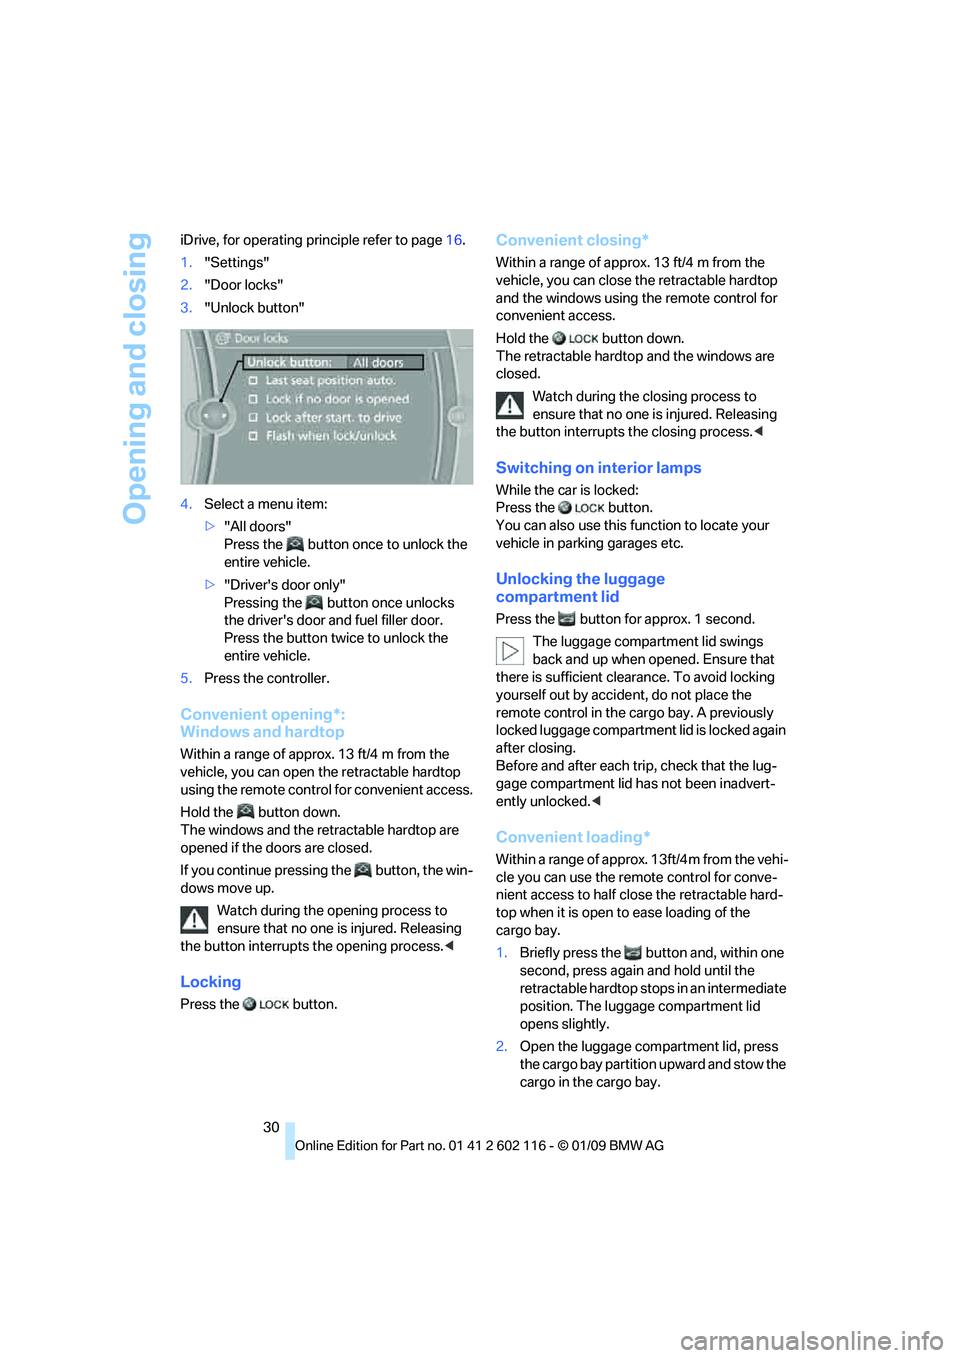
iDrive, for operating pr
inciple refer to page16.
1. "Settings"
2. "Door locks"
3. "Unlock button"
4. Select a menu item:
>"All doors"
Press the button on ce to unlock the
entire vehicle.
> "Driver's door only"
Pressing the button once unlocks
the driver's door and fuel filler door.
Press the button twic e to unlock the
entire vehicle.
5. Press the controller.
Convenient opening*:
Windows and hardtop
Within a range of approx. 13 ft/4 m from the
vehicle, you can open the retractable hardtop
using the remote contro l for convenient access.
Hold the button down.
The windows and the re tractable hardtop are
opened if the doors are closed.
If you continue pressing the button, the win-
dows move up.
Watch during the opening process to
ensure that no one is injured. Releasing
the button interrupts the opening process. <
Locking
Press the button.
Convenient closing*
Within a range of approx. 13 ft/4 m from the
vehicle, you can close the retractable hardtop
and the windows using the remote control for
convenient access.
Hold the button down.
The retractable hardto p and the windows are
closed.
Watch during the closing process to
ensure that no one is injured. Releasing
the button interrupts the closing process.<
Switching on interior lamps
While the car is locked:
Press the button.
You can also use this fu nction to locate your
vehicle in parking garages etc.
Unlocking the luggage
compartment lid
Press the button for approx. 1 second.
The luggage compartment lid swings
back and up when opened. Ensure that
there is sufficient clearance. To avoid locking
yourself out by accide nt, do not place the
remote control in the ca rgo bay. A previously
locked luggage compartment lid is locked again
after closing.
Before and after each tr ip, check that the lug-
gage compartment lid ha s not been inadvert-
ently unlocked. <
Convenient loading*
Within a range of approx. 13ft/4m from the vehi-
cle you can use the remote control for conve-
nient access to half clos e the retractable hard-
top when it is open to ease loading of the
cargo bay.
1. Briefly press the button and, within one
second, press again and hold until the
retractable hardtop stops in an intermediate
position. The luggage compartment lid
opens slightly.
2. Open the luggage compartment lid, press
the cargo bay partition upward and stow the
cargo in the cargo bay.
Page 33 of 248
Controls
31Reference
At a glance
Driving tips
Communications
Navigation
Entertainment
Mobility
3.Press down the cargo bay partition until it
engages on both sides and close the lug-
gage compartment lid.
4. Press the button for a longer period to
fold the retractabl e hardtop back in.
Confirmation signals
You can activate or deac tivate the confirmation
signals.
iDrive, for operating principle refer to page 16.
1. "Settings"
2. "Door locks"
3. "Flash when lock/unlock"
4. press the controller
Flashing when locking/unlocking the vehi-
cle is switched on.
Malfunctions
The remote control may malfunction due to
local radio waves. If this occurs, unlock and lock
the car at the door lock with the integrated key.
If the car can no longer be locked with a remote
control, the battery in the remote control is dis-
charged. Use the remote control on an
extended trip to rechar ge the battery, refer to
page 28. The remote control for convenient
access
* contains a battery that may have to be
changed, refer to page 36.
For US owners only
The transmitter and receiver units comply with
part 15 of the FCC/Fe deral Communications
Commission regulations. Operation is gov-
erned by the following: FCC ID:
LX8766S
LX8766E
LX8CAS
Compliance statement:
This device complies with part 15 of the FCC
Rules. Operation is subject to the following two
conditions:
>
This device must not cause harmful inter-
ference, and
> This device must accept any interference
received, including in terference that may
cause undesired operation.
Any unauthorized modifications or
changes to these devices could void the
user's authority to operate this equipment. <
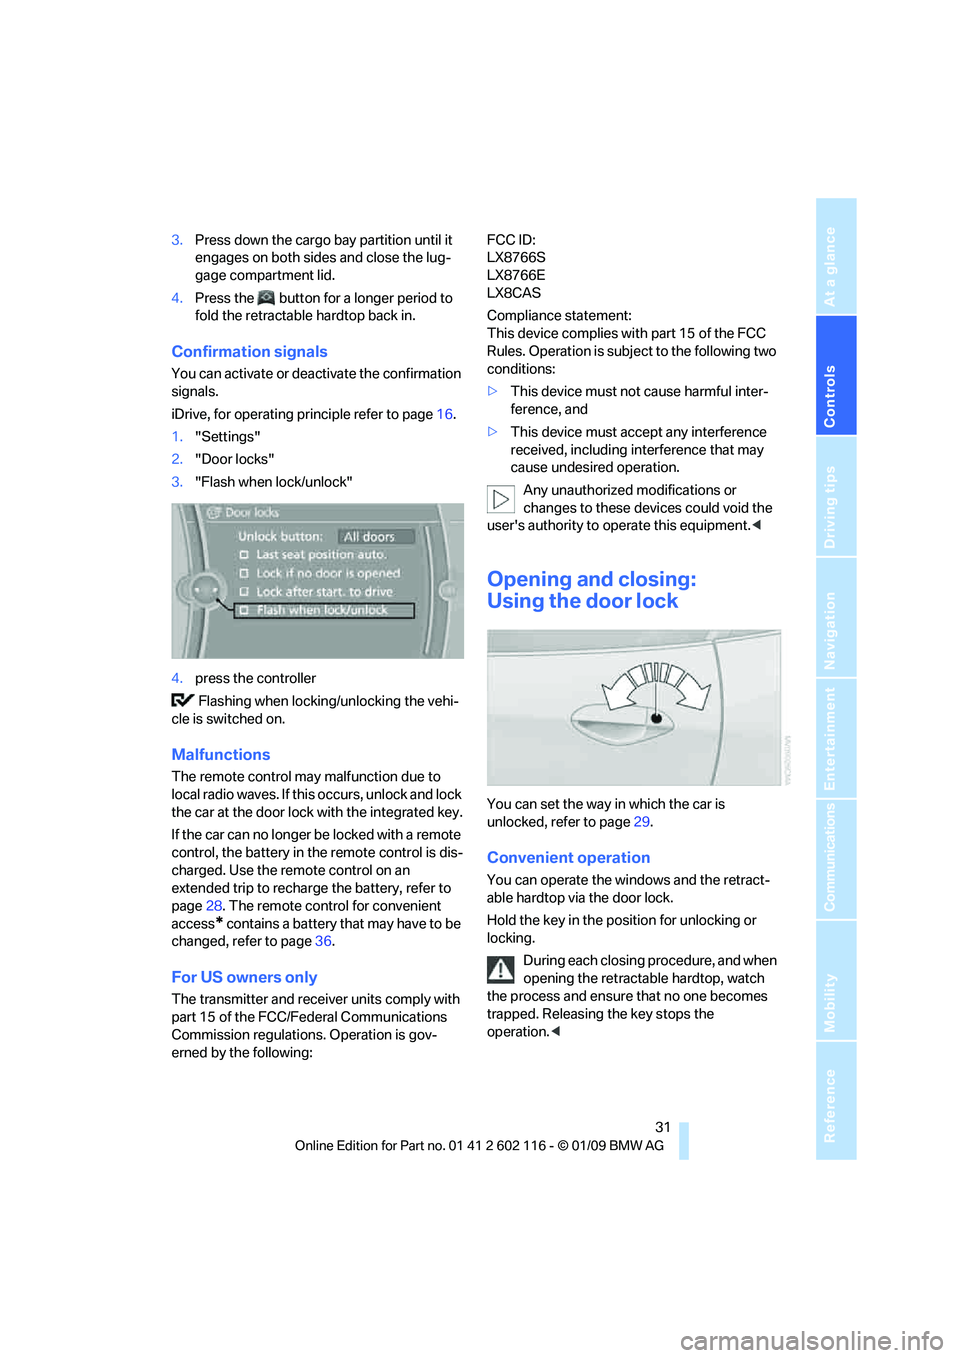
Opening and closing:
Using the door lock
You can set the way in which the car is
unlocked, refer to page29.
Convenient operation
You can operate the wi ndows and the retract-
able hardtop via the door lock.
Hold the key in the position for unlocking or
locking.
During each closing procedure, and when
opening the retractable hardtop, watch
the process and ensure that no one becomes
trapped. Releasing the key stops the
operation. <