2009 BMW Z4 SDRIVE30I ROADSTER oil
[x] Cancel search: oilPage 8 of 248
Notes
6
Installation and operation of non-BMW
approved accessories such as alarms, radios,
amplifiers, radar detector
s, wheels, suspension
components, brake dust shields, telephones,
including operation of any mobile phone from
within the vehicle without using an externally
mounted antenna, or transceiver equipment, for
instance, CBs, walkie-talkies, ham radio or sim-
ilar accessories, may ca use extensive damage
to the vehicle, compromise its safety, interfere
with the vehicle's electrical system or affect the
validity of the BMW Limi ted Warranty. See your
BMW center for additional information.<
Maintenance, replacement, or repair of
the emission control devices and sys-
tems may be performe d by any automotive
repair establishment or individual using any cer-
tified automotive part.<
California Proposition 65 warning
California law requires us to issue the following
warning:
Engine exhaust and a wide variety of
automobile components and parts,
including components foun d in the interior fur-
nishings in a vehicle, co ntain or emit chemicals
known to the State of California to cause cancer
and birth defects and reproductive harm. In
addition, certain fluids co ntained in vehicles and
certain products of component wear contain or
emit chemicals known to the State of California
to cause cancer and birth defects or other
reproductive harm.
Battery posts, terminal s and related accesso-
ries contain lead and lead compounds. Wash
your hands after handling.
Used engine oil contains chemicals that have
caused cancer in labora tory animals. Always
protect your skin by washing thoroughly with
soap and water. <
Service and warranty
We recommend that you read this publication
thoroughly.
Your BMW is covered by the following
warranties:
> New Vehicle Limited Warranty
> Rust Perforation Limited Warranty
> Federal Emissions System Defect Warranty
> Federal Emissions Performance Warranty
> California Emission Control System Limited
Warranty
Detailed information abou t these warranties is
listed in the Service and Warranty Information
Booklet for US models or in the Warranty and
Service Guide Booklet for Canadian models.
Page 14 of 248
Cockpit
12
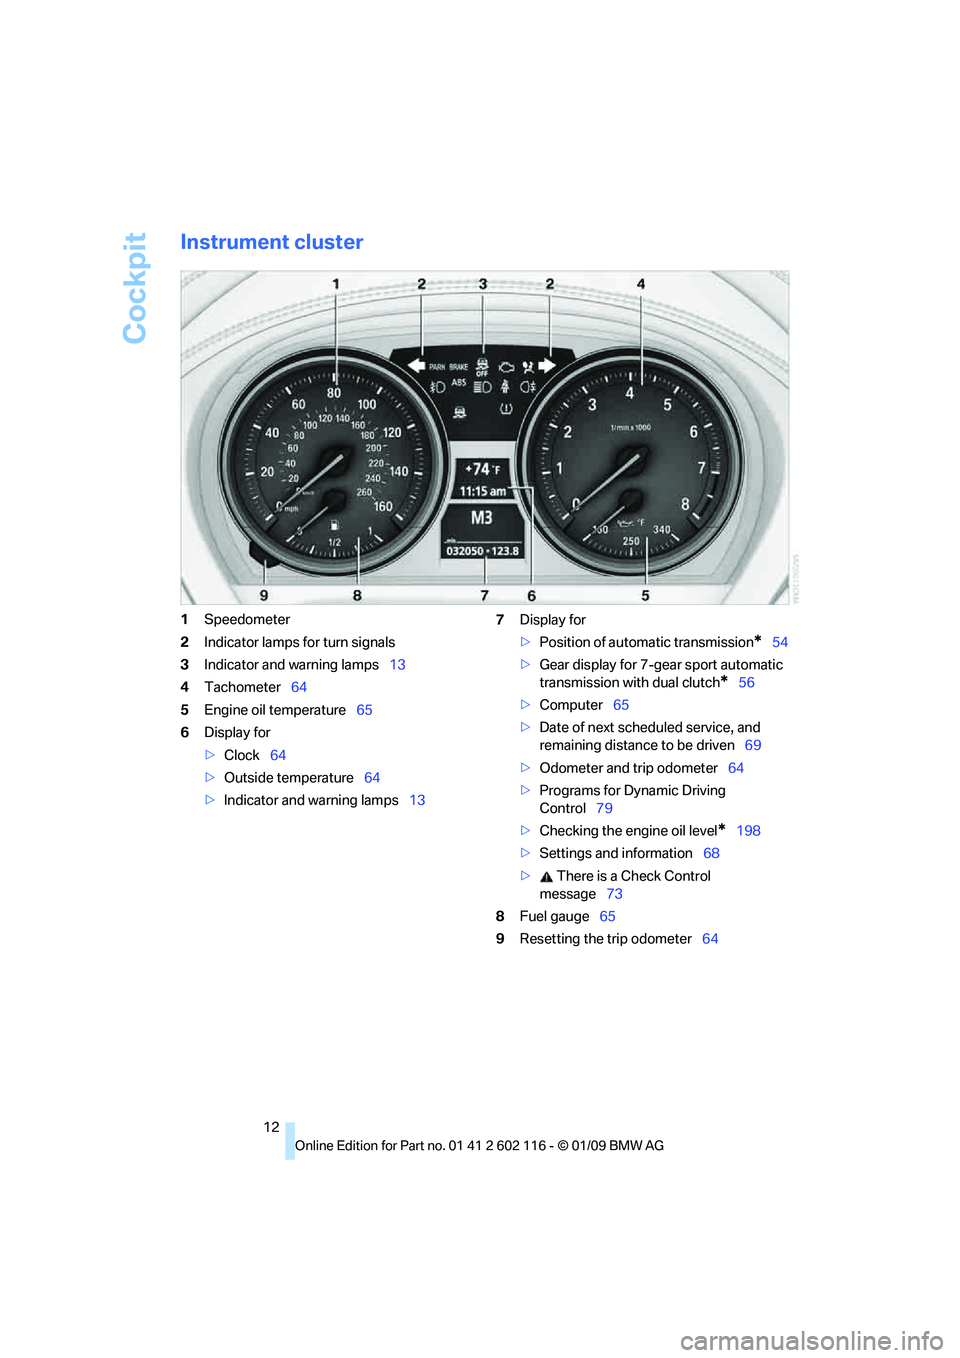
Instrument cluster
1Speedometer
2 Indicator lamps for turn signals
3 Indicator and warning lamps 13
4 Tachometer 64
5 Engine oil temperature 65
6 Display for
>Clock 64
> Outside temperature 64
> Indicator and warning lamps 137
Display for
>Position of automatic transmission
*54
> Gear display for 7-gear sport automatic
transmission with dual clutch
*56
> Computer 65
> Date of next scheduled service, and
remaining distance to be driven 69
> Odometer and trip odometer 64
> Programs for Dynamic Driving
Control 79
> Checking the engine oil level
*198
> Settings and information 68
> There is a Check Control
message 73
8 Fuel gauge 65
9 Resetting the trip odometer 64
Page 40 of 248
Opening and closing
38
Retractable hardtop
The retractable hardtop combines reliable
weather protection with simple and convenient
operation.
Please note:
> It is advisable that yo u close the retractable
hardtop when you park the vehicle. Not only
does the closed hardtop protect the vehicle
interior against unanticipated weather dam-
age, it also offers theft protection. However,
even when the hardtop is closed, valuables
should only be stored in the locked
cargo bay.
> Do not attach roof rack systems to the
retractable hardtop, and in particular do not
attach magnetic racks.
> Do not attach rack sy stems to the luggage
compartment lid, and in particular do not
attach magnetic racks.
> When the retractable hardtop is operated,
the luggage compartment lid swings back
and up. Before operat ing the retractable
hardtop, ensure that there is enough clear-
ance, e.g. in tight parking spaces.
> If you open the hardtop while it is wet, e.g.
after driving in the rain, water may drip into
the cargo bay. If necessary, remove items
from the cargo bay beforehand to avoid
water stains or soiling.
Do not place any objects on the retract-
able hardtop or on the luggage compart-
ment lid, otherwise they could fall during move-
ments of the retracta ble hardtop and cause
damage or injury.
Driving when the hardtop is not fully opened or
not fully closed may result in damage or injury.
Do not reach into th e mechanism while the
hardtop is opening or closing. Keep children
away from the swiveling area of the retractable
hardtop. <
The retractabl e hardtop cannot be moved
at temperatures below + 14 7/–10 6. A
message appears on the Control Display.
opened and closed when the vehicle is
stationary. To avoid causing damage, do not
drive off until the hardtop has stopped
moving. <
Before opening and closing
Do not let the hardtop stop in an interme-
diate position when opening or closing.
Otherwise, there is the danger of personal injury
since the hardtop will be lowered automatically
after a few minutes. <
> Comply with the safety precautions
described above.
> Ensure that the luggage compartment lid is
closed.
> The vehicle should be pa rked on fairly level
ground. Excessive angle is indicated by
alamp.
> Fold down the cargo bay partition and make
sure it engages, refer to the instructions
below.
> Do not place any object s next to or on the
cargo bay partition and close the storage
compartment on the left side of the
cargo bay.
> Do not exceed the maximum loading height
under the cargo bay partition; refer to the
label in the cargo bay showing a line indicat-
ing the maximum height.
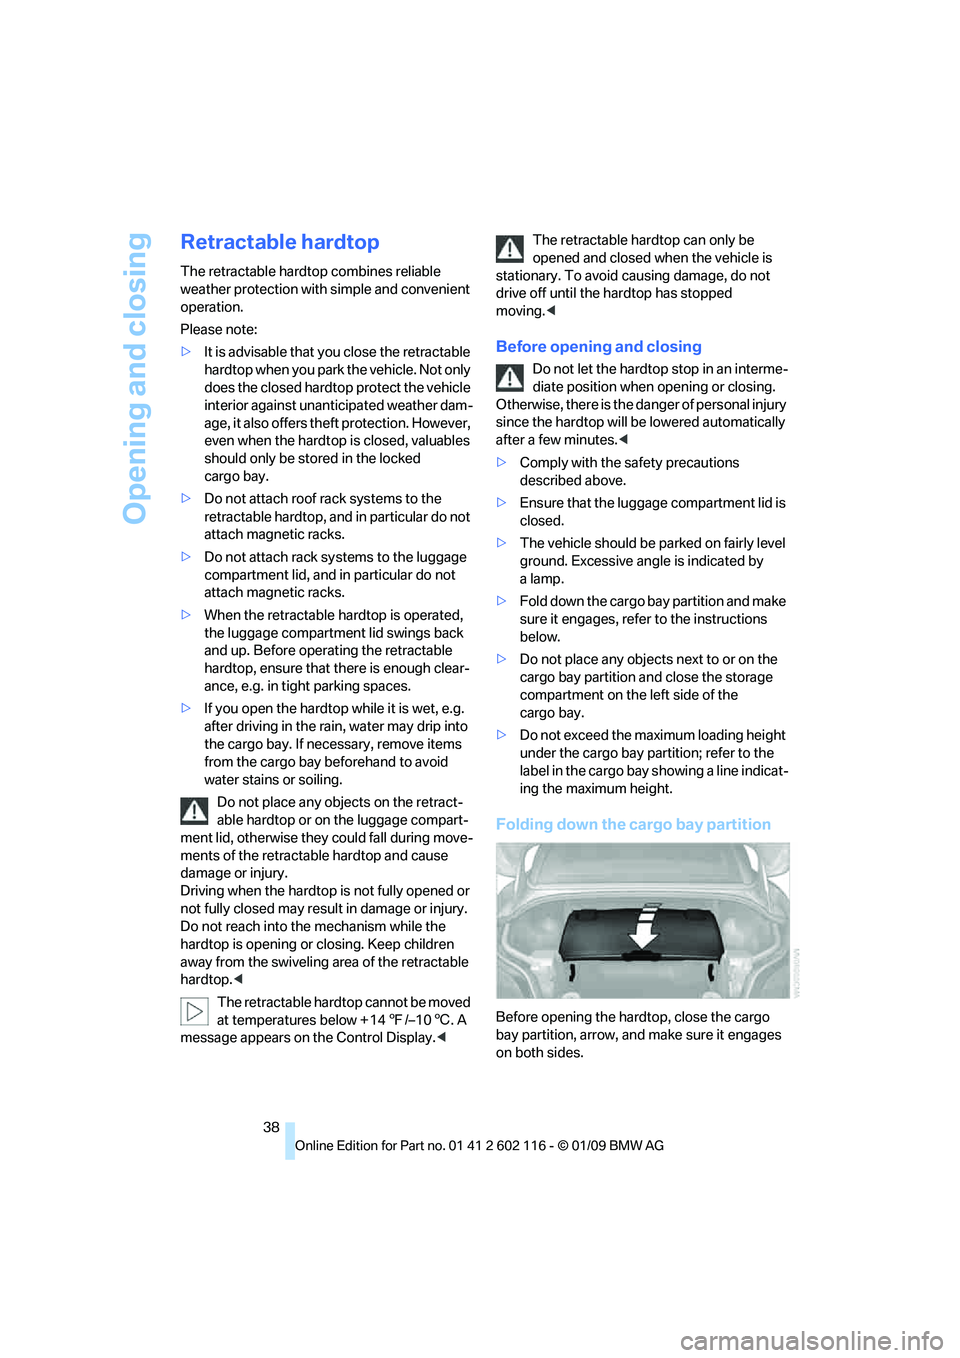
Folding down the cargo bay partition
Before opening the hardtop, close the cargo
bay partition, arrow, an d make sure it engages
on both sides.
Page 67 of 248
Controls
65Reference
At a glance
Driving tips
Communications
Navigation
Entertainment
Mobility
Coolant temperature
A warning lamp will come on if the coolant, and
therefore the engine, becomes too hot. In addi-
tion, a message will appear on the Control
Display.
Check coolant level, refer to page201.
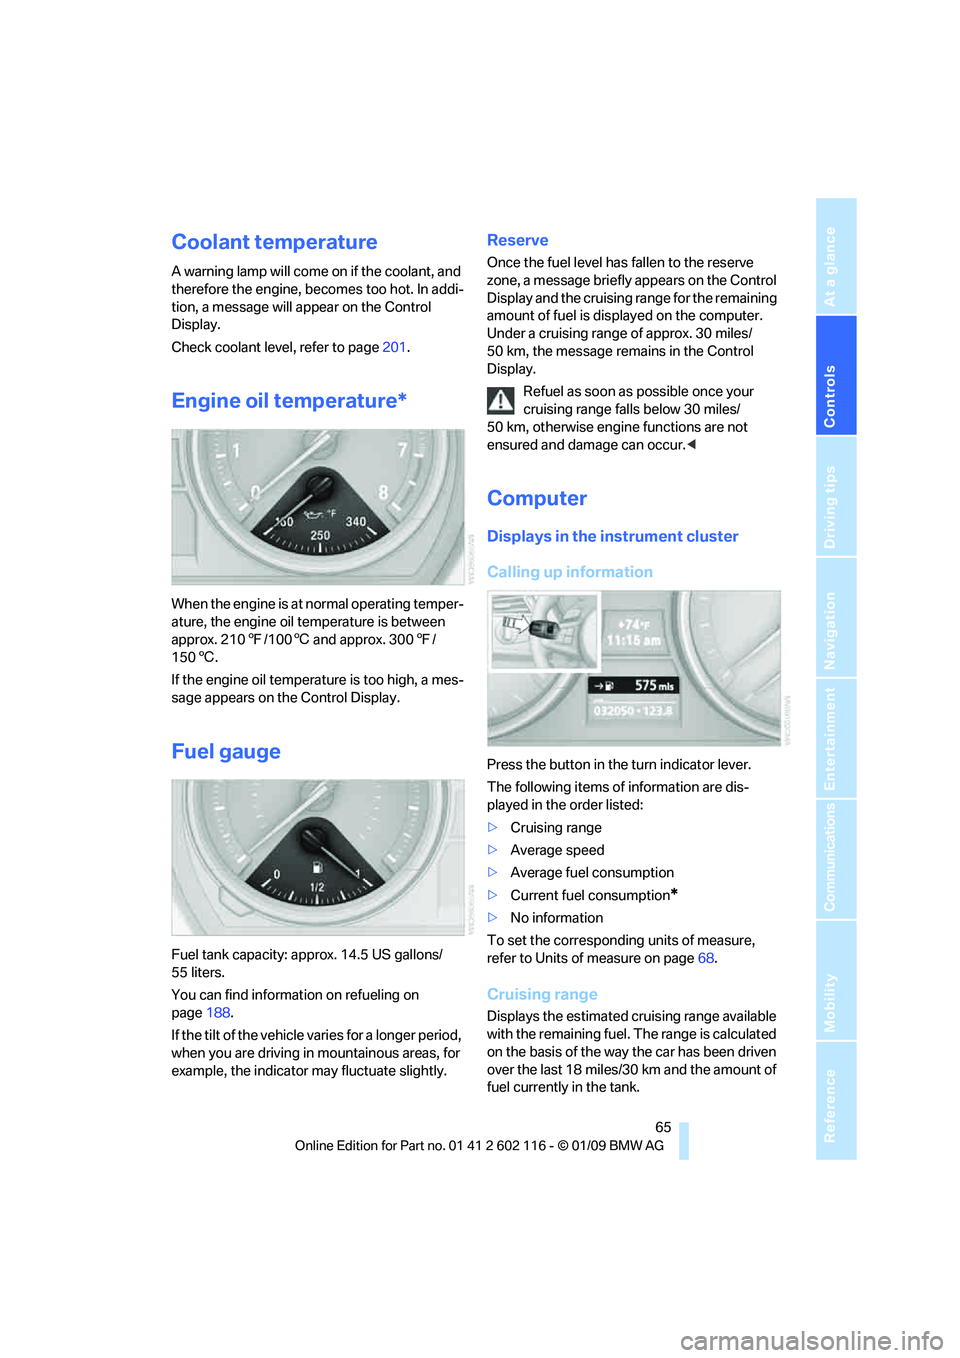
Engine oil temperature*
When the engine is at normal operating temper-
ature, the engine oil temperature is between
approx. 210 7/100 6 and approx. 300 7/
150 6.
If the engine oil temperature is too high, a mes-
sage appears on the Control Display.
Fuel gauge
Fuel tank capacity: approx. 14.5 US gallons/
55 liters.
You can find information on refueling on
page 188.
If the tilt of the vehicle varies for a longer period,
when you are driving in mountainous areas, for
example, the indicator may fluctuate slightly.
Reserve
Once the fuel level has fallen to the reserve
zone, a message briefly appears on the Control
Display and the cruising range for the remaining
amount of fuel is displayed on the computer.
Under a cruising range of approx. 30 miles/
50 km, the message remains in the Control
Display.
Refuel as soon as possible once your
cruising range falls below 30 miles/
50 km, otherwise engine functions are not
ensured and damage can occur. <
Computer
Displays in the instrument cluster
Calling up information
Press the button in the turn indicator lever.
The following items of information are dis-
played in the order listed:
>Cruising range
> Average speed
> Average fuel consumption
> Current fuel consumption
*
>No information
To set the corresponding units of measure,
refer to Units of measure on page 68.
Cruising range
Displays the estimated cr uising range available
with the remaining fuel. The range is calculated
on the basis of the way the car has been driven
over the last 18 miles/30 km and the amount of
fuel currently in the tank.
Page 70 of 248
Everything under control
68
Settings and information
Operating principle
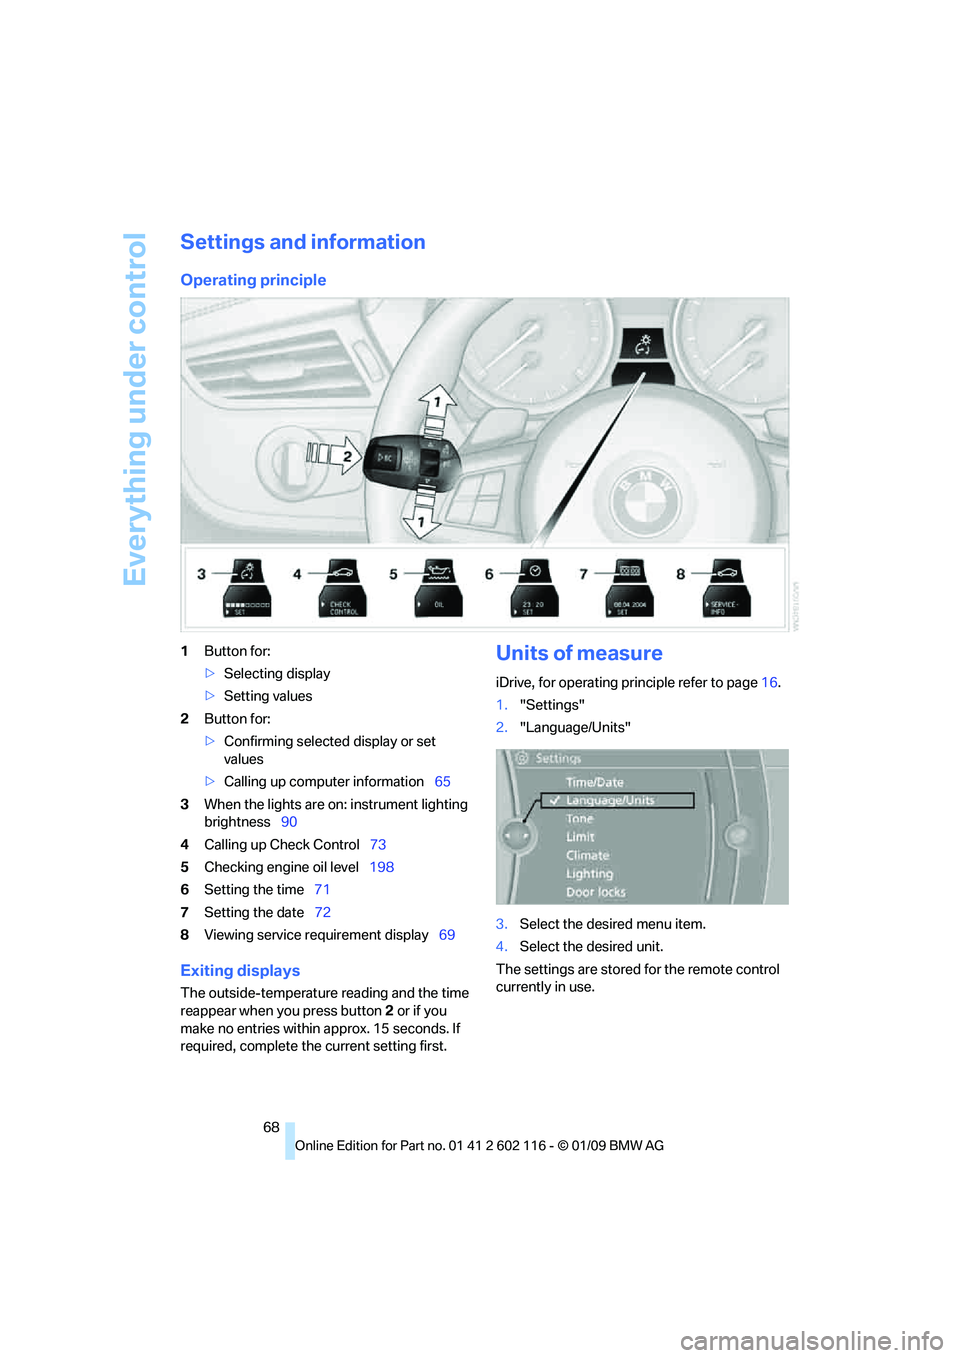
1Button for:
>Selecting display
> Setting values
2 Button for:
>Confirming selected display or set
values
> Calling up computer information 65
3 When the lights are on: instrument lighting
brightness 90
4 Calling up Check Control 73
5 Checking engine oil level 198
6 Setting the time 71
7 Setting the date 72
8 Viewing service re quirement display 69
Exiting displays
The outside-temperature reading and the time
reappear when you press button 2 or if you
make no entries within approx. 15 seconds. If
required, complete the current setting first.
Units of measure
iDrive, for operating principle refer to page16.
1. "Settings"
2. "Language/Units"
3. Select the desired menu item.
4. Select the desired unit.
The settings are stored for the remote control
currently in use.
Page 72 of 248
Everything under control
70
Possible displays
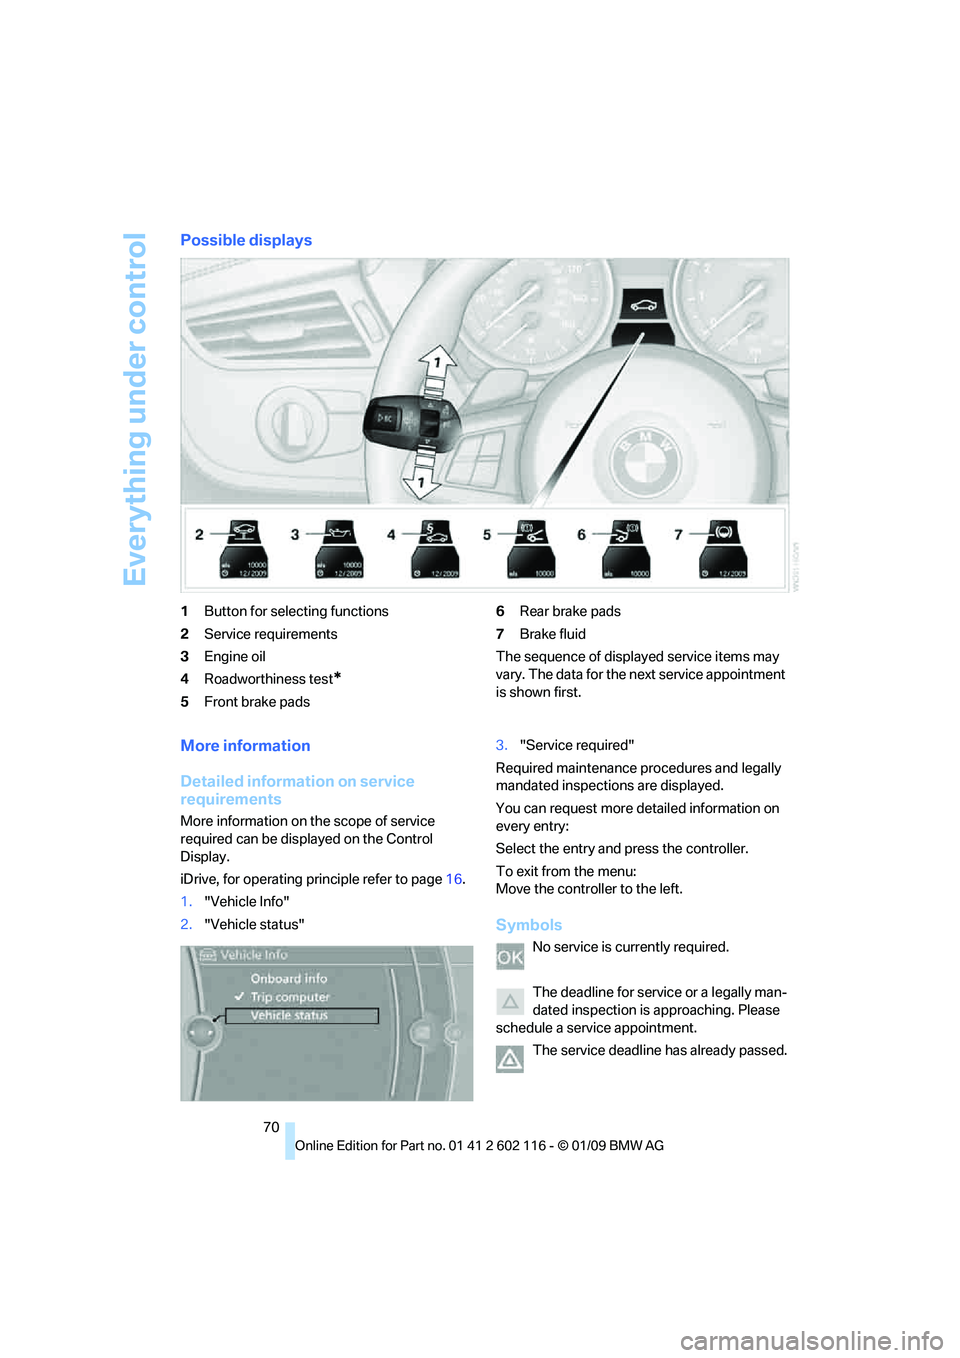
1Button for selecting functions
2 Service requirements
3 Engine oil
4 Roadworthiness test
*
5Front brake pads 6
Rear brake pads
7 Brake fluid
The sequence of displayed service items may
vary. The data for the ne xt service appointment
is shown first.
More information
Detailed information on service
requirements
More information on the scope of service
required can be disp layed on the Control
Display.
iDrive, for operating pr inciple refer to page16.
1. "Vehicle Info"
2. "Vehicle status" 3.
"Service required"
Required maintenance procedures and legally
mandated inspections are displayed.
You can request more detailed information on
every entry:
Select the entry and press the controller.
To exit from the menu:
Move the controller to the left.
Symbols
No service is currently required.
The deadline for servic e or a legally man-
dated inspection is approaching. Please
schedule a service appointment.
The service deadline has already passed.
Page 198 of 248
Wheels and tires
196
Recommended tire brands
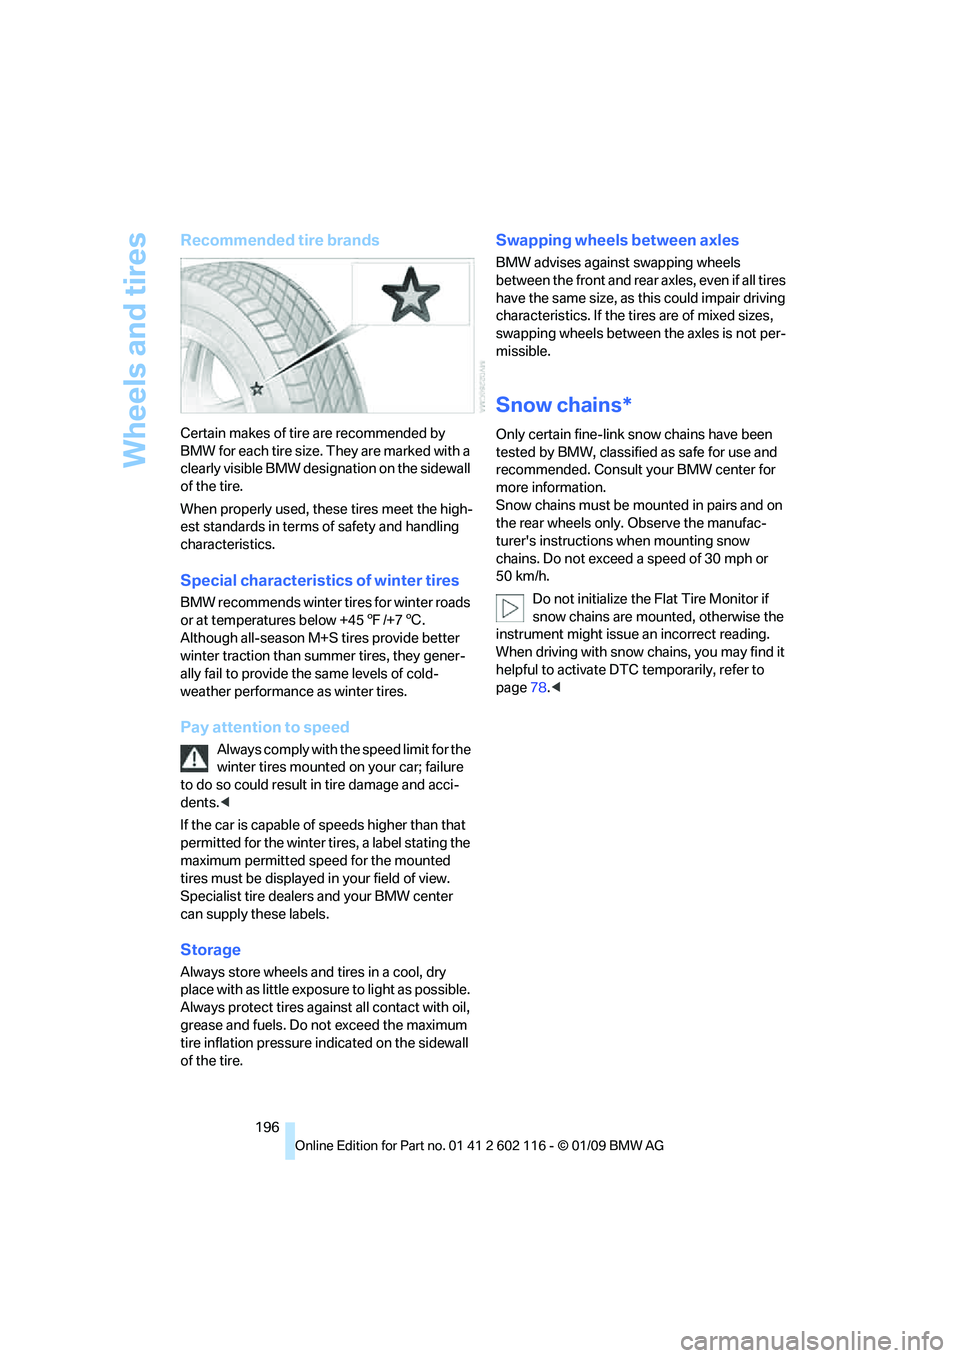
Certain makes of tire are recommended by
BMW for each tire size. They are marked with a
clearly visible BMW designation on the sidewall
of the tire.
When properly used, these tires meet the high-
est standards in terms of safety and handling
characteristics.
Special characteristics of winter tires
BMW recommends winter tires for winter roads
or at temperatures below +45 7/+7 6.
Although all-season M+ S tires provide better
winter traction than summer tires, they gener-
ally fail to provide the same levels of cold-
weather performance as winter tires.
Pay attention to speed
Always comply with the speed limit for the
winter tires mounted on your car; failure
to do so could result in tire damage and acci-
dents. <
If the car is capable of speeds higher than that
permitted for the winter ti res, a label stating the
maximum permitted speed for the mounted
tires must be displayed in your field of view.
Specialist tire dealers and your BMW center
can supply these labels.
Storage
Always store wheels and tires in a cool, dry
place with as little exposure to light as possible.
Always protect tires agains t all contact with oil,
grease and fuels. Do not exceed the maximum
tire inflation pressure indicated on the sidewall
of the tire.
Swapping wheels between axles
BMW advises against swapping wheels
between the front and rear axles, even if all tires
have the same size, as th is could impair driving
characteristics. If the tires are of mixed sizes,
swapping wheels betwee n the axles is not per-
missible.
Snow chains*
Only certain fine-link sn ow chains have been
tested by BMW, classified as safe for use and
recommended. Consult your BMW center for
more information.
Snow chains must be mounted in pairs and on
the rear wheels only. Observe the manufac-
turer's instructions when mounting snow
chains. Do not exceed a speed of 30 mph or
50 km/h.
Do not initialize the Flat Tire Monitor if
snow chains are mounted, otherwise the
instrument might issue an incorrect reading.
When driving with snow chains, you may find it
helpful to activate DTC temporarily, refer to
page 78.<
Page 200 of 248
Under the hood
198
Important parts of the engine compartment
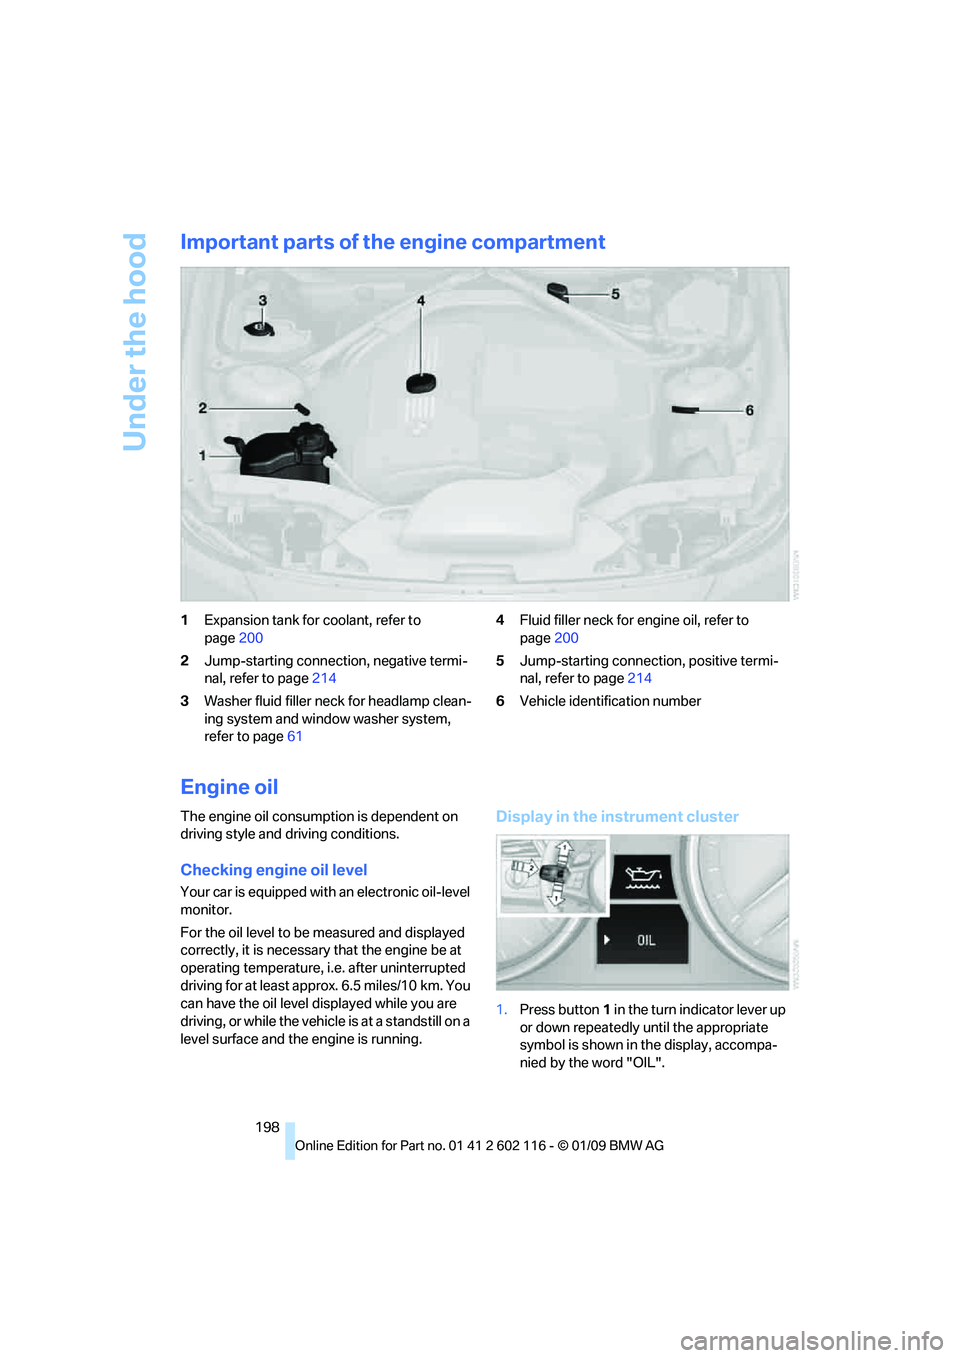
1Expansion tank for coolant, refer to
page 200
2 Jump-starting connection, negative termi-
nal, refer to page 214
3 Washer fluid filler neck for headlamp clean-
ing system and window washer system,
refer to page 61 4
Fluid filler neck for engine oil, refer to
page 200
5 Jump-starting connection, positive termi-
nal, refer to page 214
6 Vehicle identification number
Engine oil
The engine oil consumption is dependent on
driving style and driving conditions.
Checking engine oil level
Your car is equipped with an electronic oil-level
monitor.
For the oil level to be measured and displayed
correctly, it is necessary that the engine be at
operating temperature, i.e. after uninterrupted
driving for at least approx. 6.5 miles/10 km. You
can have the oil level displayed while you are
driving, or while the vehicle is at a standstill on a
level surface and the engine is running.
Display in the instrument cluster
1.Press button 1 in the turn indicator lever up
or down repeatedly until the appropriate
symbol is shown in the display, accompa-
nied by the word "OIL".