2009 BMW X6 XDRIVE tow limit
[x] Cancel search: tow limitPage 9 of 317
7Reference
At a glance
Controls
Driving tips
Communications
Navigation
Entertainment
Mobility
Service and warranty
We recommend that you read this publication
thoroughly.
Your BMW is covered by the following warran-
ties:
>New Vehicle Limited Warranty
> Rust Perforation Limited Warranty
> Federal Emissions System Defect Warranty
> Federal Emissions Performance Warranty
> California Emission Control System Limited
Warranty
Detailed information about these warranties is
listed in the Service and Warranty Information
Booklet for US models or in the Warranty and
Service Guide Booklet for Canadian models.
Reporting safety defects
For US customers
The following applies only to vehicles owned
and operated in the US.
If you believe that your vehicle has a defect
which could cause a crash or could cause injury
or death, you should immediately inform the
National Highway Traffic Safety Administration,
NHTSA, in addition to notifying BMW of North
America, LLC, P.O. Box 1227, Westwood, New
Jersey 07675-1227, Telephone 1-800-831-
1117.
If NHTSA receives similar complaints, it may
open an investigation, and if it finds that a safety
defect exists in a group of vehicles, it may order
a recall and remedy campaign. However,
NHTSA cannot become involved in individual
problems between you, your dealer, or BMW of
North America, LLC.
To contact NHTSA, you may call the Vehicle
Safety Hotline toll-free at 1-888-327-4236
(TTY: 1-800-424-9153); go to
http://www.safercar.gov; or write to: Adminis-
trator, NHTSA, 400 Seventh Street, SW.,
Washington, DC 20590. You can also obtain
other information about motor vehicle safety
from http://www.safercar.gov
For Canadian customers
Canadian customers who wish to report a
safety-related defect to Transport Canada,
Defect Investigations and Recalls, may call
1-800-333-0510 toll-free from anywhere in
Canada or 1-613-993-9851 from the Ottawa
region and from other countries, or contact
Transport Canada by mail at: Transport
Canada, ASFAD, Place de Ville, Tower C,
330 Sparks Street, Ottawa, ON, K1A 0N5.
You can also obtain other information about
motor vehicle safety from http://www.tc.gc.ca
Page 57 of 317
Controls
55Reference
At a glance
Driving tips
Communications
Navigation
Entertainment
Mobility
Fastening
Make sure you hear the latch plate engage in
the belt buckle.
Safety belt reminder for driver's seat
and passenger seat
The indicator lamp lights up and a
signal sounds. A message also
appears on the Control Display.
Please check whether the safety belt is cor-
rectly fastened.
The safety belt reminder is operative at speeds
above approx. 5 mph/8 km/h. It can also be acti-
vated if objects are placed on the passenger
seat.
Releasing
1. Grasp the belt firmly.
2. Press the red button in the buckle.
3. Guide the belt into its reel.
The shoulder strap's anchorage point will be
correct for adult seat occupants of every build if
the seat is correctly adjusted, refer to page 49.
BMW X5: the two rear safety belt buckles inte-
grated into the rear seat are for passengers sit-
ting on the left and right. The belt buckle
embossed with the word CENTER is intended
exclusively for use by passengers riding in the
center position.
Damage to safety belts
In the event of loads caused by accidents
or other damage: replace the belt system
including the safety be lt tensioners and any
child restraint devices, an d have the belt anchor
points checked. Only have this work carried out
at a BMW Sports Activity Vehicle Center or at a
workshop that works according to BMW repair
procedures with corres pondingly trained per-
sonnel. Otherwise correct operation of this
safety equipment is not guaranteed. <
Belt-force limiter
The effect of the belt-force limiter on the
driver's seat is dependent on the position of the
driver's seat. To maintain the long-term accuracy of this
function, the driver's seat
must be calibrated if a
corresponding message is displayed on the
Control Display.
Calibrating driver's seat
The warning lamp lights up. A mes-
sage also appears on the Control Dis-
play. Please calibrate the driver's
seat.
1. Move the driver's seat forward until it stops.
2. Move the driver's seat forward again. It
briefly moves toward the front in the pro-
cess.
3. Set the desired seating position again.
The calibration is comp leted when the message
on the Control Display disappears. Should this
message continue to be displayed, repeat the
calibration. If the message does not disappear
even after repeated calibration, have the sys-
tem checked as soon as possible.
Never carry out calibration while the vehi-
cle is moving, as this can cause accidents.
Make sure that no persons or objects become
wedged during the calibration process, as this
can cause injuries or damage. <
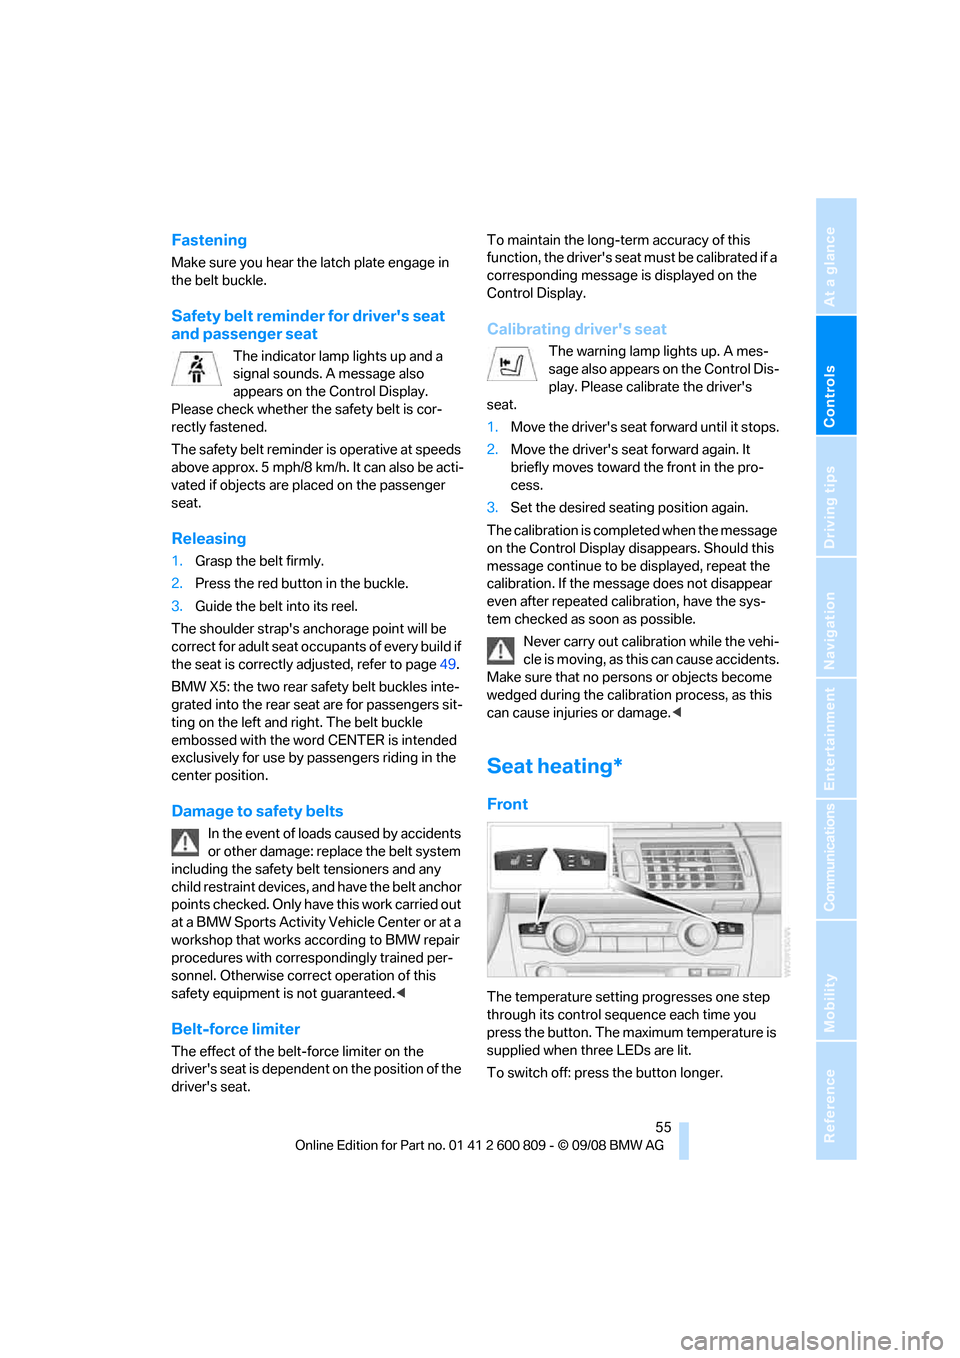
Seat heating*
Front
The temperature setting progresses one step
through its control sequence each time you
press the button. The maximum temperature is
supplied when three LEDs are lit.
To switch off: press the button longer.
Page 94 of 317

Technology for comfort, convenience and safety
92
PDC with visual warning
You can also have the system show distances
to objects on the Control Display. Objects that
are farther away are already shown there before
a signal tone sounds.
The setting is stored for the remote control cur-
rently in use.
If the vehicle is equipped with a rear view cam-
era, refer to Displays on page 95.
iDrive, for operating pr inciple refer to page16.
1. Press the button.
This opens the start menu.
2. Press the controller to open the menu.
3. Select "Settings" and press the controller.
4. Select "Vehicle / Tire s" and press the con-
troller.
5. Change to upper field if necessary. Turn the
controller until "Maneuvering aids" is
selected and press the controller. 6.
Turn the controller until "View selection" is
selected and press the controller.
7. Select "PDC in main window only" and
press the controller.
The PDC screen is activated.
The display appears on the Control Display as
soon as PDC is activated.
System limits
Even with PDC, final responsibility for
estimating the distance between the
vehicle and any obstructions always remains
with the driver. Even when sensors are pro-
vided, there is a blind sp ot in which objects can
no longer be detected. The system's detection
of objects is also subjec t to the physical limits
that apply to all forms of ultrasonic measure-
ment, such as those encountered with tow bars
and trailer couplings, th in or wedge-shaped
objects etc. Low objects already displayed, e.g.
the curb, can also disappear from the detection
area of the sensors again before or after a con-
tinuous tone already sounds. Higher, protrud-
ing objects, e.g. ledg es, cannot be detected.
For this reason, drive with care; otherwise, there
is a danger of personal injury or property dam-
age.
Loud sources of sound, inside and outside the
vehicle, could drown ou t the PDC signal tone.<
Page 96 of 317
Technology for comfort, convenience and safety
94
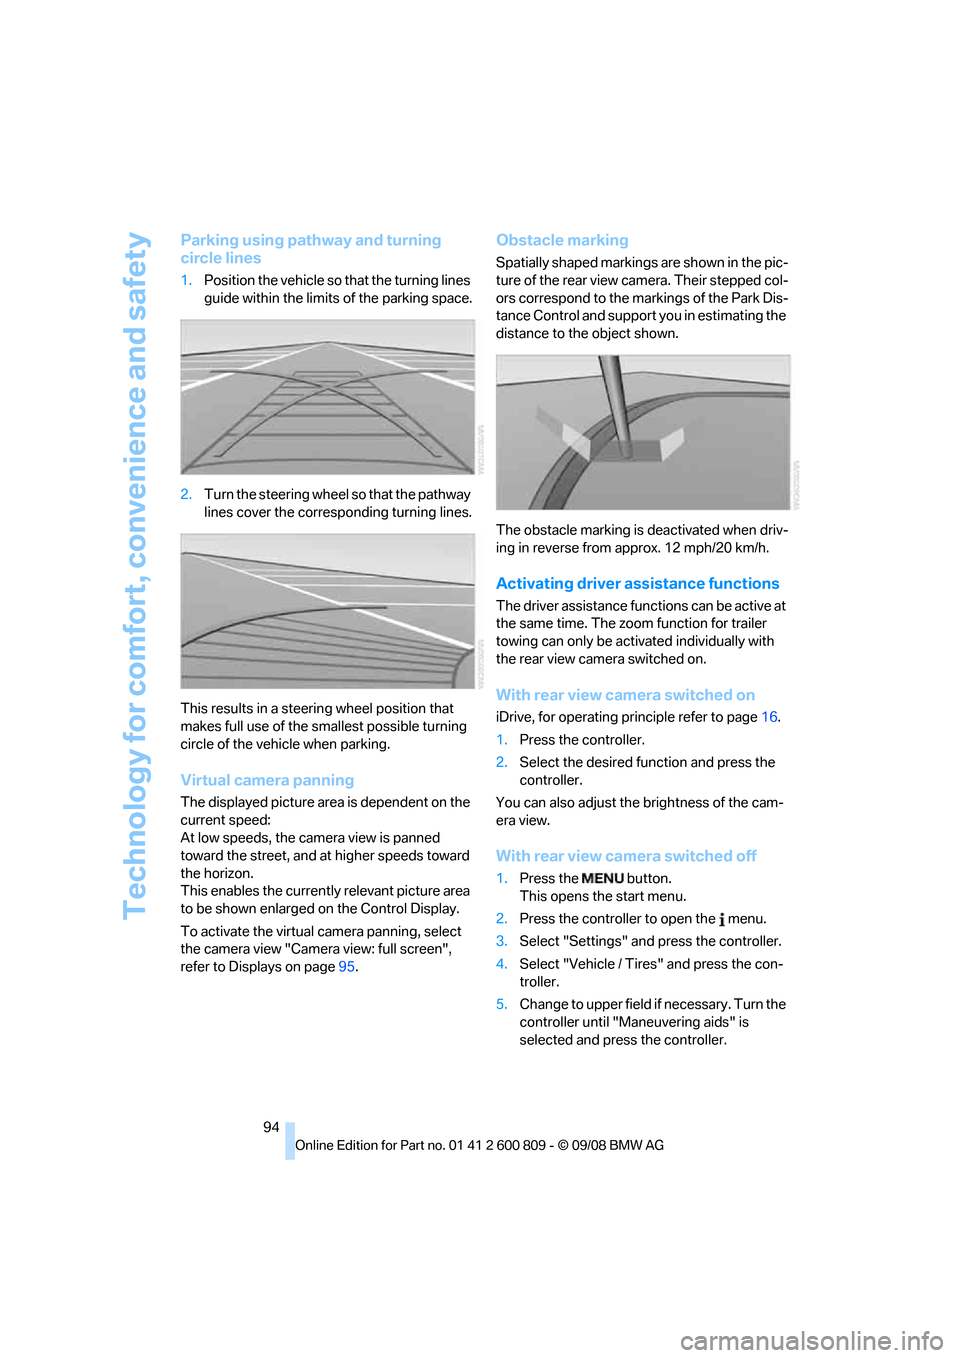
Parking using pathway and turning
circle lines
1.Position the vehicle so that the turning lines
guide within the limits of the parking space.
2. Turn the steering wheel so that the pathway
lines cover the corresp onding turning lines.
This results in a steerin g wheel position that
makes full use of the smallest possible turning
circle of the vehicle when parking.
Virtual camera panning
The displayed picture area is dependent on the
current speed:
At low speeds, the camera view is panned
toward the street, and at higher speeds toward
the horizon.
This enables the currentl y relevant picture area
to be shown enlarged on the Control Display.
To activate the virtual camera panning, select
the camera view "Camera view: full screen",
refer to Displays on page 95.
Obstacle marking
Spatially shaped markings are shown in the pic-
ture of the rear view camera. Their stepped col-
ors correspond to the markings of the Park Dis-
tance Control and support you in estimating the
distance to the object shown.
The obstacle marking is deactivated when driv-
ing in reverse from approx. 12 mph/20 km/h.
Activating driver a ssistance functions
The driver assistance functions can be active at
the same time. The zoom function for trailer
towing can only be acti vated individually with
the rear view camera switched on.
With rear view camera switched on
iDrive, for operating pr inciple refer to page16.
1. Press the controller.
2. Select the desired fu nction and press the
controller.
You can also adjust the brightness of the cam-
era view.
With rear view ca mera switched off
1.Press the button.
This opens the start menu.
2. Press the controller to open the menu.
3. Select "Settings" an d press the controller.
4. Select "Vehicle / Tire s" and press the con-
troller.
5. Change to upper field if necessary. Turn the
controller until "Maneuvering aids" is
selected and press the controller.
Page 143 of 317
Driving tips
141Reference
At a glance
Controls
Communications
Navigation
Entertainment
Mobility
General information on the care of your BMW is
provided beginning on page265.
Mixed tires*
Before driving into a car wash, make sure
that the vehicle width is not too large for
the car wash, as otherwise the vehicle and the
car wash could be damaged. <
BMW X5: rear window wiper
The rear window wiper can be damaged in car
washes. Take appropriate protective measures;
ask the car wash operator if necessary.
With comfort access*
Insert the remote control into the ignition lock.
The engine can be switched off in transmission
position N, also refer to page41.
Loading
To avoid loading the tires beyond their
approved carrying capacity, never over-
load the vehicle. Overlo ading can lead to over-
heating and increases the rate at which damage
develops inside the tire s. The ultimate result
can assume the form of a sudden blow-out. <
Make sure that no fluids leak in the cargo
bay; otherwise the vehicle could be dam-
aged. <
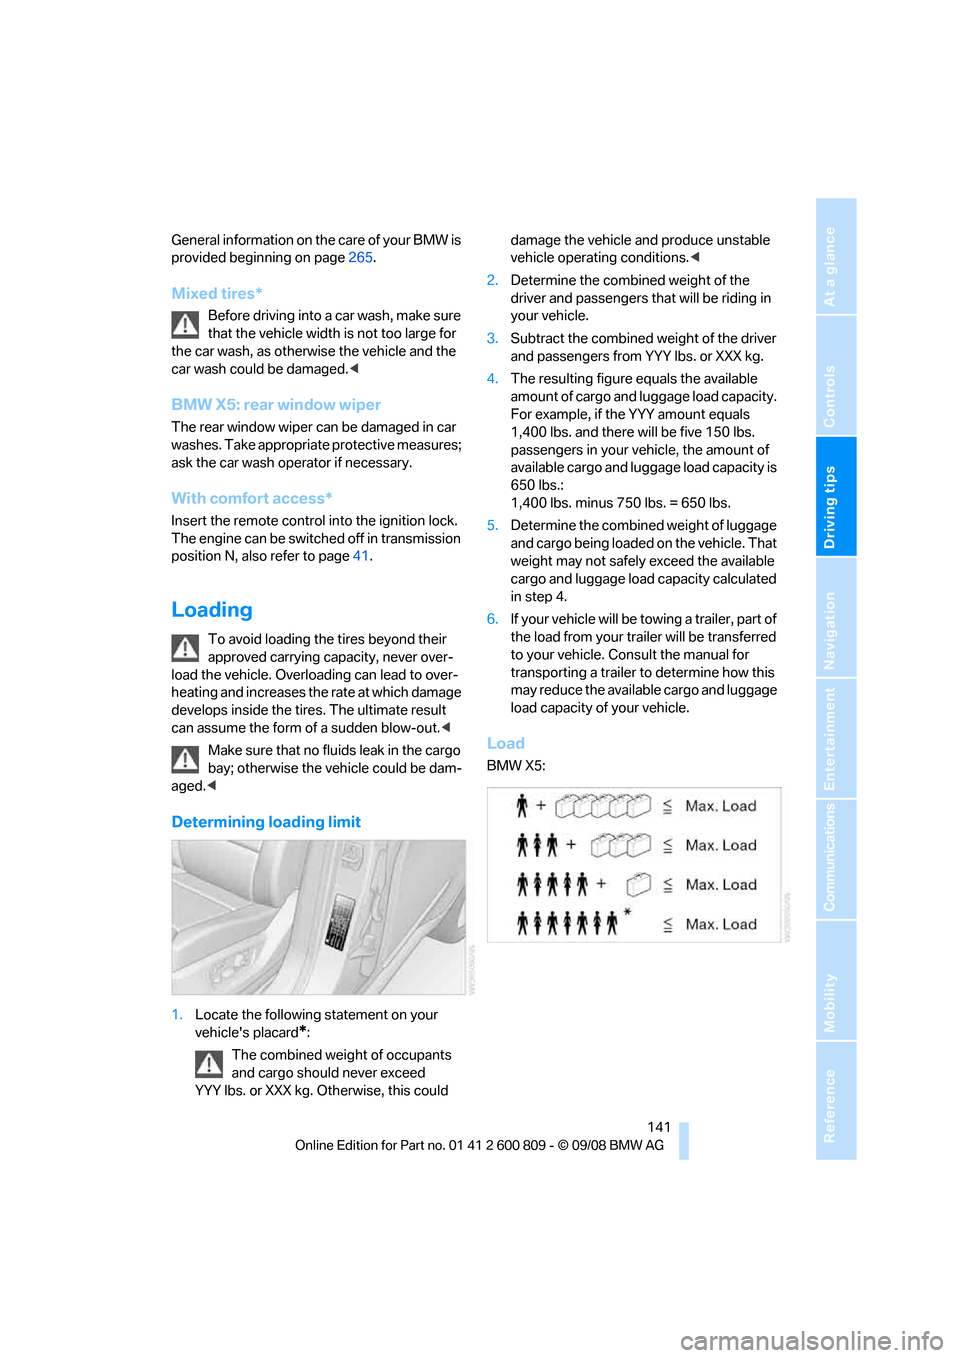
Determining loading limit
1.Locate the following statement on your
vehicle's placard
*:
The combined weight of occupants
and cargo should never exceed
YYY lbs. or XXX kg. Otherwise, this could damage the vehicle and produce unstable
vehicle operating conditions.
<
2. Determine the combined weight of the
driver and passengers that will be riding in
your vehicle.
3. Subtract the combined weight of the driver
and passengers from YYY lbs. or XXX kg.
4. The resulting figure equals the available
amount of cargo and luggage load capacity.
For example, if the YYY amount equals
1,400 lbs. and there will be five 150 lbs.
passengers in your ve hicle, the amount of
available cargo and lugga ge load capacity is
650 lbs.:
1,400 lbs. minus 750 lbs. = 650 lbs.
5. Determine the combined weight of luggage
and cargo being loaded on the vehicle. That
weight may not safely exceed the available
cargo and luggage load capacity calculated
in step 4.
6. If your vehicle will be towing a trailer, part of
the load from your tra iler will be transferred
to your vehicle. Consult the manual for
transporting a trailer to determine how this
may reduce the availa ble cargo and luggage
load capacity of your vehicle.
Load
BMW X5:
Page 145 of 317
Driving tips
143Reference
At a glance
Controls
Communications
Navigation
Entertainment
Mobility
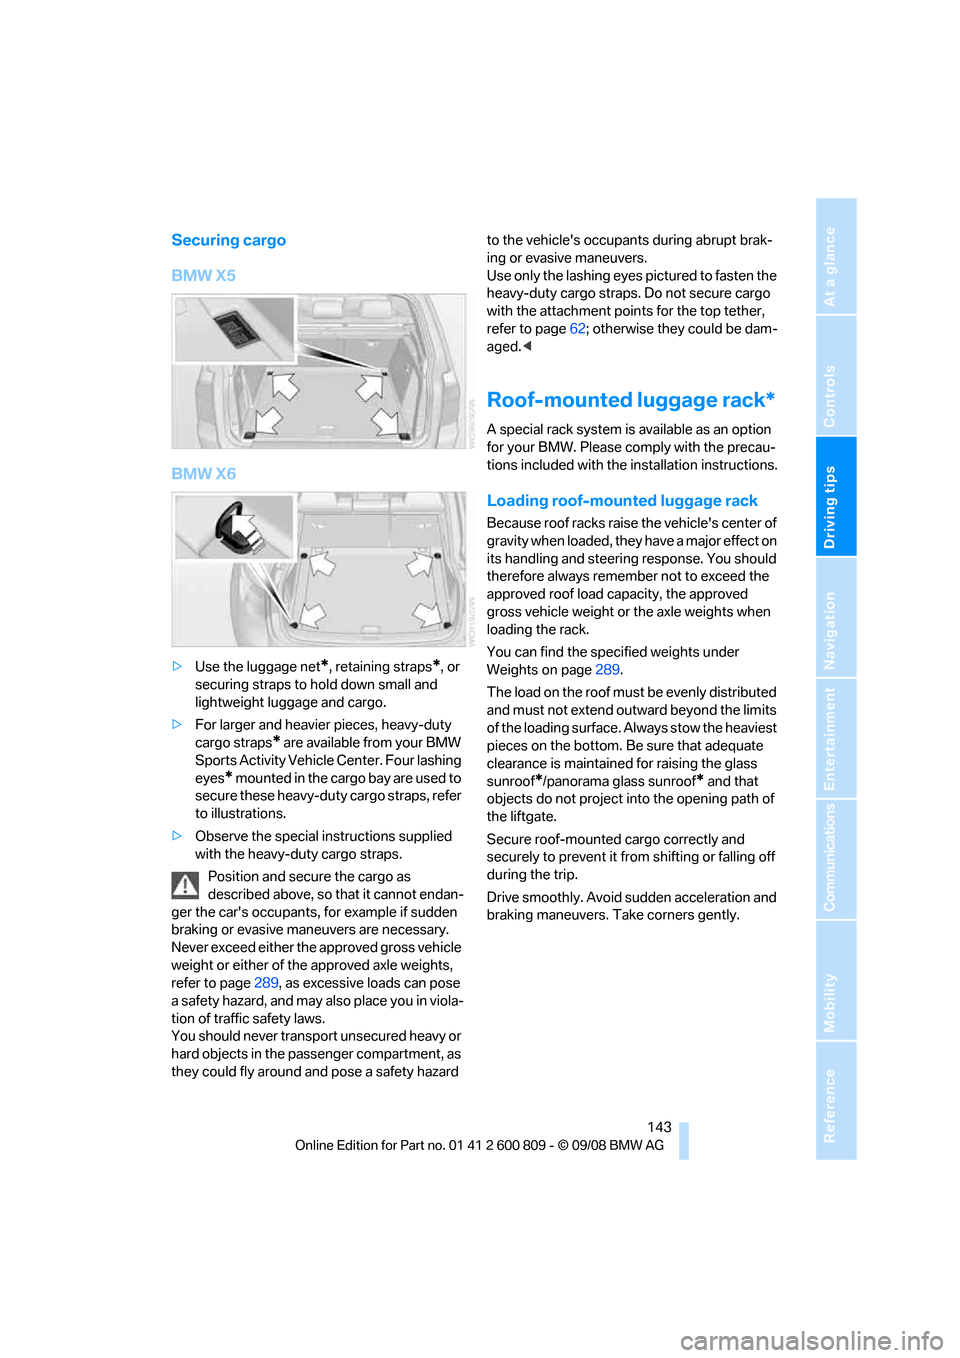
Securing cargo
BMW X5
BMW X6
>Use the luggage net*, retaining straps*, or
securing straps to hold down small and
lightweight luggage and cargo.
> For larger and heavier pieces, heavy-duty
cargo straps
* are available from your BMW
Sports Activity Vehicl e Center. Four lashing
eyes
* mounted in the cargo bay are used to
secure these heavy-duty cargo straps, refer
to illustrations.
> Observe the special instructions supplied
with the heavy-duty cargo straps.
Position and secure the cargo as
described above, so that it cannot endan-
ger the car's occupants, for example if sudden
braking or evasive maneuvers are necessary.
Never exceed either the approved gross vehicle
weight or either of the approved axle weights,
refer to page 289, as excessive loads can pose
a safety hazard, and may also place you in viola-
tion of traffic safety laws.
You should never transport unsecured heavy or
hard objects in the passenger compartment, as
they could fly around and pose a safety hazard to the vehicle's occupants during abrupt brak-
ing or evasive maneuvers.
Use only the lashing eyes pictured to fasten the
heavy-duty cargo straps. Do not secure cargo
with the attachment points for the top tether,
refer to page
62; otherwise they could be dam-
aged. <
Roof-mounted luggage rack*
A special rack system is available as an option
for your BMW. Please co mply with the precau-
tions included with the installation instructions.
Loading roof-mounted luggage rack
Because roof racks raise the vehicle's center of
gravity when loaded, they have a major effect on
its handling and steering response. You should
therefore always remember not to exceed the
approved roof load capacity, the approved
gross vehicle weight or the axle weights when
loading the rack.
You can find the specified weights under
Weights on page 289.
The load on the roof must be evenly distributed
and must not extend outward beyond the limits
of the loading surface. Always stow the heaviest
pieces on the bottom. Be sure that adequate
clearance is maintained for raising the glass
sunroof
*/panorama glass sunroof* and that
objects do not project into the opening path of
the liftgate.
Secure roof-mounted cargo correctly and
securely to prevent it fr om shifting or falling off
during the trip.
Drive smoothly. Avoid su dden acceleration and
braking maneuvers. Take corners gently.
Page 279 of 317
Mobility
277Reference
At a glance
Controls
Driving tips
Communications
Navigation
Entertainment
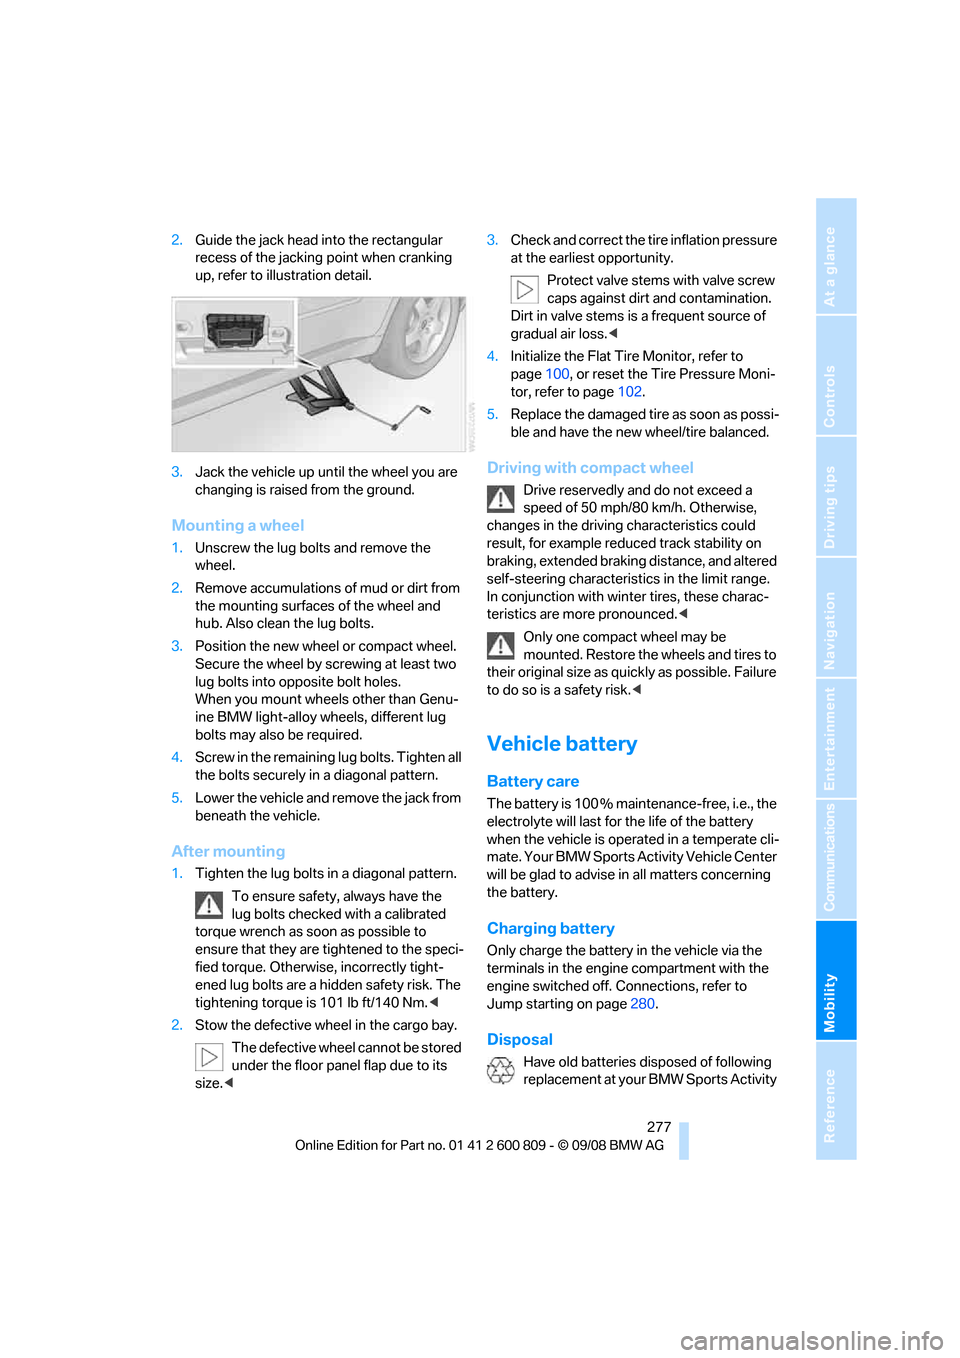
2.Guide the jack head into the rectangular
recess of the jacking point when cranking
up, refer to illustration detail.
3. Jack the vehicle up until the wheel you are
changing is raised from the ground.
Mounting a wheel
1.Unscrew the lug bolts and remove the
wheel.
2. Remove accumulations of mud or dirt from
the mounting surfaces of the wheel and
hub. Also clean the lug bolts.
3. Position the new wheel or compact wheel.
Secure the wheel by sc rewing at least two
lug bolts into opposite bolt holes.
When you mount wheels other than Genu-
ine BMW light-alloy wheels, different lug
bolts may also be required.
4. Screw in the remaining lug bolts. Tighten all
the bolts securely in a diagonal pattern.
5. Lower the vehicle and remove the jack from
beneath the vehicle.
After mounting
1.Tighten the lug bolts in a diagonal pattern.
To ensure safety, always have the
lug bolts checked with a calibrated
torque wrench as soon as possible to
ensure that they are tightened to the speci-
fied torque. Otherwis e, incorrectly tight-
ened lug bolts are a hidden safety risk. The
tightening torque is 101 lb ft/140 Nm. <
2. Stow the defective wheel in the cargo bay.
The defective wheel cannot be stored
under the floor panel flap due to its
size. < 3.
Check and correct the ti re inflation pressure
at the earliest opportunity.
Protect valve stems with valve screw
caps against dirt and contamination.
Dirt in valve stems is a frequent source of
gradual air loss. <
4. Initialize the Flat Tire Monitor, refer to
page 100, or reset the Tire Pressure Moni-
tor, refer to page 102.
5. Replace the damaged tire as soon as possi-
ble and have the new wheel/tire balanced.
Driving with compact wheel
Drive reservedly and do not exceed a
speed of 50 mph/80 km/h. Otherwise,
changes in the driving characteristics could
result, for example reduced track stability on
braking, extended brakin g distance, and altered
self-steering characterist ics in the limit range.
In conjunction with wint er tires, these charac-
teristics are more pronounced. <
Only one compact wheel may be
mounted. Restore the wheels and tires to
their original size as quickly as possible. Failure
to do so is a safety risk. <
Vehicle battery
Battery care
The battery is 100 % main tenance-free, i.e., the
electrolyte will last for the life of the battery
when the vehicle is operated in a temperate cli-
mate. Your BMW Sports Activity Vehicle Center
will be glad to advise in all matters concerning
the battery.
Charging battery
Only charge the battery in the vehicle via the
terminals in the engine compartment with the
engine switched off. Connections, refer to
Jump starting on page 280.
Disposal
Have old batteries disposed of following
replacement at your BMW Sports Activity
Page 284 of 317

Giving and receiving assistance
282
Being towed
Make sure that the ignition is switched on,
refer to page65, otherwise the low
beams, tail lamps, turn signals and windshield
wipers would not be available. When the engine
is stopped, there is no power assist. This then
requires increased effort for braking and steer-
ing. Active steering is deactivated and larger
steering wheel movements are required.<
Switch on the hazard wa rning flashers depend-
ing on the local regulations. If the electrical sys-
tem fails, mark the vehicle to be towed, e.g. with
a sign or warning triangle in the rear window.
Before towing, manua lly unlock the trans-
mission lock, refer to page 72; failure to
do so can result in damage to the transmis-
sion. <
Do not exceed a towing speed of 45 mph/
70 km/h and a towing distance of
90 miles/150 km, otherwise the automatic
transmission may be damaged. <
Towing methods
Do not lift vehicle by tow fitting or body
and chassis parts, otherwise damage may
result. <
In some countries, towi ng with tow bars or
ropes in public traffic is not permitted. Familiar-
ize yourself with the regu lations on towing in the
respective country.
With tow bar
The towing vehicle may not be lighter
than the vehicle to be towed, otherwise it
will not be possible to reliably control vehicle
response. <
The tow fittings used sh ould be on the same
side on both vehicles. Should it prove impossi-
ble to avoid mounting the tow bar at an offset
angle, observe the following:
> Clearance and maneuvering capability will
be sharply limited during cornering.
> When mounted at an angle, the tow bar will
exert lateral forces, tending to push the
vehicle sideways. Only attach the tow bar to the tow fittings,
as attachment to other vehicle parts can
lead to damage. <
With tow rope
When starting off in the towing vehicle, make
sure that the tow rope is taut.
To avoid jerking and the associated
stresses on vehicle components when
towing, always use nylon ropes or nylon straps.
Only attach tow ropes to the tow fittings, as
attachment to other vehi cle parts can lead to
damage. <
With tow truck
Do not tow your BMW with the front or
rear axle raised indi vidually; otherwise,
the wheels may lock and the transfer case may
be damaged. <
Have the BMW transported only on a flatbed
surface.
Tow-starting
The engine cannot be started by tow-starting.
Start the engine by jump starting it, refer to
page 280.
Have the cause of the st arting difficulties elimi-
nated.