2009 BMW X6 XDRIVE 35I Idrive
[x] Cancel search: IdrivePage 155 of 317

Navigation
Driving tips
153Reference
At a glance
Controls
Communications
Entertainment
Mobility
The related town/city is displayed after the
street name.
If a town/city has already been entered, you can
undo this entry. This may be practical if the
desired street does not exist in the entered des-
tination, because, for example, it belongs to
another part of the town/city.
1. Change to upper field.
The arrow is selected.
2. Turn the controller to the right until the
request for the entry of a street in the coun-
try appears and press the controller.
3. Change to the second field from the top and
enter the street.
Entering house number
All house numbers stored for the street on the
navigation DVD can be entered.
1.Select "House number" and press the con-
troller.
2. Enter the house number:
Select the desired digits and press the con-
troller.
3. Change into the third field from the top.
Turn the controller until the house number
is selected and press the controller.
Starting destination guidance with
manual destination entry
>Select "Start guidance" and press the con-
troller.
Destination guidance starts immediately.
> If the destination guidance does not need to
be started immediately:
Select "Add to destination list" and press
the controller.
The destination is stored in the destination
list, refer to page 157.
Entering destination via
voice*
You can enter a desired destination with the
voice activation system . When entering the
destination, it is possible to change between
voice command and iDrive at any time. Reacti-
vate the voice command system for this pur-
pose if necessary.
With {Options } you can have the possible
commands read aloud. <
1. Press the button on the steering wheel.
2.{Enter address }
Page 156 of 317

Destination entry
154
Selecting country
1.Wait for the system to ask for the country of
destination.
Say the name of the coun try of destination in
the language of the vo ice activation system.
Entering destination
The destination can be sp elled or entered as an
entire word.
Spelling destination
To enter the destination, spell it using the
orthography of the coun try of destination.
Pronounce the letters smoothly and at normal
volume, avoiding excessive emphasis and
pauses.
The system can suggest up to 20 destina-
tions that match your entries. Up to
6 entries are displayed at once on the Con-
trol Display. The town/city can also be
selected from the list
via iDrive:
Turn the controller until the destination is
selected and press the controller.
Entering destination as an entire word*
Towns/cities and streets located in the region
where the language of the voice activation sys-
tem is spoken can be entered as an entire word.
Example: to enter a destination located in the
US as an entire word, the language of the sys-
tem must be English.
Speak smoothly and at normal volume, avoiding
excessive emphases and pauses.
1. Wait for the system to request the destina-
tion.
The system can suggest up to 6 destina-
tions that match your entries.
The town/city can also be selected from the list
via iDrive:
Turn the controller until the destination is
selected and press the controller.
Destinations that sound the same which
cannot be differentia ted by the system
are summarized in a sepa rate list and shown as
a destination followe d by three dots.
2.
Say the name of the country of destina-
tion.
1. Spell town/city name:
Say at least the first three letters of the
destination. The more letters you say,
the more exactly the system recognizes
the town/city.
A destination is suggested by the system.
2. Select city/town:
>Choose selected city/town: { Yes}
> Select other city/town: {No }
> Select entry, e.g. {Entry 3 }
> Display additional entries of the list:
{Next page }
> Spell the city/town again: {Repeat }
2.Say the name of the destination.
A destination is suggested by the system.
3. Select city/town:
>Choose selected city/town: { Yes}
> Select other city/town: {No }
> Select entry, e.g. {Entry 3 }
> Enter city/town again: {Repeat }
> To enter the town/city by spelling:
{Spell }
Page 160 of 317

Destination entry
158
>
Delete all entries:
Select "Delete list". The destination
guidance is switched off.
> Change entry:
Select "Edit". For operation, refer to
Entering destination via town/city name,
page 151.
3. Press the controller.
Address book
Opening address book
iDrive, for operating pr inciple refer to page16.
Select "Address book" and press the controller.
Storing destinations in address book
You can store approx. 100 destinations in the
address book.
1.Select "Address book" and press the con-
troller.
2. Select "New address" and press the con-
troller.
3. Select "Enter address" and press the con-
troller. 4.
Enter name and address, also refer to
Entering a destinat ion manually, page 151.
5. Select "Store in a ddress book" and press
the controller.
The entry is stored in the address book.
You can also store a destination from the desti-
nation list into the a ddress book, refer to
page 157.
Storing current position*
The current position can be applied in the
address book.
1.Select "Address book" and press the con-
troller.
2. Change into the third field from the top.
Turn the controller until "New address" is
selected and press the controller.
3. Select "Use current location as address"
and press the controller.
The name given can be changed. For oper-
ation, refer to Entering a destination manu-
ally, page 151.
4. Select "Store in a ddress book" and press
the controller.
You can also apply your current position in the
address book if you have left the sector covered
by the navigation DVD. In this case, you must
enter a name.
Page 164 of 317

Destination guidance
162
Destination guidance
Starting destination
guidance
Via iDrive
iDrive, for operating principle refer to page16.
1. Change to upper field if necessary. Turn the
controller until "Navigation" is selected and
press the controller.
2. Select a destination from the destination list
and press the controller or enter a new des-
tination, refer to page 150.
3. Select "Start guidance" and press the con-
troller.
After the route has been calculated, destination
guidance is indicated by arrows or a map dis-
play on the Control Display.
The destination guidance can also be started in
the arrow or map view:
Select the symbol and press the controller.
During destination guid ance, you can operate
other equipment via iDrive at any time. You will
be punctually notified of a change of direction by spoken instructions
and the display of the
direction arrow.
Via programmable memory buttons
Press the ... button on which the
desired destination is stored, also refer to
page 22.
Ending/continuing
destination guidance
In arrow or map display
Select the symbol and press the controller.
In destination list
This symbol indicates the current destina-
tion.
1. Select the current destination and press the
controller.
2. Select "Stop guidance" and press the con-
troller.
Page 168 of 317

Destination guidance
166
Setting volume of voice instructions
The volume can only be adjusted while a voice
instruction is being output.
1.Repeat the last voice instruction, if neces-
sary.
2. Turn the knob during the voice instruction
to select the desired volume.
This volume is independen t of the volume of the
audio sources.
The setting is stored fo r the remote control cur-
rently in use.
Changing route
During destination guidan ce, you can revise the
navigation system's route recommendations to
avoid particular stretches of road. Enter the
number of miles/kilomete rs that you want to
travel before returning to the original route.
1. Select "Navigation" and press the control-
ler.
2. Change into the third field from the top.
Turn the controller until "New route" is
selected and press the controller.
3. Turn the controller to enter the desired
number and press the controller. The route is recalculated.
To exit from the menu without changing the
route:
Select the arrow and press the controller.
Traffic information*
In many congested areas, you can receive traf-
fic information transmitted by radio stations.
The traffic conditions ar e monitored by traffic
management centers and the traffic information
is periodically updated.
During destination guid ance, the traffic infor-
mation relevant to your planned route is auto-
matically displayed and, if you wish, taken into
account in the route planning. Whether destina-
tion guidance is active or not, you can have the
traffic information displayed in the map view or
in the traffic info list.
Switching reception of traffic
information on/off
iDrive, for operating pr inciple refer to page16.
1. Press the button.
This opens the start menu.
2. Press the controller to open the menu.
3. Turn the controller until "Settings" is
selected and press the controller.
4. Turn the controller until "Traffic Info set-
tings" is selected and press the controller.
Page 176 of 317

On/Off and settings
174
On/Off and settings
The following audio sources have shared con-
trols and setting options:
> Radio
> CD player
> CD changer
*
Controls
The audio sources can be controlled using:
>Buttons in the area of the CD player
> iDrive
> Buttons
on steering wheel, refer to page 11
> Programmable memory buttons, refer to
page 21
Buttons on CD player
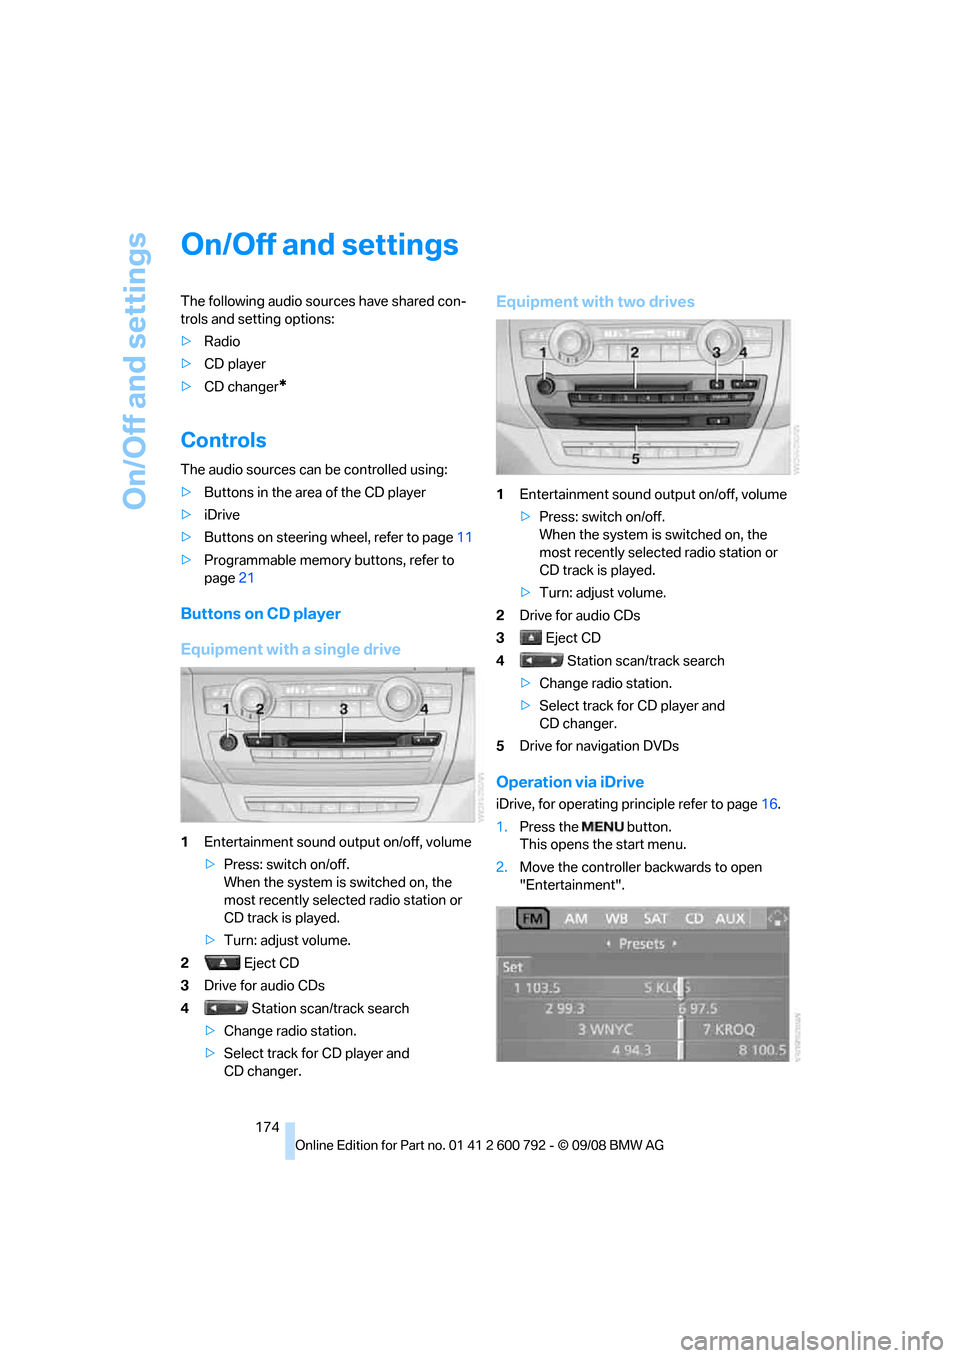
Equipment with a single drive
1Entertainment sound output on/off, volume
>Press: switch on/off.
When the system is switched on, the
most recently select ed radio station or
CD track is played.
> Turn: adjust volume.
2 Eject CD
3 Drive for audio CDs
4 Station scan/track search
> Change radio station.
> Select track for CD player and
CD changer.
Equipment with two drives
1 Entertainment sound output on/off, volume
>Press: switch on/off.
When the system is switched on, the
most recently select ed radio station or
CD track is played.
> Turn: adjust volume.
2 Drive for audio CDs
3 Eject CD
4 Station scan/track search
> Change radio station.
> Select track for CD player and
CD changer.
5 Drive for navigation DVDs
Operation via iDrive
iDrive, for operating pr inciple refer to page16.
1. Press the button.
This opens the start menu.
2. Move the controller backwards to open
"Entertainment".
Page 180 of 317

Radio
178
Radio
Your radio provides reception of the FM and AM
wavebands.
Listening to radio
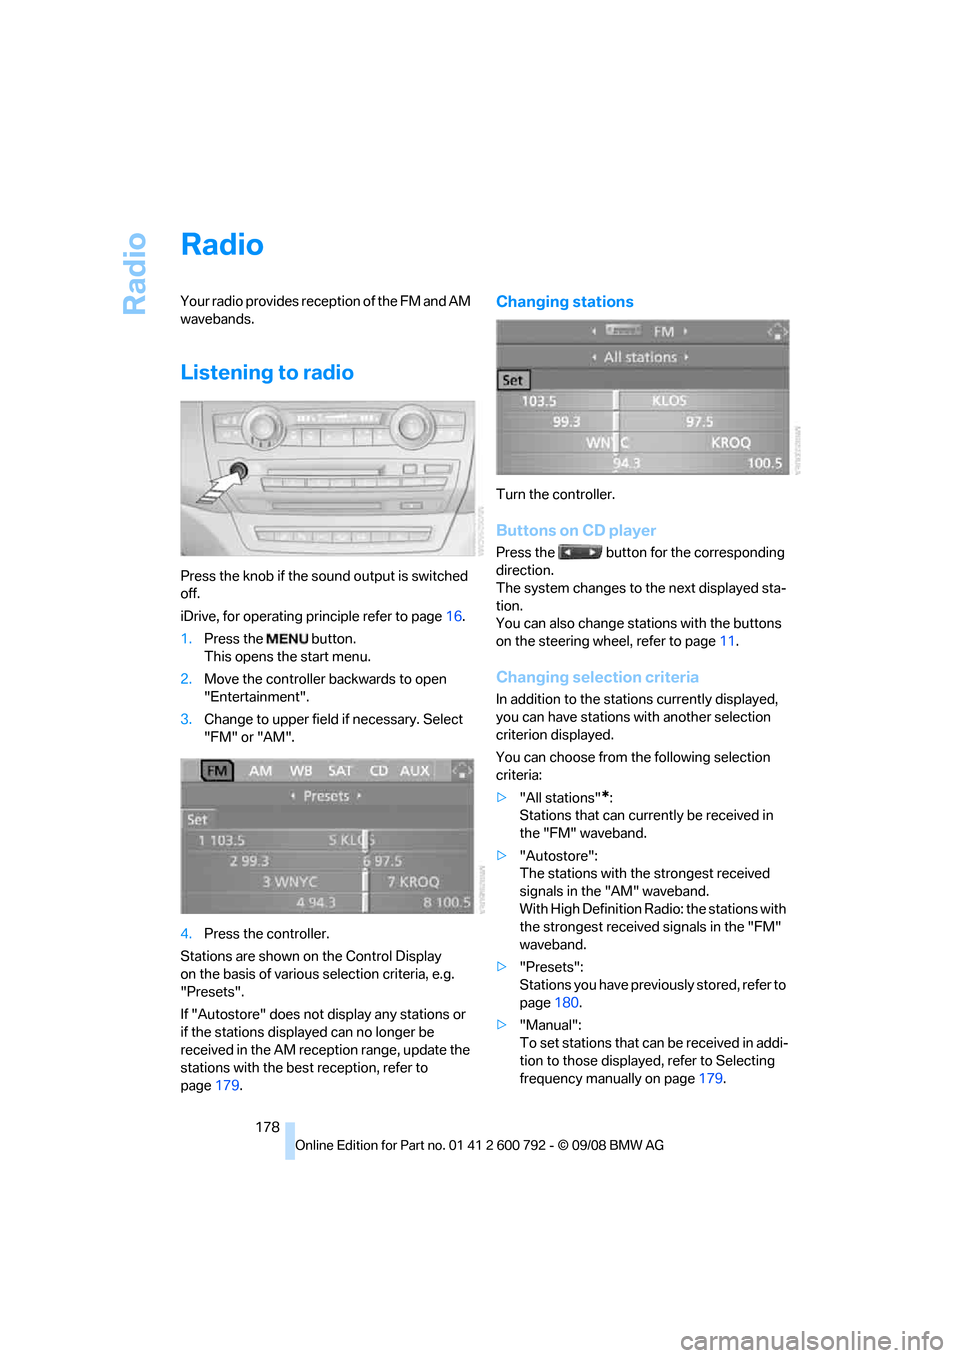
Press the knob if the sound output is switched
off.
iDrive, for operating principle refer to page16.
1. Press the button.
This opens the start menu.
2. Move the controller backwards to open
"Entertainment".
3. Change to upper field if necessary. Select
"FM" or "AM".
4. Press the controller.
Stations are shown on the Control Display
on the basis of various selection criteria, e.g.
"Presets".
If "Autostore" does not display any stations or
if the stations displayed can no longer be
received in the AM reception range, update the
stations with the best reception, refer to
page 179.
Changing stations
Turn the controller.
Buttons on CD player
Press the button for the corresponding
direction.
The system changes to the next displayed sta-
tion.
You can also change stat ions with the buttons
on the steering wheel, refer to page 11.
Changing selection criteria
In addition to the stations currently displayed,
you can have stations with another selection
criterion displayed.
You can choose from the following selection
criteria:
> "All stations"
*:
Stations that can currently be received in
the "FM" waveband.
> "Autostore":
The stations with the strongest received
signals in the "AM" waveband.
With High Definition Radio: the stations with
the strongest received signals in the "FM"
waveband.
> "Presets":
Stations you have previously stored, refer to
page 180.
> "Manual":
To set stations that ca n be received in addi-
tion to those displayed, refer to Selecting
frequency manually on page 179.
Page 182 of 317

Radio
180
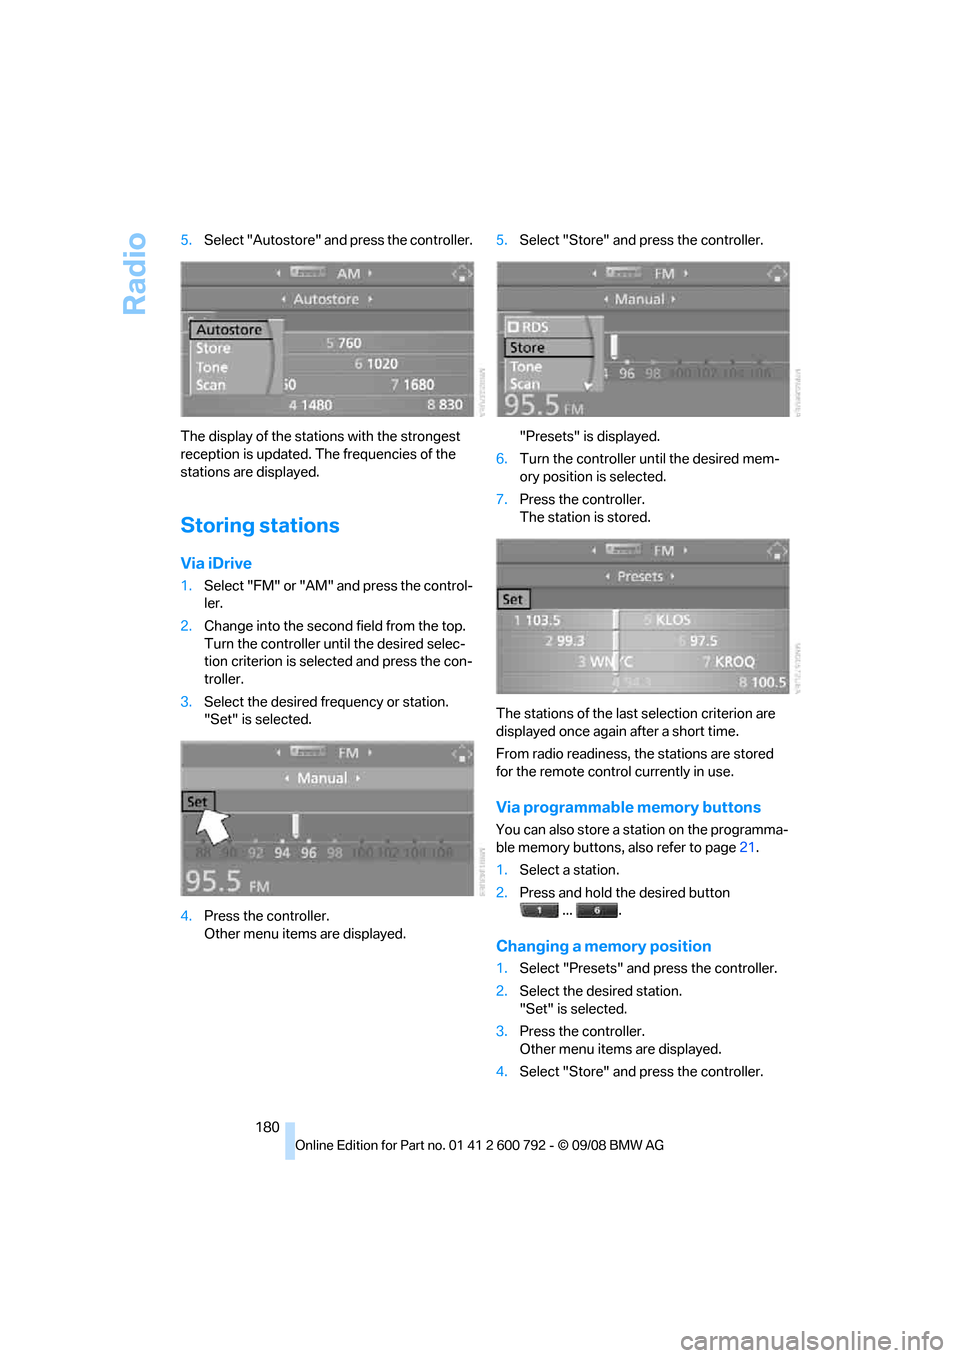
5.
Select "Autostore" and press the controller.
The display of the stations with the strongest
reception is updated. The frequencies of the
stations are displayed.
Storing stations
Via iDrive
1. Select "FM" or "AM" and press the control-
ler.
2. Change into the second field from the top.
Turn the controller until the desired selec-
tion criterion is selected and press the con-
troller.
3. Select the desired frequency or station.
"Set" is selected.
4. Press the controller.
Other menu items are displayed. 5.
Select "Store" and press the controller.
"Presets" is displayed.
6. Turn the controller until the desired mem-
ory position is selected.
7. Press the controller.
The station is stored.
The stations of the last selection criterion are
displayed once again after a short time.
From radio readiness, the stations are stored
for the remote control currently in use.
Via programmable memory buttons
You can also store a station on the programma-
ble memory buttons, also refer to page21.
1. Select a station.
2. Press and hold the desired button
... .
Changing a memory position
1.Select "Presets" and press the controller.
2. Select the desired station.
"Set" is selected.
3. Press the controller.
Other menu items are displayed.
4. Select "Store" and press the controller.