Page 113 of 146
Reference
At a glance
Controls
Driving tips
Mobility
111
Storing your vehicle
If you are planning not to drive your vehicle for
more than three months, please seek advice
from your BMW Sports Activity Vehicle Center
or a workshop that works in accordance with
BMW guidelines.
Page 114 of 146

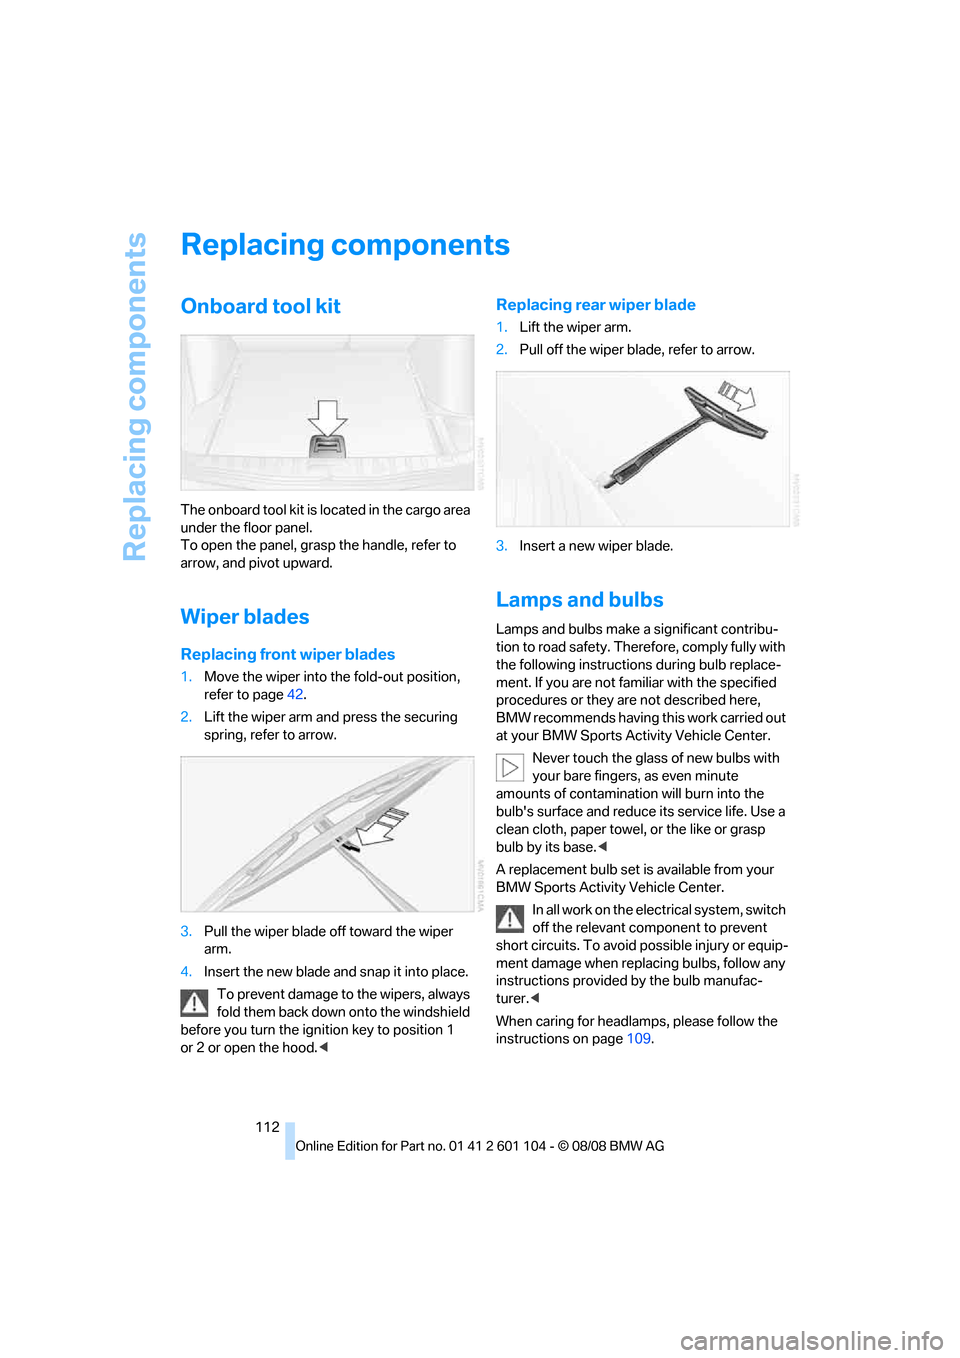
Replacing components
112
Replacing components
Onboard tool kit
The onboard tool kit is located in the cargo area
under the floor panel.
To open the panel, grasp the handle, refer to
arrow, and pivot upward.
Wiper blades
Replacing front wiper blades
1.Move the wiper into the fold-out position,
refer to page42.
2.Lift the wiper arm and press the securing
spring, refer to arrow.
3.Pull the wiper blade off toward the wiper
arm.
4.Insert the new blade and snap it into place.
To prevent damage to the wipers, always
fold them back down onto the windshield
before you turn the ignition key to position 1
or 2 or open the hood.<
Replacing rear wiper blade
1.Lift the wiper arm.
2.Pull off the wiper blade, refer to arrow.
3.Insert a new wiper blade.
Lamps and bulbs
Lamps and bulbs make a significant contribu-
tion to road safety. Therefore, comply fully with
the following instructions during bulb replace-
ment. If you are not familiar with the specified
procedures or they are not described here,
BMW recommends having this work carried out
at your BMW Sports Activity Vehicle Center.
Never touch the glass of new bulbs with
your bare fingers, as even minute
amounts of contamination will burn into the
bulb's surface and reduce its service life. Use a
clean cloth, paper towel, or the like or grasp
bulb by its base.<
A replacement bulb set is available from your
BMW Sports Activity Vehicle Center.
In all work on the electrical system, switch
off the relevant component to prevent
short circuits. To avoid possible injury or equip-
ment damage when replacing bulbs, follow any
instructions provided by the bulb manufac-
turer.<
When caring for headlamps, please follow the
instructions on page109.
Page 115 of 146

Reference
At a glance
Controls
Driving tips
Mobility
113
Please have your BMW Sports Activity
Vehicle Center work on lamps whose
replacement is not described here.<
Light-emitting diodes LEDs
Light-emitting diodes installed behind translu-
c e n t l e n s e s s e r v e a s t h e l i g h t s o u r c e f o r m a n y o f
the controls and displays in your vehicle. These
light-emitting diodes are related to ordinary
lasers.
Do not remove the covers, and never
stare into the unfiltered light for several
hours, as irritation of the retina could result.<
Xenon lamps*
The service life of these bulbs is very long and
the probability of failure is very low, provided
that they are not switched on and off an unusual
number of times. If one of these bulbs should
nevertheless fail, it is possible to continue driv-
ing with great caution using the fog lamps, pro-
vided traffic laws in your area do not prohibit
this.
To avoid risk of potentially fatal injuries
due to the extremely high voltages at
which these units operate, service work should
always be entrusted to qualified personnel.<
Halogen low beams
H7 bulb, 55 watts
Always wear gloves and eye protection –
the atmosphere inside the H7 bulb is
pressurized. Failure to observe this precaution
can lead to injuries should the bulb be dam-
aged.<
For checking and adjusting headlamp
aim, please contact your BMW Sports
Activity Vehicle Center.<
Driver's side
1.Position the screwdriver from the onboard
tool kit and pull off the lamp cover.
Exercise caution when handling the
screwdriver; otherwise, personal
injury can occur or the vehicle can be dam-
aged.<2.Press the bulb holder downward and
remove.
3.Remove the bulb, install a new bulb.
4.Place the bulb holder with the lower edge
against the bracket and press it in until the
lamp base locks into place.
Front passenger side
Before replacing the bulb, remove the reservoir
for the windshield washing system from the
bracket. To do so, unscrew the screws, refer to
arrow, using the screwdriver from the onboard
tool kit and set reservoir aside.
Bear in mind that the windshield washing
system reservoir is heavy. Failure to take
this into account can lead to personal injury or
damage to the vehicle.<
Page 116 of 146

Replacing components
114 For bulb replacement procedure, refer to
Driver's side.
Halogen high beams
H7 bulb, 55 watts
Always wear gloves and eye protection –
the atmosphere inside the H7 bulb is
pressurized. Failure to observe this precaution
can lead to injuries should the bulb be dam-
aged.<
For checking and adjusting headlamp
aim, please contact your BMW Sports
Activity Vehicle Center.<
Driver's side
1.Open the clip and remove the lamp cover.
2.Press the bulb holder downward and
remove, refer to Low beams.
3.Pull off the lamp base; plug in a new lamp
base.
4.Place the lamp base with the lower edge
against the bracket and press it in until the
lamp base locks into place.
Make sure that the cover does not fall into
the engine compartment; otherwise, the
vehicle can be damaged or other road users can
be endangered.<
Front passenger side
Before replacing the bulb, remove the reservoir
of the windshield washer system from the
bracket, refer to Halogen low beams on
page113.
For bulb replacement procedure, refer to
Driver's side.
Parking and roadside parking lamps
W5W bulb, 5 watts
A bulb is located over each high beam.
1.Remove bulb cover for high beams, refer to
Halogen high beams.
2.Remove bulb holder.
3.Remove and replace the bulb.
Turn signal, front
Lamp PSY24W, 24 Watt
or PSY24W Silver Vision
*
Access to the turn signal is at the edge of the
lamp unit, refer to arrow.
Make sure that the lamp base does not fall
into the engine compartment; otherwise,
the vehicle can be damaged or other road users
can be endangered.<
1.Turn the lamp base and remove it.
2.Replace the bulb.
3.Insert the lamp base. If it does not snap into
place immediately, turn the lamp base until
it does.
Page 117 of 146

Reference
At a glance
Controls
Driving tips
Mobility
115
Side-mounted turn signals
W5W bulb, 5 watts
1.Use finger pressure against the rear end of
the lamp, refer to arrow, to press it forward
for removal.
2.Apply gentle pressure to the bulb while
turning it to the left and pull it out.
3.Install in the reverse order.
Front fog lamps
H11 bulb, 55 watts
Always wear gloves and eye protection –
the atmosphere inside the H11 bulb is
pressurized. Failure to observe this precaution
can lead to injuries should the bulb be dam-
aged.<
1.Pull the cover in front of the fog lamp for-
ward.
2.Loosen the screw, refer to arrow, pivot
headlamp out on this side and remove
toward the front.
3.Turn the lamp base at the back of the head-
lamp to the left and remove it.
4.Disconnect the cable connector.
5.Slide new bulb onto plug connector; be sure
it snaps firmly into place.6.Install in the reverse order.
Tail lamps
>Turn signal lamp:
PY21WSV bulb, 21 watts
>Other bulbs:
W16W bulb, 16 watts
1Brake lamp
2Parking lamp/rear lamp, LED
3Turn signal
4Backup lamp
5Rear lamp, LED
In the event of a defect involving the lamps 2, 4
and 5, please consult your BMW Sports Activity
Vehicle Center.
Changing
Open the flap in the side panel, refer to page78.
Turn signal lamp:
1.Turn bulb holder to the left, refer to arrow1,
and remove.
2.Apply gentle pressure to the bulb fitting
while turning it to the left, remove and
replace.
Page 118 of 146

Replacing components
116 Brake lamp:
1.Remove bulb holder, refer to arrow 2.
2.Remove and replace the bulb.
License plate lamps
C5W bulb, 5 watts
1.Press the lamp out to the side with a screw-
driver.
2.Remove the lamp and replace the bulb.
Liftgate lamp
10 watt bulb
1.Take out the bulb holder.
2.Replace the bulb.
Center brake lamp
This lamp is designed with LED technology.
In the event of a malfunction, please consult a
BMW Sports Activity Vehicle Center or a garage
that works in accordance with BMW guidelines
with appropriately trained personnel.
Wheel changes
Safety precautions to observe in the
event of a flat tire and during all tire
changes:
Park the vehicle as far as possible from passing
traffic. Park on a firm, flat, surface. Switch on the
hazard warning flashers.
Lock the steering wheel with the wheels point-
ing straight ahead. Engage the handbrake and
shift into first gear or reverse, or move the
selector lever to position P.
All passengers should be outside the vehicle
and well away from your immediate working
area, behind a guardrail, for instance.
If a warning triangle
* or portable hazard warning
lamp
* is required, set it up on the roadside at an
appropriate distance from the rear of the vehi-
cle. Comply with all safety guidelines and regu-
lations.
Change the wheel only on a level, firm surface
which is not slippery. The vehicle or the jack
could slip to the side if you attempt to raise the
vehicle on a soft or slippery surface such as
snow, ice, tile, etc.
Position the jack on a firm support surface.
Do not use a wooden block or similar object as a
support base for the jack, as this would prevent
it from extending to its full support height and
reduce its load-carrying capacity.
To avoid serious or fatal injury: never lie under
the vehicle, and never start the engine while it is
supported by the jack.<
Page 119 of 146

Reference
At a glance
Controls
Driving tips
Mobility
117
What you will need
Open liftgate and raise or remove floor cover,
refer to page78.
1Vehicle jack
2Lug wrench
3Wheel chock
In order to avoid rattling noises later, note the
position of the tools when you remove them and
return them to their original position when you
are through using them.
Compact wheel
The compact wheel is located under the cargo
area on the undercarriage of the vehicle.
Removing compact wheel
1.Unscrew bolt, refer to arrow1.
2.Fold up lifting handle, refer to arrow2.
3.Turn the handle to the left as far as possible,
refer to arrow3.
Turning the handle releases the com-
pact wheel. Its weight of approx.
18 lbs./8 kg is then entirely supported by
the handle.<4.Slowly lower the handle as far as possible,
refer to arrow4.
5.Pull the compact wheel to the rear so that it
is still securely resting in its compact wheel
receptacle.
6.If need be, turn the wheel in the compact
wheel receptacle so that the attachment of
the retaining strap to the rim points toward
the rear.
7.Rotate the clamp by 180°, refer to arrows 1,
and unhook the retaining strap from the
clamp, refer to arrow 2.
8.Take out the compact wheel toward the
back.
9.Fasten the retaining strap to the compact
wheel receptacle and resecure the compact
wheel receptacle by reversing the above
steps.
The width of the defective wheel prevents
it from fitting into the compact wheel
receptacle in place of the compact wheel
itself.<
Page 120 of 146

Replacing components
118
Inserting compact wheel
The compact wheel is reinserted in the reverse
sequence of its removal.
When attaching the retaining strap to the
compact wheel, make sure the belt is
threaded through 2 rim openings, with one
unoccupied hole between them; otherwise, the
compact wheel could come loose in an acci-
dent.<
Preparing wheel change
1.Observe the safety precautions on
page117.
2.Secure the vehicle to prevent it from rolling:
Place the wheel chock behind the front
wheel on the side of the vehicle opposite
the side being raised. If the vehicle is parked
on a downward slope, place the wheel
chock securely in front of this wheel. If the
road surface is steeply inclined, take addi-
tional preventive steps to stop the vehicle
from rolling.
3.Loosen the wheel lugs by a half turn.
Jacking up vehicle
1.Position the vehicle jack at the jacking point
closest to the wheel so that the entire sur-
face of the jack base perpendicularly con-
tacts the ground under the jacking point.
The vehicle jack is designed for
changing wheels only. Do not attempt
to raise another vehicle model with it or to
raise any load of any kind. To do so could
cause accidents and personal injury.<2.Guide the jack head into the rectangular
recess of the jacking point when cranking
up, refer to drawing inset.
3.Jack the vehicle up until the wheel you are
changing is raised from the ground.
Mounting a wheel
1.Unscrew the lug bolts and remove the
wheel.
2.Remove accumulations of mud or dirt from
the mounting surfaces of the wheel and
hub. Clean the lug bolts.
3.Position the new wheel or compact wheel.
Secure the wheel by screwing at least two
lug bolts into opposite bolt holes. When you
mount wheels other than Genuine BMW
light-alloy wheels, different lug bolts may
also be required.
4.Screw in the remaining lug bolts. Tighten all
the bolts securely in a diagonal pattern.
5.Lower the jack and remove it from beneath
the vehicle.
After mounting
1.Tighten the lug bolts in a diagonal pattern.
To ensure safety, always have the lug
bolts checked with a calibrated
torque wrench as soon as possible to
ensure that they are tightened to the speci-
fied torque. The tightening torque is
101 lb ft/140 Nm.<
2.Stow the defective wheel in the cargo area.
3.Check and correct the tire inflation pressure
at the earliest opportunity.
 1
1 2
2 3
3 4
4 5
5 6
6 7
7 8
8 9
9 10
10 11
11 12
12 13
13 14
14 15
15 16
16 17
17 18
18 19
19 20
20 21
21 22
22 23
23 24
24 25
25 26
26 27
27 28
28 29
29 30
30 31
31 32
32 33
33 34
34 35
35 36
36 37
37 38
38 39
39 40
40 41
41 42
42 43
43 44
44 45
45 46
46 47
47 48
48 49
49 50
50 51
51 52
52 53
53 54
54 55
55 56
56 57
57 58
58 59
59 60
60 61
61 62
62 63
63 64
64 65
65 66
66 67
67 68
68 69
69 70
70 71
71 72
72 73
73 74
74 75
75 76
76 77
77 78
78 79
79 80
80 81
81 82
82 83
83 84
84 85
85 86
86 87
87 88
88 89
89 90
90 91
91 92
92 93
93 94
94 95
95 96
96 97
97 98
98 99
99 100
100 101
101 102
102 103
103 104
104 105
105 106
106 107
107 108
108 109
109 110
110 111
111 112
112 113
113 114
114 115
115 116
116 117
117 118
118 119
119 120
120 121
121 122
122 123
123 124
124 125
125 126
126 127
127 128
128 129
129 130
130 131
131 132
132 133
133 134
134 135
135 136
136 137
137 138
138 139
139 140
140 141
141 142
142 143
143 144
144 145
145


