2009 BMW M5 SEDAN Start
[x] Cancel search: StartPage 105 of 266
Controls
103Reference
At a glance
Driving tips
Communications
Navigation
Entertainment
Mobility
The air emerges through the upper body region
vent outlets in the instrument panel. These vent
outlets must be open for the system to operate.
The parked car ventilation is operated via iDrive.
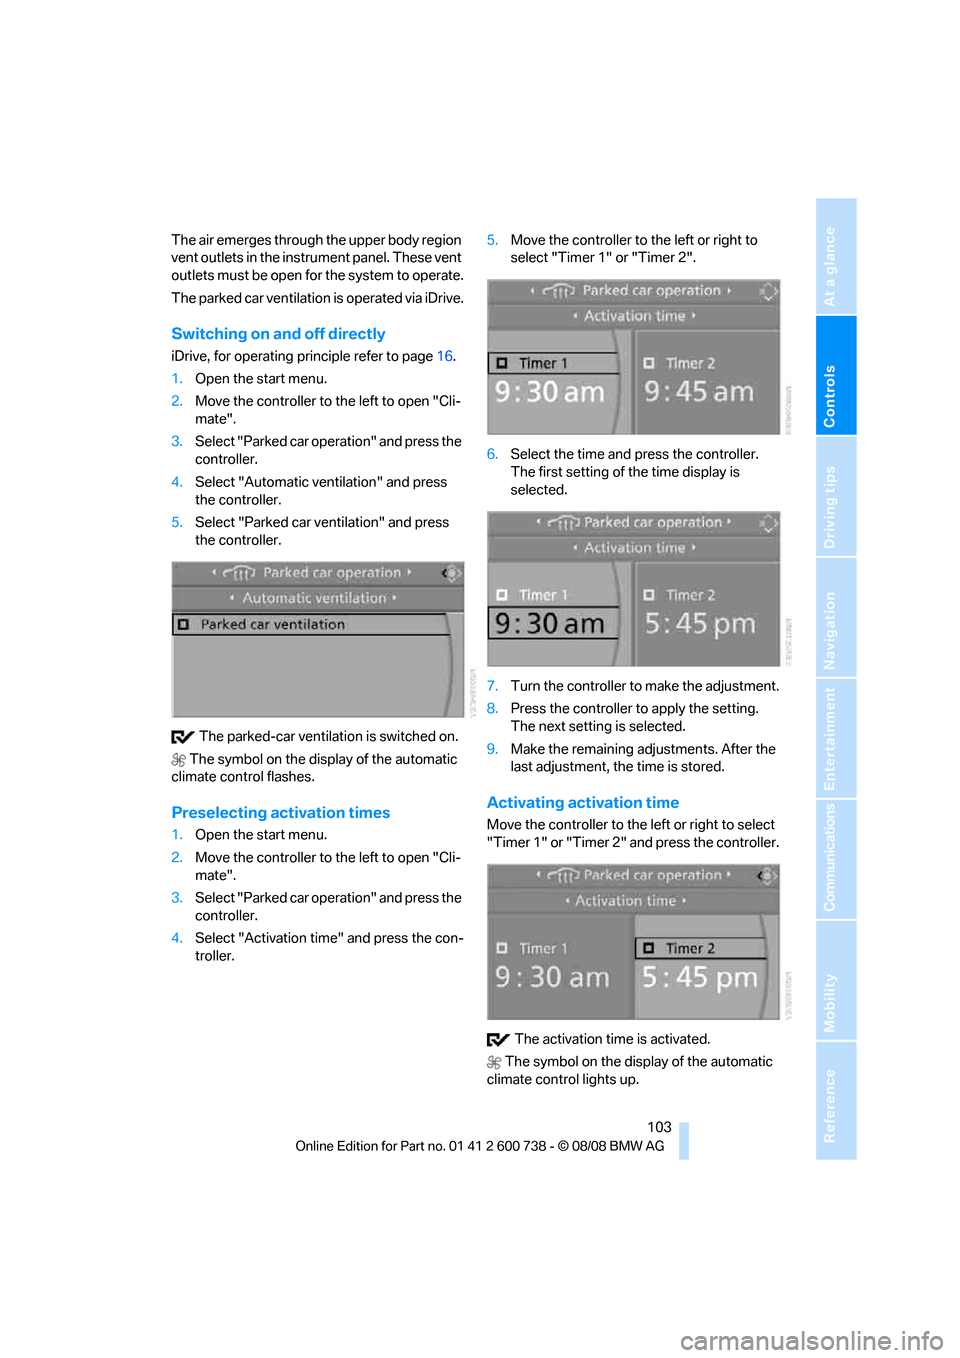
Switching on and off directly
iDrive, for operating principle refer to page16.
1.Open the start menu.
2.Move the controller to the left to open "Cli-
mate".
3.Select "Parked car operation" and press the
controller.
4.Select "Automatic ventilation" and press
the controller.
5.Select "Parked car ventilation" and press
the controller.
The parked-car ventilation is switched on.
The symbol on the display of the automatic
climate control flashes.
Preselecting activation times
1.Open the start menu.
2.Move the controller to the left to open "Cli-
mate".
3.Select "Parked car operation" and press the
controller.
4.Select "Activation time" and press the con-
troller.5.Move the controller to the left or right to
select "Timer 1" or "Timer 2".
6.Select the time and press the controller.
The first setting of the time display is
selected.
7.Turn the controller to make the adjustment.
8.Press the controller to apply the setting.
The next setting is selected.
9.Make the remaining adjustments. After the
last adjustment, the time is stored.
Activating activation time
Move the controller to the left or right to select
"Timer 1" or "Timer 2" and press the controller.
The activation time is activated.
The symbol on the display of the automatic
climate control lights up.
Page 107 of 266
Controls
105Reference
At a glance
Driving tips
Communications
Navigation
Entertainment
Mobility
Practical interior accessories
Integrated universal remote
control*
The concept
The integrated universal remote control can
replace as many as three hand-held transmit-
ters for various remote-controlled accessories,
such as garage and gate or lighting systems.
The integrated universal remote control regis-
ters and stores signals from the original hand-
held transmitters.
The signal of an original hand-held transmitter
can be programmed on one of the three mem-
ory buttons1. After this, the programmed
memory button1 will operate the system in
question. The LED2 flashes to confirm trans-
mission of the signal.
Should you sell your vehicle one day, be sure to
delete the stored programs beforehand for your
safety, refer to page106.
To prevent possible damage or injury,
before programming or using the inte-
grated universal remote control, always inspect
the immediate area to make certain that no peo-
ple, animals or objects are within the travel
range of the device. Also, comply with the
safety precautions of the original hand-held
transmitter.<
Checking compatibility
If you see this symbol on the packaging
or in the manual supplied with the orig-
inal hand-held transmitter, it is safe to
assume that it is compatible with the integrated
universal remote control.
If you have additional questions, please
contact your BMW center or call:
1-800-355-3515.
Information is also provided on the Internet at:
www.bmwusa.com or
www.homelink.com.
HomeLink is a registered trademark of Johnson
Controls, Inc.<
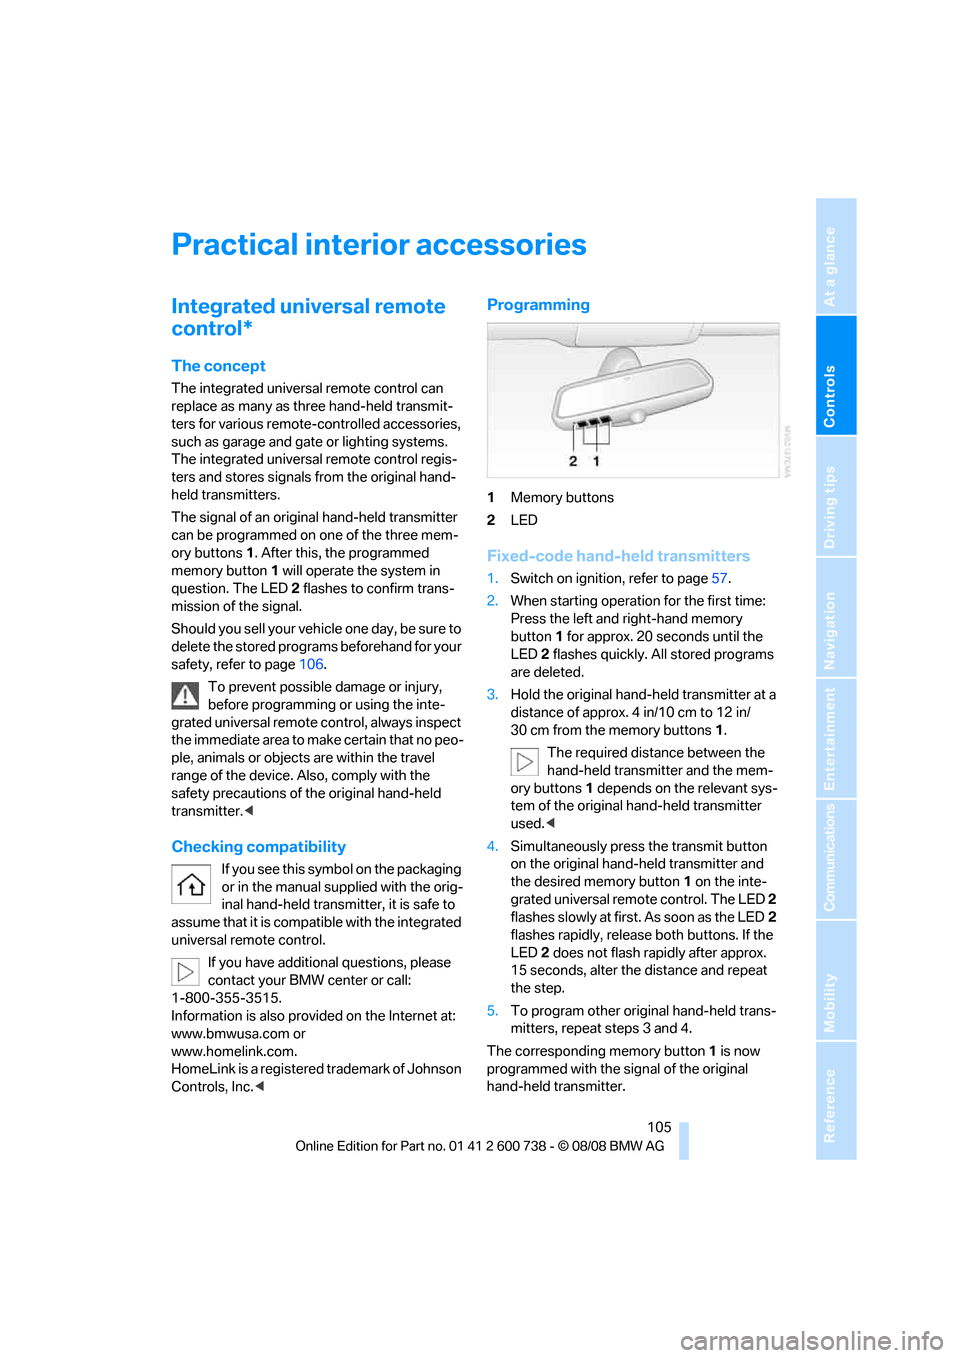
Programming
1Memory buttons
2LED
Fixed-code hand-held transmitters
1.Switch on ignition, refer to page57.
2.When starting operation for the first time:
Press the left and right-hand memory
button1 for approx. 20 seconds until the
LED2 flashes quickly. All stored programs
are deleted.
3.Hold the original hand-held transmitter at a
distance of approx. 4 in/10 cm to 12 in/
30 cm from the memory buttons1.
The required distance between the
hand-held transmitter and the mem-
ory buttons1 depends on the relevant sys-
tem of the original hand-held transmitter
used.<
4.Simultaneously press the transmit button
on the original hand-held transmitter and
the desired memory button 1 on the inte-
grated universal remote control. The LED 2
flashes slowly at first. As soon as the LED2
flashes rapidly, release both buttons. If the
LED2 does not flash rapidly after approx.
15 seconds, alter the distance and repeat
the step.
5.To program other original hand-held trans-
mitters, repeat steps 3 and 4.
The corresponding memory button 1 is now
programmed with the signal of the original
hand-held transmitter.
Page 120 of 266

Things to remember when driving
118 vehicle. Traces of condensed water under the
vehicle are therefore normal.
Before driving into a car wash
Fold in the exterior mirrors, refer to page50,
otherwise they could be damaged due to the
width of the vehicle.
You can find valuable information on this topic
under Care, starting on page218.
Ground clearance
Make sure that sufficient ground clear-
ance is available. To drive down curbs,
select the "Sport" program of the EDC Elec-
tronic Damping Control, refer to page83, to
keep the ground clearance as uniform as possi-
ble. Otherwise the vehicle may be damaged.<
Cargo loading
To avoid loading the tires beyond their
approved carrying capacity, never over-
load the vehicle. Overloading can lead to over-
heating and increases the rate at which damage
develops inside the tires. The ultimate result
can assume the form of a sudden blow-out.<
Make sure that no fluids leak in the cargo
bay; otherwise the vehicle could be dam-
aged.<
Determining loading limit
1.Locate the following statement on your
vehicle's placard
*:
The combined weight of occupants
and cargo should never exceed
XXX lbs. or YYY kg, as otherwise the vehicle may be damaged and unstable driving con-
ditions may result.<
2.Determine the combined weight of the
driver and passengers that will be riding in
your vehicle.
3.Subtract the combined weight of the driver
and passengers from XXX lbs. or YYY kg.
4.The resulting figure equals the available
amount of cargo and luggage load capacity.
For example, if the XXX amount equals
1,400 lbs. and there will be five 150-lb. pas-
sengers in your vehicle, the amount of avail-
able cargo and luggage load capacity is
650 lbs.:
1,400 lbs. minus 750 lbs. = 650 lbs.
5.Determine the combined weight of luggage
and cargo being loaded on the vehicle. That
weight may not safely exceed the available
cargo and luggage load capacity calculated
in step 4.
6.If your vehicle will be towing a trailer, part of
the load from your trailer will be transferred
to your vehicle. Consult the manual for
transporting a trailer to determine how this
may reduce the available cargo and luggage
load capacity of your vehicle.
Load
The permissible load is the total of the weight of
occupants and cargo/luggage. The greater the
weight of occupants, the less cargo/luggage
can be transported.
Page 126 of 266
Starting navigation system
124
Starting navigation system
Your navigation system can use satellites to
ascertain the precise position of your vehicle
and guide you reliably to any destination you
enter.
Navigation DVD
The navigation system requires a special navi-
gation DVD. The latest version is available at
your BMW center.
Inserting navigation DVD
1.Insert the navigation DVD with the labeled
side up. The navigation DVD is retracted.
2.Allow several seconds for the system to
scan the data from the DVD.
Removing navigation DVD
1.Press button 1.
The DVD emerges slightly from the drive.
2.Remove the DVD.
If the DVD is not ejected from the drive, it is pos-
sible that it is blocked. In this case a message is
also shown on the Control Display.
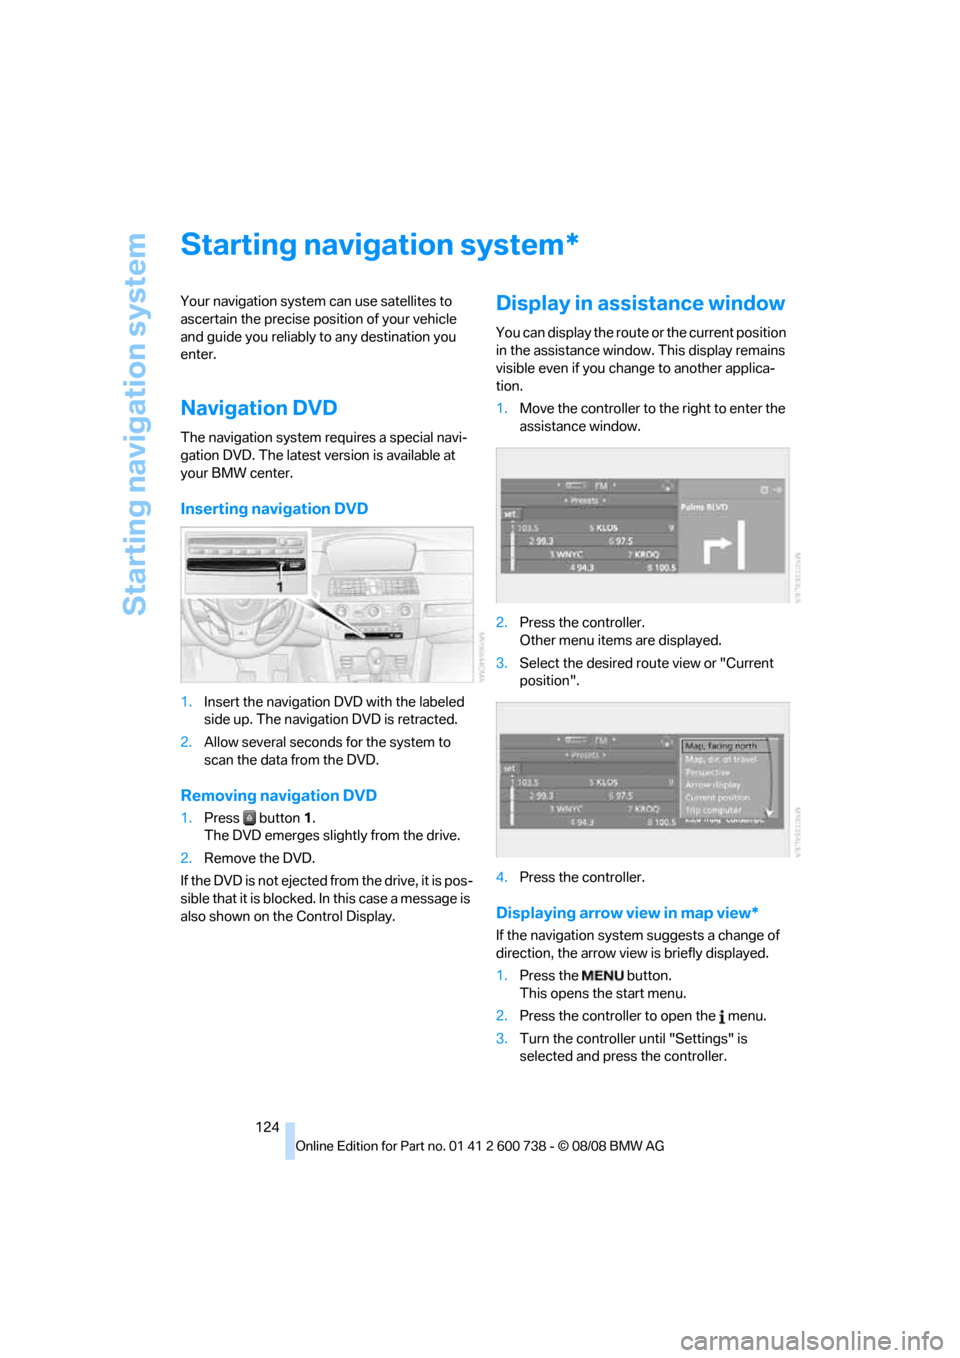
Display in assistance window
You can display the route or the current position
in the assistance window. This display remains
visible even if you change to another applica-
tion.
1.Move the controller to the right to enter the
assistance window.
2.Press the controller.
Other menu items are displayed.
3.Select the desired route view or "Current
position".
4.Press the controller.
Displaying arrow view in map view*
If the navigation system suggests a change of
direction, the arrow view is briefly displayed.
1.Press the button.
This opens the start menu.
2.Press the controller to open the menu.
3.Turn the controller until "Settings" is
selected and press the controller.
*
Page 128 of 266
Destination entry
126
Destination entry
In entering your destination you can select from
among the following options:
>Entering a destination manually, see below
>Entering destination via voice*, refer to
page129
>Selecting destination using information,
refer to page132
>Selecting destination from a list, refer to
Destination list, page133
>Selecting destination from address book,
refer to page134
>Selecting home address, refer to page136
After selecting your destination you can pro-
ceed to start the destination guidance, refer to
page138.
You can also store a navigation destination on
the programmable memory buttons, refer to
page22.
Enter data only when the vehicle is sta-
tionary, and always give priority to the
applicable traffic regulations in the event of any
contradiction between traffic and road condi-
tions and the instructions issued by the naviga-
tion system. If you do not observe this precau-
tion, you can endanger the vehicle occupants
and other road users.<
iDrive, for operating principle refer to page16.
1.Press the button.
This opens the start menu.
2.Move the controller to the right to open
"Navigation".
3.Select "Navigation" and press the control-
ler.
The Control Display shows:
>the arrow view or map view during destina-
tion guidance
>the destination list when destination guid-
ance is switched offEntering a destination
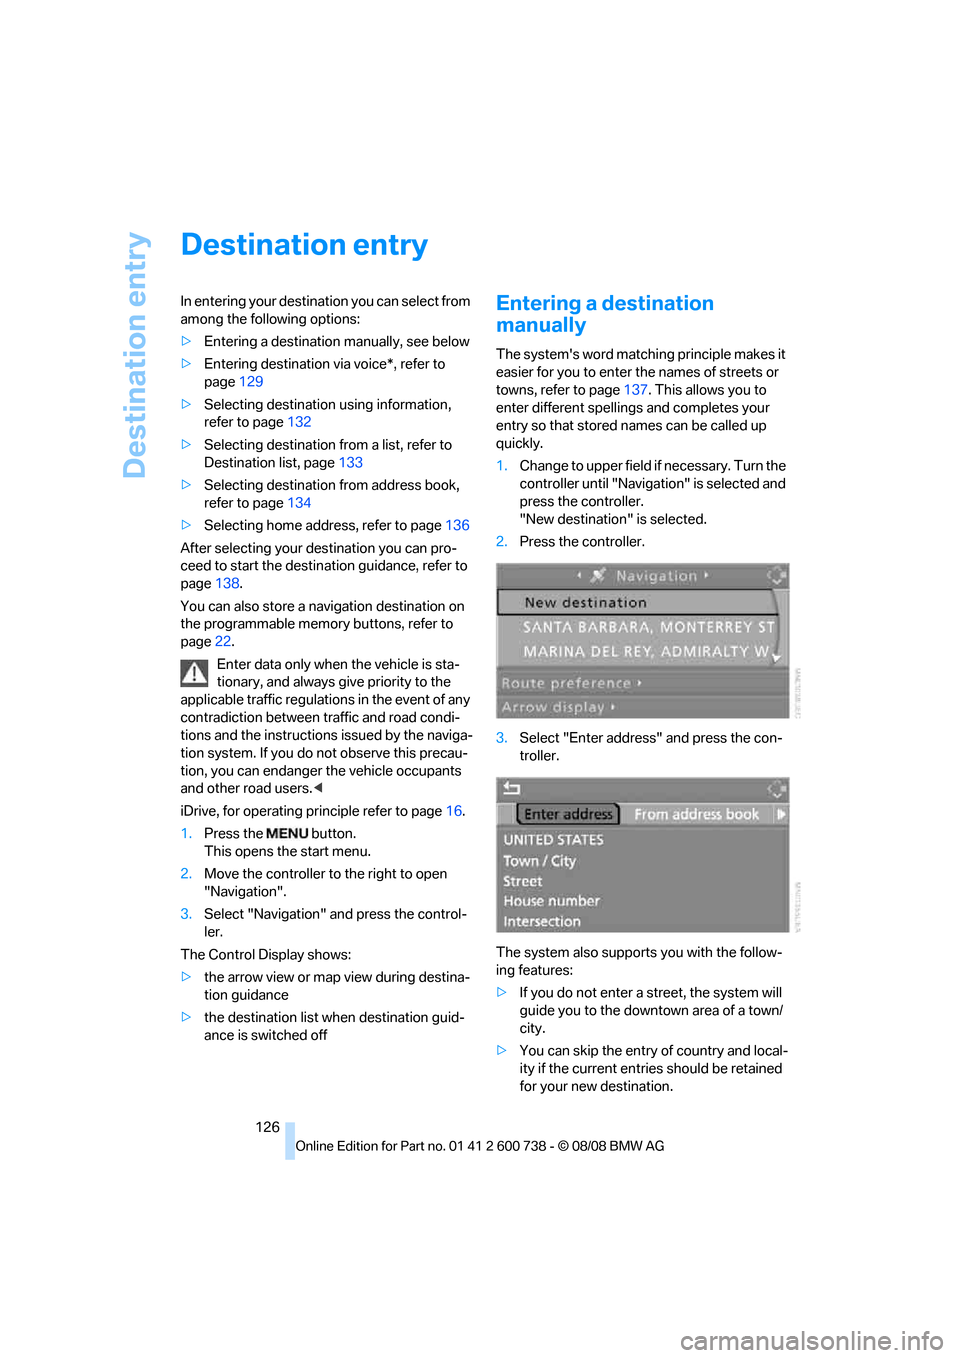
manually
The system's word matching principle makes it
easier for you to enter the names of streets or
towns, refer to page137. This allows you to
enter different spellings and completes your
entry so that stored names can be called up
quickly.
1.Change to upper field if necessary. Turn the
controller until "Navigation" is selected and
press the controller.
"New destination" is selected.
2.Press the controller.
3.Select "Enter address" and press the con-
troller.
The system also supports you with the follow-
ing features:
>If you do not enter a street, the system will
guide you to the downtown area of a town/
city.
>You can skip the entry of country and local-
ity if the current entries should be retained
for your new destination.
Page 129 of 266
Navigation
Driving tips
127Reference
At a glance
Controls
Communications
Entertainment
Mobility
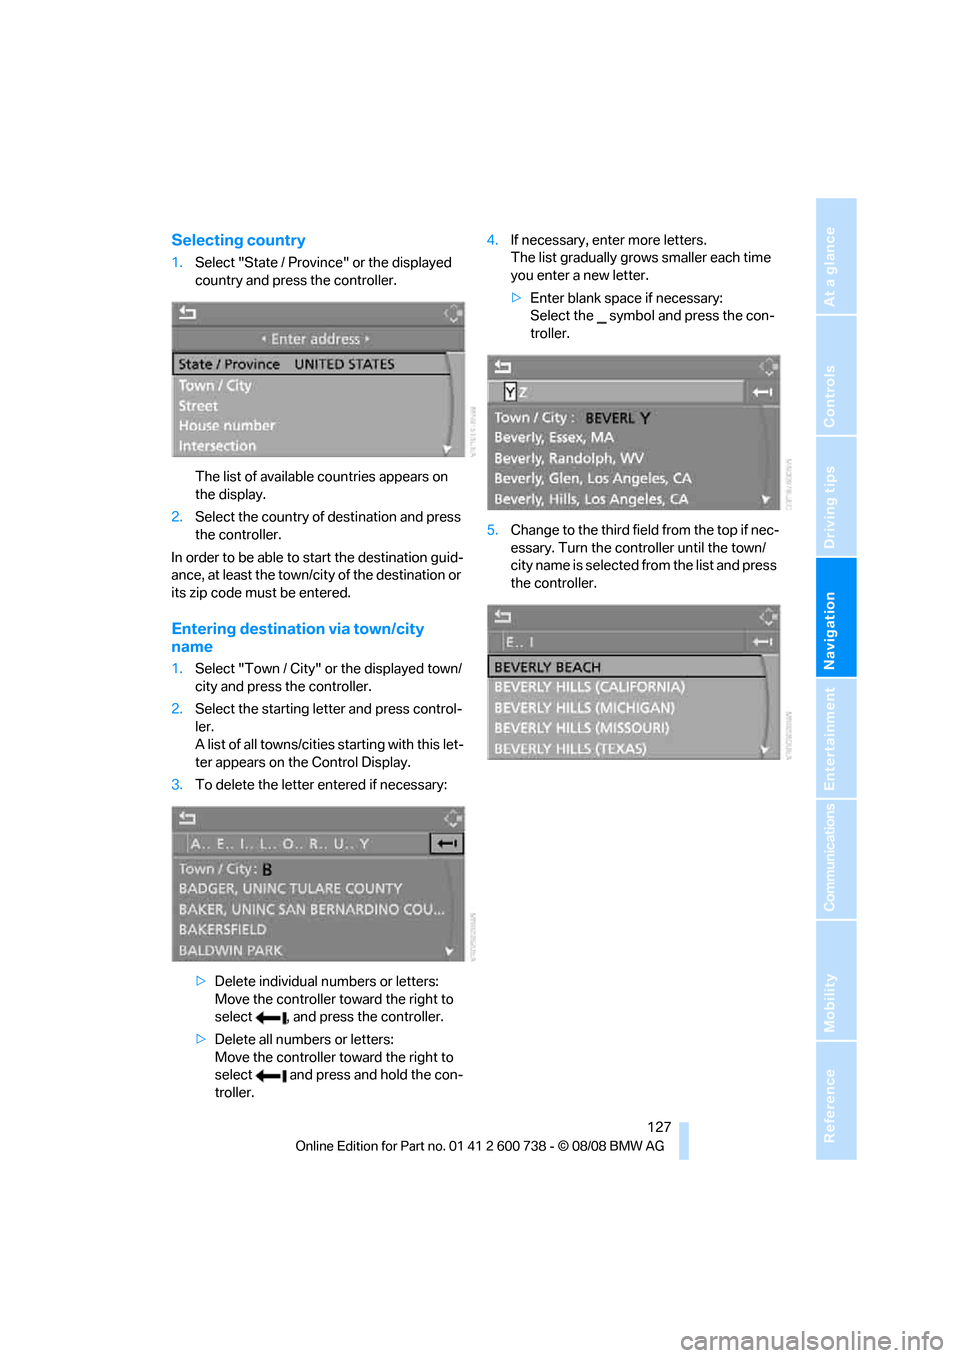
Selecting country
1.Select "State / Province" or the displayed
country and press the controller.
The list of available countries appears on
the display.
2.Select the country of destination and press
the controller.
In order to be able to start the destination guid-
ance, at least the town/city of the destination or
its zip code must be entered.
Entering destination via town/city
name
1.Select "Town / City" or the displayed town/
city and press the controller.
2.Select the starting letter and press control-
ler.
A list of all towns/cities starting with this let-
ter appears on the Control Display.
3.To delete the letter entered if necessary:
>Delete individual numbers or letters:
Move the controller toward the right to
select , and press the controller.
>Delete all numbers or letters:
Move the controller toward the right to
select and press and hold the con-
troller.4.If necessary, enter more letters.
The list gradually grows smaller each time
you enter a new letter.
>Enter blank space if necessary:
Select the symbol and press the con-
troller.
5.Change to the third field from the top if nec-
essary. Turn the controller until the town/
city name is selected from the list and press
the controller.
Page 131 of 266
Navigation
Driving tips
129Reference
At a glance
Controls
Communications
Entertainment
Mobility
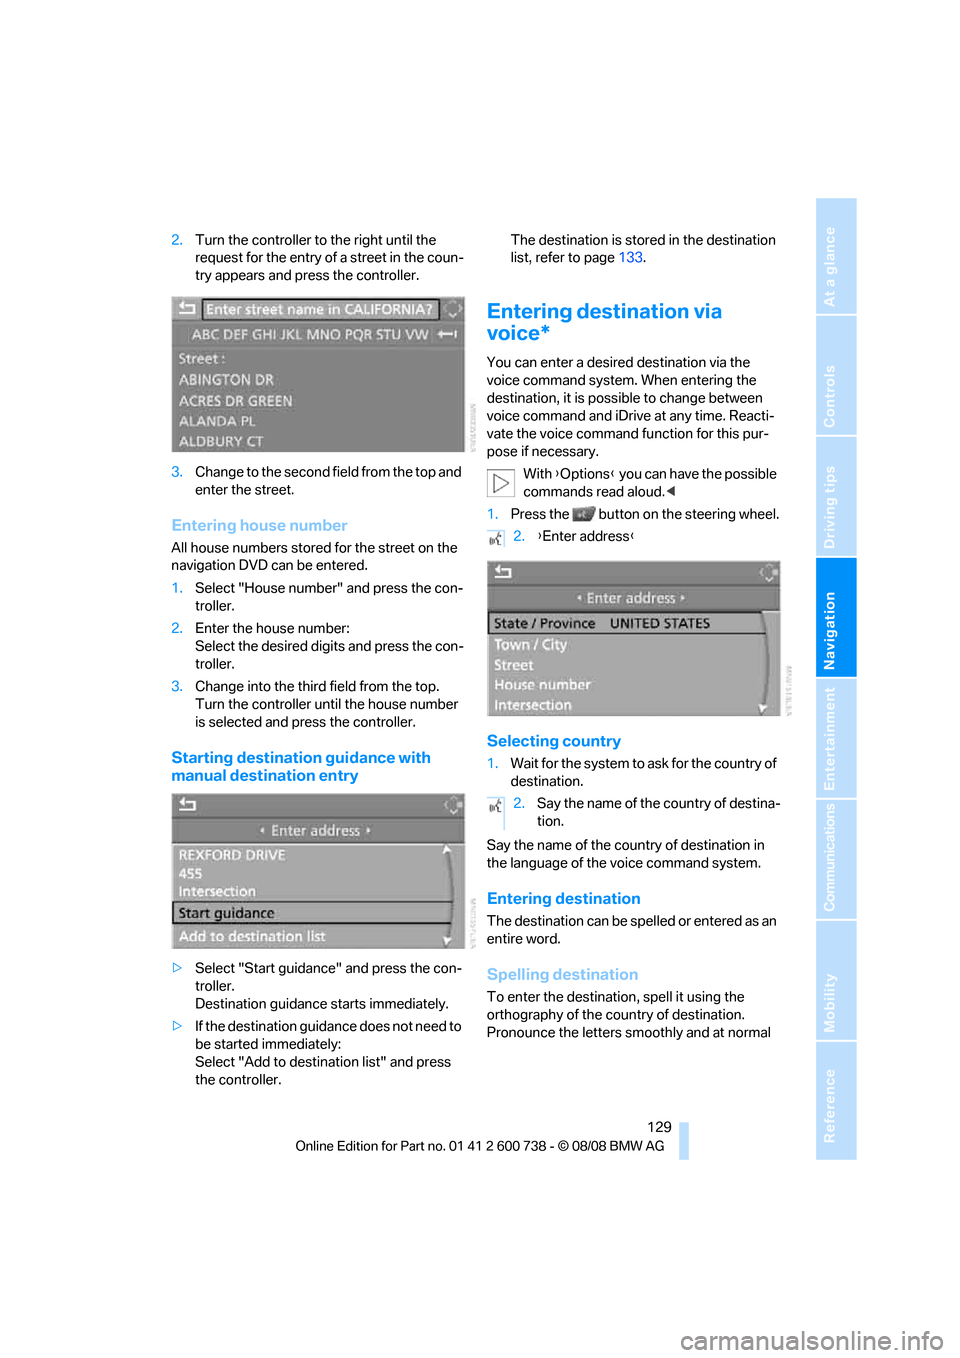
2.Turn the controller to the right until the
request for the entry of a street in the coun-
try appears and press the controller.
3.Change to the second field from the top and
enter the street.
Entering house number
All house numbers stored for the street on the
navigation DVD can be entered.
1.Select "House number" and press the con-
troller.
2.Enter the house number:
Select the desired digits and press the con-
troller.
3.Change into the third field from the top.
Turn the controller until the house number
is selected and press the controller.
Starting destination guidance with
manual destination entry
>Select "Start guidance" and press the con-
troller.
Destination guidance starts immediately.
>If the destination guidance does not need to
be started immediately:
Select "Add to destination list" and press
the controller.The destination is stored in the destination
list, refer to page133.
Entering destination via
voice*
You can enter a desired destination via the
voice command system. When entering the
destination, it is possible to change between
voice command and iDrive at any time. Reacti-
vate the voice command function for this pur-
pose if necessary.
With {Options} you can have the possible
commands read aloud.<
1.Press the button on the steering wheel.
Selecting country
1.Wait for the system to ask for the country of
destination.
Say the name of the country of destination in
the language of the voice command system.
Entering destination
The destination can be spelled or entered as an
entire word.
Spelling destination
To enter the destination, spell it using the
orthography of the country of destination.
Pronounce the letters smoothly and at normal
2.{Enter address}
2.Say the name of the country of destina-
tion.
Page 133 of 266
Navigation
Driving tips
131Reference
At a glance
Controls
Communications
Entertainment
Mobility
Starting destination guidance
Destination guidance starts immediately.
Saving destination
The destination is added to the destination list
or can be stored in the address book.
Map-guided destination
selection
If you only know the location of the town/city or
street of the destination, then you can enter the
destination by using a map. You can use the
cursor to select the destination on the map and
then adopt it into the destination guidance.
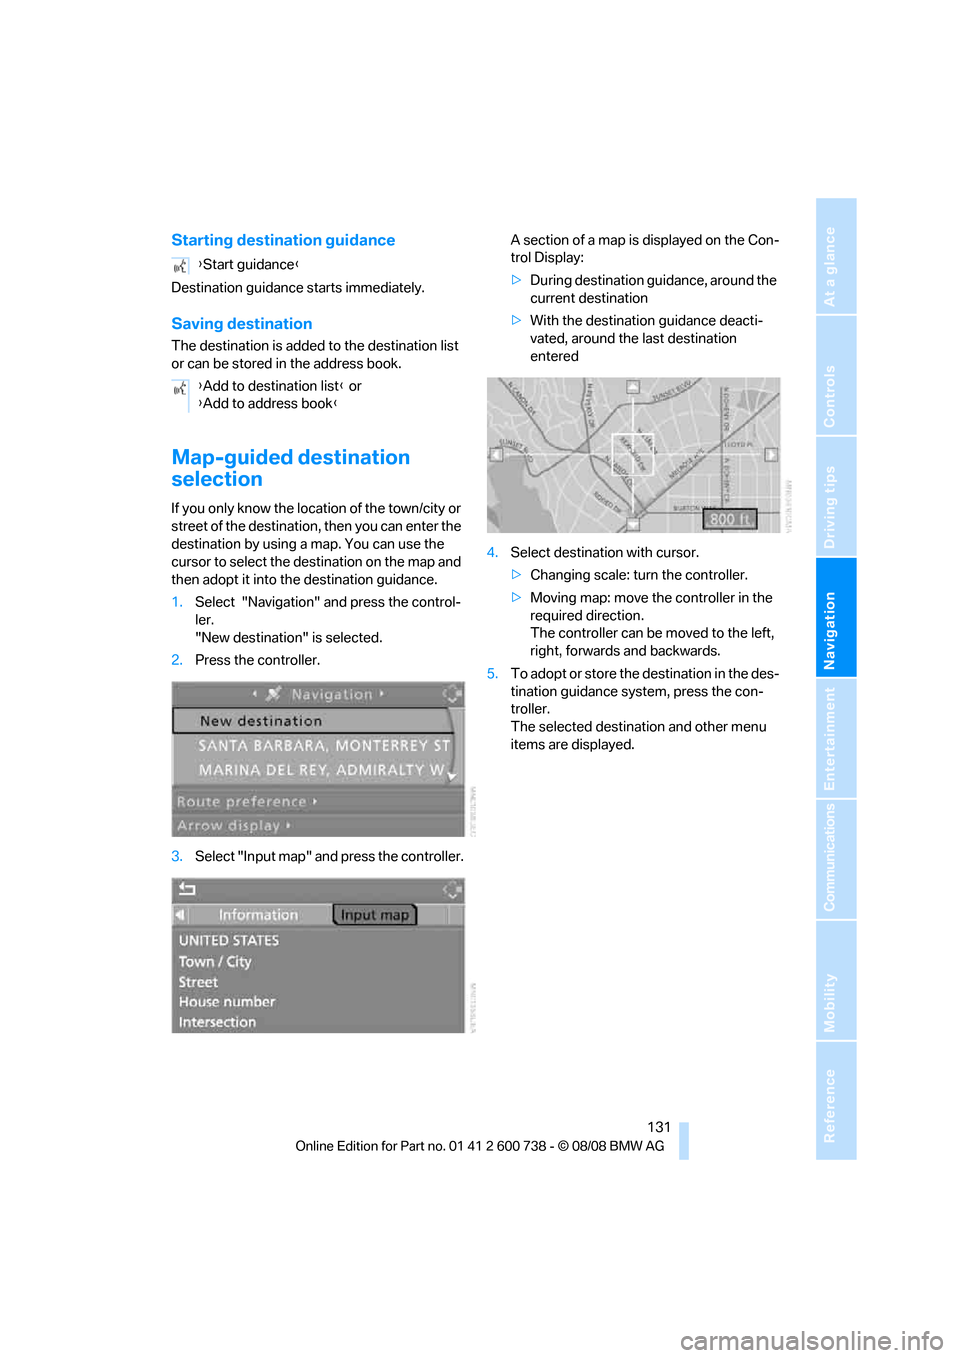
1.Select "Navigation" and press the control-
ler.
"New destination" is selected.
2.Press the controller.
3.Select "Input map" and press the controller.A section of a map is displayed on the Con-
trol Display:
>During destination guidance, around the
current destination
>With the destination guidance deacti-
vated, around the last destination
entered
4.Select destination with cursor.
>Changing scale: turn the controller.
>Moving map: move the controller in the
required direction.
The controller can be moved to the left,
right, forwards and backwards.
5.To adopt or store the destination in the des-
tination guidance system, press the con-
troller.
The selected destination and other menu
items are displayed. {Start guidance}
{Add to destination list} or
{Add to address book}